Double-Breasted Jacket Purse
Finished size — 10″ tall × 10¾″ wide (without handles)
Skill Level — Intermediate

This unique purse will certainly attract attention. As you proudly carry it, nobody will know that you made it yourself. Be careful, though — if they do find out, you'll probably get more orders than you can handle!
Materials:
2 rolls (7 oz./200 g each) nylon cord in hot pink
Size F/5 (3.75 mm) hook
1 ball (1.75 oz./55 yd.)black fur yarn
4 large black buttons, 1½″ in diameter
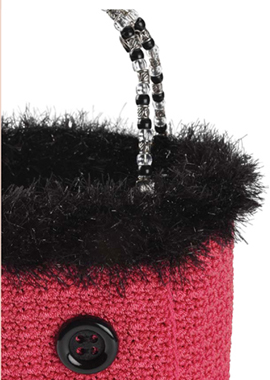
2 decorative purse handles with silver and black beads
Yarn needle
1/3 yd. fabric for lining (optional)
1/3 yd. extra-firm stabilizer (optional)
Sewing needle and matching thread
Used in this project: Hilos # 18 100% nylon cord in Hot Pink (see resources, pg. 125), Lion Brand Festive Fur in black, Peltex extra-firm stabilizer. Substitute J&P Coats Crochet Nylon Cord.
Gauge:
6 pattern sts (sc and dc alternating sts) = 1½″
8 rows = 2″
Stitch Pattern: alternating sc and dc
Helpful Hint
Nylon cord can be slippery, making it hard to weave in ends. Try using a fabric glue, such as “OK To Wash It”, to secure ends to the purse after they are woven through.
INSTRUCTIONS:
Bottom
Rnd 1: Ch 29, 4 sc in second ch from hook, sc in next 26 chs, 4 sc in last ch. Working along opp side of starting ch, sc in next 26 chs, sl st to first sc — 60 sc.
Rnd 2: Ch 1, 2 sc in same sp as joining, 2 sc in each of next 4 sc, sc in each of next 25 sc to end, 2 sc in each of 5 sc on curved end, sc in each of next 25 sc, sl st to first sc — 70 sc (10 incs).
Rnd 3: Ch 1, * 2 sc in next sc, sc in next sc, rep from * 4 more times, sc in next 25 sc, (2 sc in next sc, 1 sc in next sc) 5 times, sc in next 25 sc, sl st to first sc — 80 sc.
Rnd 4: Ch 1, sc in each sc around, join — 80 sc.
Rnd 5: Ch 1,* (sc in next 2 sc, 2 sc in next sc, sc in next 2 sc) 3 times, sc in next 25 sc; rep from * and join with sl st — 86 sc.
Rnd 6: Work sc in each sc around, in(cing) 2 sc on each end, join — 90 sc.
Rnd 7: Ch 1, working sc in each sc around, inc 3 sc on each end, join — 96 sc.
Rnd 8: Ch 1, sc in each sc around with no inc — 96 sc.
Rnd 9: Ch 1, sc in each sc around, working 4 incs on each end, join. End off — 104 sc.
Trace bottom of purse onto cardboard to use later as pattern for stabilizer and lining bottom (should measure approx. 10″ × 3¾″).
Body of Purse
This rectangle piece will be sewn to bottom and overlapped at front.
Row 1: Starting at top edge, ch 112, sc in second ch from hook, * dc in next ch, sc in next ch, rep from *. End with sc in last ch, turn — 111 sts.
Row 2: Ch 1, * dc in sc, sc in dc, rep from *. End with dc in sc, turn — 111 sts.
Row 3: Ch 1, * sc in next st, dc in next st, rep from *, end with sc in last st, ch 1, turn.
Row 4: Rep Row 2.
Row 5: Rep Row 3.
Cont in patt, alternating Rows 4 and 5 until piece measures 7½″ from beg ch.
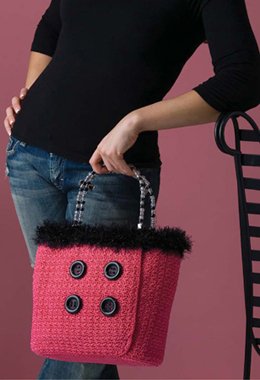
Next row: Mark beg of next row. At beg of this row, work 2ststog (1 dec made). Cont in patt, dec 1 st at marked edge, every other row (curving that edge in as shown in photo). Work until piece measures 9″. End off (curved edge will be at bottom).
Work 1 row of scs around sides and bottom edge, leaving top edge of purse unworked. You may have to inc some sts on curved edge or dec some sts on short sides if necessary, so body of purse will lay flat. Do not work scs on top edge.
Attaching Body of Purse to Bottom Piece
Using photo as a guide, pin bottom of purse to sides, overlapping front curved edge to other end. Baste top to bottom with piece of yarn. Start attaching body of purse to bottom at end that will be underneath flap, and sew bottom edge to purse bottom with a topstitch/whipstitch on outside edges using cord and yarn needle. Do not pull too tight. End off. Before attaching short side of purse tog, turn purse inside out and weave in loose ends. Sew flap that is to be over-lapped to purse through both pieces with needle and thread from inside, leaving edge a little loose.
Words of Encouragement
Isn't it fun to receive a gift when someone is thoughtful enough to remember you? We all love gifts, receiving phone calls, cards and being invited over for lunch. Even though we should not expect anything in return, sometimes it doesn't seem to occur to people to return the favor and reach out. Be a giver as well as a receiver.
Optional Lining: Use cardboard tracing as a pattern to cut a piece of stabilizer for bottom of purse. Tack stabilizer to bottom of purse. For extra firmness, cut a piece of plastic canvas and glue to bottom stabilizer. Cut a rectangular piece of stabilizer to fit inside of purse. Tack stabilizer to sides of purse with needle and thread. Cut a purse bottom out of fabric using the cardboard as a pattern and adding a 1/3″ seam allowance. Cut a piece of lining fabric 10¼″ high by 26″ wide. Pin “side” lining to “bottom” lining. Place lining in purse and pin side seam. Sew bottom and side seam by hand or machine. Insert lining into purse, WS tog. Adjust length of lining by turning top edge to inside and pinning in place. Whip st top edge of lining to top edge of purse. (Be sure stitching does not interfere with sts on top edge of purse that will be used for trim.)
Top Edge
Attach fur yarn with F hook to any st at top edge of purse, sc in same st and in each st around. End off. If you want fur to be wider, rep rows of sc with fur for desired length.
Finishing
Weave in ends. Sew buttons to front of purse using photo as a guide. Sew handles to front and back at top edges.