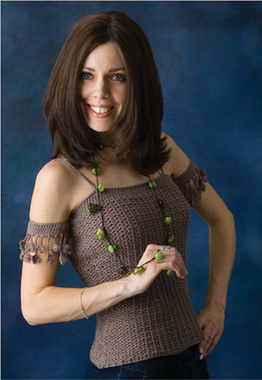
Cloverleaf Top
Fits sizes xs (sm, med, lg, xlg, 1x, 2x)
Skill Level — Intermediate

You're sure to get lots of compliments in this funky top with dangling cloverleaves. Wear it on a warm summer evening, or dress it up with a long black skirt for a special occasion. You could also make a tube top using this pattern by omitting the armbands and straps.
Materials:
6 (6, 7, 7, 8, 8, 9) balls (1.75 oz./50 g/136 yd. each) 100% mercerized cotton yarn in taupe
Size F/5 (3.75 mm) hook
Yarn needle
Sewing needle and matching thread
24″ tiny elastic for strap (optional)
Fabric glue (optional)
Used in this project: Patons Grace yarn in Taupe, “Okay to Wash It” fabric glue
Gauge:
Having the right gauge is very important with this top. Change to a larger hook if the gauge does not match.
14 shell rows = 3½″
3 shell rows = 1¾″
7 sc = 2″
7 sc rows = 1″
1 three-leaf clover = 1″
Special Stitch:
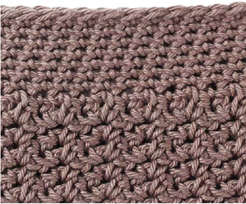
Sc Shell (sh): In designated st, work (1 sc, ch 2, 1 sc).
Three-Leaf Clover (clo): (Ch 5, sl st in fifth ch from hook) 3 times.
INSTRUCTIONS:
Back
Row 1: Ch 81 (87, 93, 99, 105, 111) In third ch from hook, work (sc, ch 2, sc — shell made) * sk 2 chs, sh in next ch, rep from * across, ch 1, turn — 27 (29, 31, 33, 35, 39, 41) shs.
Row 2: Sh in each ch-2 sp of sh across, ch 1, turn.
Rows 3–14: (all sizes) Rep Row 2.
Note: If you are making sizes 1x or 2x, do not work dec rows. 1x and 2x will be worked even with 39 shells (1x) and 41 shells (2x) until piece measures 14″ or desired length from beg ch to underarm.
Row 15: 2 sh dec row (sizes xs-xlg only should measure 3½″ from beg ch at this point) sh in first sh; * in ch-2 sp of next sh, pull up a lp. 2 lps on hook, pull up a lp in ch 2 sp of next sh, yo and pull through all 3 lps on hook (1 sh dec made). * Ch 2, sc in same sh (third shell). Sh in next 21 (23, 25, 27, 29) shs. Repeat between * one time, sh in last sh, ch 1, turn — 25 (27, 29, 31, 33).
Rows 16–20 (xs-xlg): Work even with no dec — 25 (27, 29, 31, 33).
Row 21 (xs-xlg): Sh in first 7 shs, dec 1 sh over next 2 shs, sh in next 7 (9, 11, 13, 15) shs, dec 1 sh over next 2 shs, sh in next 7 shs, ch 1, turn (2 sh decs made), 23 (25, 27, 29, 31) shs.
Rows 22–36: (xs-xlg) Work even with no dec until piece measures 9″.
Row 37 (xs-xlg — 2 sh inc row): Sh in first sh, sh in sp before next sh, (inc made) sh in next 21 (23, 25, 27, 29) shs, sh in sp before last sh (inc) sh in last sh, ch 1, turn — 25 (27, 29, 31, 33) shs.
Rows 38–40 (xs-xlg): Work even — 25 (27, 29, 31, 33) shs.
Row 41 (xs-xlg): 2 sh inc row) Rep row 37, working 23 (25, 27, 29, 31) shells after first inc, ch 1, turn — 27 (29, 31, 33, 35) shs.
Rows 42–54 (all sizes): Rep Row 2, working even until piece is 13″ or desired length from beg ch to underarm. End off.
Front
(All sizes): Make same as back. With WS tog, sew side seams with yarn and yarn needle. Turn RS out.
Band for Top Edge
Attach yarn at either side to st at top of side seam on last row worked. Place 4 markers in ch-2 sp of 4 shs evenly spaced around top edge. Sc in each sh and in each st between shs; where markers were placed. Work 2sctog (dec) over marked st and next sc (4 dec made). Cont working in rnds without joining, until band measures 1¼″ or desired width. End off.
Words of Encouragement
I'm sure you love receiving compliments, but do you give compliments freely? I've heard people say that you shouldn't give compliments because they are only flattery. The dictionary defines flattery as “insincere praise”. A genuine compliment is not insincere. This world would be a better place if people would learn to give compliments and praise from the heart.
Attaching Sleeve Band to Band on Top
Row 1: Working from WS of band on inside, attach yarn to st at top of band directly above side seam. Counting sl st as first ch, ch 44 (46, 48, 50, 52, 56, 58) being careful not to twist ch, turn front toward you and join to st next to where first sl st was placed, forming a circle; ch 1.
Row 2: Ch 1, sc in each sc around, join to first sc with sl st. Do not attach to band on top, allowing arm band to hang loosely. At this point, try top on to make sure band fits your arm. (You have the option of later weaving elastic through top row so band will not slide down.) If band is too tight, add to beg ch. Cont working scs in rnds till band measures approx. 1″. Join with sl st. End off.
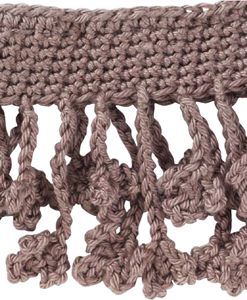
Dangling Cloverleafs
Cloverleaf 1: Turn arm band upside down and attach to center st of underarm on edge. Ch 6, work 3 leaf clo (see special st), sl st to ch before first clo leaf. End off.
Cloverleaf 2: Sk next st, attach yarn to next st, ch 11, work 3 leaf clo, sl st in ch before first clo leaf. End off. Cont around band. Rep Cloverleaf 1 and 2. End off. Rep for other band.
Optional elastic: On outside of armband at top edge, starting at seam, attach yarn to band and work scs all around top edge of band encasing elastic between sts. Be sure to leave long tails for tying tog. Try armband on and adjust to fit; tie knot in ends of elastic.
Straps
Try top on and pm on front and back where you want straps to be. On front, join yarn to st at marker, ch 57 and attach to back at marker. Try top on and adjust number of chs to fit. From inside (WS), sl st to st at left of where you joined, ch 1, turn. Encasing elastic between sts as you work, sc in each ch across and attach to edge of band. End off.
Optional: With yarn needle, weave elastic through strap. Adjust and sew ends to WS with needle and thread to secure.
Finishing
Weave in ends, and secure each end with fabric glue. Press cloverleaves flat if desired.