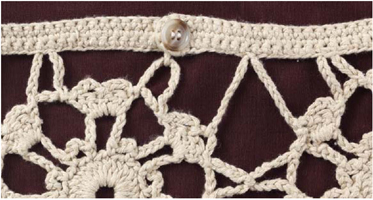
Skirt Overlay

Size xs-sm (med, lg, xlg, 1x, 2x, 3x)
Hip sizes — 34½″–37½ (38″–40″, 41″–43″, 44″–46½″, 47″–49″, 52″–57¾″, 58″–61¼″)
Skill Level — Advanced Beginner

This project is perfect if you want a crocheted skirt but don't have time to make one. It also looks great over a bathing suit.
INSTRUCTIONS:
Motifs
See materials for size hook to use for each skirt size.
Sizes xs-sm, med, lg: make 5 motifs.
Sizes xl, 1x: make 6 motifs.
Sizes 2x, 3x: make 7 motifs.
Ch 8, join with sl st to form a ring.
Rnd 1: Ch 3 (counts as first dc throughout), 27 more dc in ring, join to top of ch 3 — 28 dc.
Rnd 2: Ch 1, sc in same st as joining, * ch 4, sk next dc, sc in next dc, ch 10, sk next dc, sc in next dc, rep from * around. End with sl st in first sc, ch 1, turn — 7 ch-10 lps and 7 ch-4 lps.
Rnd 3: Sl st twice in ch-10 lp, ch 3, 4 dc in same lp, * ch 5, 5 dc in next ch-10 lp, rep from *. End with ch 5, join, ch 1, turn — 35 dc with ch-5 between each set.
Rnd 4: * Sl st into ch-5 sp, ch 10, sl st into same ch-5 sp, sl st into first dc of 5-dc group, ch 4, sl st into center dc, ch 4, sl st into last dc of 5-dc group, rep from *. End with sl st in first sl st. End off — 7 ch-10 lps, 14 ch-4 lps.
Next Step: Attach motifs with yarn, securing with 2 knots on underside at ch-10 lps on each side of motifs as in Diagram A. Before weaving in loose ends, place motifs around hip area over garment with which it will be worn. If piece is too small, add another motif. If it's too large, eliminate one motif (you may have to adjust length of chs between motifs).
Waistband
Row 1: Sl st to any ch-10 lp on any motif, * counting first sl st as first ch (here and throughout pattern), ch 13, attach with sl st to next ch-10 lp on motif, ch 11, attach to ch-10 lp on second motif. Rep from * with all 5 (6, 7) motifs, making sure you have 13 chs between petals and 11 chs between each motif. End last ch lp with ch 15 (instead of 13); ch 1, turn.
Row 2: Sc in second ch from hook and in each ch across, ch 1, turn.
Rows 3–4: Rep Row 2, working sc in each sc. At end of Row 4, end off.
Chain Links Below Motifs
Connect lower part of motifs.
Rnd 1: Attach yarn to any loose ch-10 lp (petal) that is at lower left side of any motif. * Ch 11, join to next ch-10 lp on next motif (connecting them tog), ch 15, join to next petal (twice), rep from * around, sl st to first sl st. End off. Ch 11 will only be between each motif.
Rnd 2: Attach yarn to center of any ch lp sp, * ch 15, sl st to next ch sp. Rep from * around, sl st to first sl st. End off.
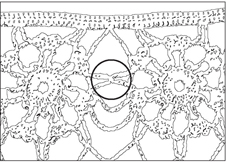
Diagram A
Materials:
1 ball (400 yd.) crochet cotton yarn or thread in linen
For sizes xs-sm, size G/6 (4 mm) hook
Med, size H/8 (5 mm) hook
Lg, size I/9 (5.5 mm) hook
Xlg, size H/8 (5 mm) hook
1x–2x, size I/9 (5.5 mm) hook
3x, size J/10 (6 mm) hook
1 button, ½″ in diameter
Yarn needle
Sewing needle and matching thread
Used in this project: Aunt Lydia's Denim Quick Crochet Cotton yarn in Linen, “Okay To Wash It” fabric glue
Gauge:
Each motif (from 10″ lp to 10″ lp): (G = 7¼″) (H = 7¾″) (I = 8¼″) (J = 8¾″)
7 sc: (G = 15/8″) (H = 1
 ″) (I = 1¾″) (J = 17/8″) — waistband
2 dc: (G and H = 3/8″) (I and J = ½″)
Helpful Hint:
Placing connected motifs around a form, such as a dark throw pillow, will help when working chains together for the waistband.
Words of Encouragement
There are times when children don't want to listen to their parents. It may seem as if they are constantly giving you a hard time about things you will not allow them to do. But your children are listening and they need guidelines to feel that you love them, even if they fuss about it. When I was in high school I had a friend whose parents let her do just about anything she wanted. Once she told me, “Mary Jane, sometimes I just wish they would say no. Then I would know that they really loved me.”
Helpful Hint:
Use “OK to Wash It” fabric glue to secure loose ends. After weaving through, pull the loose end and put a tiny drop of glue on the part of the yarn that will be hidden “inside” the stitches. Let go of the loose end, and it will pull itself back into the stitch where it will not show.
Rnd 3: Rep Rnd 2, working ch-16 lp instead of ch-15 lp. End off.
Rnd 4: Pm at first sl st, and repeating Rnd 2, work ch 17, instead of ch 15.
At last lp, instead of ch 17, work ch 14 (so sp won't be so big), attach ch 14 to first ch-17 on rnd. Cont working ch-17 sps in rnds without ending off until desired length. End off.
Fill-in Stitches Between Motifs
Step 1: Attach yarn to lower ch-4 sp on any motif, as in Diagram B. Ch 15, being careful not to twist ch, attach to corresponding ch-4 sp on next motif. End off.
Step 2: Attach yarn to ch-4 sp directly above ch-4 sp in first step, ch 10 and attach to ch-4 on next motif. End off. Rep Steps 1 and 2 on all other motifs.
Step 3: Turn piece upside down. Attach yarn to center st on underside of waistband at open sp between motifs, as in Diagram B, ch 9 and attach to ch-4 sp closest to ch-10 sp at center of motif at rt as in Diagram B. End off.
Step 4: Attach yarn to same center sp on waistband as in Step 3, ch 9 and attach to ch-4 to motif at rt. End off. Rep Steps 1–4 between each motif.
Finishing — Butt on and Loop
Attach yarn to either corner on long loose end of waistband, ch 7, attach to other corner, ch 1, turn, work 7 sc around ch-7, sl st to edge of waistband. End off. Sew button to top of waistband on opposite side at other end.
Fringe: Attach three 14″ pieces of yarn that have been folded in half to each ch-17 sp on bottom row for fringe. Trim ends even. Weave in end.
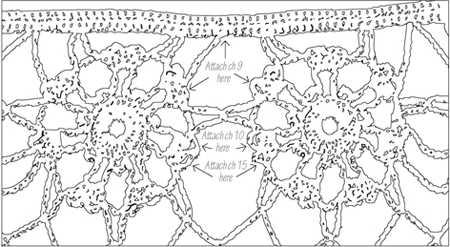
Diagram B