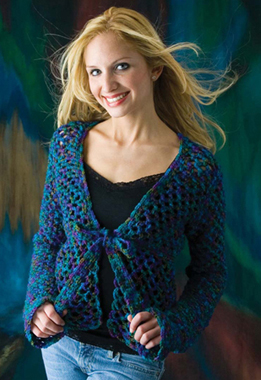
Tie-Front Sweater
Size — sm-med (lg, xlg)
Skill Level — Intermediate

Doubling the yarn and using chain link stitches will help you create this trendy sweater in no time! Instructions are also given to make it cropped like a shrug.
Materials:
3 skeins (10 oz./283 g/508 yd. per skein) yarn in variegated blue
Size H/8 (5 mm) or size K/10.5 (6.5 mm) hook
Yarn needle
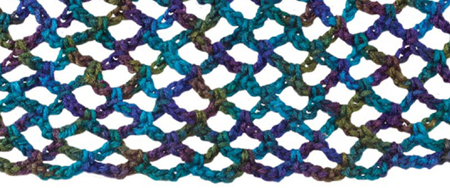
Used in this project: Caron Rainbow Dreams in Jet Stream, used with crochet hook size H (5 mm). Substitute 3 skeins (6 oz. each) Caron Simply Soft, used with crochet hook size K (6.5 mm).
Gauge:
Measure gauge on fourth row.
(sc, ch-3 lp, sc, ch-3 lp, sc) = 3″
1 ch-3 lp = 1¼″
4 ch-3 rows = 2″
Helpful Hint:
You can get ideas from old crochet books and update them with new yarn for a modern look.
INSTRUCTIONS:
Note: Use 2 strands of yarn for yoke and sleeves, but only 1 strand for flare at sleeve ends, ties and lower bodice.
The starting ch is the waistline of bodice of sweater.
Top Bodice Front
With 2 strands of yarn and H hook (or K hook, depending on yarn used), loosely ch 61 (65, 69).
Row 1: Sc in second ch from hook and in each ch across, turn — 60 (64, 68) sc.
Row 2: * Ch 3, skip first sc, sc in next sc, rep from * across row, turn — 30 (32, 34) ch-3 lps.
Row 3: * Ch 3, sc in next ch-3 lp, rep from * across, turn — 30 (32, 34) lps.
Row 4–8: Rep Row 3 — 30 (32, 34) lps.
Row 9: Ch 2, sc in first lp, * ch 3, sc in next lp, rep from * across row, end with sc in last lp, turn — 29 (31, 33) lps.
Row 10: This is Row 1 of left front. This row will start to divide the bodice for underarm. Ch 2, sc in first lp (ch 3, sc in next lp) 6 (7, 8) times, turn. 7 (8, 9) lps on this row, which includes 6 (7, 8) ch-3 lps, and 1 ch-2 lp.
Row 11 (Row 2 of left front): Shape armhole: sl st to center of first ch-3 lp, * ch 3, sc in next lp, rep from * across, end with last sc in ch-2 lp, turn — 6 (7, 8) lps (includes ch 2 lp).
Row 12 (Row 3 of left front): Ch 2, sc in first ch-3 lp. Work in patt as established, turn — 6 (7, 8) lps.
Rows 13–16: Rep last 2 rows twice — 4 (5, 6) lps.
Row 17 (Row 8 of left front): Ch 2, sc in first space, * ch 3, sc in next sp, rep from * across. End with sc in ch-2 lp — 4 (5, 6) lps.
Rows 18–25: Rep Row 17. End off.
Top Bodice Back
Row 1: With 2 strands, join yarn to same sp at left underarm with last lp of front, * ch 3, sc in next sp, rep from * 14 (15, 16) times, turn — 15 (16, 17) lps.
Row 2: Sl st to center of first ch-3 lp, * ch 3, sc in next lp, rep from * across, turn — 14 (15, 16) lps. Rep Row 2, decreasing in the following manner:
Row 3: 13 (14, 15) lps.
Row 4: 12 (13, 14) lps.
Row 5: 11 (12, 13) lps.
Rows 6–13: Work even with no decs, being sure to ch 3 at beg of each row.
Neck Shaping and Shoulders
Row 14 of back: Work 4 (5, 6) lps, turn.
Rows 15–16: Work 4 (5, 6) lps. End off.
Other side of rows 14–16: Turn work, and join yarn to first lp on row at short side of back at armhole, ch 3, work 4 lps. Turn and work 2 more rows even, same as other side. End off.
Right Front of Top Bodice
At unworked edge of rt center front, join yarn and ch 2. Work rt front same as left front, reversing shaping. End off — 25 rows total. Sew shoulder seams.
Words of Encouragement
Do you constantly beat yourself up by dwelling on your past? Maybe other people keep bringing up your past, and won't let you forget it, even if you have changed. That is not constructive in any relationship. Yesterday is the rearview mirror — you're not going that way. Tomorrow is a new road, waiting for the footsteps of your choosing. Everybody deserves a second chance.
Sleeves
Make 2, begin at lower edge.
With 2 strands, ch 18 (20, 22). Join to first ch to form a ring. Mark beg of first rnd.
Rnd 1: Ch 3, sc in next ch, * ch 3, sk next ch, sc in next ch, rep from * around. Join to top of ch 3 with sl st from here on out — 9 (10, 11) ch-3 lps.
Rnds 2–11: * Ch 3, sc in next lp, rep from * around — 9 (10, 11) lps on each rnd.
Rnd 12 (inc rnd): Ch 3, sc in last ch-3 lp worked in, work in patt around. (1 lp inc — 10 (11, 12) lps on this rnd.) You'll be working 2 scs, with a ch-3 lp in between, in the first lp of the inc rnd.
Rnds 13–23: Work even with no incs.
Rnd 24 (inc rnd): Rep Rnd 12 — 11 (12, 13) lps.
Rnds 25–35: Work even with no incs.
Rnd 36 (inc rnd): Rep Rnd 12 — 12 (13, 14) lps.
Rnds 37–38: Work even.
Armhole Shaping for Sleeve Cap
Rnd 39: Ch 2, sc in next ch-3 lp, * ch 3, sc in next ch-3 lp, rep from * 9 (10, 11) times, turn — 11 (12, 13) lps (includes ch-2 lp).
Rnd 40: Ch 2, sc in next ch-3 lp, * ch 3, sc in next ch-3 lp, rep from * to within last ch 2-lp, turn (do not sc in last ch-2 lp) —10 (11, 12) lps.
Rnds 41–46: Rep last rnd 6 (7, 8) times. End off — 4 lps (all sizes).
Flared Rounds for Sleeve End
At wrist: 1 strand of yarn and H (or K, if using Simply Soft) hook.
Rnd 1: Sl st into any sc on sleeve edge. * Ch 3, sk next st, sc in next st, rep from * around — 9 (10, 11) ch-3 lps.
Rnds 2–11: Inc 1 lp every other rnd, or until you reach desired length for flared sleeve. End off. Rnd 11 should have 14 (15, 16) ch-3 lps.
Example — Rnd 2: Inc 1 lp this rnd (10 lps). Rnd 3: Work even (10 lps). Rnds 4 and 5 should each have 11 lps, etc.
RS tog, sew sleeves onto sweater with yarn and needle.
Edging
Step 1 (back): With RS facing and size K hook (all sizes), attach 1 strand of yarn to first st at left lower corner, sc in same st as sl st, sc in each st across lower back edge — 60 (64, 68) sc.
Step 2 (rt center front): 2 sc in each of next 2 sc (corner) Cont up rt center front edge, sc 28 sts evenly across to rt shoulder seam.
Step 3 (neck): Cont across neck edge, sc 28 (30, 32) evenly across to next shoulder seam.
Step 4 (Left center front): Cont down left center front, work 28 sc evenly across to left corner at bottom of sweater, 2 sc in each of last 2 sts for corner.
Helpful Hint:
On flared sleeve, pm at each inc, and when you work inc on 2 rnds above that, move inc over to the left 1–2 lps. Do not place incs above each other — stagger them.
Helpful Hint:
If you are using a stiff, acrylic yarn, put it in the dryer with fabric sheets to make it softer.
Ties
Note: For shorter ties, work fewer rows.
Row 1: With 1 strand of yarn and K hook, attach yarn to st at front rt corner. Sc in same sp as joining, sc in next sc, ch 1, turn — 2 sc.
Row 2: 1 sc in each sc, ch 1, turn — 2 sc.
Rows 3–46: Rep Row 2. End off. Rep for other side.
Finishing Edge
(Work around entire shrug and ties).
With RS facing, take 1 strand of yarn and H hook, and attach yarn to first sc at left side of tie on left lower front, counting sl st as first ch, ch 3, sk 1 sc, sc in next sc, * ch 3, sk next sc, sc in next sc, rep from * across lower back edge — 30 (32, 34) ch-3 lps.
Next Step: Cont up side of tie, * ch 3, skip 2 rows, sc in next row (or space) rep from * ending with sc in sc on row 46 of tie. Ch 3, sc in second sc on end — 23 ch-3 lps on side edge of tie and 1 ch-3 lp at end of tie.
Next Step: Cont up other side of tie, * ch 3, sk 2 rows, sc in next sp, rep from * cont up rt front, neck, and left front edges, sc and ch 3 around next tie in same manner. At end of tie, sl st to first sl st. End off — 168 (172, 176) ch-3 lps around entire edge of sweater, including ties. You can end here for a cropped top, or go to the next step to extend the length.
Body of Top Below Yoke (all sizes)
Row 1: With 1 strand, attach yarn to last ch 3 at bottom edge of tie at left corner of top, * ch 4, sc in next ch-3 lp, rep from * across, end with ch 4 in first ch-3 lp at rt corner of top, ch 5, turn.
Rows 2–13: Sc to first ch-4 lp, * ch 5, sc to next ch-4 lp, rep from * across, ch 5, turn. Rep Row 2 until you have reached desired length.

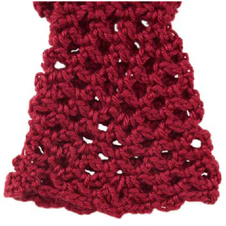
This sweater also looks great in raspberry.