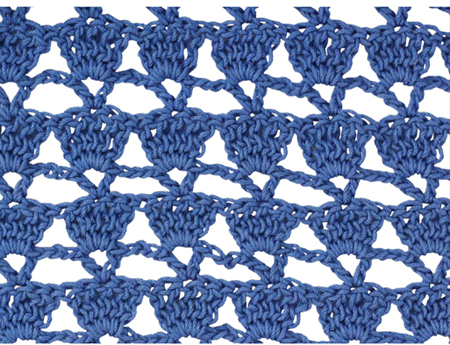
Long, Lacy Tunic

Fits sizes xs (sm, med, lg, xlg, 1x, 2x), 28″ long (all sizes)
Skill Level — Advanced Beginner

A larger project like this may seem like a burden if you are used to making only small things. But just keep working at it, a little every day, and you'll be finished before you know it. You will be surprised at how easy this is!
INSTRUCTIONS:
Front
Ch 61 (66, 71, 76, 81, 91, 96), should measure 16½″ (17½″, 18½″, 19½″, 20½″, 22½″, 23½″) when slightly stretched.
Row 1: [Work V-st (dc, ch 2, dc) into eighth ch from hook, * ch 3, sk 4 chs, work V-st into next ch] rep from * to last 3 chs, ch 2, 1 dc into last ch, turn —11 (12, 13, 14, 15, 17, 18) V-sts, with dc at each end of row.
Row 2: Ch 4 (counts as 1 tr), sk first ch 2 sp, work 5 tr into next ch 2 sp, * sk ch 3 sp, work 5 tr into next ch 2 sp of V-st; rep from * to last sp, sk ch 2, 1 tr into next ch, turn — 11 (12, 13, 14, 15, 17, 18) shs.
Row 3: Ch 5, into middle tr of 5 tr sh work V-st, * ch 3, sk 4 tr, into next tr work V-st, rep from * to last 3 tr, ch 2, 1 dc into fourth ch of ch 4 at beg of prev row, turn.
Rows 4–28: Rep Rows 2 and 3. End off.
Left Sleeve and Left Shoulder
Row 1: With front facing, [attach yarn with sl st to corner at top of ch 4, before first sh. Loosely ch 26 (if you want the sleeve longer, do chs in increments of 5). Rep instructions in brackets on Row 1 of top front. Continue working V-sts across remainder of ch. When you come to end of ch 26 (where sl st was attached at corner), work V-st into same sp where yarn was attached to corner, ch 3 and cont in patt until you have worked over 4 (4, 5, 5, 6, 7, 7) shs. (You will have 5 V-sts across ch 26.) After you've worked last V-st, ch 2 and work 1 dc into top of fifth tr of same sh, turn — 9 (9, 10, 10, 11, 12, 12) V-sts.
Row 2: Ch 4, cont in patt, to last sp, sk ch 2, tr into next ch, turn — 9 (9, 10, 10, 11, 12, 12) shs.
Rows 3–8: Work in patt, end with last row a sh row. End off.]
Note: for sizes sm-med, work 9 rows; sizes lg-xlg, 10 rows, and 1x-2x, 11 rows.
Right Front Shoulder and Sleeve
With WS facing, at opp corner (rt front), rep instructions in brackets on Rows 1–8 of left sleeve.
Back
Work same as front Rows 1–28.
Back Shoulder and Sleeves
Row 1: With back facing, attach yarn to top left corner, loosely ch 21. End off. Attach yarn to corner at rt, ch 26 and work same as Row 1 of left sleeve; do not end off after V-sts are worked. Work across first 4 shs of top row. After fourth V-st is worked, do not ch 2 and do not work dc in fifth tr of sh. After fourth V-st, ch 3 and cont in patt (V-st in center tr of next sh, etc.) across row. When you get to last sh at corner, work a V-st into corner as before, where yarn was attached. Work 4 V-sts across ch, skipping 4 chs between each. After last V-st, ch 1, sk 2 chs, dc in last ch, turn — 21 (22, 23, 24, 25, 27, 28) V-sts.
Row 2: Ch 4, cont in tr sh patt across row. End with sk dc, sk ch 1, tr into next ch, turn — 21 (22, 23, 24, 25, 27, 28).
Rows 3–9: Rep Rows 2 and 3 of front, ending with V-st row (Row 3). End off.
Materials:
3 (4, 4, 5, 5, 6, 7) skeins (3.52 oz./100 g/218 yd. each) sport-wt. 100% mercerized cotton yarn in blue
Size G/6 (4 mm) hook
Yarn needle
Used in this project: Sinfonia 100% mercerized cotton (available at Hobby Lobby and www.craftsetc.com). Substitute Paton's Grace.
Gauge:
9 sc = 2″
6 sc rows = 1¼″
1 5-tr shell = 1½″ at widest point
1 dc V-st = ¾″ at widest point
4 rows (2 tr sh rows with V-st rows between) = 2½″
Special Stitch:
V-Stitch: (1 dc, ch 2, 1 dc) in one st.
Tr Shell (tr sh): 5 triple crochet sts in designated st.
Helpful Hint:
This fitted tunic is very flattering, but if you want it to be loose, make the next larger size. You could also lengthen the tunic, add a belt, and wear it as a dress!
Words of Encouragement
We all carry burdens from time to time. But there are times we carry them unnecessarily. If someone tries to put a guilt trip on you, gives unjustified negative criticism, or tells a lie about you, it can feel like someone is stabbing you in the heart. If their words or actions are unjust, let it be their burden. Just because someone throws something at you doesn't means you have to catch it and carry it around. Choose not to let that person control you. Drop that burden and quit carrying it around like a ton of bricks on your shoulders!
Note: For sizes sm-med, work 10 rows; sizes lg-xlg, 11 rows, sizes 1x-2x, 12 rows.
Side and Shoulder Seams
Sew side and shoulder seams with yarn and yarn needle, matching up patt.
Arm Bands
Row 1: Attach yarn to seam at underarm on sleeve edge, sc in same sp, * work 2sctog over next 2 sts, sc in next st, rep from * around, sl st to first sc.
Row 2: Place 4 markers evenly spaced around armband. Work a dec over each marked sc and next st; sc in all other sts.
Rows 3–15: Pm at beg of row, and sc around continuously, without joining rows. End off.
Bottom Band
(Sc loosely so band is not too tight.)
Attach yarn to side seam at bottom edge, sc in same sp, sc in each st around, sl st to first sc.
Cont working evenly in rnds for 13–15 rows until band measures 2¾″ wide. End off.
Neck Band
Rnd 1: With RS of back facing you, attach yarn to center back neck edge, sc in same sp, sc around neck, keeping neck edge flat. Working 2sctog in each corner (shoulder seams and neck front), sl st to first sc (4 decs).
Rnd 2: Ch 1, sc in same sp, sc around, working 2sctog at front 2 corners only. End off (2 decs). Weave in ends.
