Newsboy Cap

One size fits most
Skill Level — Intermediate

This cute and fashionable hat may look difficult to the beginner, but the pattern is constructed in a way that is very easy to follow. Wear it as you see in the photo, or flatten the top toward the brim for a Gatsby-style hat.
Materials:
3 skeins (2 oz./70 g/57 yd. each) yarn in hot pink
Size J/10 (6 mm), H/8 (5 mm) and F/5 (3.75 mm) hooks
Yarn needle
Used in this project: Lion Brand Bouclé yarn in Rose. Substitute two strands med. worsted-wt. yarn
Gauge:
Finished hat should measure approx. 11″ in diameter when lying flat
3 dc = approx. 1¼″
2 dc rows = approx. 2″
Helpful Hint:
Crocheting can be a form of therapy. It gives you something to look forward to, and it helps keep your mind off your problems.
INSTRUCTIONS:
With J hook, ch 4, sl st in first ch to form ring.
Rnd 1: Ch 4 (counts as first dc, ch 1) 5 times, 1 dc into ring, sl st in third ch of ch 4 — 12 dc, 6 ch-1 sps.
Rnd 2: Sl st in next ch, ch 4, 1 dc in same ch sp, * dc in each of 2 dc, (dc, ch 1, dc) in ch 1 sp; rep from * 4 more times, dc in next 2 dc, join — 24 dc and 6 ch 1 sps (4 dc between ch 1 sps).
Rnd 3: Sl st in next ch, ch 4, 1 dc in same ch sp, * dc in each of next 4 dc, (dc, ch 1, dc) in ch 1 sp; rep from * 4 more times, dc in next 4 dc, join — 36 dc (6 dc between ch 1 sps).
Rnd 4: Rep Rnd 3, working 8 dc between ch-1 sps — 48 dc.
Rnd 5: Rep Rnd 3, working 10 dc between ch-1 sps — 60 dc.
Rnd 6: Rep Rnd 3, working 12 dc between ch-1 sps —72 dc.
Rnd 7: Dec rnd (will have 10 dc between sps). Sl st over to first dc, ch 3 (counts as first dc), 2dctog in next 2 dc (to dec). Dc in each of next 7 dc, 2dctog in next 2 dc, * ch 1, 2dctog in next 2 dc, dc in each of next 8 dc, 2dctog in next 2 dc; rep from * 4 more times. End with ch 1, join — 60 dc (10 dc between ch 1 sps).
Rnd 8: Work even with 10 dc between ch 1 sps — 60 dc.
Rnd 9: Dec rnd.
Work this rnd with 8 dc between ch 1 sps, as in Rnd 7 — 48 dc.
Band
Rnd 10: Change to size H hook. Ch 1, sc in same sp and in each dc around, skipping ch 1 sps, join — 48 sc.
Rnd 11: Ch 1, sc in same sp and in each sc around, join. End off.
Top Stitching for Ridge on Top
With 2 strands and H hook, work ridges in the ch 1 sps (between pie shapes) as follows: With RS of hat facing, holding yarn on inside of hat, insert hook into circle at top center of hat, and sl st yarn into any ch 1 sp on first rnd. These sl sts need to be long and loose (approx. 1″) to keep from pulling up the hat and distorting it. Cont to make loose sl sts in ch 1 sps in Rnds 2–9, forming a decorative ridge. This will fill in the holes and round off the corners. After sl stitching in last ch-1 sp (Rnd 9), sl st into the sc on Rnd 10. End off.
Brim
Pm in sc on last rnd of band below any sl st ridge. This will designate middle of brim. Brim rows will not be turned. End off each row (all rows facing RS). Take H hook and single strand of yarn, and with RS of Rnd 11 (hat band) facing, join yarn with sl st in seventh st to rt of marker.
Row 1: Ch 1, sc in same sp as joining, sc in next 13 sts. End off — 14 sts.
Row 2: With RS facing, join yarn in first st to the rt of Row 1, 1 sc in each of next 3 sts, 2 sc in next st (inc made) 1 sc in each of next 6 sts, 2 sc in next st (inc) 1 sc in each of last 3 sts. End off —16 sc.
Row 3: With RS facing you, join yarn in band 2 sts over from beg of brim, 1 sc in each of these 2 sts, 1 sc in each of next 4 sts of brim, 2 sc in next st, 1 sc in each of next 6 sts, 2 sc in next st, 1 sc in each of last 4 sts of brim, 1 sc in each of next 2 sts in band. End off — 22 sts.
Words of Encouragement
I believe that every person alive is a construction worker: you can either build up or tear down by your words and actions. Unkind words can go deep into a person's soul. So just keep in mind when you talk and relate to people that you are a construction worker — are you building walls or bridges?
Rows 4–5: Cont working 2 more sts of band (on each side) and 2 more sts (incs) above inc of prev row (6 inc on each row), Row 4 (28 sts), Row 5 (34 sts). Mark incs. End off.
Row 6: From left side, count over (toward the middle) to seventh st on brim. Pm in seventh st. From rt, count over to fourth sc, attach yarn with sl st (do not sc in same sp as sl st), 1 sc in each of next 3 sc, 2 sc in next sc, sc in each st until you get to marker (st 7). 2 sc in this st (inc), 1 sc in each of next 3 sc, sl st in next sc. End off.
Button
With F hook, ch 3, sl st in third ch to form ring. Ch 1, 12 sc in ring, join. End off. Sew button to top of hat. Weave in ends.
Optional: If you want a wider band, work a sc row in back of hat from one end of Rnd 5 to the other end.
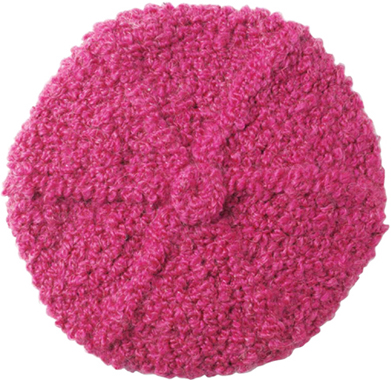
The finished hat measures 11″ when lying flat.