Fishnet Sweater

Fits womens' sizes: x-sm, sm, med, lg (can also be made to fit little girls' sizes 4–6)
Skill Level — Advanced Beginner
or

This unique sweater has an openweave stitch pattern and is full of holes. Since it's mainly for looks, you'll want to wear a long-sleeved top underneath! If you use a smaller cotton yarn, your little girl can wear it in warmer weather — or try using a P hook for plus-size!
Materials:
(Adult) 3 balls (2.5 oz./70 g/57 yd. each) bouclé yarn in variegated pink and purple
(Child) 2 hanks (1.75 oz./50 g/82 yd. each) yarn in cream
(Adult) Size K/10.5 (6.5mm) hook (or size needed to obtain gauge)
(Child) Size H/8 (5 mm) hook (or size needed to obtain gauge
Used in this project: (Adult) Lion Brand Bouclé yarn in Wild Berries. (Child) Lion Organic Cotton in Vanilla
Gauge:
3 dtr sts with 2 ch-6 spaces in between = 6″
2 dtr rows = approx. 4½″
1 ch-6 space = approx. 2½″
1 ch-5 sp = approx. 2″
Special Stitch:
Double Treble (dtr) (sometimes called quadruple st): Yo 3 times, insert hook into st, draw up lp (5 lps on hook), yo and draw through two lps 4 times.
Chain 11 = dtr + ch 6 throughout
Helpful Hint:
If you use a smaller yarn and smaller hook, it will fit a small child. Try using a size P hook for plus sizes, etc. This is a really quick project!
INSTRUCTIONS:
This sweater begins at neck and is worked in rnds. Two rnds will be worked before skipping sp for armhole.
With K hook (H hook for child's size), ch 81, being careful not to twist ch. Join to first ch with sl st to form ring.
Rnd 1: Ch 11, sk 4 chs, 1 dtr into next ch, * ch 5, dtr in next ch, Rep from * around. End with ch 5 and sl st into fifth ch of ch-11 —16 ch-5 sps.
Rnd 2: Ch 11 (counts as dtr + ch 6 from here on out) * dtr in next dtr, ch 6, Rep from *. End with sl st in fifth ch of ch-11 (16 sps).
Rnd 3: Ch 11, *dtr in next dtr, ch 6, rep from * 7 times, but at end of seventh time, do not ch 6. Ch 11, turn. This is where you will turn and work front, skipping sp where armhole will be. (8 dtr on this row.)
Rnd 4: Rep Row 3, ending with dtr in ch 5 of ch-11. Do not ch 11 at end of row. End off. (8 dtr)
Next Step: (space for armhole) Sk ch 6 sp to left of Row 3 (this will start back of sweater). See Diagram A.
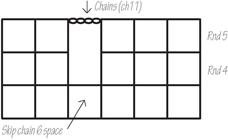
Diagram A
Rows 3–4 for back: Skipping ch-6 sp, join with sl st to next dtr, ch 11, and rep rows 3 and 4 same as front. This will leave a sp for armhole. At end of row 4 (after last dtr) do not end off yarn. Ch 11 (this ch-11 is space at bottom of armhole sp), attach with sl st to ch 5 of ch 11 (of next corner), connecting to front of sweater. See Diagram B. End off. This will leave an armhole sp.
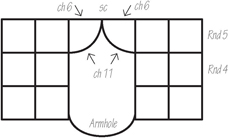
Diagram B
Next Step: At other side of sweater (at other side of Rnd 4), attach yarn with sl st to corner of ch-11, ch 11 again, and attach with sl st to next corner st on back, forming sp for armhole, the same as you did on the other side. Do not end off yarn. Proceed to Rnd 5.
Rnd 5: After sl st, ch 11, (dtr into next dtr, ch 6) 6 times, dtr in next dtr, ch 6, sc in ch 6 of ch-11 — See Diagram B for armhole — ch 6, dtr in next dtr, (ch 6, dtr in next dtr) 7 times, ch 6, sc in ch 6 of ch-11 (armhole), ch 6, sl st to ch 5 of ch-11 at beg of row (18 ch-6 sps).
Rnd 6: Ch 11, (dtr in next dtr, ch 6) 6 times.
Decrease Under Armhole: In these next 3 sts (dtr, sc and dtr), make dec this way: Work dtr in next dtr, leaving 2 lps on hook, dtr in sc, leaving 3 lps on hook, dtr in next dtr, leaving 4 lps on hook, yo and pull yarn through all 4 lps — 3 sts made into 1 st.
(Ch 6, dtr in next dtr) 6 times, ch 6. Make dec under underarm in this manner: dtr in next dtr, leaving 2 lps on hook dtr in sc, leaving 3 lps on hook, with 3 lps still on hook, sl st yarn into ch 5 of ch-11 (at beg of rnd). Now with 4 lps on hook, yo and pull yarn through all lps on hook (dec made).
Words of Encouragement
Your life may look to others as if it's perfect, but underneath, it may be full of holes. If you are discouraged because of insecurities, loneliness or mistakes you have made, the holes can be fixed. After all, “you are more than a human being — you're a human becoming!”
Rnd 7: Ch 11, dtr in next dtr (ch 6, dtr in next dtr) 12 times, ch 6, sl st to ch 5 of ch-11 (14 sps).
Rnd 8: Rep Rnd 7.
Rnd 9: * Ch 10, sl st in next dtr; rep from * around, end with ch 10 and sl st to first sl st. End off.
Sleeve
At either underarm, sl st yarn to sc.
Rnd 1: Ch 10, work 7 ch 5 sps, and 7 dtr evenly around armhole. Sl st to ch 5 of ch-10. (7 dtr and 7 ch-5-sps on this rnd.) Rnd 2: Ch 10, dtr in next dtr, (ch 5, dtr in next dtr) 5 times. Ch 5, sl st to ch 5 of ch-10 (7 ch-5 sps).
Rnd 3 of sleeve: Rep Rnd 2, working ch 9 at beg, and ch 4 between each dtr, instead of ch 10 at beg and ch 5 between (7 dtr and 7 ch-4 sps on rnd).

Rnds 4–6: Rep Rnd 3.
Rnds 7–8: Rep Rnd 2; end with sl st to ch 5 of ch-10. End off (ch 5 between each dtr).
Work other sleeve in the same manner. If sleeves are too short, add one more rnd.
Finishing: Neck Opening
Attach yarn to any dtr stitch. * Ch 4, sl st to next dtr. Rep from * around, end with sl st in first sl st. This will draw neck opening in to fit better. End off. If you want this to be an “off-the-shoulder” sweater, skip this step.