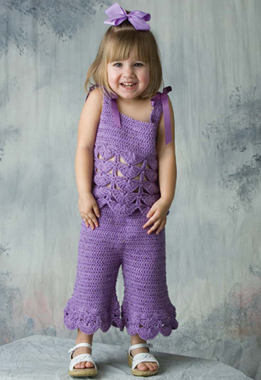
Toddler Capri Outfit
Fits sizes 2–3 (4–5), approx. chest size: 2–3 = 19″–21″, 4–5 = 22″–24″
Skill Level — Intermediate

Make these adorable outfits for the little girls in your life, possibly in different colors. They will look so precious in the top and flared capri pants with rows of scalloped shells. If you wish, try adding sleeves or make the pants into shorts.
INSTRUCTIONS:
Ch 49 (53).
Row 1: 1 dc in third ch from hook and in each ch to end, turn — 48 (52) dc (tch counts as first dc).
Row 2: Ch 2, (counts as first dc throughout pattern) 1 dc in each dc to end, turn — 48 (52) dc.
Rows 3–4: Rep Row 2 — 48 (52) dc.
Shape Armholes
Row 5: Sl st over 4 dc, ch 2, dc in each dc to within last 4 dc. Leave last 4 dc unworked, turn — 40 (44) dc.
Row 6: Ch 2, work 2dctog (1 dec). Dc in next 36 (38) dc, work 2dctog, over last 2 dc, turn — 38 (42) dc.
Row 7: Ch 2, dec one dc at each end, turn — 36 (40) dc.
Row 8: Ch 2, dc in each dc across, turn — 36 (40) dc.
Shape Neck — Left Shoulder
Row 9: Ch 2, work dc in next 7 (7) dc, turn — 8 (8) dc.
Row 10: Ch 2, work 2dctog (dec) over first 2 dc, dc in rem dc, turn —7 (7) dc.
Row 11: Ch 2, dc in next 4 dc, 2dctog over last 2 dc, turn — 6 (6) dc.
Row 12: Ch 2, work 2dctog over first 2 dc, dc in each st to end, turn — 5 (5) dc.
Row 13: Work 1 dec at end of row (neck edge), turn — 4 (4) dc.
Row 14: Work 1 dec at beg of row. End off — 3 (3) dc.
Right Shoulder
With front of top facing you, attach yarn to eighth dc on unworked end of Row 9.
Row 9: Ch 2, dc in each of next 7 (7) dc, turn — 8 (8) dc.
Rows 10–14: Work rt shoulder to correspond with left shoulder, dec(ing) 1 on neck edge of top (Row 10 —7 (7) dc, Row 14 — 3 (3) dc). End off.
Back — Work Same as Front
Sew side seams tog with yarn and yarn needle using whip st.
Bottom Edge of Top
Pms at 17 (24) sts evenly spaced around bottom edge of top. Attach yarn in st at side seam. Ch 1, sc in same sp. Work 111 (126) sc evenly spaced around entire bottom edge, working 2 sc (inc) in each st where markers are placed. End off — 111 (126) sc.
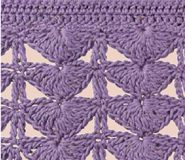
Shell Rows
Work in rounds.
Rnd 1: With front of top facing you (upside down), pm at st where rt seam is. Attach yarn in seventh st to right of st where marker was placed. Sc in same place, * sk 6 sc, work 11 tr loosely in next st (at marker). Sk 6 sc, sc in next st; rep from *. End with sl st in first sc — 8 (9) tr shs.
Rnd 2: Ch 5 (counts as first tr), tr in same st, * ch 5, 1 sc into center tr on sh, ch 5, 2 tr in sc; rep from *. End with sl st in top of ch 5.
Rnd 3: Ch 1, * 1 sc between 2 tr, 11 tr in middle st of sh, rep from *. End with sl st in first sc.
Materials:
5 (6) balls (50 g/99 yd. each) light worsted-wt. yarn in lavender
Size G/6 (4 mm) hook
(4) 12″ pieces lavender ribbon
14″ (16″) of ¼″-wide elastic for waist
Sewing needle and matching thread
Yarn needle
Used in this project: Queensland Collection Maldive yarn in lavendar
Gauge:
9 dc = 2″
11 dc rows = 4″
9 dc shell = 1¼″
11 dc shell = 2½″
Words of Encouragement
Sometimes we need to be careful about what we wish for. Some things we want can be good, but we need to listen to what we say. I know of a woman who was mad at her husband for not making enough money. She constantly belittled him and nagged for more money. Soon after that he died and left her with $250,000 in insurance money. She had plenty of money, but struggled terribly from the loss of someone she genuinely loved.
Rnds 4–9 (11): Rep Rnds 2 and 3 three (four) more times. End off. With needle and thread, sew four 12″-long pieces of ribbon to each shoulder.
Pants
Ch 98 (102), and join with sl st to make a circle, being careful not to twist ch.
Row 1: Ch 2 (count as first dc), 1 dc in each ch around. Join to top of ch 2, turn — 98 (102) dc.
Row 2: Ch 2, work 1 dc into front lp only of each dc to end, join, turn — 98 (102) dc.
Rows 3–18 (20): Rep Rnd 2, working sts into both lps on each rnd. End off.
Note: ½″ will be taken up with fold over at top of pants where elastic is to be placed.
Separation for Legs
With pants lying flat, pm in center front st, and pm in center back st. Attach these 2 sts tog with marker or a piece of yarn, creating two leg openings. There will be 49 (51) sts on each side/leg.
Row 1 (of leg): Attach yarn to inside st of leg opening, ch 2, dc in same st (inc) dc in each dc around, join with sl st, turn — 50 (52) dc.
Row 2: Ch 2, inc 1 st at beg of row, work dc in each st around, join, turn — 51 (53) dc.
Row 3: Ch 2, work even with no inc, join, turn — 51 (53) dc.
Rows 4–11 (15): Rep Rows 2 and 3 — 55 (57) dc on Row 11 (15).
Row 12 (16): 8 (4) incs on this row: Pms in 8 (4) sts, evenly spaced on row 11 (15). Sc in each st around, working 2 sc (inc) in each st where marker is placed, join, turn — 63 (63) sc.
Row 13 (17): Ch 2, dc in next 4 dc, 2 dc in each of next 7 dc, * dc in next 4 dc, 2 dc in each of next 7 dc, rep from *; end with dc in each of last 7 dc, join with sl st. Do not turn — 98 (98) dc.
Shell Rows on Pants
Work in rnds.
Rnd 14 (18): Ch 1, sc in same sp as sl st, * sk 6 dc, 9 tr in next dc, sk 6 dc, sc in next dc; rep from *. End with sl st in first sc — 7 (7) shells.
Rnd 15 (19): Rep Rnd 2 of top under Shell Rows.
Rnd 16 (20): Rep Rnd 3 of top under Shell Rows — 7 (7) shells. End off. Rep Rows 1–16 (20) for other leg.
Note: If longer leg length is desired, rep Rnds 15 (19) and 16 (20).
Finishing
Fold first row of waist edge over to meet second row, and insert elastic holding securely with pins. Adjust to fit waist, and sew short ends of elastic tog, sl st folded edge to second row to secure elastic or sew with yarn and yarn needle. Weave in ends.