Chapter 7
The Best Basic Everyday Practices
Imagine your spine as supple and strong, enabling you to stand tall and to move through your day with ease. Though “good” posture may have previously been arduous or unattainable, you begin to feel your posture improving without effort as your muscles release unnecessary tension. Your hips move fluidly, and your feet are solidly on the ground. Imagine your breath as expansive and nourishing, your ribs moving easily as your lungs fill and empty. With a steady and satisfying breath, your mind stays calm and alert, and you can focus on whatever you need to attend to, with full attention and clarity.
Does that scenario seem possible to you? It might seem like a distant goal if you are accustomed to chronic neck, shoulder, or lower back pain, as so many people are. You will find, though, that you can reduce or even eliminate that pain with the help of the balls. If you have certain spots in your back that are always nagging at your awareness with a “hot spot” or a dull ache, you have the chance to change that pattern, target those spots, and provide yourself with relief. Sore feet? Relief could be just ten minutes away.
Daily practice of the six basic techniques included in this chapter will dramatically change your experience of your body. As your body carries less tension on a daily basis, you move more easily, your energy is sustainable, and you sleep more soundly.
You can practice these techniques in any order, and you can choose one or two to get started. Once you have tried them all, you can make your own sequences that address what you most need.
1. The Neck
When you are first learning the ballwork, the neck is an excellent place to begin. Tension in the neck can be the beginning of many common discomforts—muscle and joint stiffness, eyestrain, mental fatigue, and headaches. Ballwork on the neck can help to ease tension in the jaw and face, and even have benefits down into the arms and hands. For those who spend a lot of time in front of a computer screen, it is essential.
Ball: One hollow ball, 4˝ or 5˝ or the football-shaped ball
Body position: Lying on your back, with your legs stretched out, or knees bent
Starting position of the ball: At the top of your neck, just below the edge of your skull. Your forehead will be higher than your chin.
Action: Allow the weight of your head to fully rest on the ball. Then very slowly turn your head to one side, feeling each small area that you pass over. Take your time! Linger in any spot that feels tight, possibly adding a nodding motion to explore more range. As you get farther to the side, you can move the ball over a bit with your hand, to keep your head securely on top of the ball. Once your head is turned as far as is comfortable, take a breath or two, and then slowly bring your head back to center. Let your head rest here for a few moments and then do the same slow exploration on the other side. Take a few breaths, relaxing in the center, before moving on. At any time, you may improvise a direction of movement that feels possible to explore. For instance, while your head is centered, you could try a nodding motion to feel the spine moving against the pressure of the ball.
Progression: Move the ball down an inch or so, under the middle of your neck. Your chin and forehead will be level here. Then move your head very slowly to one side and then back to center. Once back to center, take a few breaths and then repeat to the other side. After you bring your head back to center again, relax for a moment. Again, try the nodding motion while your head is centered.
At the third spot, your chin will be higher than your forehead, and your head will tilt back behind the ball. You’re working on the lower part of your neck (C4–C6), where the neck may be more stiff than it was farther up toward your head. Adjust with a smaller ball if necessary. Repeat the same process, taking your time.
The fourth spot on the neck is on C7, the lowest cervical vertebra at the base of the neck. This bone is more prominent than the ones above, so you may need a softer or a slightly smaller ball. Now your movement will be a shift or a lean from side to side, because there is limited rotation at this level of your spine. Working on this spot helps to integrate the neck into the upper back.
Duration: 10–15 minutes
Contraindications: Recent cervical disk herniation, cervical instability, extreme dizziness
Notes: It’s fine to work on only the first two spots if your neck is short or the lower spots are not comfortable. Notice possible effects in your sinuses, jaw, eyes, forehead, or shoulders. Working on your neck has many possible benefits—sometimes unexpected—and it is a fundamental practice for calming and centering the mind.
Anatomy: Cervical vertebral segments, suboccipital muscles, cervical transversospinalis muscles, cervical portions of the erector spinae, splenius capitis, upper trapezius

The Neck, Ball Position 1
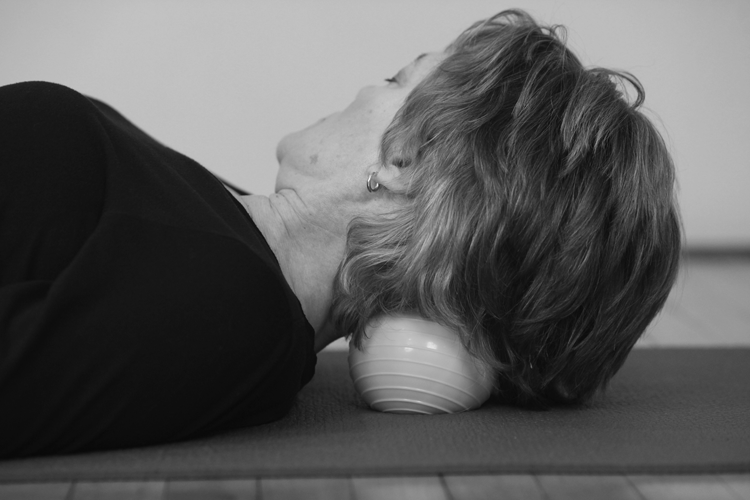
The Neck, Ball Position 1, Turning

The Neck, Ball Position 2

The Neck, Ball Position 3
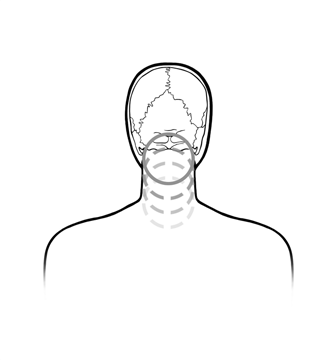
Ball Placement for the Neck
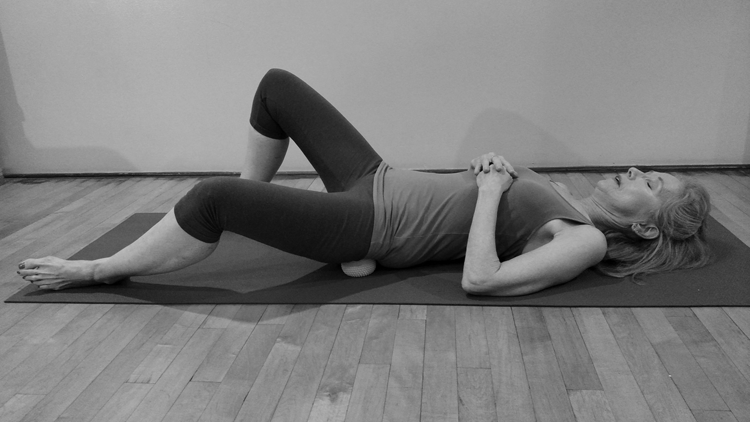
2. The Trapezius
Tension around the tops of the shoulders plagues just about everyone I know. Stress builds here in the form of muscle tension, whether it’s from carrying bags or children, worrying, hurrying, having less than ideal posture, or getting inadequate sleep—just to name a few possible causes. Softening the trapezius muscle does a huge service to your state of mind and increases comfort throughout your body. You’ll feel different after just one session, and even better if you practice this every day.
Balls: Two solid or hollow balls, 2.5˝. You might also use a folded blanket, bolster, or yoga block during this technique (see Variation).
Body position: Lying on your back with your legs straight or bent
Starting position of the balls: One on each side, at the very top of your upper back, in the area of soft tissue of the upper trapezius muscle, between your shoulders and your neck
Action: Movement 1: Position your arms with the elbows pointing upward, hands resting on your forehead or behind your head. Move your elbows slowly up toward the ceiling with your hands still touching your forehead. This movement comes from your shoulder blades moving around from the back to the sides of your ribs (protraction). Each time you release your arms down, allow the muscles to soften around the balls.
Movement 2: First, place a folded blanket behind you in case you need support for your arms. Extend your arms overhead onto the blanket. Shift your shoulders and upper back slowly to one side, then back to center, then slowly to the other side. Repeat as many times as you wish.
Move slowly and linger in any spot that feels particularly tight. Take some deep breaths and picture the muscles melting around the ball.
An alternate arm position is to cross your arms over your chest, creating more pressure.
Progression: Move the balls slightly wider apart or closer together and repeat the actions. Then move the balls an inch or two down your back, between the shoulder blades, and repeat all the actions. Continue moving the balls down one spot at a time, until you reach the bottom corner of the shoulder blades. Usually you will find four spots. Try each of the arm positions to see which one works well for you.
Duration: 15–20 minutes
Contraindications: Try this for a short time as a test if you have a recent neck or shoulder injury, shoulder subluxation, nerve entrapment, repetitive strain injury (RSI), cervical disk herniation, or labral tear. Stop if your pain increases from the pressure of the ball. This technique will help to relieve secondary spasms that follow shoulder and neck injuries, so it is worth testing it.
Variation: For more pressure at the upper trapezius, repeat movement 2 with your knees bent and your hips raised on a folded blanket, bolster, or yoga block. This lift of your hips will change the angle of pressure and reach some additional trigger points in the upper trapezius muscle.
Anatomy: Trapezius, semispinalis capitis, splenius capitis and cervicis, levator scapulae, rhomboids, intercostals
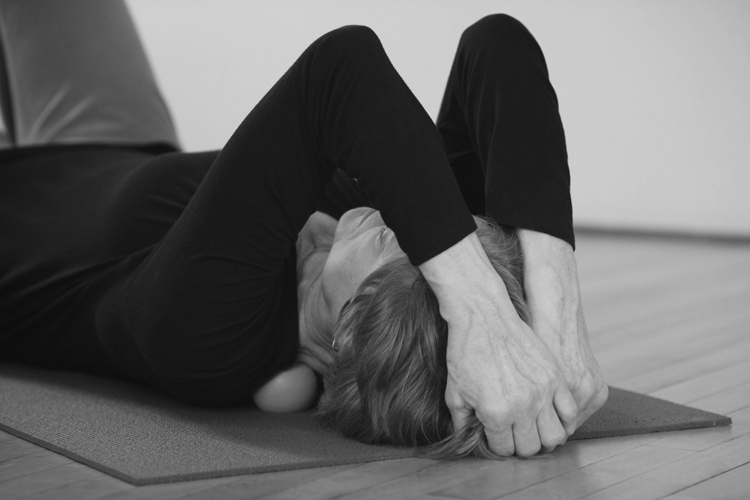
The Trapezius with Elbows Pointing Up
Many students say that these two techniques—The Neck and The Trapezius—are lifesavers. Aliza, the executive director of a nonprofit corporation, had done many years of regular yoga practice when she developed severe neck pain and numbness in her arms, making her wary of continuing her yoga. Massage and acupuncture helped, but eventually a diagnosis of herniated disks in her cervical spine took her to spinal surgeons who wanted to schedule her for immediate spinal fusion in her neck. She decided to try adding ballwork to her regular practice. “The first private class was a revelation! The ballwork made me feel immediate relief much as the massage and acupuncture had, but I could do it at home and with greater frequency. And I could practice yoga again. I take a class that combines ballwork and yoga poses weekly and try to take out the balls at home several times a week—especially when I feel stiff. I have now been practicing yoga combined with ballwork for about four years. It has helped to improve my posture and has given me almost full relief from pain. More than anything, it is empowering. If my neck tenses, I don’t go into a tailspin of ‘what ifs.’ I know it is time to grab my balls and blocks, lie down on the floor, and relieve the pain.”
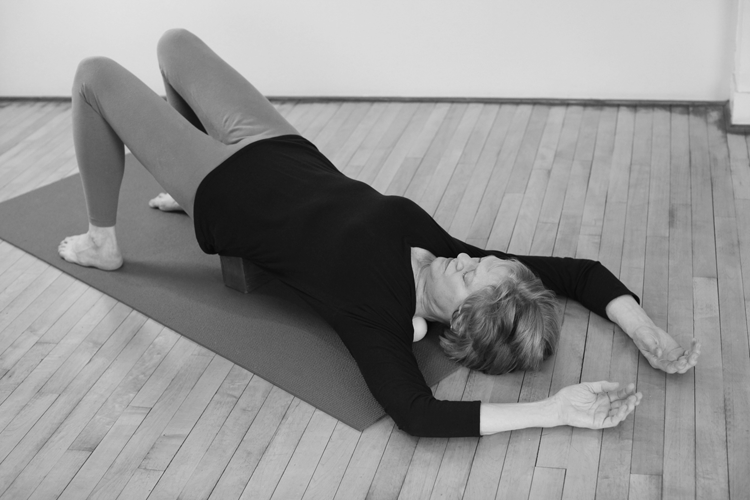
The Trapezius with Block under the Pelvis, Arms Overhead
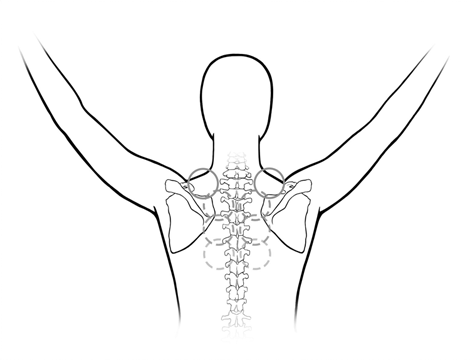
Ball Placement for the Trapezius
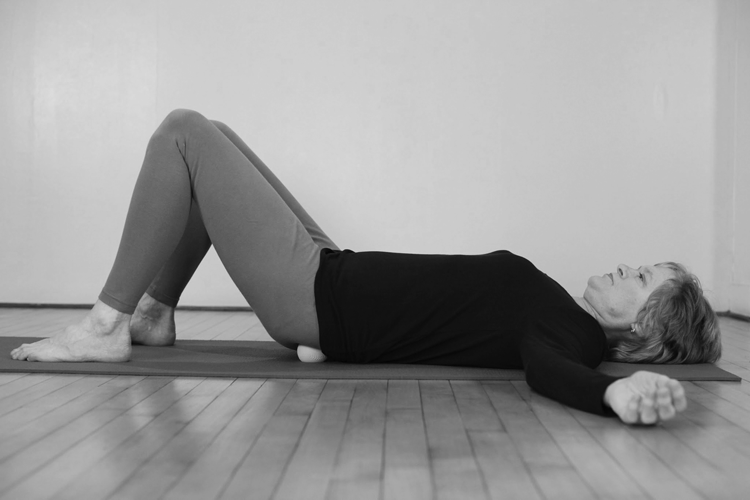
3. The Spine with Two Balls
With this technique, you can reach the large muscles of the middle and lower back that are often the source of fatigue and pain. Use it in combination with The Trapezius technique (above) and The Back of the Pelvis technique (below) if you want to work from the shoulders down through the pelvis. As a daily practice, this one will help to prevent incipient musculoskeletal back problems from developing, and your breathing will improve.
Balls: Two balls, either 2.5˝ solid balls or 3˝–4˝ hollow balls (smooth or spiky). Solid balls will penetrate more, so choose those if you like deep pressure. Hollow balls will still loosen your muscles, but with less intense pressure.
Body position: Lying on your back, with your knees bent or straight, whichever is more comfortable for you
Starting position of the balls: Just below your shoulder blades, one on each side of the spine
Action: Settle yourself on the balls, taking several deep breaths. Then begin to move your spine and ribs very slowly to one side. Take your time and feel each small gradation of movement. Then return to center and pause to breathe. Slowly move to the other side, moving only that part of your spine and ribs. Do as many repetitions from side to side as you wish. Try to move just the part of the spine where the balls are touching, and avoid pushing with your legs.
Progression: Move the balls down an inch or two on your back, either with your hands or by letting them roll as you shift your body in the direction of your head. Repeat the movements at this new spot. Continue down your entire spine, one spot at a time, until you feel the top of your pelvis in contact with the balls.
Be attentive to your breath, especially when working in the midback, near the diaphragm.
Duration: 15–20 minutes
Contraindications: Recent disk herniation, or spinal fracture. For those with spinal stenosis and scoliosis: My experience is that this technique is very beneficial, but I encourage you to use your own best judgment. Try it for a few sessions and see if you feel more ease in your posture and movement.
Notes: You may need one type of ball on the upper part of the spine and a different type lower down, due to the tension patterns in your back. Feel free to change the balls if necessary.
Anatomy: Thoracic and lumbar vertebral segments, the erector spinae and quadratus lumborum muscles, the lumbosacral fascia, and indirectly the diaphragm muscle and the iliopsoas muscle
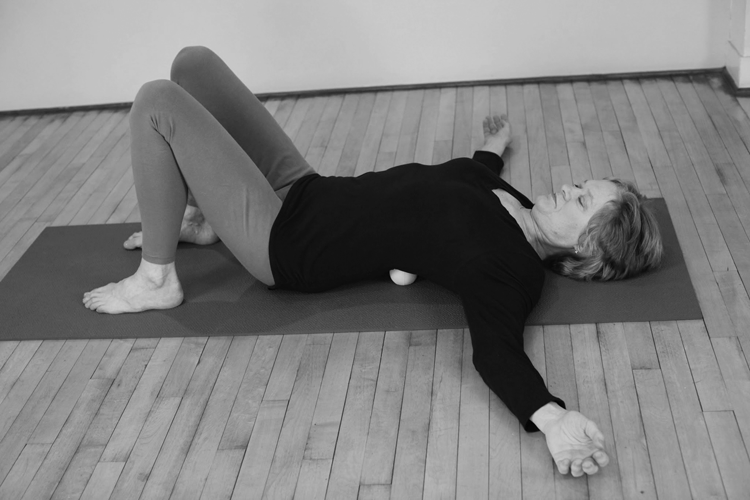
The Spine with Two Balls

Ball Placement for the Spine with Two Balls
4. The Back of the Pelvis
We sit on our hips and buttocks every day, yet we hardly feel the layers of muscles that are there. This technique will show you the tight spots and let you work on them slowly and gradually so that your pelvic muscles have a more even tone. People report relief from sciatic pain, piriformis syndrome, sacroiliac pain, general low backache, and PMS when these muscles release in response to the balls. There’s also a grounding and settling effect on the entire nervous system. From the yogic point of view, this technique increases apana vayu, the downward flowing prana that brings steadiness and calm.
Balls: Two balls, either hollow or solid, 2.5˝–4˝ in diameter
Body position: Lying on your back, knees bent
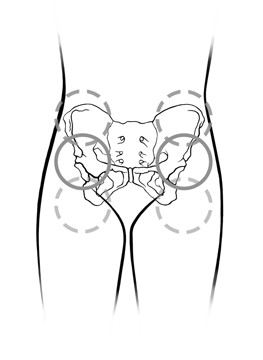
Starting position of the balls: Under the center of your buttocks, one ball on each side
Action: Begin by taking time to release your weight into the balls and compare the sensations on each side. Then start to move very slowly in any direction. Explore a side-to-side direction, an up-and-down direction, diagonals, and any other variation that you can do. Move the pelvis by itself rather than pushing with your legs. Work on one small area at a time, moving in different directions to change the angle of pressure from the balls.
Progression: Work the middle spot first, to get used to the feeling of the balls in this area. Then work systematically through the entire back of your pelvis, one spot at a time in this way: Place the balls high on the buttocks, near your waist. Find several spots here, at first close to the center, then wider apart, then even wider apart.
Move the balls lower, toward the middle of your buttocks, and in close to the midline. Progress to two or three spots farther to the sides.
Then work on the lowest row of spots, from your tailbone in the center, and progressing to the sides of the lower buttocks.
When you have explored the entire area, you can go back to a spot that felt good as an ending.
Variations:
- For deeper pressure, bring one knee toward your chest and then to the side.
- “Windshield wiper”: Widen your feet, then tilt one bent knee down and across toward your opposite foot, turning the thigh inward. This will bring more pressure to the opposite side from the knee that comes down.
- Ankle to knee: Place one ankle over the opposite knee to create more pressure on the piriformis muscle.
- Sit almost upright with your knees bent, leaning back a bit onto your hands. Work the balls into the lower buttocks, all around the sitting bones. Raising the upper body in this way will give you more pressure than when you are lying down.
With all these variations, place the legs as indicated and then move your pelvis slowly to one side and then the other.
Duration: 15–20 minutes
Contraindications: Extreme nerve pain, either in the buttocks or down the legs
Anatomy: Sacrum, sacroiliac joint and its ligaments, lumbosacral fascia, gluteus maximus, gluteus medius, gluteus minimus, piriformis, gemellus inferior and superior, obturator internus, sacrotuberous ligament
The Back of the Pelvis
The Back of the Pelvis Variation 1

The Back of the Pelvis Variation 2
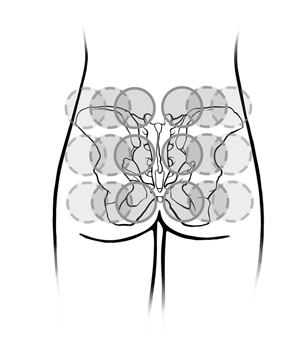
Ball Placement for the Back of the Pelvis
5. The Front of the Hips
Like the previous technique, this one is also very calming and grounding, and it increases apana vayu, the downward flowing prana in the body. This part of the body, the juncture of the upper body and the legs, is a common repository of physical and mental stress. Long car or plane trips, intense yoga practices, running, and general anxiety all tend to cause tightening here. As the hip flexor muscles release, the thighs shift back, the diaphragm releases, and the breath deepens. Try this one at the beginning, middle, or end of your day, and you’ll be glad you did. It’s gentle and yet it works very deeply.
Balls: Two 4˝ or 5˝ hollow balls
Body position: Lying face down with optional padding for your head and shoulders. Your head can face straight down resting on your hands, or you can turn it to the side.
Starting position of the balls: Under the front hip sockets, more to the sides than at the center. If you feel any numbness or a strong pulse, move the balls wider apart.
Action: Settle your weight into the balls and breathe, letting your pelvis drape over the balls. Your lower back will arch slightly from this support. If you feel your pulse strongly, move the balls wider apart to avoid pressing onto large blood vessels.
When you are ready, move slowly to one side, back to center, then to the other side, taking your time. Pause wherever it feels interesting to explore further.
Variations:
- Pelvic tilt, moving your tailbone up and then down.
- Roll the legs inward and then outward, by turning heels out and then in.
- Lengthen one leg out away from your pelvis, while shortening the other one.
Progression: Move the balls up or down an inch or two to a different spot and repeat these movements.
Duration: 10–15 minutes
Contraindications: Recent hip or abdominal surgery, labral tear, late pregnancy, ischial bursitis
Notes: Take time to breathe during this one; it encourages a release of the diaphragm and is very calming to the breath and the mind. Avoid neck strain by turning your head frequently.
If your pelvis is torqued, you can help to adjust it by placing the balls asymmetrically on your front hips. Place the ball higher on the side that tends to tilt anteriorly (arching the lumbar spine), and the ball lower on the side that tends to tilt posteriorly (tucking under).
Anatomy: Inguinal ligament, iliopsoas, rectus femoris, sartorius
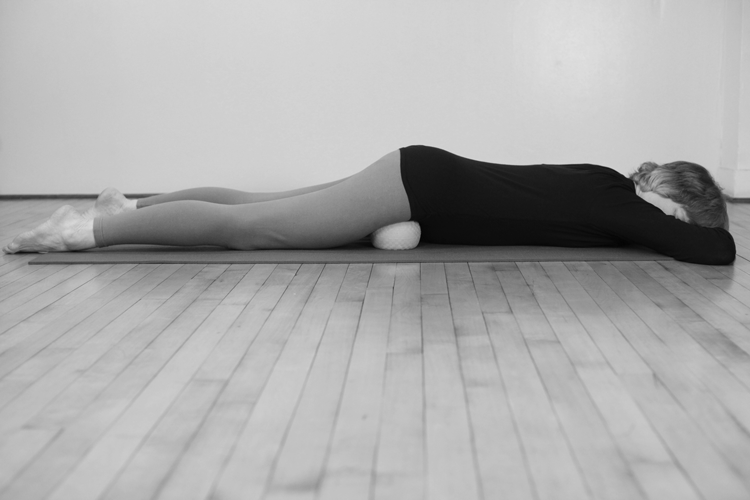
The Front of the Hips
Ball Placement for the Front of the Hips
6. The Soles of the Feet
We take our feet for granted, and sometimes stuff them into shoes that look great but feel uncomfortable or don’t support the feet well at all. We all have virtually the same anatomy in the bones and muscles, yet there is infinite variety in how all these parts function. Our feet develop in response to how they are used, or misused, or underused. I see many people who say they have flat feet, and often tell me stories about other family members whose feet are the same. Yet when I look at their feet while standing and also without bearing weight, very often their arches are not flat, but actually weak and distorted by poor alignment. The arches collapse down and the weight is randomly distributed, often with associated tensions in the lower legs.
Because our feet carry the whole weight of the body, they need to be supple, strong, and intelligent—able to appropriately respond to the ever-changing demands of daily life. The first step in reeducating the feet is to really feel them, and feel the floor under you more fully. See where the sore spots are, and investigate the effects that tightness may have on your posture. How does your walk feel different after doing a few minutes of work on your feet? People often say they feel lighter, more connected to the earth, calmer, and more aware of the way they carry weight on the feet. Your balance improves as your feet become more intelligent and aware. Pain from plantar fasciitis can be relieved. Practicing this technique for the soles of the feet is a starting point on the journey to feel, strengthen, and appreciate your feet more.
Ball: One small solid or hollow ball, 1˝–2˝
Body position: Standing, with support of a wall or chair nearby if necessary for balance support. Alternatively, you can do this technique while sitting.
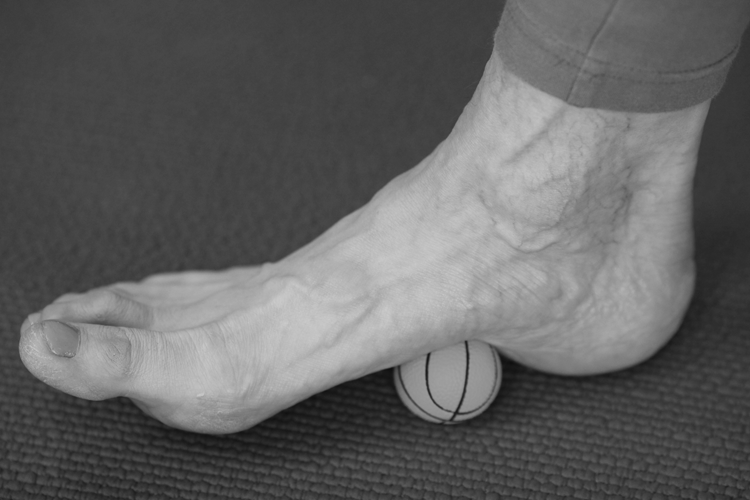
Starting position of the ball: Under the front and center of the foot, near the base of the toes. Keep your heel on the floor.
Action: Allow your foot to release and drape over the ball. Put as much pressure into the ball as you wish, but only with your body weight. Then begin to tilt your foot slowly to vary the angle of pressure. Tip in all directions, working on this one spot very thoroughly. You can also roll side to side a small amount. Always keep one part of your foot on the floor to avoid moving too fast.
Progression: Follow this pathway to reach all parts of the foot, working each spot carefully: From the starting point, progress one spot at a time toward your heel. There will be about five or six spots to work on in that centerline of your foot. Then work onto the heel, with the ball of your foot stabilized on the floor. Make your way across your heel and then work your way up to the toes, one spot at a time, along the outer edge of your foot. Then with your heel back on the floor, make your way across the toes, and down the inner edge of your foot. Finish with your favorite spot, and then repeat the sequence on your other foot.
Duration: 10 minutes per foot
Contraindications: Recent fracture
Notes: When finished with your first foot, pause to stand and walk, noticing the difference between your two feet. Also notice the effects farther up your body, into your legs and the whole side of your body. Notice how increased sensitivity in your feet allows you to carefully adjust your stance and your gait.
Anatomy: All the bones, muscles, and fascia of the feet, especially the plantar fascia, flexor digitorum brevis, abductor digiti minimi, abductor hallucis, and quadratus plantae
The Sole of the Foot, Inner Edge

The Sole of the Foot, Outer Edge
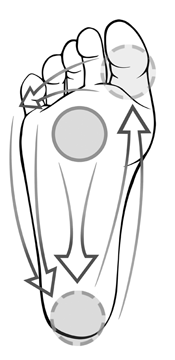
Ball Placement for the Sole of the Foot
These four techniques—The Spine with Two Balls, The Back of the Pelvis, The Front of the Hips, and The Soles of the Feet—all give a sense of groundedness. The release of outer tension in these keys areas brings our attention inward to a steady center, and a literal connection to the steadiness of the earth. Alice describes her experience: “In the course of daily life, my back tends to tighten up and gradually I have a vicious cycle of discomfort—and sometimes pain—mixed with a feeling of anxiety, distraction, and fatigue. When I work with the balls on my back, hips, and feet, I feel a powerful connection to the ground under me. It’s very calming and centering. Sometimes I do it at the beginning of the day to wake up my body awareness, sometimes in the middle as a welcome break, and sometimes at the end of the day to release the residue of any stresses that day. It’s amazing how much difference twenty minutes on the balls can make to my state of mind and my energy.”