Chapter 12
The Arms and Hands
How many different ways do you use your arms and hands in a typical day? Personal hygiene, cooking and eating meals, carrying a briefcase or a tote bag, working on a computer—all of these involve dexterity, which is a defining human trait. Perhaps you also do more specialized tasks like knitting, gardening, playing a musical instrument, drawing, or giving massages. If you’re a yogi, you may stand on your hands or on your forearms. The hands and arms can accumulate extra tension and experience tissue restriction just like any other part of the body. Pain and tightness in the arms and hands can severely inhibit your daily activities, yet help is “at hand” with the balls. This chapter offers many ways to relieve sore spots and regain full use of your arms and hands. Some techniques are on the wall, some on the floor, and some sitting at a table.
Daniel is a musician whose primary instruments are keyboard and guitar. He came to me with spasms in his hands, which made playing very painful. We worked with the balls on his forearms and hands, and he reported that “it made a world of difference. I am so glad to have something I can do to release tension before, during, and after long sessions of playing. Just a few minutes does the trick.”
1. Wall Ball for the Upper Arms
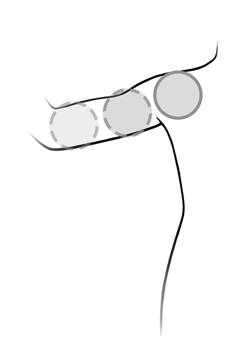
If your shoulders need help releasing, it’s likely that your upper arms do as well. There are three primary muscles here: the deltoids, which form the top contour of your shoulders and upper arms; the triceps at the back of your upper arm; and the biceps at the front. The fascia that surrounds these muscles can become torqued or matted together, causing movement restrictions and pain. This first technique is done standing against a wall, which means that you can do a few minutes of it at any time during your day—no need to change into exercise clothes or have a clear floor space to work in.
Ball: One firm ball, 2˝, 3˝, or 4˝
Body position: Standing perpendicular to a wall with one shoulder against it
Starting position of the ball: Begin working on the deltoid, which has three sections: front, side, and back. You can start anywhere on the muscle.
Action: Establish the degree of pressure you want by leaning into the ball. Take a moment to slow down and feel your arm and the ball’s pressure.
Begin to move slowly, at first up and down, then side to side. For the up-and-down movement, bend and straighten your knees. For the side-to-side movement, you can turn your arm only, or you can turn your whole body.
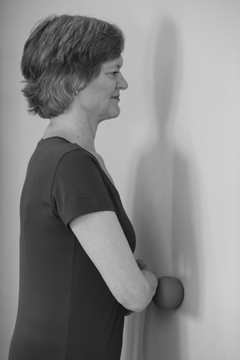
Progression: After working on the deltoid for several minutes, progress to the triceps. Turn slightly away from the wall and move the ball onto the back of your upper arm. In the same way as before, alternate between a movement up and down, and a movement side to side. You can vary the pressure by bending your elbow, then moving the arm slowly in any direction.
To access the biceps muscle, turn to face the wall and extend your arm out to one side. Place the ball on your biceps muscle, turn slightly away from the ball, and make small, slow movements in any direction to access different parts of the muscle.
Repeat on the other arm.
Duration: 5–8 minutes per arm
Contraindications: Recent surgery, abrasion, bruise, or fracture
Notes: There is a seam of fascia between the triceps and biceps that is worth working on as well. It will feel different—more tough and stringy, less bulky.
On the inner line of your upper arm, the blood vessels and nerves are near the surface, which will make this area quite tender. Stay on the muscles.
Anatomy: Deltoid, triceps, biceps, brachialis, intramuscular septum
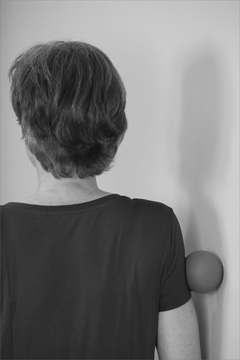
Wall Ball for the Upper Arm
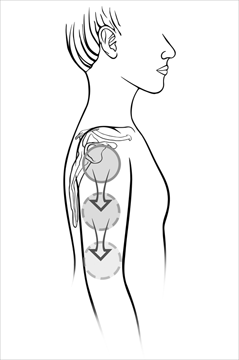
Ball Placement for Wall Ball for the Upper Arm
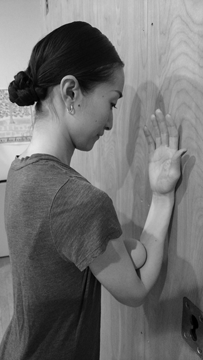
2. Wall Ball for the Lower Arms
My students use this to relieve fatigue and tension in the wrists and hands, especially from typing. Racket sports enthusiasts can also benefit. The forearm muscles rarely get to stretch in daily life, so trigger points can easily develop and cause discomfort and wrist strain. A few minutes on the ball can make a huge difference. Like the upper arm technique above, there’s no need to get onto the floor or change into exercise clothes—you can do a few minutes anywhere there is space on a wall.
Ball: One firm ball, 2˝, 3˝, or 4˝
Body position: Standing facing the wall with your elbow bent and your forearm laterally placed across your front waist
Starting position of the ball: Start near your elbow, where there is thicker muscle tissue to work with. Place the ball between your forearm and the wall.
Action: To find the right pressure, lean into the ball as little or as much as you want. Begin a slow process of working the ball into the forearm extensor muscles. You can move the ball along the direction of the muscle’s fibers, separating the bundles, or you can cross-friction the muscle by bending your knees. You will probably find some spots to be much more sensitive than others.
Progression: Patiently work through the entire outer forearm, from elbow to wrist.
Variation: Rotate your forearm, turning the palm of your hand up and down, which supinates and pronates your forearm.
To access the flexor muscles, turn around with your back to the wall, bend your elbow, and place your forearm along your back waist, with the palm facing the wall. Work through the entire forearm in the same way as before.
Repeat with the other arm.
Duration: 5–8 minutes per arm
Contraindications: Bruises or other recent injury
Notes: Don’t be deterred by sensitive spots. You can always reduce the pressure by leaning away from the wall with your whole body. Be careful to maintain a slow speed.
Anatomy: Brachioradialis, extensor carpi radialis longus and brevis, extensor carpi ulnaris, extensor digitorum, flexor carpi radialis, flexor carpi ulnaris, palmaris longus, flexor digitorum superficialis and profundus, pronator teres, pronator quadratus, supinator
Wall Ball for the Lower Arm (Extensors)

Wall Ball for the Lower Arm (Flexors)
3. Floor Balls for the Biceps
The pressure you get from the balls in techniques 3–6 may be less than in the previous two techniques, because it comes from the weight of your arms rather than the weight of your body leaning into the wall. The trade-off is that you are lying down (more restful) and you can do both arms at once (more efficient). If you have two yoga mats, it is helpful to arrange them in a “T” shape so that your body has a vertical mat and your arms have a horizontal mat. This will help you to keep the balls where you want them.
Balls: Two firm 4˝ or 5˝ balls
Body position: Lying face down, arms to the sides, with a support for your head if you wish
Starting position of the balls: Under the proximal biceps muscles of each arm (near the shoulders)
Action: Take some time to settle, and be sure that the rest of your body is comfortable. You might want to put a small pillow under your chest, abdomen, or ankles.
Begin to move your arms very slowly. To move the ball along the fibers of the biceps, stretch one arm to the side, allowing your torso to move with it. This movement will bring the ball higher on one arm and lower on the other in a gliding motion. Then return to center. Move to the other side in the same way, slowly enough to feel each part of the biceps muscle. At any point, you can add a rotating motion, slowly turning your arm inward and then outward.
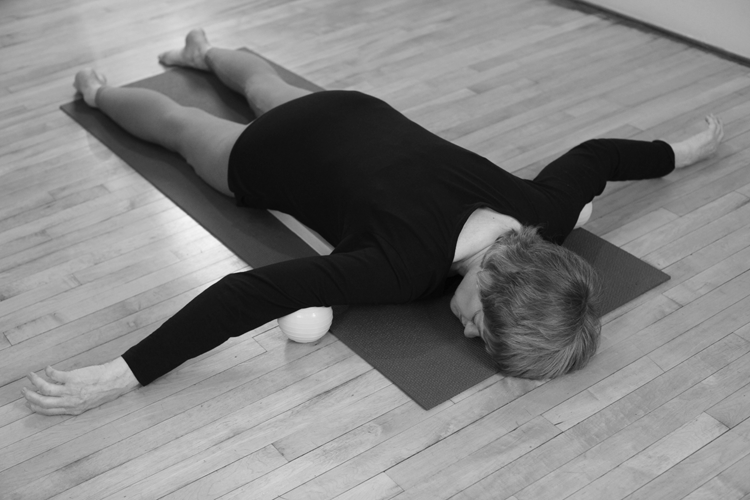
Floor Balls for the Biceps
Progression: Reposition the balls as needed, to work on the entire upper arm.
Duration: 5–10 minutes
Contraindications: Injury to the upper arm
Notes: It’s easy to get going too fast, so make the effort to maintain a slow speed.
Anatomy: Biceps, brachialis
Ball Placement for Floor Balls for the Biceps
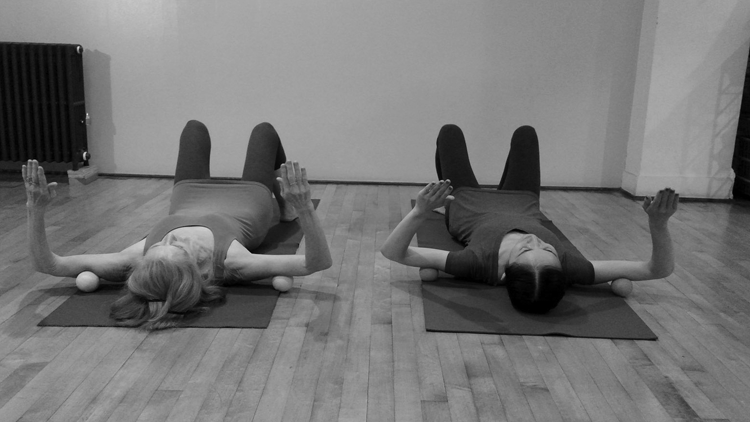
4. Floor Balls for the Triceps
This technique is a good follow-up to any shoulder work, because the triceps muscle crosses both the elbow and the shoulder joints. It is also very good for elbow pain.
Balls: Two balls of equal size and texture, 3˝–4˝ according to your preference
Body position: Lying on your back with your arms reaching out to each side
Starting position of the balls: On the back of the upper arms, near the shoulders
Action: Release the weight of your arms into the balls and breathe. Then move your upper body to one side in a gliding motion, keeping the weight on both balls if you can. Follow that with the same movement to the other side. This moves the balls along the direction of the fibers of the triceps muscle. This side-to-side movement can be done with your elbows straight or bent. You can also cross-friction the muscle by turning your arms inward and then outward, with your elbows bent.
Progression: Reposition the balls as needed to work on the entire upper arm.
Duration: 5–10 minutes
Contraindications: Recent injury
Notes: Don’t worry if the left and right balls are not on the same area of each arm.
Anatomy: Triceps
Floor Balls for the Triceps
Ball Placement for Floor Balls for the Triceps
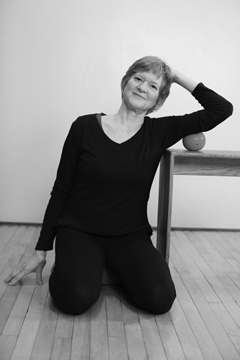
5. Chair or Table Ball for the Triceps
This technique highlights the back of the upper arm, and its connection into the shoulder and the back. Tension here can make it difficult or impossible to bring your arms overhead, which is required by many yoga poses and by daily tasks such as putting on a shirt, replacing a light bulb, or reaching up to a high shelf.
Ball: One firm 3˝–4˝ ball
Body position: Two choices: (1) sitting at a table or (2) sitting on the floor next to a chair or bench as shown here.
Chair or Table Ball for the Triceps
Starting position of the ball: At the top of your upper arm, near your shoulder
Action: Fold your elbow and place the ball under your triceps muscle at the back of your upper arm. To create some pressure, lean into it as much as you want. Then move slowly in any direction over one spot at a time. You can move slowly along the arm, following the direction of the fibers of the muscle as you extend the elbow out away from you. You can also cross-friction the muscle by rotating your arm forward as if to put your palm down, then moving the other way, tilting your hand back. The ball will move across the fibers of the muscle, helping to loosen tension.
Progression: Move the ball incrementally along your upper arm, anywhere between your shoulder and your elbow. Work in the same slow way in each spot.
Repeat with the other arm.
Duration: 5–10 minutes per arm
Contraindications: Recent injury
Notes: Be sure that the rest of your body is comfortable. If you do this technique on the floor, sit with your hips on a support to avoid lower back or hip strain.
Anatomy: Triceps, latissimus dorsi, shoulder capsule
6. Floor Balls for the Lower Arms
I recommend that you work on both sides of the lower arms, regardless of where your discomfort is. This description begins with the wrist and finger flexors while lying face down, and then continues onto the wrist and finger extensors while lying on your side.
Balls: Two firm balls of equal size and texture, 2˝–4˝
Body position: Lying face down at first, arms out to the sides. Use extra support under your hips, chest, or forehead if needed.
Starting position of the balls: Under the upper part of each inner forearm, the proximal flexor muscles
Action: Begin by settling, and releasing the full weight of your arms onto the balls.
Check that the rest of your body has adequate support, and add cushioning where needed. Then begin to move slowly, in any direction that allows the balls to access the flexor muscles. You can extend your arms out away from you, moving the balls along the fiber direction of the muscles, or you can cross-friction by rotating your forearms.
Progression: Move the balls to different spots along your entire forearms. Spend more time in the areas that feel tight.
When you are finished with the flexors, roll over onto your right side, adding some support under your head and under your ribs. Place your right forearm on the balls, and add the weight of your left forearm over the right one. Then slowly move the entire forearm over the balls, accessing the wrist and finger extensors. You can move the balls along the fiber direction of the muscles (toward your hands, toward your elbow), or you can cross-friction the balls by rotating your forearm.
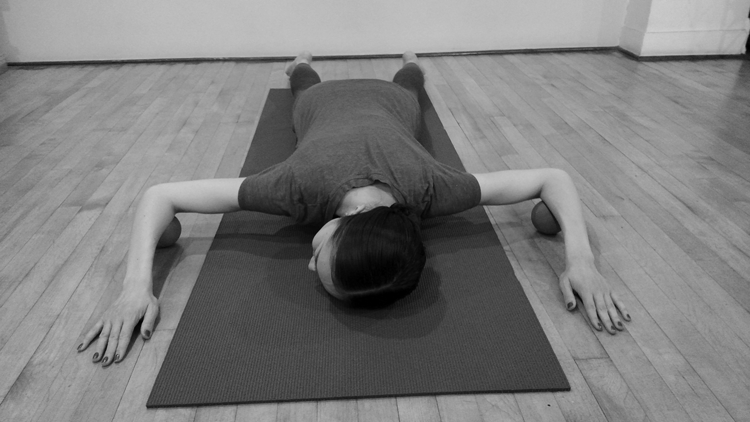
Floor Balls for the Lower Arms (Lying Prone for Flexors)
Repeat on the left forearm.
Duration: 5–10 minutes for the flexors, 5–10 minutes for the extensors
Contraindications: Abrasions or other wounds on your arms
Notes: It is easy to start moving very fast, so remind yourself to slow down.
Anatomy: All wrist flexors and extensors, flexor digitorum and extensor digitorum
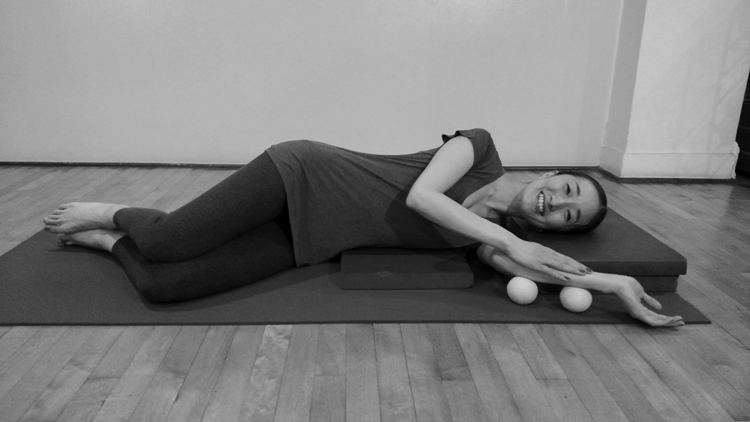
Floor Balls for the Lower Arms (Side Lying for Extensors)
7. Table Ball for the Lower Arms
This technique is very useful for working on specific knots and trigger points in your forearms. For those who spend many hours typing, it’s a perfect way to utilize your (hopefully) frequent breaks.
Ball: One 2.5˝ ball
Body position: Sitting with your forearm resting on a table or desk
Starting position of the ball: Under any part of your forearm
Action: With one forearm on the desk, palm down, place your other hand on top of it to add more weight. Move slowly, rolling the ball toward the elbow and toward the wrist, or crisscrossing over the muscles by rotating your palm and forearm up and down very slowly. You can access both the flexors and extensors because of this rotation.
Progression: Find any sore or tight spots as you explore the length of your forearm.
Repeat with the other arm.
Duration: 5–10 minutes per arm
Contraindications: Bruises or other recent injury to your forearms
Notes: It is easy to start moving very fast, so remind yourself to slow down.
Anatomy: All wrist flexors and extensors, flexor digitorum and extensor digitorum
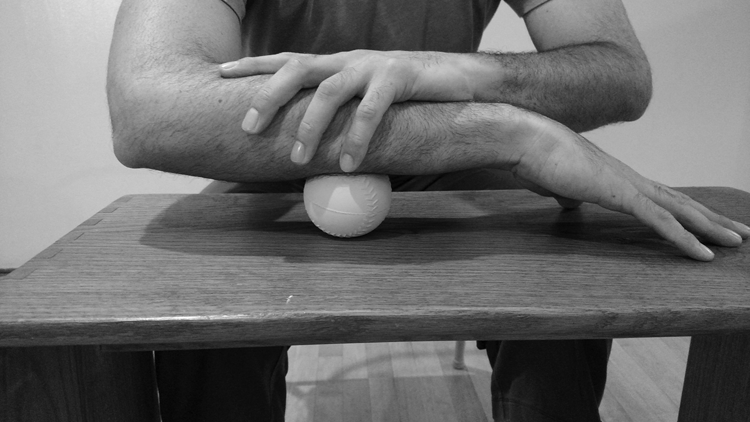
Table Ball for the Lower Arms
8. The Arm Nutcracker
As with a similar technique for the legs (technique 7, The Leg Nutcracker, in chapter 14), you can control the intensity of this one. The ball will massage both the upper and lower arms simultaneously. You’ll work on one arm at a time.
Ball: One 2.5˝ ball of any texture
Body position: Standing near a wall
Starting position of the ball: Bend your elbow and place the ball between your lower and upper arm, then rest that forearm against the wall. Your other hand touches the ball to keep it from escaping.
Action: Slowly move from side to side, guiding the ball with your movement and with your free hand.
Progression: Move the ball to other spots and do the same slow movement.
Repeat with the other arm.
Duration: 5 minutes per arm
Contraindications: Recent injury
Notes: These muscles may be very rope-like, so the support of the second hand is very helpful to keep the ball in place and the movement as smooth as possible.
Anatomy: Biceps, wrist flexors
The Arm Nutcracker
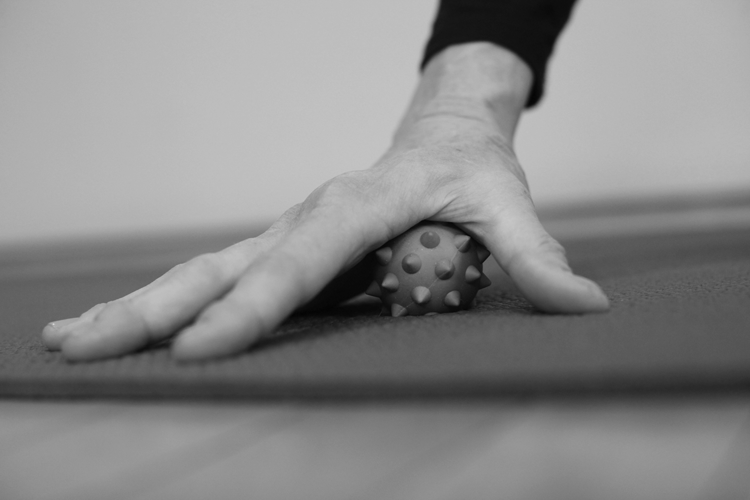
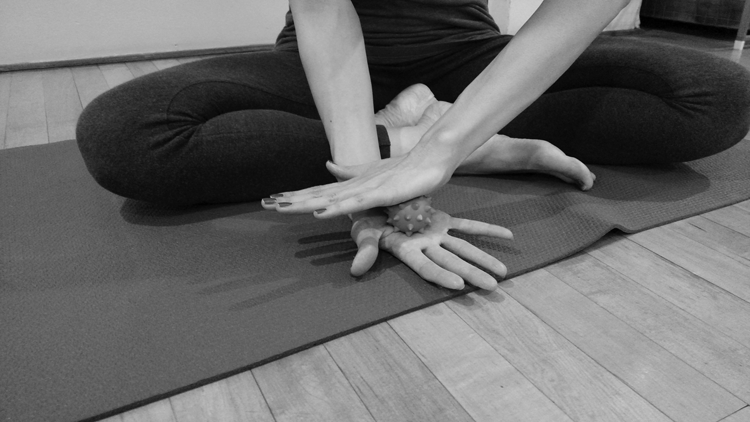
9. Hands on the Table or Floor
You might be surprised at how much tension is held in your hands. That tension can be a result of your activities, or a result of arthritic changes in the finger joints that limit your movements. The fascia surrounding the muscles can become tight if we don’t work to keep it resilient. This technique is especially good for yogis, musicians, carpenters, and massage therapists.
Ball: One small 1˝–2˝ ball of any texture
Body position: Sitting on the floor or near a table or desk
Starting position of the ball: Under the center of your palm
Action: Press down into the ball, and use your other hand to add pressure if you wish. Start with a slow circular movement, exploring the center of your palm.
Progression: Slowly progress to the mound of your thumb, out onto the thumb, and back to the palm again. Take extra time in the web between your thumb and index finger. Then work on the entire length of each finger, and the web between each finger. Proceed down the outer edge of the hand, and across the wrist. Spend extra time wherever you feel tension or stiffness.
Repeat on the other hand.
Duration: 5 minutes per hand
Contraindications: Recent injury
Notes: For a quick fix, rub one ball between your two hands with a kneading motion. Find any tight or sore spots, and roll them to relaxation.
Anatomy: Thenar group (muscles of the thumb) and hypothenar group (muscles of the pinky finger) muscles, palmar interossei, lumbricals
Hands
Two-Hand Variation
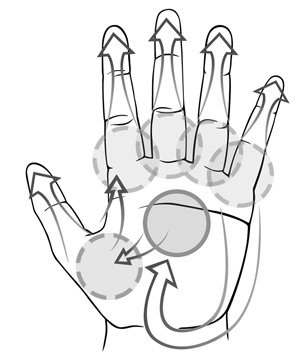
Ball Placement for Hands
Johanna is a piano teacher who developed trigger finger, a condition in which nodules form on the finger tendons and don’t allow the finger to bend and straighten smoothly. She did the usual medical treatment—a cortisone shot—which helped for three months, but then the problem returned. Her doctor recommended surgery, but she wanted to try other things first. She tried acupuncture, massage, and skin creams, which all helped. Then she started working with a small ball on her hand, and she found that she could get into the tight spots very specifically. As a result of this targeted massage, the nodule shrank enough so that it is no longer a problem. She says, “I love the ballwork because I am in control—I can do what I can tolerate without fear. My participation in the process is the best thing. When I give it my full attention, it really works. In fact, I can truthfully say that the ballwork is the most successful self-care thing that I do.”