Chapter 13
The Pelvis, Thighs, and Knees
As two-legged creatures, we are dependent on our hips and knees to walk, run, and jump. We swing one leg forward then the other, propel ourselves, catch ourselves, and readjust our balance constantly throughout the day, without thinking about it. The pelvis is the link between the upper and lower body, and mediates all of this locomotion. If we are healthy, these rather complex movements continue without much fuss or bother. If there is imbalance and strain, the simplest movements are painful, and life becomes restricted. One common situation with the large thigh and hip muscles is a constriction between layers; the fascia between the muscles becomes stuck and interrupts the smooth flow of each muscle’s range of motion. The balls can help to free up this movement between the muscles.
The techniques in this chapter supplement the two hip techniques in chapter 7 (The Back of the Pelvis and The Front of the Hips) and give you many ways to target tight spots in your pelvis and upper legs for more freedom and ease. In addition to helping you move more easily, working on your legs will calm your nervous system, helping to move the prana downward through the legs. Try these techniques if you have a vata imbalance or if you travel frequently—they are great for jet lag.
Allison is a professional dancer who came to me with a complaint of intense pain in her thighs and hips from hamstring strain. Sitting on the balls helped her to release the bellies of the hamstring muscles and separate the big thigh muscles from being “glued” together. This took pressure off the hamstring tendons and allowed them to heal. It took only a few sessions for her to feel significant relief, and now she uses the balls regularly to avoid future injuries.
1. Sitting on the Balls
Like the shoulders, the hips are complex structures with many layers of muscles and fascia and a wide range of motion. In the ideal world, if we could move the pelvis and hips in all directions evenly every day, the tone in the soft tissue in this area would be even, and the discomforts few. But that’s not the way it works for many of us, who sit for hours every day. At the other end of the spectrum are those who practice yoga, martial arts, or dance, requiring greater-than-normal range of motion.
Deep tightness can develop below the surface and have adverse effects on our alignment and movements. This technique gets to the deepest layers of hip muscles and can give you a sense of freedom relatively quickly. I practice a variation of this one in airplanes, buses, and cars.
Balls: Two firm 3˝–4˝ balls (hollow or solid)
Body position: Sitting on the floor, cross-legged at first. If this is difficult, you can try this technique sitting in a chair.
Starting position of the balls: Under the area near the sitting bones (the balls could be wider apart or closer together as you wish)
Action: Sitting up tall, notice the sensation of pressure in your buttocks muscles from the balls and your body weight. Then begin to move very slowly in any direction, exploring the deep hip muscles with the balls.
Progression: There are four ways to work:
- Explore the pelvic fascia and muscles near your sitting bones. Move slowly in any direction, taking time if you find sore spots.
- To reach the outer thighs: Bend one knee, and turn your body toward that leg. You’ll have more weight on that leg, less on the other one. As you turn, the ball will progress into the outer hip. Find small, slow movements to explore a series of spots, progressing from your hip toward the knee. You can lean over the leg and press with your hands to create more pressure if you wish. Repeat on the other leg.
- To reach the hamstrings: Extend both legs straight out in front of you with a bolster on top of your thighs to add more weight. Move your legs over the balls by slowly turning your legs inward and then outward. Roll the balls incrementally down the backs of your legs. At each spot, turn your legs in and out to reach the inner and outer hamstring muscles. Progress from the hips down to the knees.
- Sit on a firm chair with the balls under your hips, and move slowly to work into the muscles of the hips and thighs. Progress down toward your knees as far as possible.
Duration: 5–15 minutes
Contraindications: Movement restriction or injury (such as hamstring tendon tear) in the hip preventing you from being in this seated position
Anatomy: Gluteus maximus, gluteus medius, piriformis, gemellus inferior and superior, quadratus femoris, obturator externus and internus, iliotibial band, hamstrings, vastus lateralis
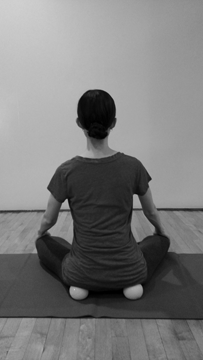
Sitting on the Balls 1
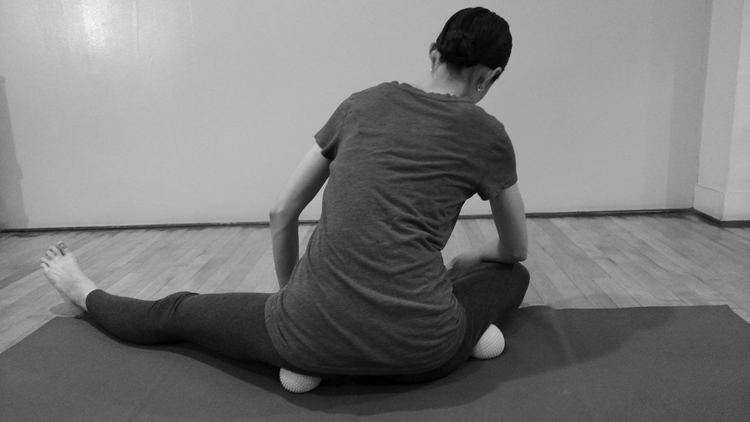
Sitting on the Balls 2
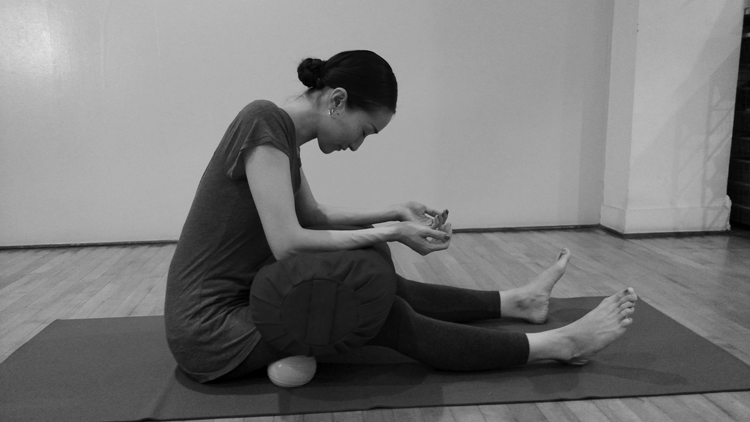
Sitting on the Balls 3
Sitting on the Balls 4
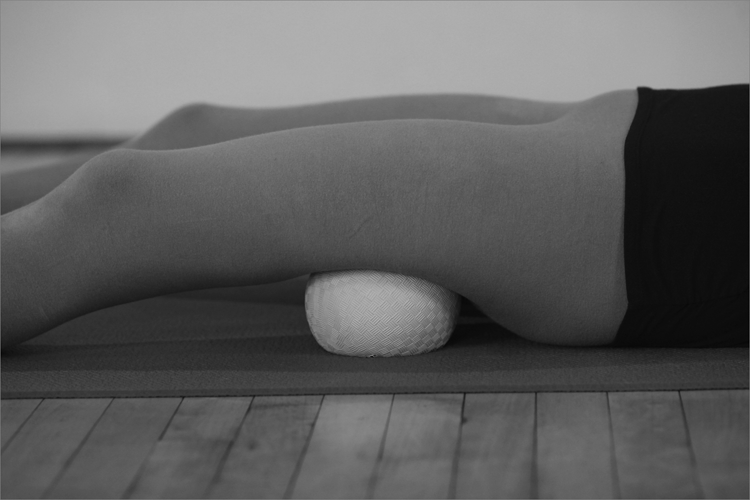
2. The Hamstrings Lying on the Floor
This technique is a gentler approach to working on the hamstrings, and you can do both legs at once while lying down. It’s a wonderful thing to do at the end of a long day on your feet, and you can do it in bed as you prepare for sleep.
Balls: Two firm 5˝ balls
Body position: Lying on your back
Starting position of the balls: Near the tops of the backs of your thighs. Find your “home base” position for the balls in which your legs can relax. That position might be with your legs turned out, or neutral, or turned in; it doesn’t matter.
Action: Very slowly and gently, turn your legs inward toward the midline, then back to home base, then outward, then back to home base.
Progression: Gradually move the balls down farther on your legs, toward your knees. Work each spot slowly and carefully.
Duration: 10 minutes
Contraindications: None
Notes: If you want deeper pressure, you can place a folded blanket across your thighs. At first this technique may feel quite mild, but with time you will access deeper layers.
Anatomy: Biceps femoris, semitendinosus, semimembranosus
The Hamstrings Lying on the Floor
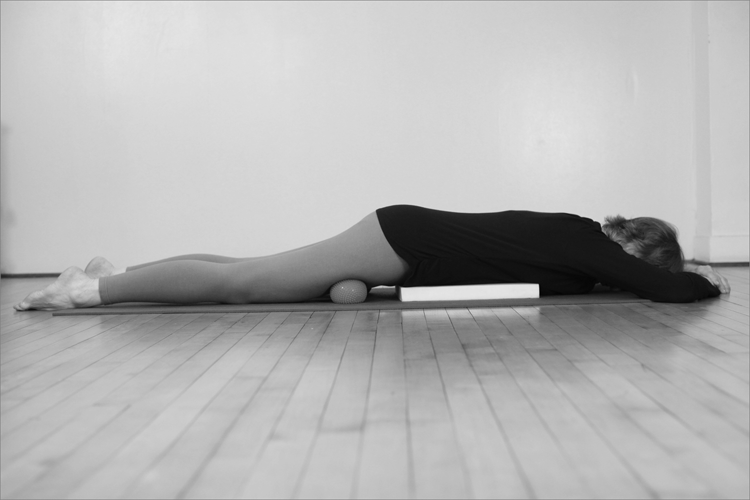
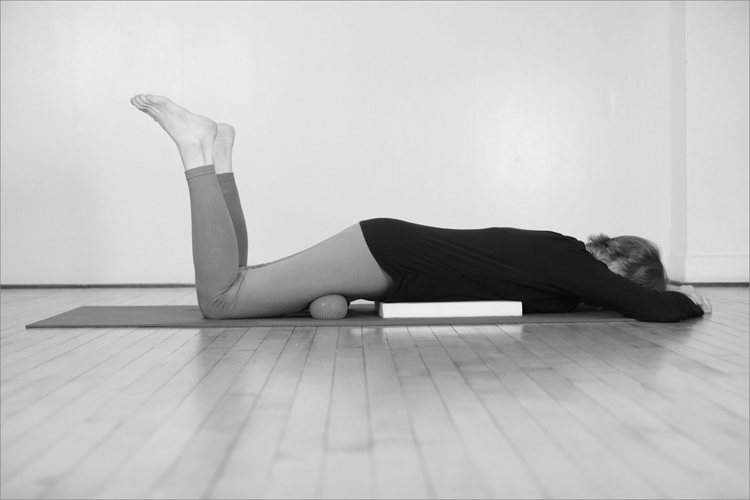
3. The Front Thighs
On the front of the thighs we have one large group of four muscles called the quadriceps whose main job is to straighten our knees. One of them (rectus femoris) crosses both the hip and the knee joints, but the others begin on the thighbone and only cross the knee. All four of them join together to form the large tendon that encircles the patella and then attaches to the tibia below the knee. These muscles can become overworked from lifting heavy objects, bicycling or hiking, any sport or dance that involves running and jumping, and of course, vigorous yoga. Chronic tightness in the quads can cause hip or knee pain, as well as misalignment of the entire lower leg. This technique can be intense at first, but quite soon the muscles learn to relax by working with the balls. As with all the leg techniques, releasing the thighs brings a generalized bodymind ease, and we feel more grounded.
Balls: Two 3˝–5˝ balls, either hollow or solid, according to your preference
Body position: Lying face down with a cushion or blanket under your torso to prevent hyperlordosis (overarching) of the lumbar spine and discomfort in the neck. You might also want a small support under your forehead and each shoulder. You can also support your ankles on a bolster.
Starting position of the balls: At the top of the thighs. Find a “home base” position for your legs in which you can relax. It might be in neutral rotation (knees facing down) or a light rotation inward or outward.
Action: There are three movements to try:
- Very slowly roll your thighs in toward the midline, then back to the home base position, then outward away from the midline, and back to home base. This will cross-friction the quadriceps.
- Bend your knees and do the same rotation, moving your foot and lower leg side to side very slowly. This position will create a deeper sensation, with more weight and a bit of stretch to the muscles.
- Slowly elongate one leg at a time. This glides the ball over the muscle longitudinally and helps the muscles to slide over each other freely. You can do this with the leg bent or straight; try it both ways.
Progression: You can move both legs at once, or alternate legs to enable you to feel more detail. Gradually move the balls down your thighs, almost to the knee joints. When the muscles narrow to morph into the patellar tendon, you’re at the stopping point.
Duration: 10 minutes
Contraindications: Difficulty lying face down, recent knee injury or surgery
Notes: Be sure that the rest of your body is comfortable. It doesn’t make sense to work on your thighs but endanger your shoulders, neck, or lower back! Try coming up onto your forearms in a “sphinx” position for a change.
Anatomy: Rectus femoris, vastus medialis, vastus lateralis, vastus intermedius
The Front Thighs 1
The Front Thighs 2
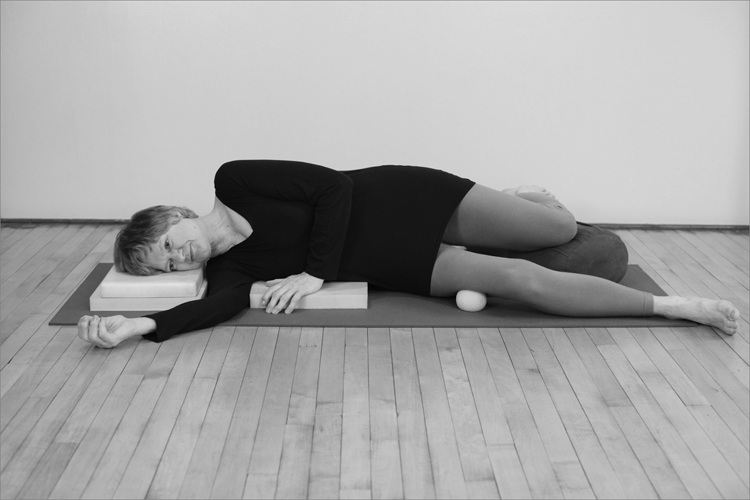
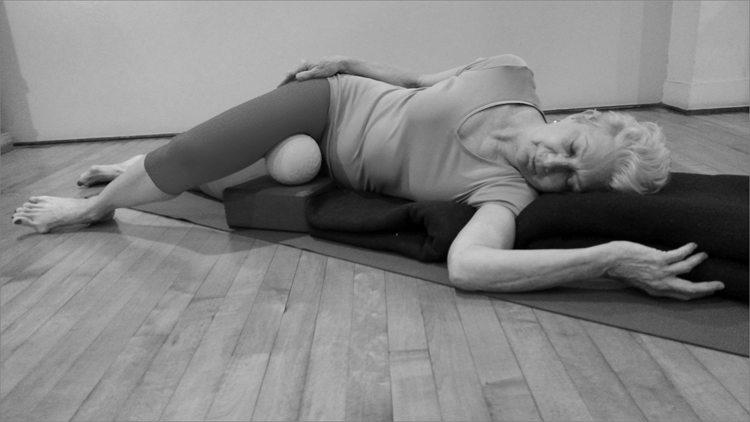
4. The Outer Thighs
The iliotibial band (ITB) is now recognized by exercise enthusiasts as a locus of tightness and restriction in the hips and legs. The ITB runs from the iliac crest (top side rim of the pelvis) all the way down the outer thigh to attach below the outer knee. This strong band of connective tissue is crucial to our balance and coordination in walking and running, and we need it for that. However, the fascia and the muscles under it (vastus lateralis, one of the quadriceps) and above it (tensor fascia lata) can hold excess tension that may impact the hip and the knee. Layers of tissue that are meant to slide over each other become stuck together, causing constriction. Try this technique as an alternative to the foam roller to increase freedom in your hips and knees. You’ll notice a new fluidity in your normal walking.
Ball: One or two 4˝ balls, either hollow or solid
Body position: Lying on your side, legs bent, with the following supports: a folded blanket or pad under your side ribs (from waist to armpit), a higher support under your head to bring it level with the rest of your spine, and an optional bolster for your upper leg. There is a space between the rib support and head support, and that’s where your shoulder rests. Without these supports, lying on your side can compress your shoulder and strain your neck.
Starting position of the ball: Under the upper part of the ITB, just below the upper rim of the pelvis. There is space for one ball between the upper rim of the pelvis and the greater trochanter, the bony prominence at the side of your hip.
Action: After settling, make small, slow movements with your pelvis. You can flex your hip, bringing your knee toward your chest. You might turn your pelvis toward or away from the floor, or move it forward and backward.
Progression: Avoiding the greater trochanter of the femur, move the ball down onto the side of your thigh. If you want to spread the pressure over a bigger area, making it less intense, add a second ball in line with the first one. As you work through each spot along your outer thigh to just above the knee, try these movements:
- Move your leg forward and back.
- Lift your foot off the floor, which will rotate the hip joint and create more pressure on the ball as it cross-frictions the muscle and fascia.
- Explore the difference between working with your other leg in front of you or behind you; it will change the angle and degree of pressure of the ball. You can also add more weight by placing the top leg over the bottom leg.
Repeat on the other leg.
Duration: 10 minutes per leg
Contraindications: Recent hip surgery or injury
Notes: Because this is an intense technique, try it for just a few minutes at first.
Anatomy: Iliotibial band, tensor fascia lata, vastus lateralis
The Outer Thighs
Ball Placement for the Outer Thighs
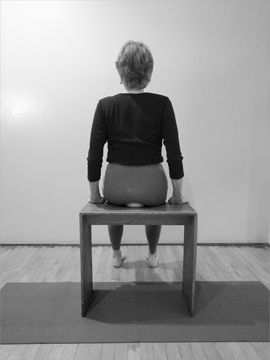
5. The Inner Thighs in a Chair
The inner thigh muscles are the adductors, and they are major stabilizers in standing and walking. They can become tight and short over time if we don’t stretch them, or if we are under chronic stress. This is the place to work if you have groin pain. There are two options: in a chair or on the floor. The chair version is good to use if your tension is closer to your hip, and the floor version is good to use if your tension is nearer the knee. You’ll need a chair without arms, such as a folding chair or a bench, because you will sit with one leg on each side of the chair.
Ball: One large 5˝ hollow ball
Body position: Sitting straddled on a chair with one leg bent to one side, the other leg behind you on the other side of the chair. Turn toward the bent leg.
Starting position of the ball: Under the top of your inner thigh on the back leg
Action: Once you have settled in a position that is workable for your hips, begin to make very small movements in any direction, allowing the ball to massage the top of your adductor muscles. Roll forward on your thigh by shifting your hips slightly back, and then roll to the back of the groin as you lean your upper body back and shift your hips forward.
Progression: Move the ball incrementally down your thigh as far as possible.
Repeat on the other leg.
Duration: 5–8 minutes per leg
Contraindications: Inability to sit straddling the chair
Notes: If some spots are too sensitive to work with, pass over them briefly and work on nearby spots.
Anatomy: Gracilis, sartorius, pectineus, adductor brevis, adductor longus, adductor magnus, semitendinosus, semimembranosus
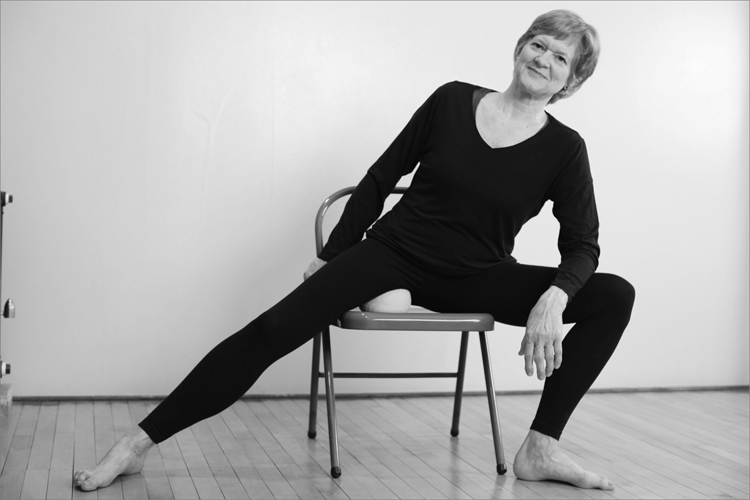
The Inner Thighs in a Chair
6. The Inner Thighs on the Floor
Working on the floor may require a bit more agility than working in a chair. The advantage is that with a comfortable setup, it’s easier to spend more time when you’re on the floor.
Ball: One large 5˝–6˝ ball
Body position: Lying on your side, legs bent, with the following supports: a folded blanket or pad under your side ribs (from waist to armpit) and a higher support under your head to bring it level with the rest of your spine. There is a space between the rib support and head support for your shoulder. Without these supports, lying on your side can compress your shoulder and strain your neck. You’ll also need a block or a folded blanket to put under the ball.
Starting position of the ball: Stack the ball on top of the block, and bring the ball as high on your inner thigh as possible toward the groin. Roll slightly forward to get some weight on the ball. Your foot can rest on the floor.
Action: Try several different movements, which are small enough to keep the ball on the block:
- Glide your leg away from you and back toward you very slowly, letting the ball massage along the direction of the muscle fibers.
- Bend your leg up toward your chest, then down away from your chest.
- Rotate the entire leg, lifting your foot off the floor.
Progression: Move the ball incrementally down your thigh to just above the knee and repeat the same actions.
Repeat on the other leg.
Duration: 5–10 minutes per leg
Contraindications: Extreme tenderness or a tear to an adductor muscle
Notes: You can vary the intensity easily by using a softer or firmer ball. You can also try it with two balls (and a block to support each one), spreading the pressure over a wider area.
Anatomy: Gracilis, sartorius, pectineus, adductor brevis, adductor longus, adductor magnus, semitendinosus, semimembranosus
The Inner Thighs on the Floor
7. The Backs of the Knees
This is one of the gentler ballwork techniques, because the knees bend easily and are not very heavy. It’s a soothing thing to do if you’ve been on your feet all day. The ball gently separates the thigh and the shin bones, opening up the joint space and softening the back of the knee.
Balls: Two firm 5˝ balls
Body position: Lying on your back
Starting position of the balls: Under the center of each knee
Action: First release, breathe, and find your “home base” position. Your legs may naturally want to turn out or turn in; let that happen. Your home base position is where your legs feel stable on the balls.
Progression: Slowly rotate your thighs inward, then back to home base, then outward, and back to home base again. Do this several times, stopping in places that feel like they need more time.
When you have done enough on this first spot, move the balls slightly higher to reach the lower end of the hamstring muscles. Work in the same way here, slowly turning your legs in and out.
Then move the balls slightly below your knees, onto the upper gastrocnemius. Do the same slow rotation here.
Duration: 10 minutes
Contraindications: Sharp pain in the knees
Notes: To create more pressure, place a block on either side of your knee and rest a blanket or sandbag over the knee, supported by the two blocks.
Anatomy: Knee capsule, tendons of hamstrings and gastrocnemius, plantaris and popliteus muscles, indirectly the bursae, menisci, and collateral and cruciate ligaments of the knees
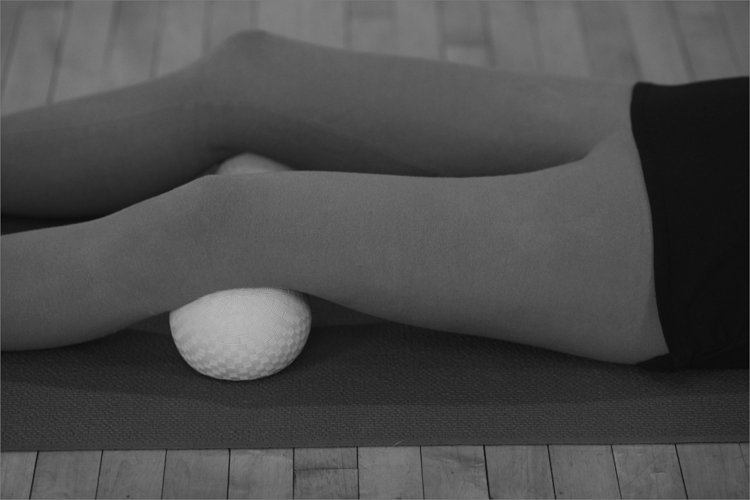
The Backs of the Knees

The Backs of the Knees with Added Weight
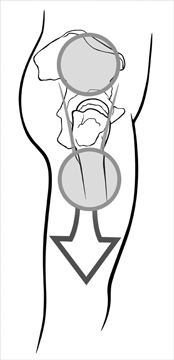
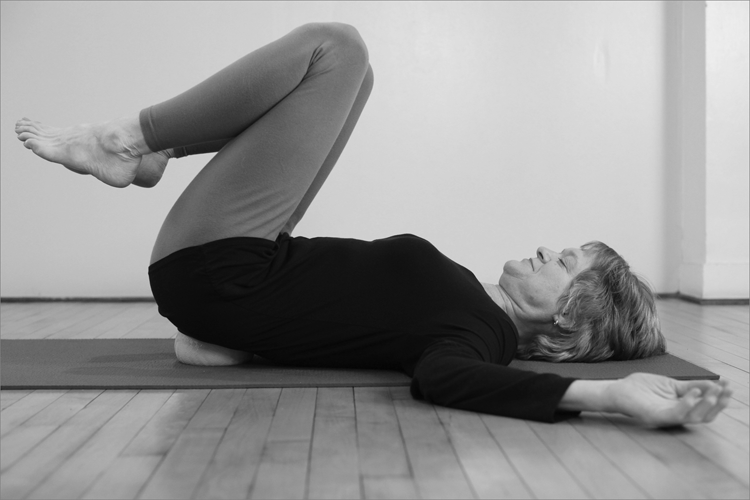
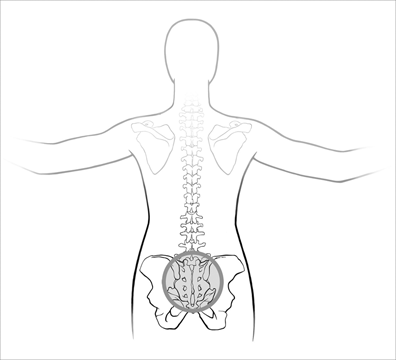
8. The Sacrum
This one is a favorite for people who have a general achiness in the lower back. With a large, soft ball under the sacrum, you get a nice gentle stretch of your lumbar spine. It’s calming after a long day of being on your feet, especially if you can rest your legs on a chair or couch.
Ball: One soft 5˝–6˝ ball
Body position: Lying on your back, legs bent. You can rest your feet on the floor, or lift them up as shown. You can also place your lower legs on a chair or couch.
Starting position of the ball: Under the middle of your sacrum
Action: Give yourself time to settle, and adjust the position of the ball as needed. Then begin to slowly explore small movements of your pelvis in any direction. The ball begins on the bony sacrum, but you can explore the edges of the bone and the surrounding muscles as well.
Progression: You can reach many good spots just by rolling, but you can also reposition the ball from time to time as desired.
Duration: 5–10 minutes
Contraindications: Sharp pain in the sacroiliac joint
Notes: If this technique is painful, start with the Back of the Pelvis technique from chapter 7.
Anatomy: Sacrum bone and associated ligaments
The Sacrum
Ball Placement for the Sacrum
9. The Pelvic Floor
The pelvic floor is a very sensitive area, and one that we don’t usually explore other than for medical or sexual reasons. But pelvic floor disorders are surprisingly common, causing pain and urinary difficulties, and it is worth carefully exploring and revitalizing this area. There are several layers of muscles and fascia that can be tight or weak—or both tight and weak. Using the ball brings resilience to these tissues, and better functioning that can benefit your organ health, your elimination, your lower back, and your posture.
Ball: One soft 3˝, 4˝, or 5˝ ball or the football-shaped ball
Body position: Sitting in a chair or on the floor
Starting position of the ball: Start with a spot that is not too sensitive.
Action: Sit still and breathe a few times to observe the sensations, then make very small pelvic movements in different directions. Use discretion and avoid extremely tender areas. Experiment with squeezing the ball with these muscles, and then releasing them.
Progression: Roll very slowly through the entire pelvic floor, from side to side, one sitting bone to the other, and also from front to back, from your pubic bone to your tailbone.
Duration: 3–5 minutes or more
Contraindications: Extreme sensitivity, recent childbirth or surgery
Notes: The fascia of the pelvic floor is continuous with the abdominal, hip, and lumbar fascia, forming a sling under the upper half of the body. You can combine this technique with ballwork on those areas to help release and invigorate the entire area.
Anatomy: Several layers of pelvic floor muscles, including piriformis, obturator internus, coccygeus, and levator ani
The Pelvic Floor