Chapter 14
The Lower Legs and Feet
As two-legged creatures, we depend on our feet for balance and locomotion. The foot has twenty-six bones and more than a dozen small muscles, but there are also muscles that span the distance between the knee and the sole of the foot that are involved with our every step. Those muscles are encased in fascial compartments, and that fascia can become overly tight, restricting circulation and movement range. The shoes we wear, the way we stand, the way we walk, and certainly the way we exercise—all affect the calves, ankles, and feet more than we might suspect. Inviting more awareness and circulation into your lower legs, ankles and feet can help develop better balance, better alignment of your ankles and feet, and a lighter and easier gait. If you have had an ankle sprain, collapsed arches, or plantar fasciitis, these techniques are very useful in the healing process. Remember to also practice the Soles of the Feet technique from chapter 7 as part of this lower leg and foot series.
1. The Calves
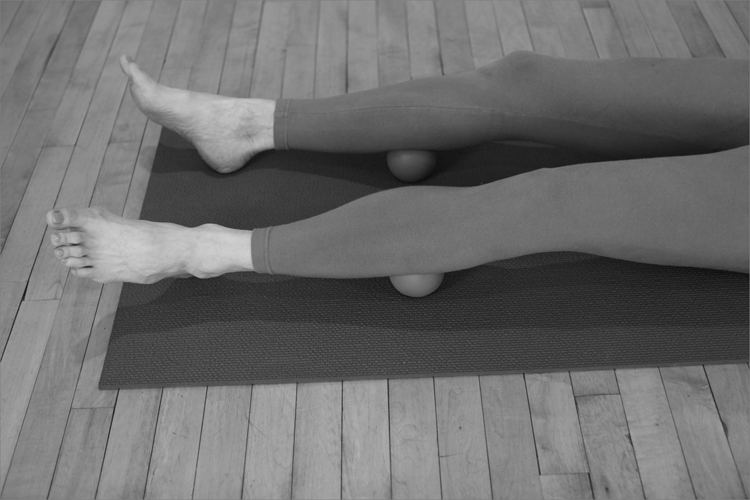
The two large muscles at the back of the calves work hard all day, propelling us forward in walking and running, and especially in jumping. Spasms or cramps in the legs can easily be remedied by regular work with the balls on these muscles. If you engage in sports frequently, drive for long periods of time, or stand at your job, your lower legs need this technique. If you have trouble winding down at the end of the day, this technique can help.
Balls: Two small 2.5˝ solid balls
Body position: Lying on your back
Starting position of the balls: Just below the backs of your knees
Action: Spend a few minutes settling to allow your legs to relax over the balls. Find your “home base” position, which might be with your legs slightly turned out and might be different on each leg. Then begin to slowly turn your legs in toward the midline, back to home base, then out away from the midline, and back to home base again. Do this several times.
Progression: Move the balls a few inches down your calves. Repeat the same slow rotation of the legs, to cross-friction the muscles. Progress incrementally down your calves until you reach your Achilles tendon.
Duration: 10–15 minutes
Contraindications: Recent Achilles tendon tear
Notes: This is a wonderful one to do at the end of your day. Notice the feeling in your feet when you finish. For more pressure, cross one leg over the other.
Anatomy: Gastrocnemius, soleus, deep toe flexors, Achilles tendon, and all fascial layers
The Calves
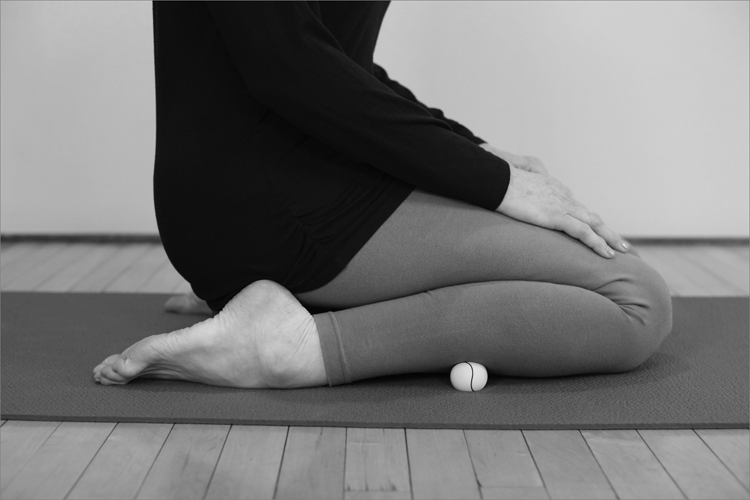
2. The Front Shins
The muscle just to the outer side of the shinbone is the tibialis anterior. Its action is dorsiflexion, which occurs as you reach your heel forward and lift your toes to take a step. When this muscle becomes swollen after exertion (hiking, jumping on a hard surface, driving for long hours), the pain is sharp and deep because the swollen muscle is pressing nerves against the bone. This technique is intense and requires full knee flexion, but it can be done in short stints with intervals of time without the balls. A variation requiring less knee flexion is described below.
Balls: Two or four small 1˝–2˝ hollow or solid balls
Body position: Kneeling on a mat with your feet folded under you or to the side of your hips, possibly with a block under your hips
Starting position of the balls: Near the top of your shinbones, just below the knees. For less intensity, sit on a block and use two balls on each leg to spread the contact area. For more intensity, use one ball on each leg and lean forward onto your arms.
Action: Move very slowly from side to side to cross-friction the muscles and fascia.
Progression: Working on one spot at a time, progress down your legs to just above your ankles. Take a break to stretch your ankles and knees whenever you need it.
Duration: 5–10 minutes
Contraindications: Recent knee or ankle injury
Variations: If the body position pictured here is difficult for you due to knee restrictions, experiment to find variations. For instance, you could stand beside a chair with a mat placed on the seat. Place the ball on the chair seat, and your tibialis anterior on the ball. Hold the chair with your hands, and move slowly over the ball, massaging the outer shin.
Anatomy: Tibialis anterior, extensor hallucis longus, extensor digitorum longus, peroneals, and all fascial layers
The Front Shins

Ball Placement for the Front Shins
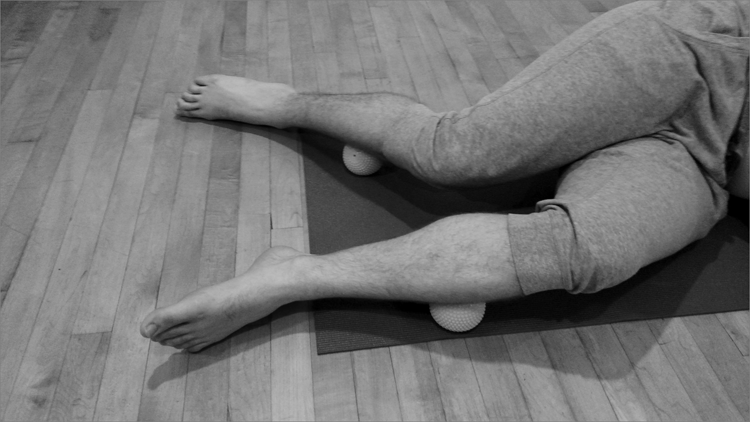
3. The Inner and Outer Calves
The sides of the calves can surprise you with trigger points and dull achiness. Working on this area improves the circulation and movement range in your ankles and feet. There are several variations, allowing you to control the intensity. The outer shin tends to be more dense and tight, but the inner calf can carry tension as well, and may be more sensitive.
Balls: Two balls, hollow or solid, 2˝–4˝, plus one 4˝–5˝ ball
Body position: Lie on your side with appropriate support for your spine. I recommend a folded blanket or small pillow under your side ribs, and a higher support for your neck and head, leaving a space between the two supports for your shoulder. Your legs are in front of you with your knees bent and your legs separated to allow the balls access to the outer calf of the bottom leg and the inner calf of the top leg.
Starting position of the balls: There are several variations; see below.
Action: Move very slowly, exploring both a lengthwise movement of the ball along the muscles, and also a cross-friction action by slightly bending and straightening your knees.
Progression: Move the balls gradually down your calves to just above your ankles.
Duration: 10 minutes
Contraindications: None
Variations of ball placement:
- Place one ball under the outer calf of the bottom leg, the other ball under the inner calf of the top leg, both near the knee. Try both the 2˝ and 4˝ size to determine your preference.
- For more pressure on the outer shin of the bottom leg, stack your legs and possibly place a 4˝ or 5˝ ball between your knees. Place two small balls under your bottom calf. Continue to move in the same way, progressing down your leg. This position will simultaneously create more weight for the bottom leg and some good massage for the inner calf of both legs. Move the balls slowly down your legs in small increments.
- Sit on the floor with one leg bent and one leg straight and to the side. Work with the ball under the outer shin of the bent leg, and lean into it with your hands for more pressure.
Anatomy: Inner gastrocnemius, peroneals, and all fascia layers
The Inner and Outer Calves 1
The Outer Calves 2
The Inner and Outer Calves 2
The Outer Calves 3
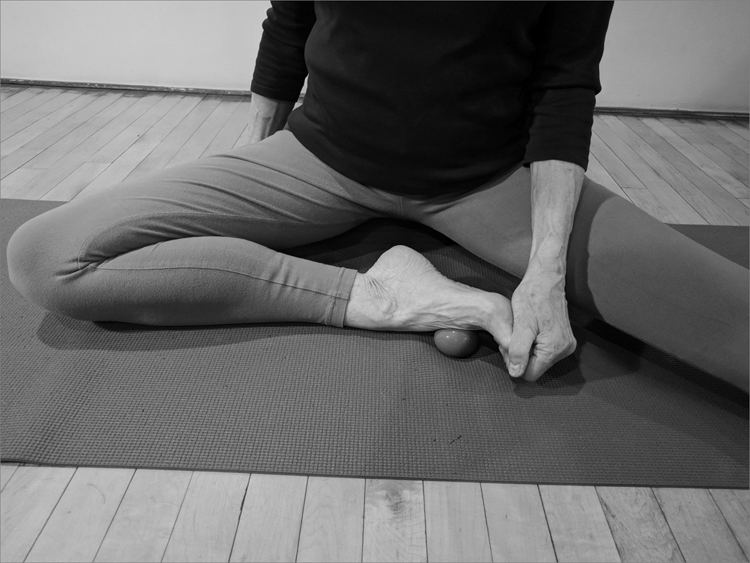
4. The Outer Ankle and Foot
The outer edge of the ankle and foot is our fine-tuning balance support. Try standing on one leg for a few seconds, and watch this area responding to each small weight shift. Tightness here can force excess weight onto the inner edge of the foot, and over time, the arches will weaken. Working here can give us refined awareness and mobility that will greatly improve balance, and it can also heal a sprained ankle, once you can tolerate the pressure.
Johanna, the piano teacher you met earlier, was experiencing cramps in her lower legs and feet during the night when she moved her toes or her ankles. The cramps were worse on her right leg, the one she uses for the pedal under the piano. The cramps also coincided with the beginning of summer, when she started to wear sandals. There were many causative factors but one remedy: She tried this technique and found sensitive trigger points in her outer ankle and shin. After one concentrated session with this technique, the cramps ceased.
Ball: One 2˝–4˝ ball, either hollow or solid
Body position: Sitting on the floor with one leg bent, the other extended to the side. Put some support under your hips if needed.
Starting position of the ball: Under your outer ankle
Action: The movement is a combination of small movements initiated from your foot and ankle, combined with a guiding action with your hands. Also use your hands to give more pressure, and keep your tempo slow and steady. Explore all possible movements.
Progression: Move the ball incrementally along the outer edge of your foot, from around the ankle to the little toe. Work each spot patiently and slowly, adding pressure with your hands as you wish.
Repeat on the other side.
Duration: 5–10 minutes
Contraindications: Hip or knee restrictions that prevent sitting in this position
Notes: For more pressure, try this on the front foot in Pigeon Pose (one leg bent and forward and the other leg extending straight back behind you).
You can combine this technique with working on the top of the foot, as in the next technique. You may want to use a 3˝–4˝ ball on the outer ankle, and continue with a 1˝–2˝ ball on the foot.
Anatomy: Ankle retinaculum (band of connective tissue organizing the tendons of many muscles as they cross the ankle), tarsal and metatarsal bones, attachments of the peroneal muscles, and toe extensors
The Outer Ankle and Foot
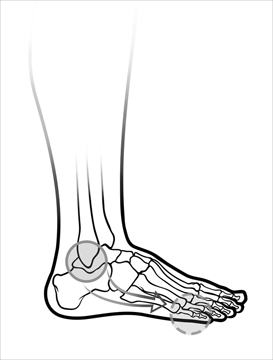
Ball Placement for the Outer Ankle and Foot
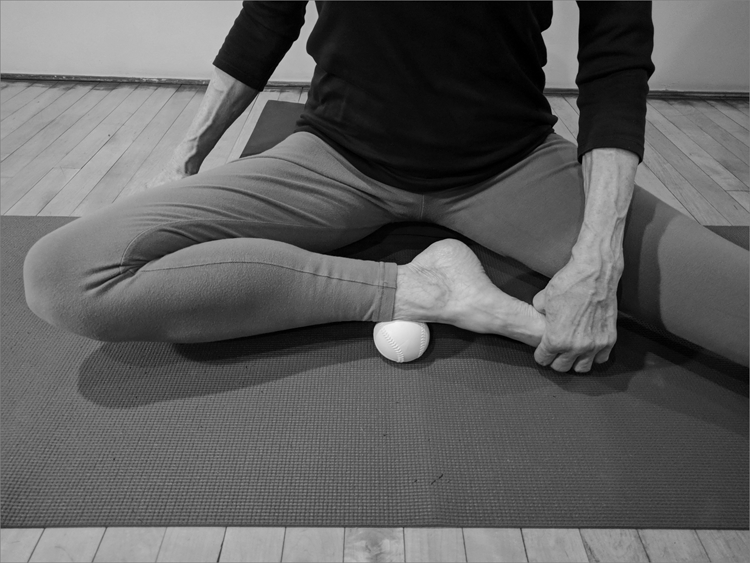
5. The Top of the Foot (Version 1)
There are two ways to access the tops of your feet with the balls. Version 1 is sitting on the floor with support under your hips if needed, and your legs spread wide apart, as in the previous technique. You’ll work on one foot at a time, and you’ll need to get the top of your foot turned toward the floor and the sole of your foot facing upward, which involves rotating your leg. If that is not possible, you can try version 2 below, also for the top of the foot, but with a different sitting position.
You may not think there are any muscles on the tops of your feet—they feel very bony when you touch them—so why would we work there with the balls? In fact, you have muscles between the metatarsal bones that spread your toes, and also the toe extensor muscles, some of which are only in the foot, while others extend all the way up almost to your knees. When these muscles are tight, they can contribute to ankle stiffness, poor walking patterns, and even plantar fasciitis. The plantar fascia is spread across the bottoms of your feet and provides support for your arches and the muscles located there. Plantar fasciitis has many possible causes (poor arch support and weak feet are the most common), and one contributing factor can be chronic tension in the tops of the feet.
Judy, the health researcher you met earlier, has suffered from chronic plantar fasciitis and foot cramps for many years. After I taught her this technique, she had very direct and immediate relief. There was no need for surgery or drugs—just a few minutes on the balls.
Ball: One small 1˝–2˝ ball, hollow or solid
Body position: Sitting on a blanket or two with one knee bent to the side, and the foot directly in front of you with the sole of the foot facing upward. The other leg can be in any comfortable position.
Starting position of the ball: Under the top of the foot of the bent leg
Action: Spend a few minutes adjusting to the seated position. If your bent leg does not rest easily on the floor, lean to that side until it does come down. You can turn the lower leg so that the sole of the foot faces upward.
Progression: Place the ball under your metatarsals—the part of your foot between your toes and your ankle. Press down into your foot with your hand to get the degree of pressure that you like. Then move your foot with your hand very slowly over the ball. You can move to different spots as desired, and do any manipulation of the foot (twisting, for example) that applies a good pressure into the metatarsal area.
Duration: 5 minutes per foot
Contraindications: Recent foot injury, hip or knee problems that prevent sitting on the floor
Anatomy: Toe extensor muscles, dorsal interossei muscles
The Top of the Foot (Version 1)
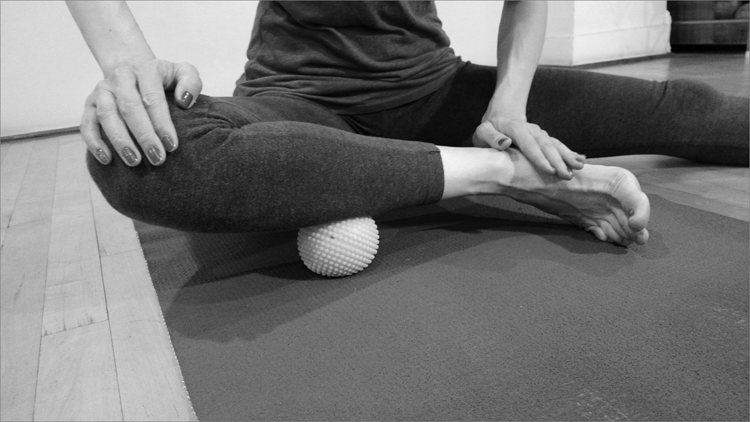
6. The Tops of the Feet (Version 2)
Each step we take involves movement of the many joints in the foot. We instinctively coordinate the ankle, foot, and toes as we roll through the foot in a normal gait. Poor alignment, weak feet, or poor shoes (or all of the above) can derail this daily movement and cause pain and stiffness through the big toe and into the ankle. This technique brings relief and better ankle mobility, and more spring in your arches.
This technique is done in a kneeling position, with your feet and lower legs folded to the sides of your hips as in the yoga pose called Virasana. Sit on one or two blocks for support, and turn the soles of your feet upward, and the tops of your feet down toward the floor. If your knees are unhappy in this position, use version 1 above to work on the tops of the feet. In version 2, you can work with both feet at once, or one foot at a time by bringing the other leg forward in any comfortable position.
Balls: Two hollow 4˝ balls
Body position: Sitting on a block or other support, with one or both knees bent and feet pointing backward beside the hips, with the soles of the feet facing up.
Starting position of the balls: Under the tops of the feet
Action: Spend a few minutes adjusting to the seated position. If your knees are uncomfortable, sit on a higher support. Move your feet slowly over the balls, one at a time, or both feet at once. Use your hands to guide the movements of your feet and to give more pressure if desired.
Progression: Reposition the balls to reach every part of the foot and ankle.
Duration: 5 minutes per foot
Contraindications: Recent foot injury, hip or knee problems that prevent sitting in this position
Anatomy: Tibialis anterior, toe extensor muscles, dorsal interossei muscles, retinaculum, extensor hallucis longus, tarsal and metatarsal bones
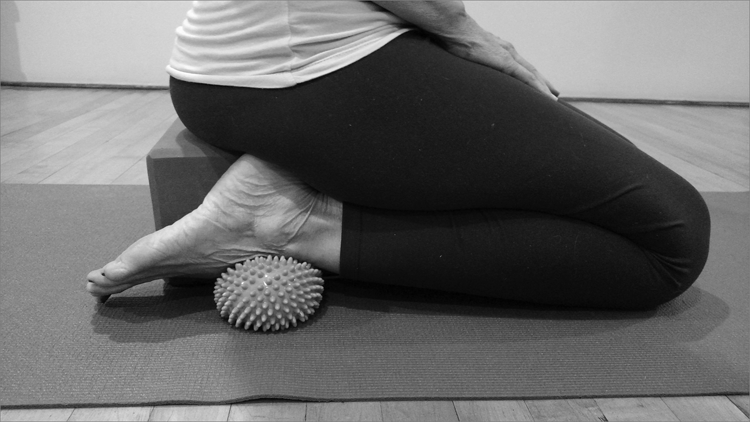
The Tops of the Feet (Version 2)
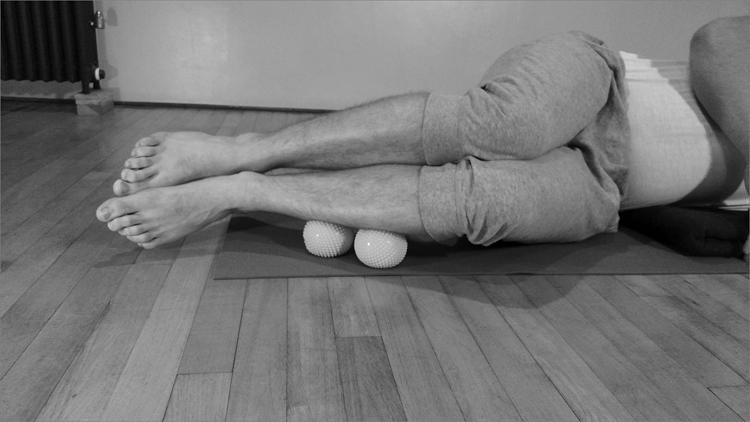
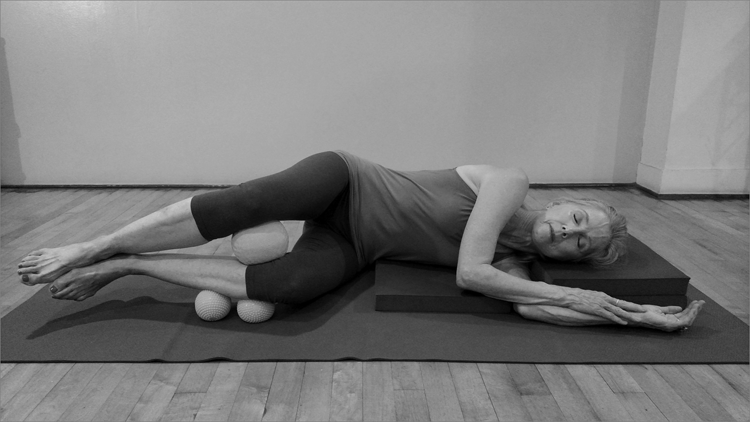
7. The Leg Nutcracker
This one may make you laugh or cry! It’s intense but worth trying, and works on the three hamstrings and the gastrocnemius/soleus muscles all at once. You can picture this action as separating strands of long muscles that have become stuck together. It’s a “fast track” release for the backs of the legs.
Balls: Two 2˝–4˝ balls, hollow or solid
Body position: Sitting on your heels, toes pointed back, with padding under your legs as needed and possibly a block under your hips (the same position as in the previous technique). Lean forward onto your hands.
Starting position of the balls: Behind the knees, as far up as you can fit them
Action: At first, give yourself time to adjust to the pressure and choose whether to lean forward (gentler) or sit more upright (more intense). Then move your legs and hips very slowly from side to side, cross-frictioning the muscles.
Progression: One spot at a time, move the balls down your legs until you reach your ankles. In each spot, move your legs very slowly from side to side.
Duration: 5–10 minutes
Contraindications: Inability to sit in this position
Notes: Be sure to sit in the same position without the balls before you put the balls in, and after you take them out. The difference may surprise you!
Anatomy: Hamstrings, gastrocnemius, soleus, deep toe flexors
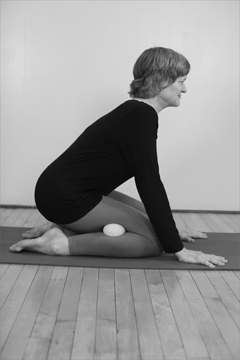
The Leg Nutcracker