
We covered a lot of ground, and you’re almost finished with this book. We’ll miss you, but before we let you go, we wouldn’t feel right about sending you out into JavaLand without a little more preparation. We can’t possibly fit everything you’ll need to know into this relatively small appendix. Actually, we did originally include everything you need to know about Java (not already covered by the other chapters), by reducing the type point size to .00003. It all fit, but nobody could read it. So, we threw most of it away, but kept the best bits for this Top Ten appendix.
This really is the end of the book. Except for the index (a must-read!).
We’ve talked about the fact that there are 8 bits in a byte, 16 bits in a short, and so on. You might have occasion to turn individual bits on or off. For instance you might find yourself writing code for your new Java enabled toaster, and realize that due to severe memory limitations, certain toaster settings are controlled at the bit level. For easier reading, we’re showing only the last 8 bits in the comments rather than the full 32 for an int).
Bitwise NOT Operator: ~
This operator ‘flips all the bits’ of a primitive.
int x = 10;   //     bits are 00001010

x = ~x;        // bits are now 11110101
The next three operators compare two primitives on a bit by bit basis, and return a result based on comparing these bits. We’ll use the following example for the next three operators:
int x = 10;      // bits are 00001010

int y =  6;      // bits are 00000110
Bitwise AND Operator: &
This operator returns a value whose bits are turned on only if both original bits are turned on:
int a = x & y; // bits are 00000010Bitwise OR Operator: |
This operator returns a value whose bits are turned on only if either of the original bits are turned on:
int a = x | y; // bits are 00001110Bitwise XOR (exclusive OR) Operator: ^
This operator returns a value whose bits are turned on only if exactly one of the original bits are turned on:
int a = x ^ y; // bits are 00001100The Shift Operators
These operators take a single integer primitive and shift (or slide) all of its bits in one direction or another. If you want to dust off your binary math skills, you might realize that shifting bits left effectively multiplies a number by a power of two, and shifting bits right effectively divides a number by a power of two.
We’ll use the following example for the next three operators:
int x = -11; // bits are 11110101Ok, ok, we’ve been putting it off, here is the world’s shortest explanation of storing negative numbers, and two’s complement. Remember, the leftmost bit of an integer number is called the sign bit. A negative integer number in Java always has its sign bit turned on (i.e. set to 1). A positive integer number always has its sign bit turned off (0). Java uses the two’s complement formula to store negative numbers. To change a number’s sign using two’s complement, flip all the bits, then add 1 (with a byte, for example, that would mean adding 00000001 to the flipped value).
Right Shift Operator: >>
This operator shifts all of a number’s bits right by a certain number, and fills all of the bits on the left side with whatever the original leftmost bit was. The sign bit does not change:
int y = x >> 2; // bits are 11111101Unsigned Right Shift Operator: >>>
Just like the right shift operator BUT it ALWAYS fills the leftmost bits with zeros. The sign bit might change:
int y = x >>> 2; // bits are 00111101Left Shift Operator: <<
Just like the unsigned right shift operator, but in the other direction; the rightmost bits are filled with zeros. The sign bit might change.
int y = x << 2; // bits are 11010100When your Java programs start to get big, you’ll inevitably end up with lots and lots of String objects. For security purposes, and for the sake of conserving memory (remember your Java programs can run on teeny Java-enabled cell phones), Strings in Java are immutable. What this means is that when you say:
String s = "0";

for (int x = 1; x < 10; x++) {
  s = s + x;
}
What’s actually happening is that you’re creating ten String objects (with values “0”, “01”, “012”, through “0123456789”). In the end s is referring to the String with the value “0123456789”, but at this point there are ten Strings in existence!
Whenever you make a new String, the JVM puts it into a special part of memory called the ‘String Pool’ (sounds refreshing doesn’t it?). If there is already a String in the String Pool with the same value, the JVM doesn’t create a duplicate, it simply refers your reference variable to the existing entry. The JVM can get away with this because Strings are immutable; one reference variable can’t change a String’s value out from under another reference variable referring to the same String.
The other issue with the String pool is that the Garbage Collector doesn’t go there. So in our example, unless by coincidence you later happen to make a String called “01234”, for instance, the first nine Strings created in our for loop will just sit around wasting memory.
How does this save memory?
Well, if you’re not careful, it doesn’t! But if you understand how String immutability works, than you can sometimes take advantage of it to save memory. If you have to do a lot of String manipulations (like concatenations, etc.), however, there is another class StringBuilder, better suited for that purpose. We’ll talk more about StringBuilder in a few pages.
In the Math chapter we talked about the two main uses of the wrapper classes:
Wrapping a primitive so it can pretend to be an object.
Using the static utility methods (for example, Integer.parseInt()).
It’s important to remember that when you create a wrapper object like:
Integer iWrap = new Integer(42);That’s it for that wrapper object. Its value will always be 42. There is no setter method for a wrapper object. You can, of course, refer iWrap to a different wrapper object, but then you’ll have two objects. Once you create a wrapper object, there’s no way to change the value of that object!
We haven’t talked much about how to debug your Java program while you’re developing it. We believe that you should learn Java at the command line, as we’ve been doing throughout the book. Once you’re a Java pro, if you decide to use an IDE[14], you might have other debugging tools to use. In the old days, when a Java programmer wanted to debug her code, she’d stick a bunch of System.out.println( ) statements throughout the program, printing current variable values, and “I got here” messages, to see if the flow control was working properly. (The ready-bake code in Chapter 6 left some debugging ‘print’ statements in the code.) Then, once the program was working correctly, she’d go through and take all those System. out.println( ) statements back out again. It was tedious and error prone. But as of Java 1.4 (and 5.0), debugging got a whole lot easier. The answer?
Assertions
Assertions are like System.out.println( ) statements on steroids. Add them to your code as you would add println statements. The Java 5.0 compiler assumes you’ll be compiling source files that are 5.0 compatible, so as of Java 5.0, compiling with assertions is enabled by default.
At runtime, if you do nothing, the assert statements you added to your code will be ignored by the JVM, and won’t slow down your program. But if you tell the JVM to enable your assertions, they will help you do your debugging, without changing a line of code!
Some folks have complained about having to leave assert statements in their production code, but leaving them in can be really valuable when your code is already deployed in the field. If your client is having trouble, you can instruct the client to run the program with assertions enabled, and have the client send you the output. If the assertions were stripped out of your deployed code, you’d never have that option. And there is almost no downside; when assertions are not enabled, they are completely ignored by the JVM, so there’s no performance hit to worry about.
How to make Assertions work
Add assertion statements to your code wherever you believe that something must be true. For instance:
assert (height > 0);

// if true, program continues normally
// if false, throw an AssertionError
You can add a little more information to the stack trace by saying:
assert (height > 0) : "height = " +
height + " weight = " + weight;
The expression after the colon can be any legal Java expression that resolves to a non-null value. But whatever you do, don’t create assertions that change an object’s state! If you do, enabling assertions at runtime might change how your program performs.
Compiling and running with Assertions
To compile with assertions:
javac TestDriveGame.java
(Notice that no command line options were necessary.)
To run with assertions:
java -ea TestDriveGame
In Chapter 9, we talked about how local variables live only as long as the method in which they’re declared stays on the stack. But some variables can have even shorter lifespans. Inside of methods, we often create blocks of code. We’ve been doing this all along, but we haven’t explicitly talked in terms of blocks. Typically, blocks of code occur within methods, and are bounded by curly braces { }. Some common examples of code blocks that you’ll recognize include loops (for, while) and conditional expressions (like if statements).
Let’s look at an example:
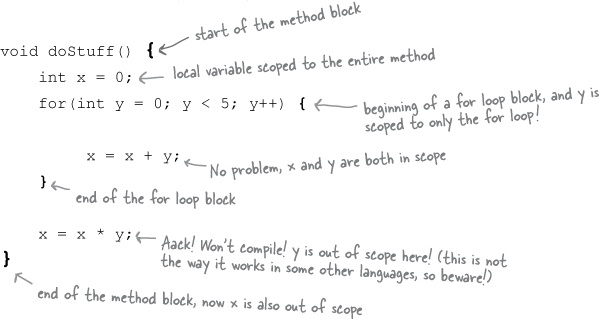
In the previous example, y was a block variable, declared inside a block, and y went out of scope as soon as the for loop ended. Your Java programs will be more debuggable and expandable if you use local variables instead of instance variables, and block variables instead of local variables, whenever possible. The compiler will make sure that you don’t try to use a variable that’s gone out of scope, so you don’t have to worry about runtime meltdowns.
While you did see a little of this in this book, we tried to keep our syntax as clean and readable as possible. There are, however, many legal shortcuts in Java, that you’ll no doubt be exposed to, especially if you have to read a lot code you didn’t write. One of the more common constructs you will encounter is known as linked invocations. For example:
 StringBuffer sb = new StringBuffer("spring");

 sb = sb.delete(3,6).insert(2,"umme").deleteCharAt(1);

 System.out.println("sb = " + sb);

// result is sb = summer
What in the world is happening in the second line of code? Admittedly, this is a contrived example, but you need to learn how to decipher these.
1 - Work from left to right.
2 - Find the result of the leftmost method call, in this case sb.delete(3,6). If you look up StringBuffer in the API docs, you’ll see that the delete() method returns a StringBuffer object. The result of running the delete() method is a StringBuffer object with the value “spr”.
3 - The next leftmost method (insert())is called on the newly created StringBuffer object “spr”. The result of that method call (the insert() method), is also a StringBuffer object (although it doesn’t have to be the same type as the previous method return), and so it goes, the returned object is used to call the next method to the right. In theory, you can link as many methods as you want in a single statement (although it’s rare to see more than three linked methods in a single statement). Without linking, the second line of code from above would be more readable, and look something like this:
sb = sb.delete(3,6);
sb = sb.insert(2,"umme");
sb = sb.deleteCharAt(1);
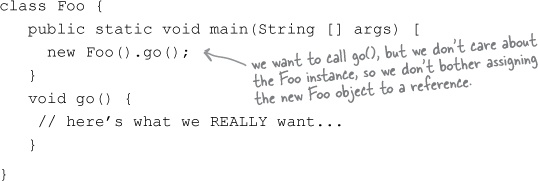
But here’s a more common, and useful example, that you saw us using, but we thought we’d point it out again here. This is for when your main() method needs to invoke an instance method of the main class, but you don’t need to keep a reference to the instance of the class. In other words, the main() needs to create the instance only so that main() can invoke one of the instance’s methods.
Nested classes come in many flavors
In the GUI event-handling section of the book, we started using inner (nested) classes as a solution for implementing listener interfaces. That’s the most common, practical, and readable form of an inner class—where the class is simply nested within the curly braces of another enclosing class. And remember, it means you need an instance of the outer class in order to get an instance of the inner class, because the inner class is a member of the outer/enclosing class.
But there are other kinds of inner classes including static and anonymous. We’re not going into the details here, but we don’t want you to be thrown by strange syntax when you see it in someone’s code. Because out of virtually anything you can do with the Java language, perhaps nothing produces more bizarre-looking code than anonymous inner classes. But we’ll start with something simpler—static nested classes.
Static nested classes
You already know what static means—something tied to the class, not a particular instance. A static nested class looks just like the non-static classes we used for event listeners, except they’re marked with the keyword static.
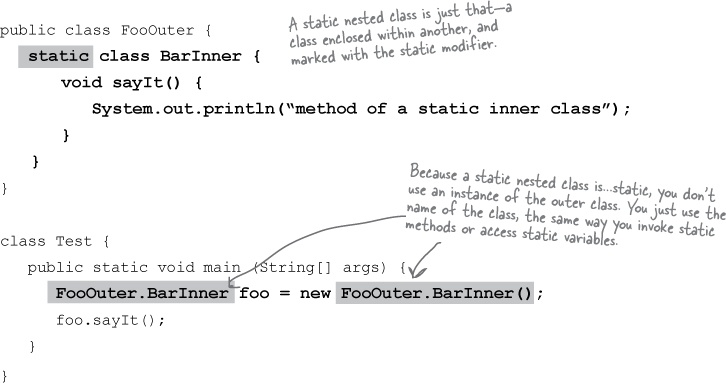
Static nested classes are more like regular non-nested classes in that they don’t enjoy a special relationship with an enclosing outer object. But because static nested classes are still considered a member of the enclosing/outer class, they still get access to any private members of the outer class... but only the ones that are also static. Since the static nested class isn’t connected to an instance of the outer class, it doesn’t have any special way to access the non-static (instance) variables and methods.
The difference between nested and inner
Any Java class that’s defined within the scope of another class is known as a nested class. It doesn’t matter if it’s anonymous, static, normal, whatever. If it’s inside another class, it’s technically considered a nested class. But non-static nested classes are often referred to as inner classes, which is what we called them earlier in the book. The bottom line: all inner classes are nested classes, but not all nested classes are inner classes.
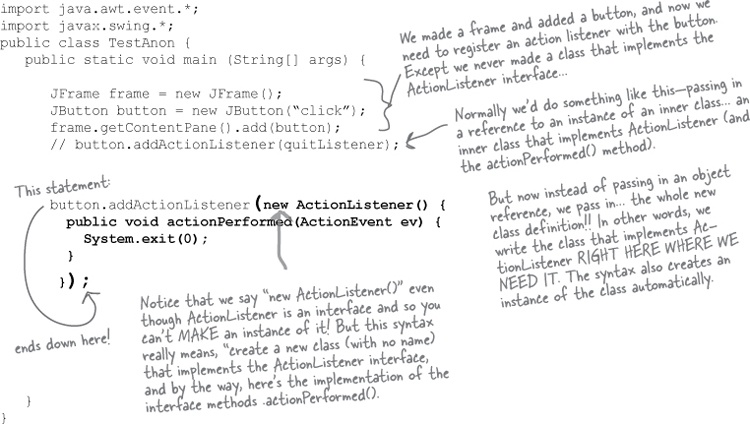
Anonymous inner classes
Imagine you’re writing some GUI code, and suddenly realize that you need an instance of a class that implements ActionListener. But you realize you don’t have an instance of an ActionListener. Then you realize that you also never wrote a class for that listener. You have two choices at that point:
1) Write an inner class in your code, the way we did in our GUI code, and then instantiate it and pass that instance into the button’s event registration (addActionListener()) method.
OR
2) Create an anonymous inner class and instantiate it, right there, just-in-time. Literally right where you are at the point you need the listener object. That’s right, you create the class and the instance in the place where you’d normally be supplying just the instance. Think about that for a moment—it means you pass the entire class where you’d normally pass only an instance into a method argument!
Java has four access levels and three access modifiers. There are only three modifiers because the default (what you get when you don’t use any access modifier) is one of the four access levels.
Access Levels (in order of how restrictive they are, from least to most restrictive)
Access modifiers
public
protected
private
Most of the time you’ll use only public and private access levels.
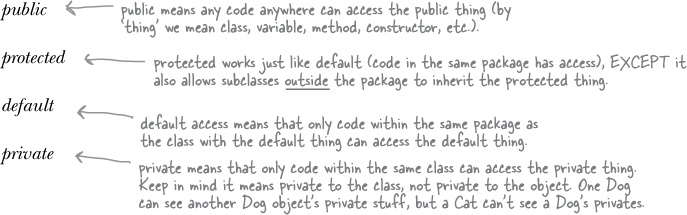
public
Use public for classes, constants (static final variables), and methods that you’re exposing to other code (for example getters and setters) and most constructors.
private
Use private for virtually all instance variables, and for methods that you don’t want outside code to call (in other words, methods used by the public methods of your class).
But although you might not use the other two (protected and default), you still need to know what they do because you’ll see them in other code.
default
Both protected and default access levels are tied to packages. Default access is simple—it means that only code within the same package can access code with default access. So a default class, for example (which means a class that isn’t explicitly declared as public) can be accessed by only classes within the same package as the default class.
But what does it really mean to access a class? Code that does not have access to a class is not allowed to even think about the class. And by think, we mean use the class in code. For example, if you don’t have access to a class, because of access restriction, you aren’t allowed to instantiate the class or even declare it as a type for a variable, argument, or return value. You simply can’t type it into your code at all! If you do, the compiler will complain.
Think about the implications—a default class with public methods means the public methods aren’t really public at all. You can’t access a method if you can’t see the class.
Why would anyone want to restrict access to code within the same package? Typically, packages are designed as a group of classes that work together as a related set. So it might make sense that classes within the same package need to access one another’s code, while as a package, only a small number of classes and methods are exposed to the outside world (i.e. code outside that package).
OK, that’s default. It’s simple—if something has default access (which, remember, means no explicit access modifier!), only code within the same package as the default thing (class, variable, method, inner class) can access that thing.
Then what’s protected for?
protected
Protected access is almost identical to default access, with one exception: it allows subclasses to inherit the protected thing, even if those subclasses are outside the package of the superclass they extend. That’s it. That’s all protected buys you—the ability to let your subclasses be outside your superclass package, yet still inherit pieces of the class, including methods and constructors.
Many developers find very little reason to use protected, but it is used in some designs, and some day you might find it to be exactly what you need. One of the interesting things about protected is that—unlike the other access levels—protected access applies only to inheritance. If a subclass-outside-the-package has a reference to an instance of the superclass (the superclass that has, say, a protected method), the subclass can’t access the protected method using that superclass reference! The only way the subclass can access that method is by inheriting it. In other words, the subclass-outside-the-package doesn’t have access to the protected method, it just has the method, through inheritance.
Two of the most commonly used classes in the Java API are String and StringBuffer (remember from #9 a few pages back, Strings are immutable, so a StringBuffer/StringBuilder can be a lot more efficient if you’re manipulating a String). As of Java 5.0 you should use the StringBuilder class instead of StringBuffer, unless your String manipulations need to be thread-safe, which is not common. Here’s a brief overview of the key methods in these classes:
Both String and StringBuffer/StringBuilder classes have:
char charAt(int index); | // what char is at a certain position |
int length(); | // how long is this |
String substring(int start, int end); | // get a part of this |
String toString(); | // what’s the String value of this |
To concatenate Strings:
String concat(string); | // for the String class |
String append(String); | // for StringBuffer & StringBuilder |
The String class has:
String replace(char old, char new); | // replace all occurences of a char |
String substring(int begin, int end); | // get a portion of a String |
char [] toCharArray(); | // convert to an array of chars |
String toLowerCase(); | // convert all characters to lower case |
String toUpperCase(); | // convert all characters to upper case |
String trim(); | // remove whitespace from the ends |
String valueOf(char []) | // make a String out of a char array |
String valueOf(int i) | // make a String out of a primitive // other primitives are supported as well |
The StringBuffer & StringBuilder classes have:
StringBxxxx delete(int start, int end); | // delete a portion |
StringBxxxx insert(int offset, any primitive or a char []); | // insert something |
StringBxxxx replace(int start, int end, String s); | // replace this part with this String |
StringBxxxx reverse(); | // reverse the SB from front to back |
void setCharAt(int index, char ch); | // replace a given character |
Note: StringBxxxx refers to either StringBuffer or StringBuilder, as appropriate.
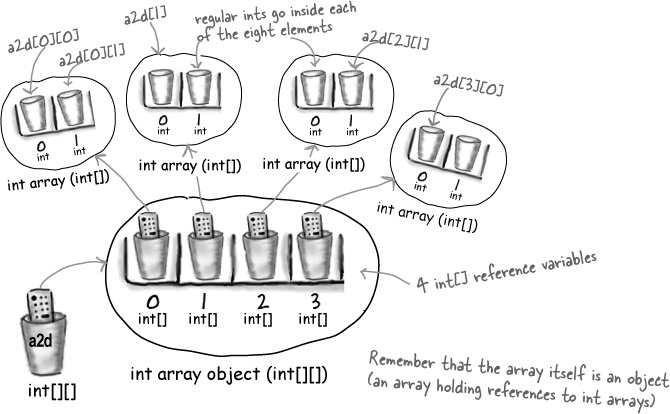
In most languages, if you create, say, a 4 x 2 two-dimensional array, you would visualize a rectangle, 4 elements by 2 elements, with a total of 8 elements. But in Java, such an array would actually be 5 arrays linked together! In Java, a two dimensional array is simply an array of arrays. (A three dimensional array is an array of arrays of arrays, but we’ll leave that for you to play with.) Here’s how it works
int[][] a2d = new int [4][2];
The JVM creates an array with 4 elements. Each of these four elements is actually a reference variable referring to a (newly created), int array with 2 elements.
Working with multidimensional arrays
To access the second element in the third array:
int x = a2d[2][1]; // remember, 0 based!To make a one-dimensional reference to one of the sub-arrays:
int[] copy = a2d[1];Short-cut initialization of a 2 x 3 array:
int[][] x = { { 2,3,4 }, { 7,8,9 } };To make a 2d array with irregular dimensions:
int[][] y = new int [2][];     // makes only the first array, with a length of 2
y[0] = new int [3];    // makes the first sub-array 3 elements in length
y[1] = new int [5];    // makes the second sub-array 5 elements in length
We’ve talked about constants that are defined in the API, for instance, JFrame.EXIT_ON_CLOSE. You can also create your own constants by marking a variable static final. But sometimes you’ll want to create a set of constant values to represent the only valid values for a variable. This set of valid values is commonly referred to as an enumeration. Before Java 5.0 you could only do a half-baked job of creating an enumeration in Java. As of Java 5.0 you can create full fledged enumerations that will be the envy of all your pre-Java 5.0-using friends.
Who’s in the band?
Let’s say that you’re creating a website for your favorite band, and you want to make sure that all of the comments are directed to a particular band member.
The old way to fake an “enum”:

The good news about this technique is that it DOES make the code easier to read. The other good news is that you can’t ever change the value of the fake enums you’ve created; JERRY will always be 1. The bad news is that there’s no easy or good way to make sure that the value of selectedBandMember will always be 1, 2, or 3. If some hard to find piece of code sets selectedBandMember equal to 812, it’s pretty likely your code will break...
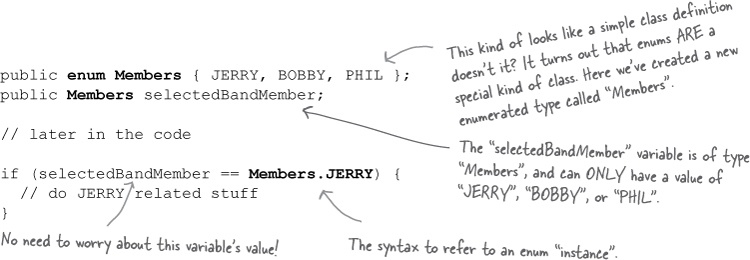
The same situation using a genuine Java 5.0 enum. While this is a very basic enumeration, most enumerations usually are this simple.
A new, official “enum”:
Your enum extends java.lang.Enum
When you create an enum, you’re creating a new class, and you’re implicitly extending java.lang.Enum. You can declare an enum as its own standalone class, in its own source file, or as a member of another class.
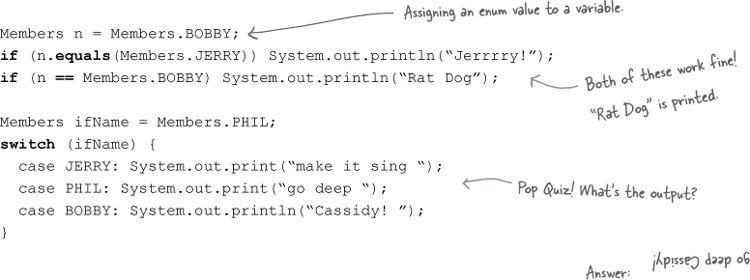
Using “if” and “switch” with Enums
Using the enum we just created, we can perform branches in our code using either the if or switch statement. Also notice that we can compare enum instances using either == or the .equals() method. Usually == is considered better style.
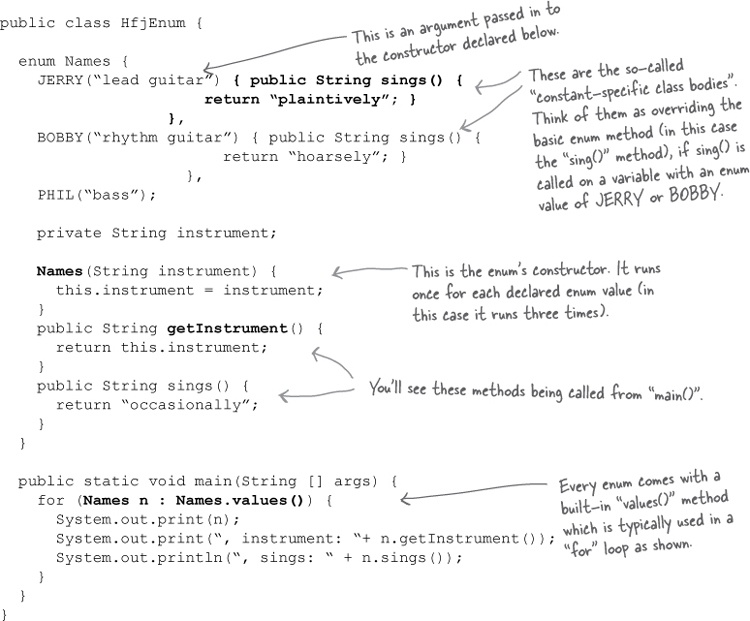
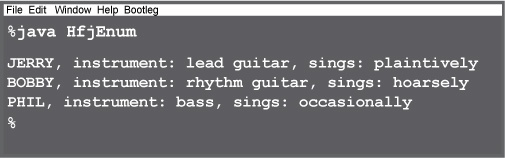
A really tricked-out version of a similar enum
You can add a bunch of things to your enum like a constructor, methods, variables, and something called a constant-specific class body. They’re not common, but you might run into them:
Five-Minute Mystery

Captain Byte of the Flatland starship “Traverser” had received an urgent, Top Secret transmission from headquarters. The message contained 30 heavily encrypted navigational codes that the Traverser would need to successfully plot a course home through enemy sectors. The enemy Hackarians, from a neighboring galaxy, had devised a devilish code-scrambling ray that was capable of creating bogus objects on the heap of the Traverser’s only navigational computer. In addition, the alien ray could alter valid reference variables so that they referred to these bogus objects. The only defense the Traverser crew had against this evil Hackarian ray was to run an inline virus checker which could be imbedded into the Traverser’s state of the art Java 6 code.
Captain Byte gave Ensign Smith the following programming instructions to process the critical navigational codes:
“Put the first five codes in an array of type ParsecKey. Put the last 25 codes in a five by five, two dimensional array of type QuadrantKey. Pass these two arrays into the plotCourse() method of the public final class ShipNavigation. Once the course object is returned run the inline virus checker against all the programs reference variables and then run the NavSim program and bring me the results.”
A few minutes later Ensign Smith returned with the NavSim output. “NavSim output ready for review, sir”, declared Ensign Smith. “Fine”, replied the Captain, “Please review your work”. “Yes sir!”, responded the Ensign, “First I declared and constructed an array of type ParsecKey with the following code; ParsecKey [] p = new ParsecKey[5];, next I declared and constructed an array of type QuadrantKey with the following code: QuadrantKey [] [] q = new QuadrantKey [5] [5]; . Next, I loaded the first 5 codes into the ParsecKey array using a ‘for’ loop, and then I loaded the last 25 codes into the QuadrantKey array using nested ‘for’ loops. Next, I ran the virus checker against all 32 reference variables, 1 for the ParsecKey array, and 5 for its elements, 1 for the QuadrantKey array, and 25 for its elements. Once the virus check returned with no viruses detected, I ran the NavSim program and re-ran the virus checker, just to be safe... Sir ! “
Captain Byte gave the Ensign a cool, long stare and said calmly, “Ensign, you are confined to quarters for endangering the safety of this ship, I don’t want to see your face on this bridge again until you have properly learned your Java! Lieutenant Boolean, take over for the Ensign and do this job correctly!”
Why did the captain confine the Ensign to his quarters?
Five-Minute Mystery Solution
A Long Trip Home
Captain Byte knew that in Java, multidimensional arrays are actually arrays of arrays. The five by five QuadrantKey array ‘q’, would actually need a total of 31 reference variables to be able to access all of its components:
1 - reference variable for ‘q’
5 - reference variables for q[0] - q[4]
25 - reference variables for q[0][0] - q[4][4]
The ensign had forgotten the reference variables for the five one dimensional arrays embedded in the ‘q’ array. Any of those five reference variables could have been corrupted by the Hackarian ray, and the ensign’s test would never reveal the problem.
[14] IDE stands for Integrated Development Environment and includes tools such as Eclipse, Borland’s JBuilder, or the open source NetBeans (netbeans.org).