
Doubleweave pick-up is a hand-manipulated technique that allows the creativity of the weaver to shine through. Any design that can be drawn on graph paper can be woven using this method. The process is a slow one, but with a stick, some time, and a good dose of patience, you can create what would otherwise require a drawloom or Jacquard loom, with the same design in reversed colors on the other side.
In a typical bottom-layer shed, the top layer is raised while simultaneously lifting one shaft from the bottom layer. In doubleweave pick-up, only selected threads are raised with a pick-up stick, while weaving the shed for the other layer. Then the process is reversed to fill in the opposite set of threads. You pick up the dark threads when weaving with the light weft, and pick up the light threads when weaving with the dark weft. There are no floats in this structure, so the design areas can be any size that you want.
In this introduction to doubleweave pick-up, you’ll work from a graphed design and follow a specific series of steps on the sampler using the design in FIGURE 1. This is a good design for learning the technique because the lines are all straight and don’t frequently change. Once you become comfortable with the weaving process, you can create more complex designs of your own.

FIGURE 1: A simple graphed pattern for doubleweave pick-up.
This is the last section of the sampler from the previous chapter, and is already sett at 32 ends per inch, with four threads sleyed per dent in an eight-dent reed. Use graph paper that has a scale of eight squares to 1 inch (2.5 cm), which corresponds exactly to the warp spacing in the reed. Each square of the graph paper represents a pair of warp threads for each layer, or one dent in the reed, as well as a pair of weft picks for each layer. There are four steps in the weaving sequence, which take both weft threads across to the right and back again to the left, to complete the plain-weave sequence in each layer. When you’ve woven the four steps, you’ve completed one row of the graphed design.
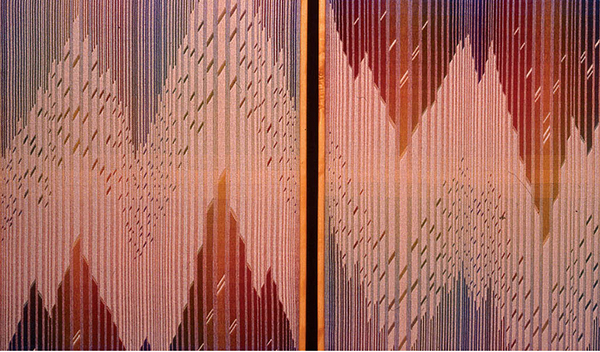
CHROMATIC FANTASY; two panels 3 x 4 feet (0.9 x 1.2 m) with tan solid layer

CHROMATIC FANTASY; five panels 3 x 4 feet (0.9 x 1.2 m) with black solid layer
Use both the light and dark wefts and start both shuttles from the left. You may choose to interlock the weft threads at the selvedges or not. Try both ways to see which one gives you better results, and then use it consistently.
Begin reading the graphed design from the bottom. For any row that has no dark squares, simply weave a unit of two separate layers with light on top:
Likewise, if you have any rows with all dark squares, you can simply weave a unit of two separate layers with dark on top:
Now let’s go through the steps for weaving with pick-up in detail.
1. Lift shafts 34 (right center treadle).
Using a pick-up stick or double-pointed knitting needle, pick up a pair of dark threads for every dark square in the row of the graphed design (FIGURE 2). It can be helpful to hold your left hand underneath the lifted layer while manipulating the pick-up stick with your right hand.

FIGURE 2: Pick up dark threads for dark squares in the graph.
Look at your pick-up against the reed to make sure that all the pairs are complete.
Lower shafts 34.
Lift shaft 1.
Push the pick-up stick back to the reed. The warp threads may tend to stick together and not want to separate cleanly into a shed. Pull the beater forward to the cloth and then back again, and the shed will tend to clear. You can also insert another stick through the shed to clear it, and even flip the stick on edge to hold the shed open while weaving.
Look at the shed from the side. Are the dark threads that are not on the pick-up stick creeping up into the shed? The dark threads that have been picked up may be trying to bring their friends along for the ride. But you do not want to weave under these threads. Pass the shuttle holding the light weft through the shed, laying it in at a generous angle, and watch closely as you go (FIGURE 3). The shuttle should be going through the light shed and underneath the dark threads that are held up by the pick-up stick. You should not see any dark threads above the weft other than those that are on the pick-up stick (FIGURE 4). Pull out the pick-up stick and beat firmly. Notice that the light layer is plain weave in the top layer, except for where you picked up the dark threads (FIGURE 5).

FIGURE 3: Pass the weft through the light shed as well as under the picked-up dark threads.

FIGURE 4: Leave a generous angle with your weft thread, and be sure there are no dark threads on top of it, except for those on your pick-up stick.

FIGURE 5: The light layer is plain weave except for where there were dark threads picked up.
2. Lift shafts 12 (left center treadle).
Pick up a pair of light threads for every white square in the same row of the graphed design (FIGURE 6). This is probably the part of the process that causes the most confusion. The areas that you’re picking up here are opposite the areas that you picked up in the previous step. Another way to think about it is that you’re picking down the areas that you picked up in the previous step—or that you’re picking up the light threads in the same places that the light weft is showing on top in the previous row. The most common mistake that I see (and make) is to pick up the light threads in the same places that the dark threads were picked up in the previous row. Again, make sure that you’ve picked up all complete pairs by checking your pick-up against the reed (FIGURE 7).
Lower shafts 12.
Lift shaft 3.

FIGURE 6: Lift shafts 1 and 2, and pick up a pair of light threads for every white square in the graphed design. The white threads that are picked up here are exactly the opposite of the threads that were picked up in the previous step.
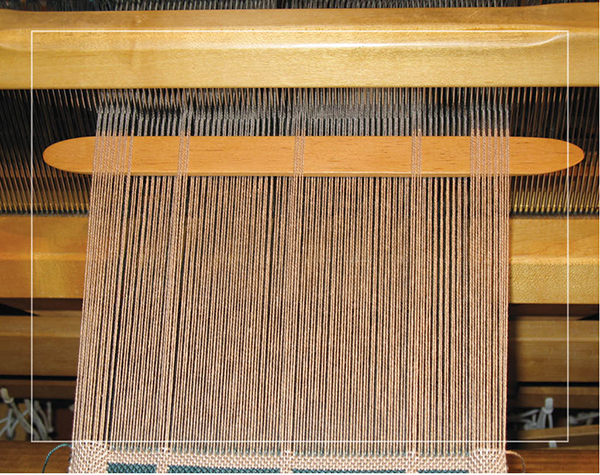
FIGURE 7: Push the pick-up stick back to the reed so you can easily see whether you’ve picked up complete pairs.
Push the pick-up stick back to the reed. Weave with the dark weft, placing the weft at a generous angle (FIGURE 8). Remove the pick-up stick and beat firmly. Notice that the dark layer has filled in with plain weave in exactly the places left blank in the previous step (FIGURE 9). This is what you want to see after every pair of steps—a complete row of plain weave filled in with areas of the light layer and areas of the dark layer. You shouldn’t see any mixture of light and dark threads weaving together.
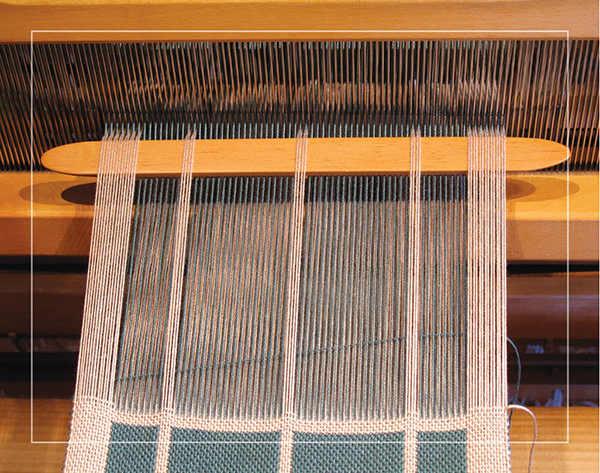
FIGURE 8: Weave with the dark weft, being sure to place the weft at a generous angle before beating.

FIGURE 9: The dark weft fills in with plain weave the places that were left blank after weaving the light weft.
3. Duplicate step 1, except that after creating the pick-up, weave with shaft 2 lifted instead of shaft 1: lift shafts 34 (right center treadle).
Pick up a pair of dark threads for every dark square in the same row of the graphed design (these will be the same threads that you picked up in step 1). Notice that it’s plain to see where these threads are because they were already picked up in step 1, but it’s still easy to be off by one thread, particularly at the edge of a design area. Double check—there’s no substitute for counting!
Lower shafts 34.
Lift shaft 2.
Push the pick-up stick back to the reed. Then weave with light weft. Finally, remove the pick-up stick and beat firmly.
4. Duplicate step 2, except that after creating the pick-up, weave with shaft 4 lifted instead of shaft 3: lift shafts 12 (left center treadle).
Pick up a pair of light threads for every white square in the same row of the graphed design. It’s easier to see where these threads are because they were already picked up in step 2.
Lower shafts 12.
Lift shaft 4.
Push the pick-up stick back to the reed. Then weave with dark weft. Finally, remove the pick-up stick and beat firmly. Again, you should see a completely filled-in row of plain weave with areas of the light layer and areas of the dark layer.
Both of your shuttles should now be back on the left side. You’ve now completed one row of the graph and are ready to move up to the next row and follow the sequence again. Draw through the finished row on the graphed design with a highlighter so that you can see where you are for the next row.
Whew! These are a lot of steps for just two rows of weaving on each layer. But with practice, the process becomes easier and a rhythm develops. Now that you’ve made it through the process once, let’s take a look at how these steps look in shorthand in the treadling draft (FIGURE 10).

FIGURE 10: Doubleweave pick-up process
1) Lift 34, pick up dark squares, lower 34.
Lift 1*, weave with light weft**.
2) Lift 12, pick up light squares, lower 12.
Lift 3*, weave with dark weft**.
3) Lift 34, pick up dark squares, lower 34.
Lift 2*, weave with light weft**.
4) Lift 12, pick up light squares, lower 12.
Lift 4*, weave with dark weft**.
*Push pick-up stick back to the reed.
**Remove stick and beat.
Designing for doubleweave pick-up is a straightforward “what-you-see-is-what-you-get” process. If you’ve already tried out the weaving process, you probably understand why it’s advantageous to use a reed sleyed with four threads per dent—a pair from each layer. It’s much easier to count out pairs of warp threads as they’re grouped in the reed than it is to count individual threads.
By the same token, it’s ideal to work with graph paper that corresponds to the size of your reed, so that the graphed design will be exactly the same size as your warp on the loom. Simply mark off the width of your warp on the graph paper—this would be 9 inches (23 cm) in the case of our sampler—and design in that area. The height of your design can be any size that you like. However, it’s not a big problem if you’re working with graph paper of a different scale; your graphed design will just be a different size than your weaving. It’s still advantageous to have each square on your graph paper represent one dent in the reed. Figure out how many dents your warp is occupying—in the case of the sampler, it’s 72 dents—and mark off that many squares on the graph paper to use as your designing width.
Drawing a design is as simple as filling in squares on the graph paper. If you’re not ready to create your own original design, there are plenty of sources to use as starting points. Books of patterns for other textile media, such as knitting, cross-stitch, and embroidery, have lots of graphed designs all ready to go. Even words and numbers are easy to weave in doubleweave pick-up once you draw them on graph paper.
Geometric designs are natural for fitting into the gridwork of graph paper, but what if you want to draw a more organic or curving shape? Let’s take a circle as an example. Let’s say you want a circle 2 inches (5 cm) in diameter. Working in a 2 x 2-inch (5 cm x 5 cm) section of the graph paper, place the point of a drawing compass in the center, open the compass to 1 inch (2.5 cm), and turn a circle (FIGURE 11).

FIGURE 11: Begin to design a picked-up circle by drawing a perfect circle on graph paper.
Then look at each of the small squares of the graph paper going around the perimeter of the circle. If a square is half or more inside the circle, fill it in. If a square is less than half inside the circle, it doesn’t get filled in (FIGURE 12). This same guideline can be applied to any shape you wish to draw on graph paper.
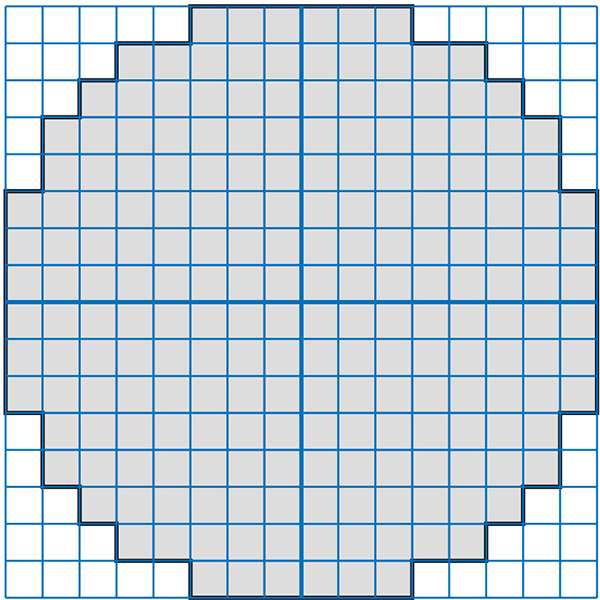
FIGURE 12: If the square is more than half inside the circle, fill it in. If it’s less than half in the circle, don’t. This results in a somewhat crude but still identifiable circular shape.
The shape in figure 12 is starting to look somewhat like a circle, but it’s still fairly blocky. What if you want it to be more rounded? So far, I’ve talked about doing pick-up using pairs of warp threads. But if you want to get more detailed in your designs, or have more curving lines, you can break the squares of the graph paper into quarter squares, and use single warp threads for the pick-up. Applying the same guideline as for full squares, fill in each quarter square if it’s half or more contained within the circle to get a design that looks like FIGURE 13.
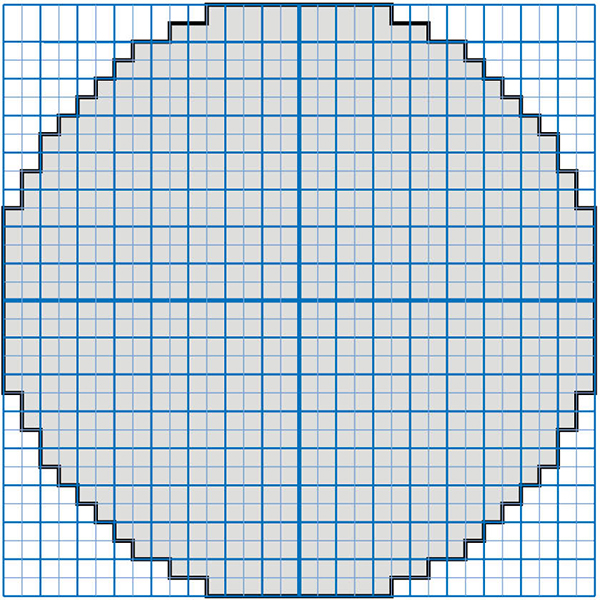
FIGURE 13: For a more refined circle, divide each square into quarters, and use the same process as in figure 12.
Now that looks much more like a circle! And when woven, rather than drawn on graph paper, it will result in a remarkably smooth circle. Picking up warp threads singly is a much slower process than picking up pairs, but the results can be well worth it.
If you’re working with a pick-up unit (a single warp thread) that’s half the size of a pair of threads, you must break the weaving sequence in half. For paired-thread pick-up, there is a sequence of four steps—each weft pair traveling over to the right and then back again to the left—for each row of the graphed design. When working in single-thread pick-up, weave the first two steps—each weft traveling over to the right—and move up half a line on the graphed design. Then weave steps 3 and 4—each weft traveling back to the left—and move up another half line on the graphed design.
Let’s look at an example of a triangular design woven in doubleweave pick-up (FIGURE 14).

FIGURE 14: The center triangles were woven with paired-thread pick-up, while the smoother outside ones were woven with single-thread pick-up.
The center two triangles were woven in paired-thread pick-up and have a distinct jagged appearance. The outer two triangles were woven in single-thread pick-up and have much smoother diagonal lines. It’s entirely up to you how much detail you feel is important to show in your designs and how much time you want to spend weaving.
In FIGURE 15, the triangle on the left is graphed for paired-thread pick-up and the center triangle is graphed for single-thread pick-up. But rather than spend all my time drawing all those tiny stairsteps, if I’m going to weave a diagonal line in single-thread pick-up, I simply draw straight diagonal lines, such as the triangle on the right, and know that means that I’ll be moving over one thread for every two steps in the weaving process.

FIGURE 15: Graph examples for single-thread pick-up
As you look at a design area, such as the square in FIGURE 16, you can see that the left edge is a little smoother than the right edge, and the top edge is a little smoother than the bottom edge. This is a natural characteristic of the doubleweave pick-up technique.

FIGURE 16: The right and bottom edges of this square are slightly more jagged than the other two; on the reverse side, the effect would be opposite. This slight irregularity tends to disappear when the weaving is not under tension.
The edges that are smoother on the front are more jagged on the back, and the edges that are more jagged on the front are smoother on the back. This quality is more pronounced when the weaving is on the loom under tension. When you take it off the loom and the threads relax, it becomes much less noticeable.
An advantage to this characteristic is that it produces completely reversible cloth that looks just the same on both sides, but with the colors reversed. There are other methods of creating doubleweave designs, such as finnweave, that produce smooth edges all the way around a design area on the front, but they result in jagged edges all the way around on the back, so the design is not truly reversible. Finnweave is not covered in this book; see the bibliography for resources for this technique.
You may notice that your design becomes taller in your weaving than it was drawn on graph paper. The warp is sett to give a balanced plain weave for a single layer of cloth, but when woven in doubleweave pick-up, the threads are constantly interchanged between the layers. And when you move from layer to layer, you can’t beat the threads in as closely together as when they’re in a single layer of cloth. So another natural characteristic of doubleweave pick-up is that you can’t beat in as many picks per inch as you have warp ends per inch to give a balanced plain-weave sett—and the wider the weaving and the more pick-up areas across the width of the weaving, the more the design will elongate. You can deal with this in several ways:
Thus far, we’ve focused on using a light color for one layer and a dark color for the other layer. This works very well in doubleweave and lends itself to the positive/negative design aspects of doubleweave pick-up. But you’re not limited to this in any way! One of the great delights of doubleweave is the ability to play the colors of one layer against the colors of the other layer.
One way to easily add depth and richness to your weaving, even when working with a solid light layer and a solid dark layer, is to choose either one or both weft colors that are similar to, but a little different from, the warp colors. For the four-shaft sampler in this book, I used weft colors that were the same as the warp. But for the detail samples and the pick-up samples shown in this chapter, I used a dark weft that was of the same value but leaned more to blue than the dark warp color.
A very effective and satisfying way to work with color in doubleweave is to choose a solid background color for one layer, while creating a gradation of colors for the other layer. The warps for most of my doubleweave pick-up wall pieces are designed in this way. FIGURE 17 shows an example: a solid dark layer, and a layer that shades from blue to yellow-green and back again.
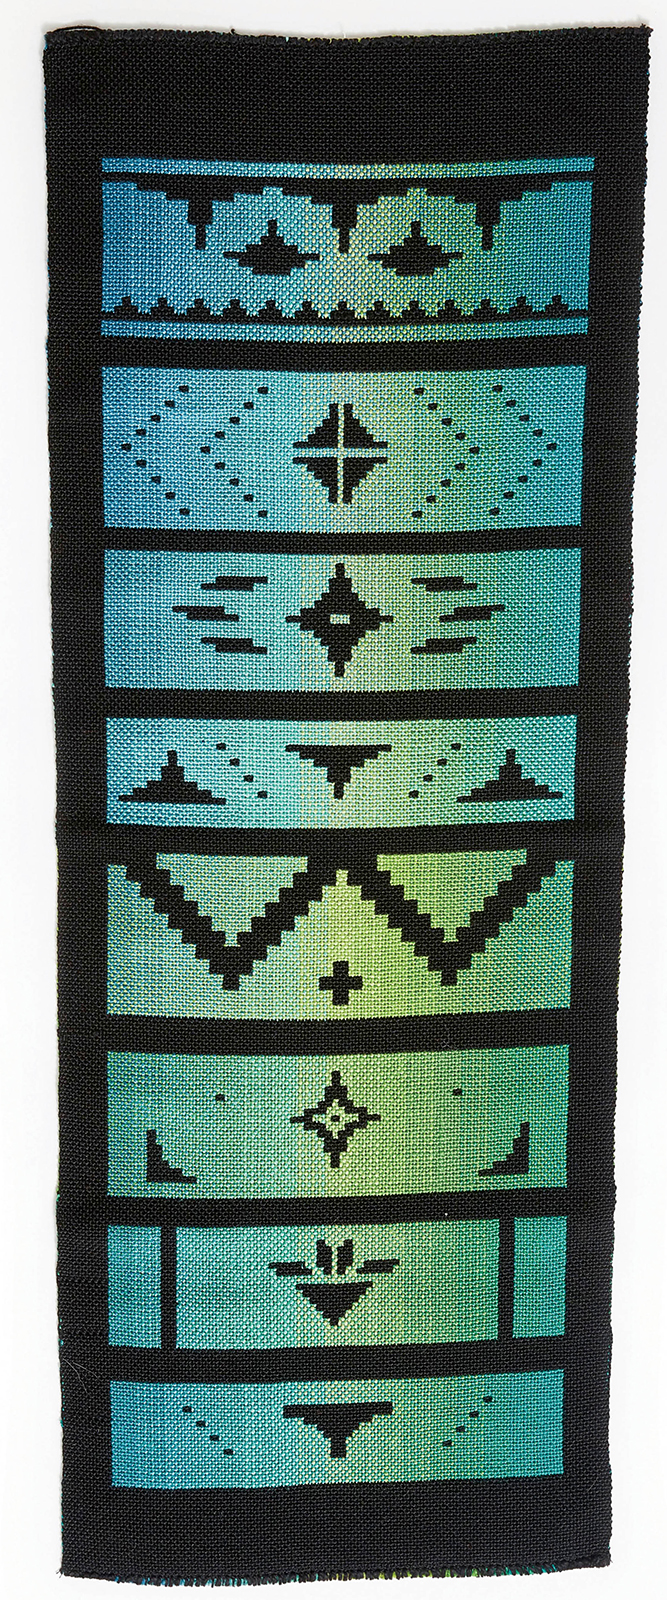
FIGURE 17: This doubleweave design has a solid (black) layer, and a layer that shades from blue to yellow-green and back.
It helps to have a good range of colors on hand for the yarn you’ll be working with. I have about 200 colors of pearl cotton in my stash, which gives me a high degree of control over my color blending. In any one piece, I usually use between 10 and 20 colors. Start where you can, and add to your collection as you go. Dyeing your own yarn will, of course, give you the ability to create as wide a range of colors as you like.
I begin by deciding on a general color mood or palette—do I want a bright, primary spectrum, or do I want more muted, autumn-like colors? Do I want to cover the full range of the spectrum, or do I want to focus on a narrower range of the color wheel? Sometimes I like to have a harmonious gradation of colors, but then throw in a surprise color here and there.
Once I’ve decided on my general palette, I pull every cone of yarn that falls within that range off my shelves and start lining them up. I spend quite a lot of time at this stage, moving the cones of color around, trying them out in different arrangements, taking a color out here and adding another one in there. Eventually, I get the colors narrowed down and end up with an arrangement that feels good to me.
At this point, I have a pretty good feeling for how the colors will work together and how smoothly they’ll blend from one to another, but there are still limitations when looking at cones of yarn lined up one next to the other. An excellent way to fine-tune the gradation is to make a yarn wrapping (FIGURE 18). It’s not necessary to wrap the full width of your warp. Just 1⁄4 inch to 1⁄2 inch (0.5–1.3 cm) of each color will show you how smoothly the colors will blend, or whether there are any obvious gaps in your color gradation.

FIGURE 18: Make a yarn wrap to test color gradation.
In contrast to having one solid color adjacent to the next solid color, you can create more subtle gradations by having intermediate combinations that are a mixture of the two adjacent colors. When I’m winding sections of my warp that are mixed like this, I wind with four threads at a time—the two colors that I’m mixing together and two threads of my background color. I have just the right number of fingers to keep one between each of the four threads while I’m winding to keep them from twisting together. Any more than that, and it’s necessary to use a warping paddle.
Once I have a color gradation that I feel satisfied with, I plug that into my graphed design, adjusting the width of the warp color bands to fit the width of the weaving. I write out the number of warp ends that I’ll have in each color band across the width of the weaving, and this becomes the warping plan for the multicolored layer.
If the second layer is a solid background color, simply follow the warping plan for your multicolored layer while carrying along a thread of the background color at the same time. There’s no need to have a warping plan for the solid layer or to figure out how the two warps align with each other. If you wish to have two warps that each have a color gradation or a stripe pattern, you’ll need to make a warping plan for both layers. The easiest way to set this up is to have the color changes in each layer align with each other. That way you can make the color changes as you’re warping for both layers at the same time. If the color changes for the two layers are not in sync with each other, it will probably be easier to wind the two warps separately and have each warp in its own set of lease sticks on the loom for threading.
If there are design elements in your weaving that fall consistently into the same places, it can be helpful to align color changes in your warp so that they correspond to these places. That way the color changes will guide your eye to where these should fall. Alternatively, if you have design elements that are going to recur consistently in the same place on the warp, you can tie marker threads into your reed to mark those spots. This can save considerable time in the process of counting threads for doing your pick-up.