
With so many different things that can be done in doubleweave on four shafts, just imagine what you can do with six, eight, or more shafts! For each pair of shafts that’s added, the possibilities grow exponentially.
In this chapter, you’ll explore a number of techniques that can be woven with eight shafts, as well as ideas for how they can be expanded beyond eight shafts. Once you understand how to take ideas from four shafts to eight, it’s a fairly straightforward process to build these ideas onto more shafts. Just as doubleweave on four shafts can be thought of as divided into two looms with two shafts each, you can look at looms with more shafts and think in terms of different ways that they can be divided.

With the basic four-shaft draft, it takes two shafts to create a layer of plain weave. Therefore, you can weave three layers of plain weave on a six-shaft loom, four layers on an eight-shaft loom, eight layers on a 16-shaft loom, and so on. Whatever number of shafts you have to work with, divide that number by two, and that’s how many layers of plain weave you can create.
Regardless of how many layers you’re weaving, each layer is sett the same as if it were a single layer. So if each layer is sett at 16 ends per inch and you’re weaving four layers, your total sett will be 64 ends per inch. Warps become very dense when weaving more than two layers! It works well to use a reed size that gives you two threads from each layer in each dent. So in this example, you would use an 8-dent reed, and sley 8 threads per dent, which is 2 from each layer.
For purposes of planning your warp, it’s easiest to think in terms of a single layer. Take the sett that you’re using for a single layer and multiply that number by the number of inches wide you want the warp to be. This is the number of warp threads you’ll need for each of the layers.
To wind the warp, carry one thread for each layer and wind them together, keeping your fingers between them, or use a warping paddle. Your layers may all be the same color, or they may be different colors. You only need to count up to the number that you need for a single layer.
Keep each layer threaded on two adjacent shafts, and thread one warp thread from each layer in succession before beginning again with the first layer. In this eight-shaft draft (FIGURE 1), layer 1 is threaded on shafts 1 and 2, layer 2 is threaded on shafts 3 and 4, layer 3 is threaded on shafts 5 and 6, and layer 4 is threaded on shafts 7 and 8.

FIGURE 1: Basic four-layer draft
The odd-numbered shafts are threaded in succession for each layer, and then the even-numbered shafts are threaded in succession for each layer. To expand this onto more shafts, simply thread as many odd-numbered shafts as you have, then continue by threading the remaining even-numbered shafts.
Now take a look at the tie-up. There are two treadles for each layer, one for each plain-weave shed. If you follow the line of numbers running diagonally from the lower left to the upper right, which are 1 through 8, these are the actual plain-weave lifts for each layer. Below those are the shafts that need to be lifted for any layers that are above the layer being woven.
If you were working with more shafts and more layers, you would continue building additional treadles with this process. The same principle applies as when weaving two layers: The top layer is lifted to weave the bottom layer. No matter how many layers you’re weaving, to weave a given layer, you lift all of the layers above it, plus the individual shafts for that layer.

With eight shafts, you can weave four separate plain-weave layers.
As with two layers, the options for weaving the layers without layer exchange are to weave them as two separate layers, to connect them on one selvedge, or to connect them on both selvedges. When you increase the number of layers, you increase the number of selvedges, and the number of ways that they can be connected grows dramatically. The following diagrams show various configurations that can be woven with four layers using different treadling sequences and one or more shuttles.
If you’re intrigued by the idea of weaving dimensional or sculptural pieces, you might like to put on a warp several inches wide and several yards long and try these out. Be sure to weave at least several inches of each configuration that you try so that you’ll have enough to open them up and see what’s happening.

A quadruple-width fabric woven on eight shafts
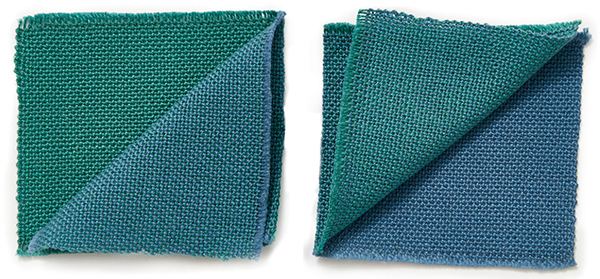
The treadling sequence in FIGURE 2, if woven with one shuttle, creates a cloth that opens up to become four times the width that it was on the loom. If this sequence is woven with two shuttles, one weaving the sheds for layers 1 and 2, and a second shuttle weaving the sheds for layers 3 and 4, two cloths are created that each open up to become twice the width that they were on the loom.
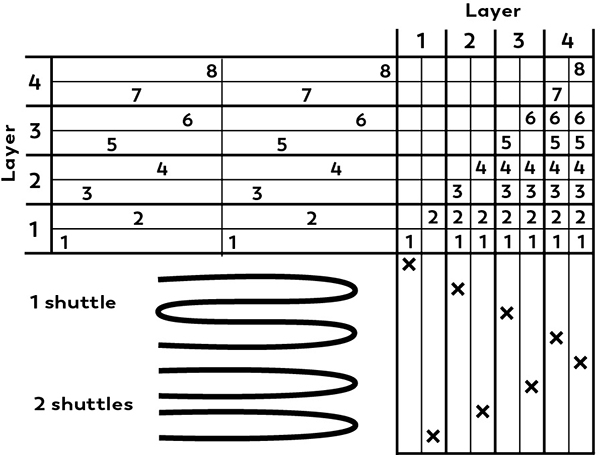
FIGURE 2: Four-layer draft, treadlings for quadruple width or two doublewidth cloths
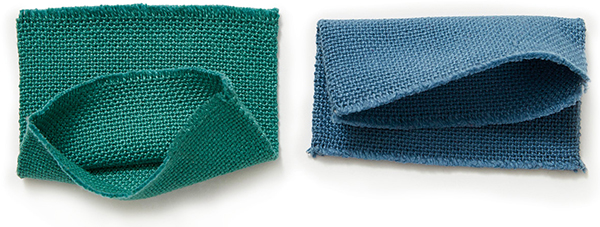
The treadling sequence in FIGURE 3, if woven with one shuttle, creates a cloth that opens up to create a tube that’s twice the width that it was on the loom. If this sequence is woven with two shuttles, one weaving the sheds for layers 1 and 2, and a second one weaving the sheds for layers 3 and 4, two tubes are created, one above the other.

FIGURE 3: Four-layer draft, treadlings for doublewidth tube or two tubes

SHAWL WOVEN IN TWO BLOCKS OF FOUR-SHAFT TWILL ON 16 SHAFTS
What do you suppose would happen if you wove this sequence with one shuttle for a while, and then immediately introduced a second shuttle and wove the sequence with two shuttles for a while? When you opened it up, you’d have a little pair of pants (FIGURE 4). While this isn’t a very efficient or stylish method for weaving clothing, imagine using this for creating dolls or stuffed animals.
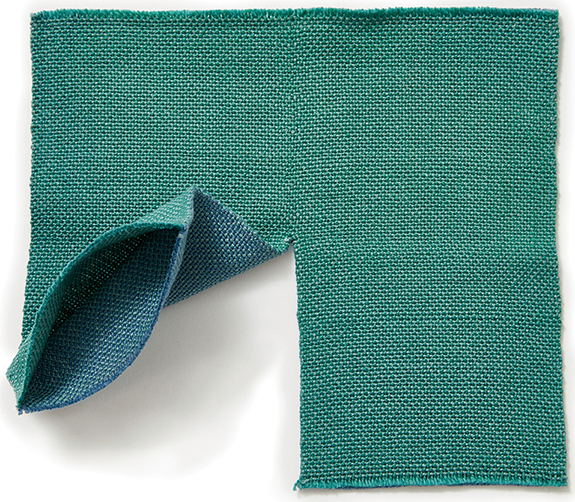
FIGURE 4: A length of tubular weave split into two tubes creates what is effectively a little pair of pants.
The treadling sequence shown in FIGURE 5, if woven with one shuttle, opens up to reveal a tube in the center with flat layers on either side. If this sequence is woven with two shuttles, one weaving the sheds for layers 1 and 3, and the other weaving the sheds for layers 2 and 4, you’ll create a four-page book that’s bound on one selvedge.
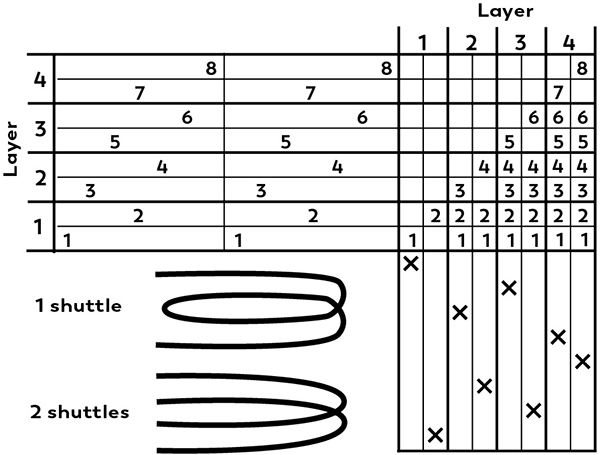
FIGURE 5: Four-layer draft, treadling for tube with flat layers at sides or four-page “book”
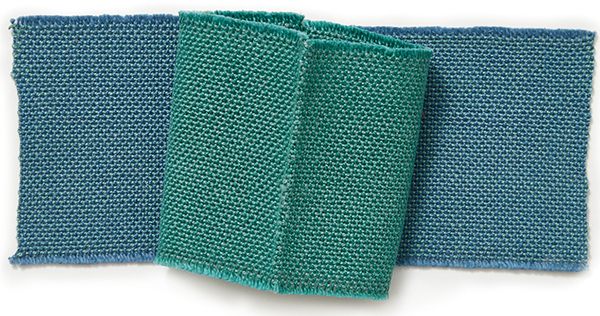
The treadling sequence in FIGURE 6, if woven with one shuttle, will also create a four-page book bound on one selvedge.
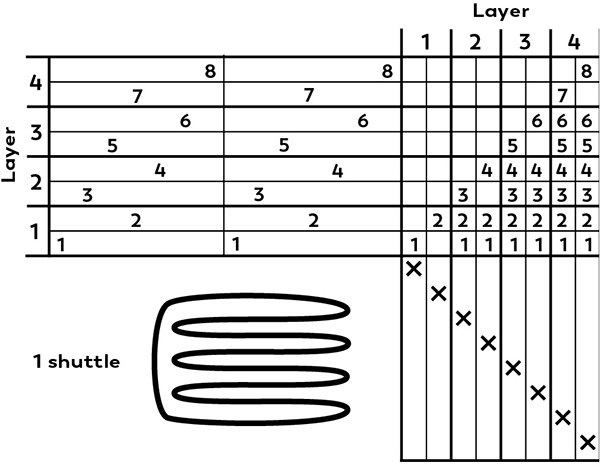
FIGURE 6: Four-layer draft, treadling for four-page “book” bound on one selvedge

The treadling sequence in FIGURE 7 is particularly amazing, and almost has to be woven to be believed. When woven with two shuttles—one weaving the sheds for layers 1 and 4, and the second weaving the sheds for layers 2 and 3—two tubes, one inside the other, are created. No, you don’t need a miniature shuttle to weave the inside tube—one shuttle simply follows the other as the two tubes build up simultaneously.
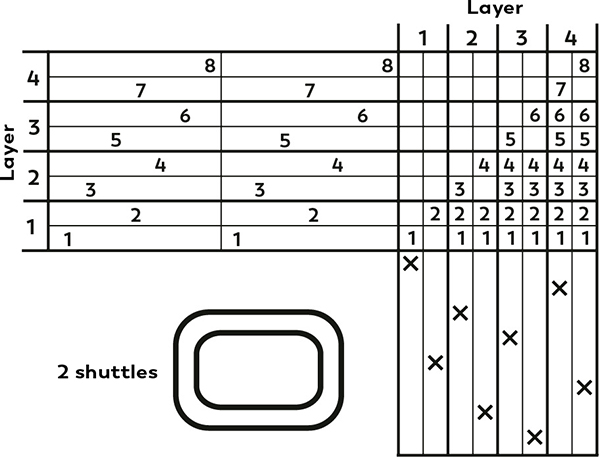
FIGURE 7: Four-layer draft, treadling for two tubes, one inside the other
For all of the two-shuttle configurations, it’s necessary to be sure that your two shuttles do not interlock at the selvedges if you do not want the layers tied together.
In each of the previous examples, each layer always stays in its own position, regardless of the order in which the layers are woven. But you can also switch the positions of the layers to create any number of configurations.
The easiest way to understand how this works is to draw a diagram showing the positions of all your layers. Your layers may or may not be different colors, but if you draw them each in a different color on the diagram, it will be easier to follow the pathway of each layer.
Each time the layers exchange positions, you need to create a new tie-up (or weave on a computerized dobby loom or a table loom, which allows you to freely mix and match the lifts using the levers). No matter what positions the layers are in, the same rule applies. To weave any given layer, you must lift all of the layers above that layer in addition to the individual shafts for that layer, whether these are in numerical order or not. In the following example, red is on shafts 1 and 2, yellow is on shafts 3 and 4, blue is on shafts 5 and 6, and green is on shafts 7 and 8. There are six sections in which the layers are in different positions.
In FIGURE 8, follow each section from the top down, both in the diagram and in the lift sequence plan. For the top layer, the first—or odd—shaft is lifted. Then the top layer plus the first, or odd, shaft are lifted for the second layer. Then the top two layers plus the first, or odd, shaft are lifted for the third layer. Then all of the top three layers plus the first, or odd, shaft are lifted for the fourth layer. The second half of the treadling sequence follows the same pattern, but uses the second, or even, shaft for each layer.
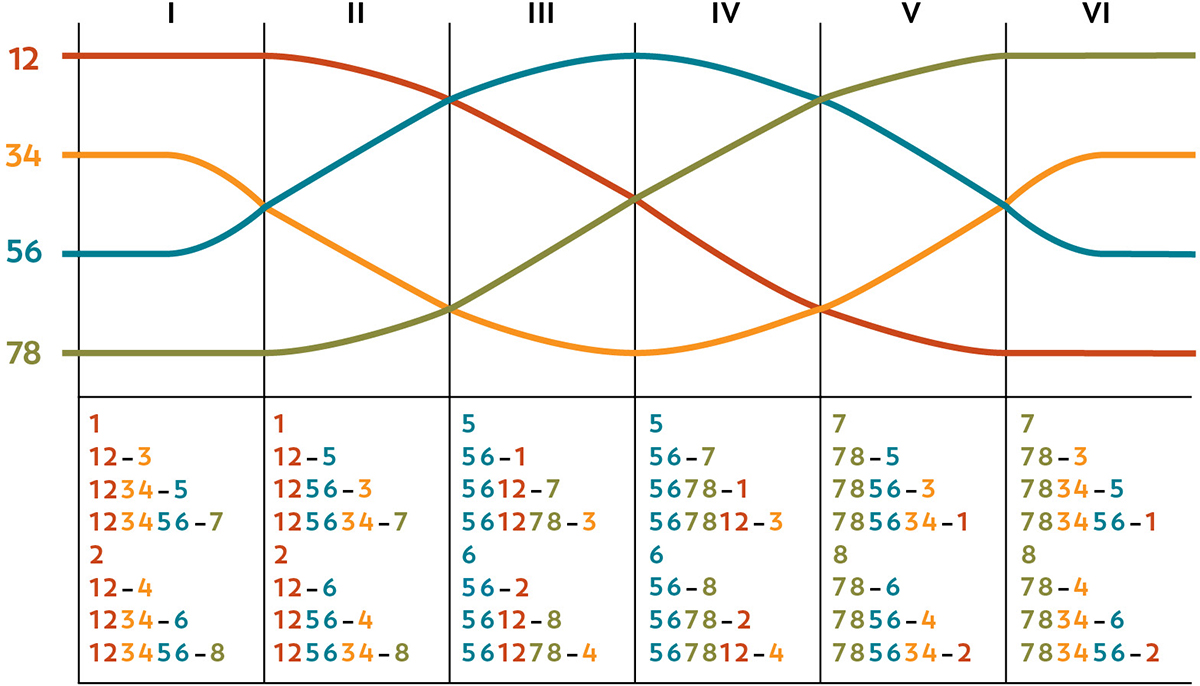
FIGURE 8: Multiple layers with layer exchange, with lift sequences
You can create your own configurations using any number of layers by drawing out a diagram and working out the treadling sequences for each section using this process. For more examples of multilayer configurations, see Paul O’Connor’s book Loom-Controlled Double Weave.