Chapter 10: Low-Light Landscapes
Photographing Landscapes in Low Light
Long Exposures
Most landscape photos are taken when there is plenty of light, giving you many options when it comes to shutter speeds, apertures, and ISO settings. When photographing in low light, there can be fewer choices, but the results can be much more dramatic.
When it comes to landscape photography, you can just wait until you get it right. The subject doesn’t get up and leave or have to take a break because they are tired. Landscapes don’t complain or show up late; in other words, they make great subjects for photographs.
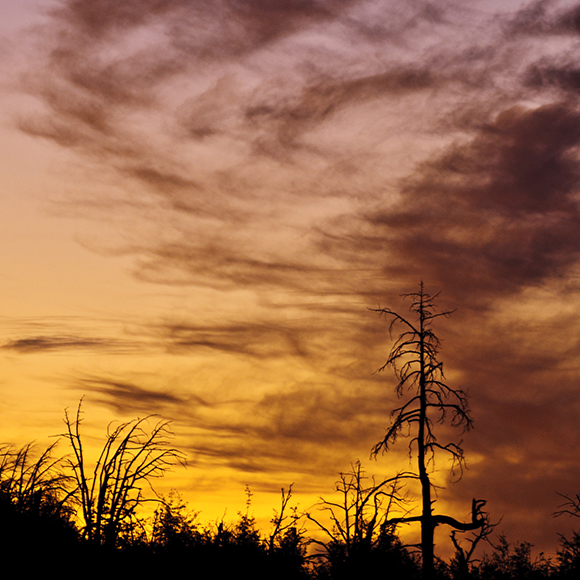
Photographing landscapes takes patience. It might not seem as exciting as photographing concerts and sports, but when the photographs are done right, they will get viewers to stop and stare. Because I live on the West Coast of the United States, many of the landscape photography opportunities have to do with photographing at the seashore, and the combination of the different tides, structures, and sunset conditions makes for endless photographic opportunities. Each time I set up a tripod and camera at the water’s edge, I am treated to a different scene depending on who or what is present. For Figure 10-1, I set up the camera before sunset and started to take photos as the sun went down, waiting until I thought I had just the right light.
10-1
ABOUT THIS PHOTO The water’s edge makes for a great setting, especially as the sun sets. This was taken on a small jetty to get a side angle on the incoming tide. Taken at 1/30 second, f/2.8, and ISO 800.
Photographing landscapes in low light
Photographing landscapes in low light does not mean that you can ignore composition. Because you usually have time to set up the photograph, there are no excuses for sloppy composition. Before tackling the exposures, here is a refresher of some guidelines and suggestions to keep in mind (they’re not hard and fast rules, even though the first one is called a rule):
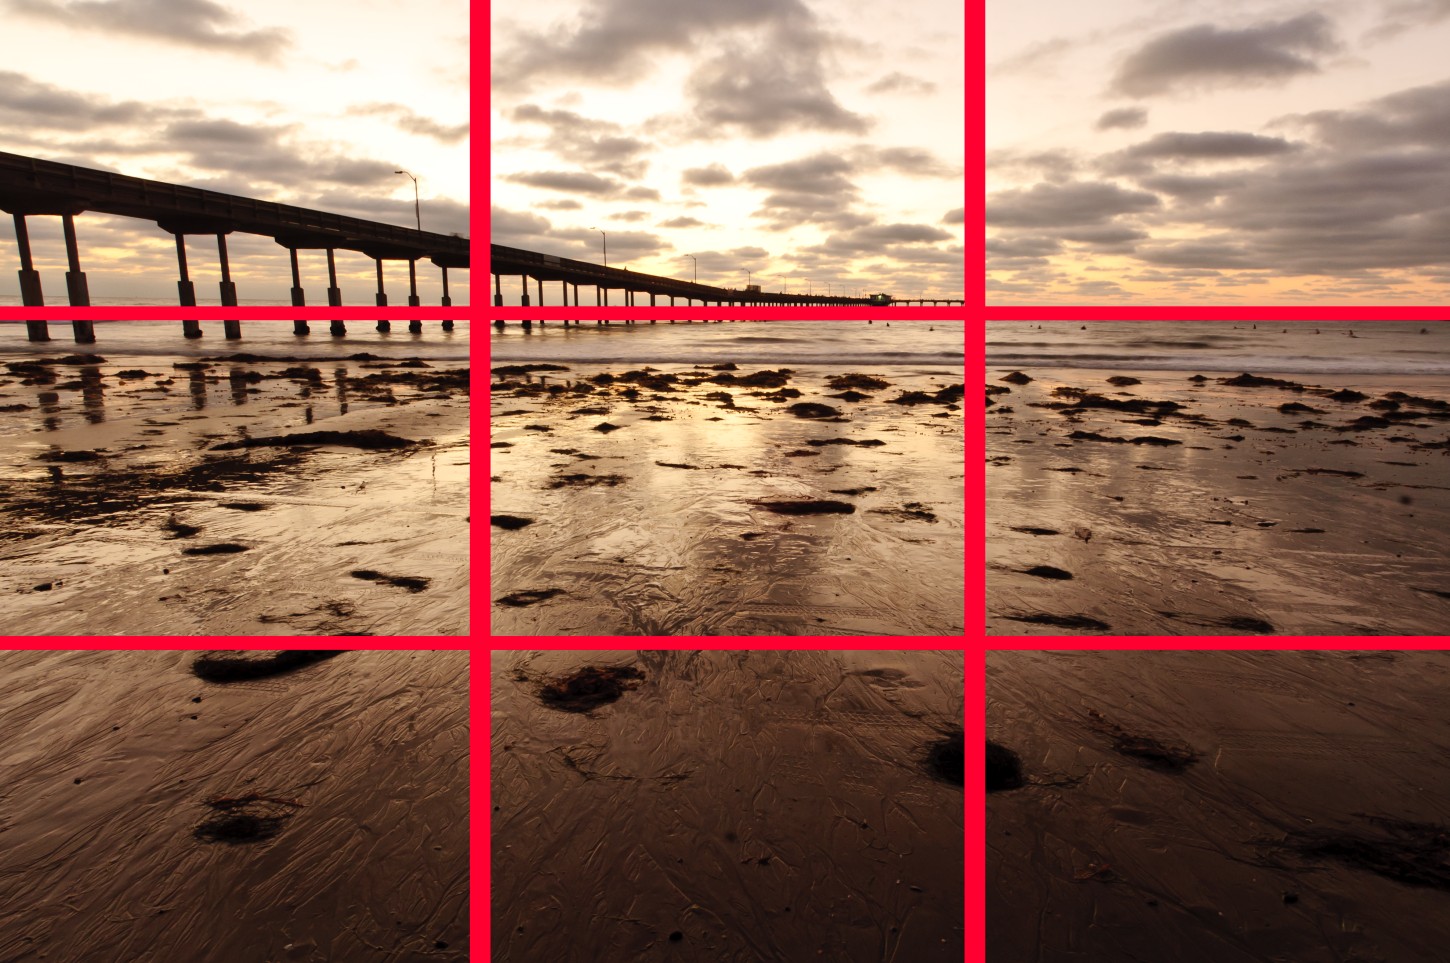
• The Rule of Thirds. One of the most used rules in composition is the Rule of Thirds. This rule states that the best placement for the subject in your image is not in the center but instead at one of the intersecting points when you divide the frame into thirds. Imagine a tic-tac-toe board superimposed over the frame, and then place the main subject at one of the points where the lines intersect. When it comes to landscape photography, the same rule applies, but instead of placing the subject on a point, you place the horizon line one-third in from either the top or the bottom. If you place the horizon line directly in the middle of the image, then the sky and the land are both treated equally, which doesn’t have the same tension as when one is given two-thirds and the other one-third of the compositional space.
When in doubt, try all three compositions, with the horizon line one-third from the bottom, then one-third from the top, and finally right in the middle. As you shoot more landscapes, you will start to see what works for you. As you can see from Figures 10-2 and 10-3, the horizon line was placed one-third of the way in from the top of the frame, which matches up to the Rule of Thirds grid.
10-2
ABOUT THIS PHOTO Photographing during the sunset really allows you to capture the most amazing colors. Taken at 1 second, f/16, and ISO 100.
10-3
ABOUT THIS PHOTO Here the grid illustrating the placement of the thirds is placed over the image shown in Figure 10-2. Notice how the Rule of Thirds grid matches the location of the horizon line.
• Background/foreground. When shooting landscapes, foreground elements give the scene a sense of depth. A foreground subject gives the viewer something to focus on and will help with the composition. Although wide-angle lenses are often used for landscape photography to show the sweeping views, these lenses also tend to exaggerate the distances between the foreground and the background. You can reduce this effect by shooting from a lower angle, which can cause the middle ground to be compressed.
• Leading lines and curves. If you look around, you will see that there are lines everywhere. These lines can be man-made or appear naturally, but they are there. The really great part about these lines is that you can use them in your images to lead the viewer’s eye where you want it to go. You can use lines to lead the eye into the image, lead it out of the image, and to keep the viewer looking at the image. By training yourself to look for these types of lines in your images, you can improve your compositions immeasurably:
> Straight lines. Straight lines can run vertically and horizontally through your image. Examples of vertical lines include buildings, trees, and even people. When photographing vertical lines, adjust the angle so that you are shooting slightly upward, and the lines will seem stronger. The easiest horizontal line is the horizon, but, as described in the Rule of Thirds, you want to keep that out of the center of your image. Other horizontal lines include bridges, tops of buildings, and piers.
> Diagonal lines. These are lines that come from the corners into the image, and they can be some of the strongest compositional elements. Diagonal lines can draw the viewer’s attention from the edge of the image into the center. The downside is that they can do the opposite as well — draw the eye from the center of the image to the edge. This could include tree branches, power lines, and bridges and roads, depending on the angle of the image.
> Curving lines. Curving lines are a great way to keep a viewer interested in your image because they lead the eye around the image. These can include star trails and curves in a road or even the patterns the clouds or landscape makes.
• Framing. Framing your image within a natural frame can add a sense of depth, but more than that, it can help to draw the viewer’s eye to the main subject. For example, framing the sunset with a pier or using a doorway or window to frame the subject works great, especially when the frame is darker than the subject.
Once you have decided what to shoot, the next step is to get the correct exposure, which is explained in the next section.
Exposure considerations
Because you are shooting in low-light conditions, one way to deal with potential exposure problems is to use a wide aperture, which allows the most light to pass through the lens. However, for landscapes, you most often want a deep depth of field, so a wide aperture is not recommended. Going back to the basics of composition, if you want a deep depth of field, then you need a small opening; this means that you need a higher ISO or longer shutter speed to allow enough light to reach the sensor to get a proper exposure. When shooting the image in Figure 10-4 of the Golden Gate Bridge in San Francisco, the wind was incredibly strong, and so I used a wider aperture than I normally would so that I could use a shorter shutter speed. It still took 2.5 seconds to get the exposure, even at f/5.6.
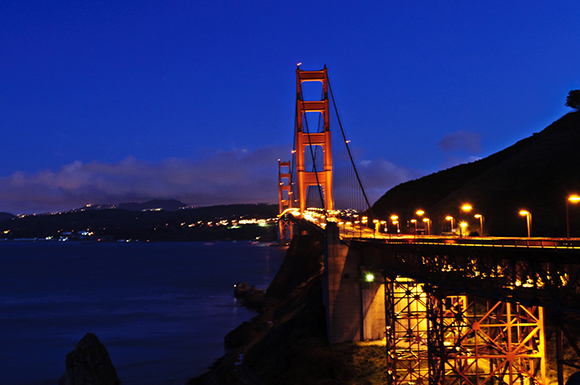
10-4
ABOUT THIS PHOTO Setting up on the north side of the Golden Gate Bridge and shooting at night allowed me to get a view of the underside of the bridge that is usually not seen. Taken at 2.5 seconds, f/5.6, and ISO 250.

Equivalent exposures are discussed in more detail in Chapter 2.
Landscape photographs typically deal with large areas, and during the day that can mean a very big difference between the brightness of the sky and the landscape below. Once the scene becomes darker, it is actually easier to determine the correct exposure because there is not as much difference in brightness between the land and the sky. This can occur right before sunrise or right after sunset and during overcast or heavily cloudy skies, which are all great times to photograph landscapes. If you are photographing outdoors during bad weather, make sure that you have the proper clothing and protective gear for both you and your camera and lens.
So, you are now set up to photograph your landscape, and it is time to get the right exposure settings. There are two good options: the first is to use manual mode and the second is to use aperture priority mode. Both of these modes allow you to set the aperture to get the desired depth of field; the difference is that in manual mode, you can set the shutter speed as well.
In aperture priority mode, the camera uses the built-in light meter to read the light and then sets the shutter speed for you. To get the results you want, you need to make sure that the built-in light meter reads the scene correctly. The spot metering mode works well in this situation, as you can make sure that the area that is most important is the area being read by the light meter. When using aperture priority, you can bracket the exposures, which causes the camera to use a series of different shutter speeds to first underexpose and then overexpose the same scene. This way, you can make sure that you get the desired exposure. Figure 10-5 was taken using aperture priority mode with an aperture of f/2.8. The camera metered the scene and picked a 1/5 second shutter speed at ISO 6400. When photographing in manual mode, you set the aperture and then the shutter speed using the readings from the built-in light meter, but after taking the first shot, you can use either a faster or slower shutter speed. For Figure 10-6, I used the manual mode and worked out the settings based on a meter reading using the spot meter. The exposure that I came up with was 21 seconds using f/16 and ISO 1600. This allowed the water to look a little softer, which I thought was more pleasing to the eye, but the exposures are very close to each other.

10-5
ABOUT THIS PHOTO The lights from the hotel spill into the bay making great lines to photograph. Taken at 1/5 seconds, f/2.8, and ISO 6400.

10-6
ABOUT THIS PHOTO The same scene as Figure 10-5 but this time the manual settings allowed for softer-looking water. Taken at 21 seconds, f/16, and ISO 1600.
Moonlight as a main light source
It is possible to shoot landscapes at night, but after the light of the sun has long faded from the horizon, it does become more difficult. While the moon is bright, especially compared to the dark sky around it, it really isn’t very bright. So, when you are shooting landscapes at night, you have to allow for the moonlight to illuminate your scene, and that usually involves either very long shutter speeds, very high ISO settings, or wide open apertures — usually a combination of all three. Landscapes usually are shot with a small aperture creating a deep depth of field; landscape photography at night is no different. So that leaves you with the shutter speed and the ISO to adjust. The easiest way to get enough light into the scene is to just leave the shutter open for a long time; how long depends on the brightness of the moon and any other light in the scene. This works great unless the moon is actually in the scene because if you expose the scene for the landscape, then the moon will be overexposed. Also, the moon is moving, so it will no longer appear sharp. The key is to set up the shot where the moon illuminates the scene but isn’t actually part of the scene.
The perfect conditions would be a light colored landscape such as a desert or sandy hill with a full moon because the light color of the landscape reflects the light the moon provides. However, honestly, those conditions won’t happen very often. One solution is to shoot with large bodies of water in the image because they can act as reflectors.
There is also a simple method for taking a landscape shot with the moon in the frame: use a piece of black board positioned so that the moon and the sky are covered and take the photo with settings that will expose the landscape. You then remove the board for the last second or two of the exposure. It isn’t a perfect system, but it can work, especially if you are facing the moon. If you don’t cover the moon, and the scene is exposed for longer than a few seconds, the moon will have moved and then you end up with a moon like that in Figure 10-7, a weird looking oval instead of a clear, sharp-edged moon.
10-7
ABOUT THIS PHOTO The moon in this night scene doesn’t look particularly good because the moon moved during the exposure. Taken at 79 seconds, f/16, and ISO 200.
Long exposures
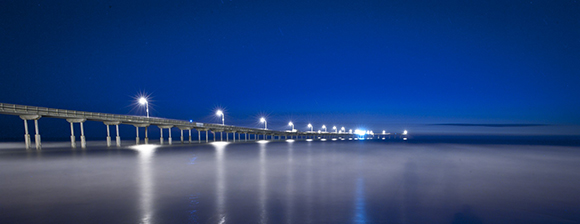
When you leave the shutter open for a long period of time, you are compressing everything that happens into a single image. This means that items that move through the frame relatively quickly are not recorded, while things that are usually hidden by shadows can be seen. This is because the longer the shutter is open, the more light it collects. Two of the coolest effects that you can create with long shutter speeds are getting water to look silky smooth and turning night into day. First, it’s important to get the sharpest image possible during these long exposures, so reducing any movement is imperative. The photo in Figure 10-8 was taken well after the sun had set, and most of the light was provided by street lights on the pier. The exposure time was 4 minutes, and that allowed for the water to turn from surf to silky smooth.
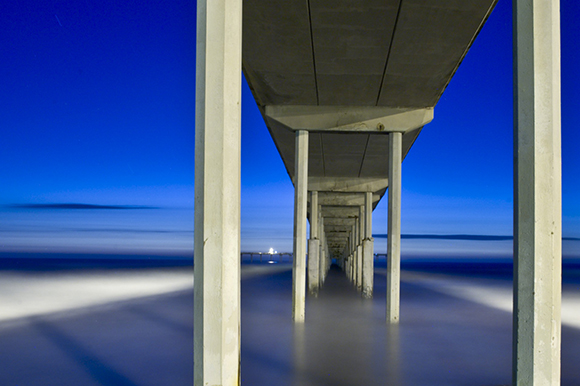
10-8
ABOUT THIS PHOTO Setting up a tripod under the pier and exposing for 4 minutes revealed the details in the pier and turned the water to a flat, smooth expanse. The image then had the color corrected for the orange glow of the lights. Taken at 4 minutes, f/16, and ISO 200.
Dealing with vibration
The longer that you have the shutter open, the more likely it is that the camera can move during the exposure and ruin the image. To avoid this, the first thing to do is to make sure that the camera is securely locked into a tripod that can support the camera and lens weight properly. A smaller tripod might look like it is holding the weight just fine, but over time it might not be holding the camera and lens as steady as you think. This might not show up in a 10-, 20-, or even 30-second exposure, but when you start to leave the shutter open for 5, 10, or 15 minutes, even a little movement is noticeable.
That doesn’t mean you need to buy a tripod rated to hold 40 pounds. Keep in mind that the more your tripod is rated to hold, the more it will probably weigh, and a heavy tripod is usually left behind when you are picking gear to carry. You just need to make sure that the combined weight of the gear can be supported by both the tripod and the tripod head. There is no easy way to test this other than to try it out. Go to your local camera shop and ask what they recommend, check the reviews online, and if you are really planning on buying an expensive tripod, try it out first.

Companies like LensProToGo rent both tripods and tripod heads, which is a really good way to test the equipment before you buy it. For about $100, you can rent a good tripod and head for over a week, giving you plenty of time to try before you buy.
There are a few things that you can do to make the tripod you are using even more stable and to reduce the chances of vibration ruining your images:
• Make sure the legs are locked into place. No matter what type of leg-locking mechanism you are using, make sure that it is snug and not going to loosen up during the exposure.
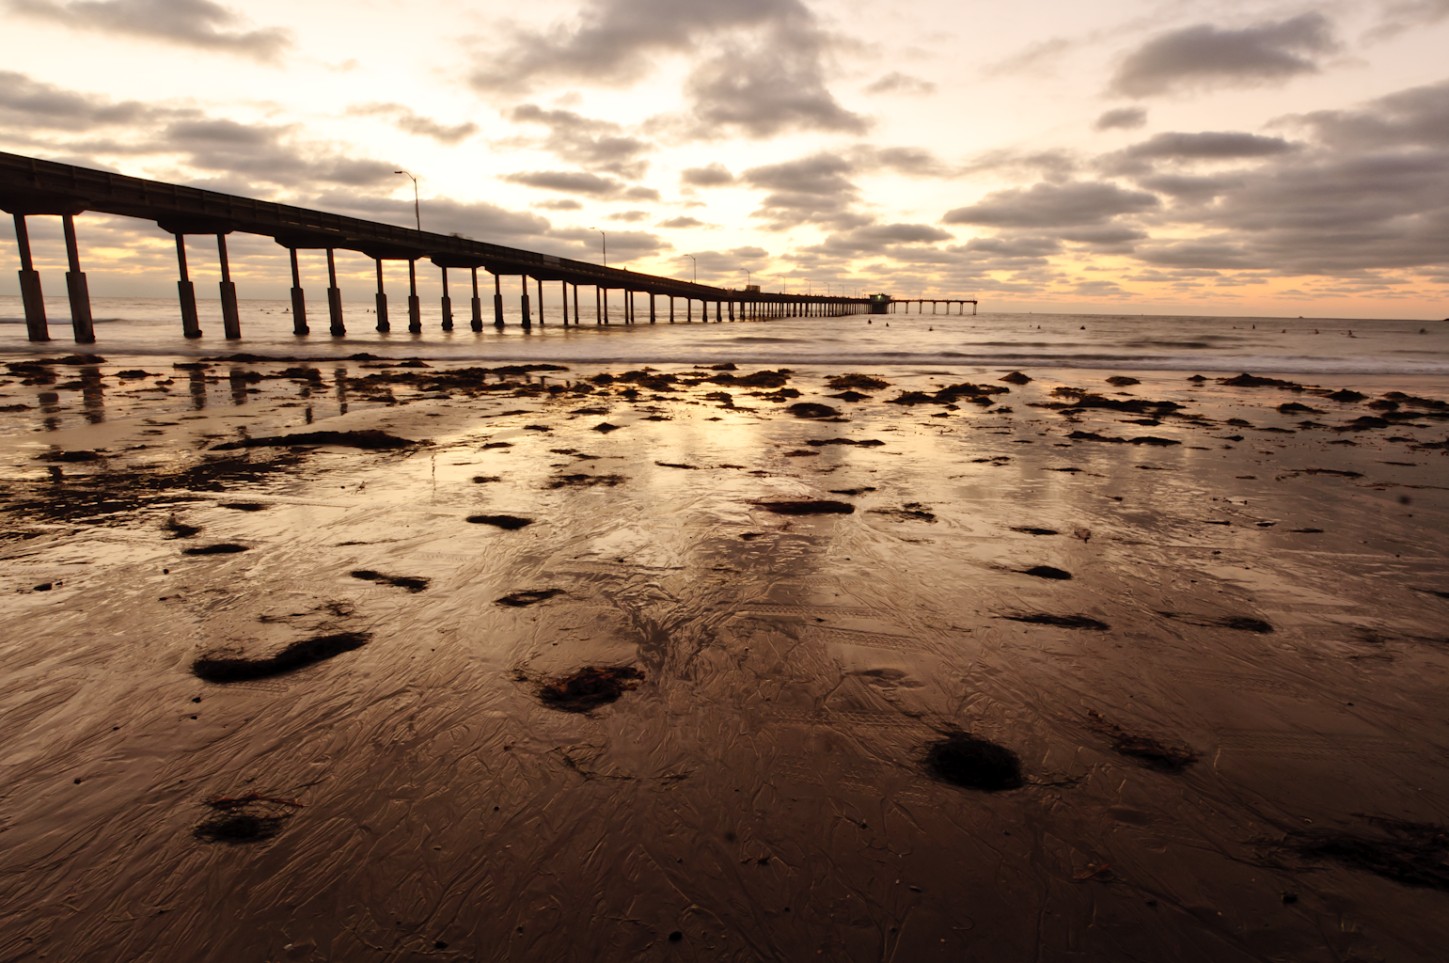
• Use the tripod on a firm surface. Make sure that the tripod is placed on firm ground that isn’t going to move during the exposure. I was once out taking long exposures at the beach, and the incoming tide caused the tripod legs to shift. As you can see in Figure 10-9, the image was ruined. That small movement caused everything to shake just a little.
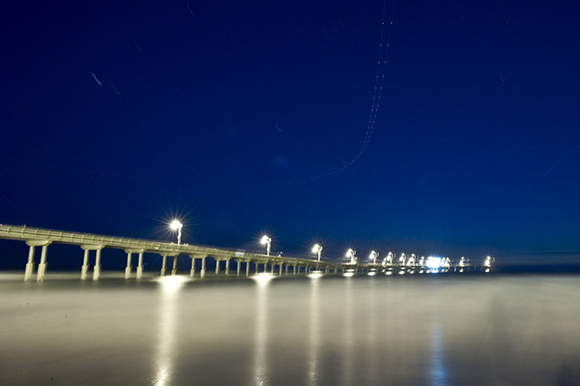
10-9
ABOUT THIS PHOTO The pier at Ocean Beach, California, was in sharp focus until the water came in and moved the tripod just slightly. Taken at 418 seconds, f/14, and ISO 200.
• Add some extra weight. Some tripods allow you to hang a weight from the bottom of the center column. This is a great idea, as it keeps the tripod more stable. After setting everything up, I frequently attach my camera bag as the weight; just make sure that everything you need is removed because you will not be able to touch the bag after the exposure has started.
• Stay low. Avoid extending the center column, as it is the weakest part of the tripod in terms of stability. I also only raise the tripod as much as I absolutely need to in order to get the desired composition. The lower and wider the legs, the more stable the tripod.
• Avoid the wind. Try to set up the tripod and camera where it will be shielded from any wind, as all it takes is a little gust to set up a little vibration and ruin your shot. If wind can’t be avoided, try to position yourself as a human shield for the camera. Every bit helps.
• Avoid touching the camera. I know this one seems to be obvious, but I find myself doing it all the time. It is important not to sabotage yourself by touching the camera and causing any vibration.
There are two other things that you can do to make sure you get the sharpest images; use a cable release or remote and use the mirror lockup feature if your camera has one. They have to do with what happens when you press the shutter release button. There are a series of actions that happen when you take a photograph:
1. You press the shutter release button.
2. The mirror moves up and out of the way, allowing the light entering the lens to reach the shutter.
3. The aperture changes from wide open to whatever setting you are using.
4. The shutter moves out of the way of the sensor for the amount of time indicated by the shutter speed setting.
5. The shutter closes.
6. The aperture is set to the widest point.
7. The mirror returns to the position so that the light entering the lens is now focused on the eyepiece, allowing the through-the-lens view on the camera.
There have been tests done using a laser pointer that show how much vibration is caused when you physically press the shutter release button on a camera. It’s a lot, take my word for it. The solution is to use a remote control or cable release, which I cover earlier in this book.
Another situation where there are vibrations is when the mirror is moved up out of the way so that the light can reach the sensor. This only happens on dSLR cameras because of the way they work. In the camera, there is a mirror that takes the view through the lens and angles it up toward the eyepiece so that when you look through the viewfinder, you are seeing the exact scene that the camera will record. This makes it really easy to see how the different focal lengths are affecting your composition, and this helps you determine exactly what to focus on. The problem is that this mirror needs to be moved up and out of the way before you can take any photos. When the mirror is moved, it can cause slight vibrations that affect the sharpness of your image, especially at longer shutter speeds.
To counteract the vibrations created by the mirror moving, camera manufacturers have come up with a solution called mirror lockup. This feature allows the camera to move the mirror out of the way before the photo is taken to minimize vibrations. Check your manual to see if your camera has this feature. The way it usually works is that the mirror moves out of the way the first time you press the shutter release button, and the image is taken the second time you press the button.
For cameras that offer a live view feature, the mirror is locked up already, so using live view might actually be a better option. Using live view allows you to compose the image without having to put your eye to the viewfinder and inadvertently touching the camera as the image appears on the LCD. For Figure 10-10, I made sure that the tripod was set securely and I used the mirror lockup feature to make sure there was no blur at all.
10-10
ABOUT THIS PHOTO Photographing the pier on a moonless night resulted in a darker sky, and most of the illumination came from the lights on the pier. This is the same scene as in Figure 10-9 but here I set the tripod farther up the beach away from the incoming tide. Taken at 5 minutes and 30 seconds, f/16, and ISO 200.
One last note about vibration, and specifically vibration reduction technology: Vibration reduction or image stabilization technology is meant to be used when handholding the camera and lens, not when it is set in a tripod. Some lenses can detect when they are mounted on a tripod, and they turn off the vibration reduction automatically. As a result, when the camera and lens are mounted in a tripod, you need to turn the vibration reduction or image stabilization feature off.
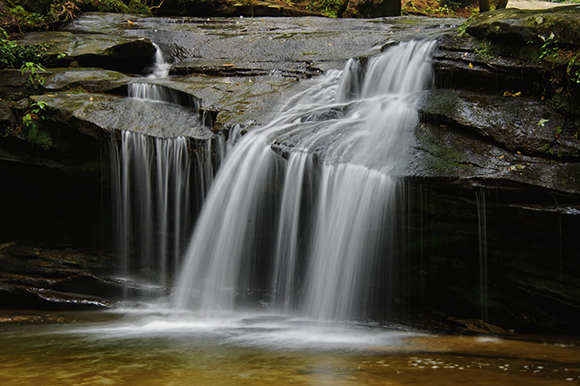
Flowing water
Many photographers love the look of silky-smooth flowing water, and so they use neutral density filters to be able to use long shutter speeds during the day to get this effect. A neutral density filter goes over the front of your lens to reduce the amount of light by a specific amount, usually measured in stops. For example, a 3-stop neutral density filter reduces the amount of light by 3 stops and the 6-stop filter reduces the light by 6 stops, as shown in Figure 10-11.
10-11
ABOUT THIS PHOTO This image was shot with a longer shutter speed to get the water to flow, but because of the amount of light present, a 6-stop neutral density filter was needed. The 2 second exposure time really managed to smooth out the fast-moving water. Taken at 2 seconds, f/11, and ISO 200. © Ken Toney
The general idea is to use a shutter speed that blurs the motion of the water enough that you stop seeing the water’s details, but instead see the water as a bigger moving object. The actual shutter speed that you need depends on how much the water is moving.
When it comes to photographing the ocean, remember that the tide is either coming in or going out. So when you set up the shot, know that the water will either be coming in toward you or going out away from you, and adjust the composition accordingly. For example, if the water is going away from you, make sure that you are not left with just sand, unless that’s the look you are going for. If the tide is coming in, you want to give yourself a little space so that you don’t end up in the water.
When photographing along the coast, the best times to shoot are at dawn or dusk when the sun is below the horizon but there are still traces of light in the sky. This also depends on which coast you are photographing. Generally the East Coast has better light before sunrise, while the West Coast has better light right after sunset. With that being said, just being on the West Coast doesn’t mean that there will be a great sunset every night, nor does it mean that every sunrise on the East Coast will produce a great image, but the odds are in your favor.
When composing for coastline photographs, try not to just point the camera out to sea and hope for the best. These images can appear really boring unless there is a stunning sunrise or sunset to hold the viewer’s attention. Look for areas where there is an interesting subject, like pier pilings, rocks, driftwood, and even the patterns in the sand. These are great compositional elements that you can use in conjunction with the smooth look of the water that is captured with a long shutter speed. The same effect can be used at lakes, streams, and ponds, with streams being the easiest as the water is usually visibly moving. With ponds and lakes, you have to judge how long to leave the shutter open — a little (or a lot) longer to get a smooth look depending on the water’s movement.
The water and wet sand create a great reflective surface that you can use to capture the reflection of any nearby lights, and even the sunrise or sunset as the light streaks across the coastline.
To use a long enough exposure to smooth out the water, start with a shutter speed of 1 second or longer. To get the proper settings, just do the following:
1. Set the camera in a tripod.
2. Compose the scene.
3. Set the camera to aperture priority mode.
4. Pick the aperture that gives you the desired depth of field.
5. Set the ISO to 400.
6. Use spot metering mode and set the focus point on the critical subject in the scene.
7. Press the shutter release button halfway down to get a light meter reading, and make a note of the shutter speed.
> If the shutter speed is 1 second or longer, go ahead and take the photo.
> If the shutter speed is less than 1 second, decrease the ISO and repeat steps 6 and 7.
8. If the ISO is at the lowest setting available on your camera and the shutter speed is still faster than 1 second, then you have to either make the aperture smaller or wait until there is less light.

You can also change the camera to manual mode and enter the settings. Then start to adjust the shutter speed so that each exposure is longer as the sun goes down. Observe how the shutter speed changes the look of the water and what shutter speed is needed to give you the silky look you want.
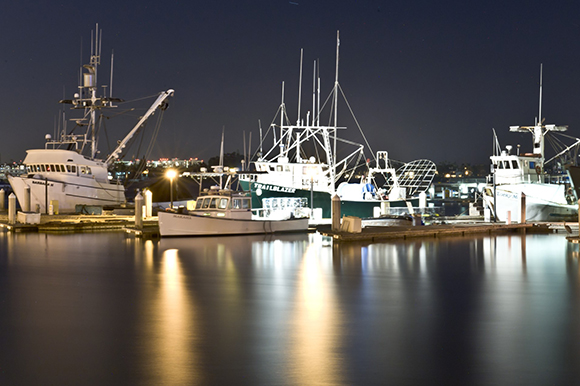
This is not an exact science because the amount of blur in the water will be influenced by how fast the water is moving and where in the tide cycle it is if there is a tide. For example, the water in Figure 10-12 was moving very slowly, needing a shutter speed of more than 2 minutes to get the right amount of blur. Make sure that you keep your gear dry, and if your tripod does get wet, rinse the affected areas with clean fresh water, and dry and lubricate as necessary.
10-12
ABOUT THIS PHOTO The tuna boats were docked, and thanks to a very still night, they could be captured in low light without the boats moving. Taken at 131 seconds, f/22, and ISO 400.
Always clean off any sand that you may get on your tripod when photographing at the beach. The sand can cause the tripod legs to stick, turning a working tripod into an exercise in frustration.
Turning night into day
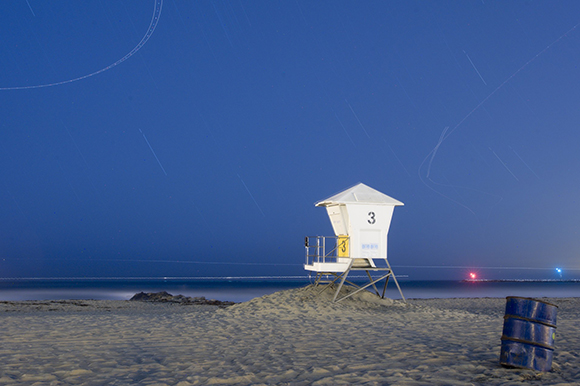
If you leave the shutter open long enough, then enough light is collected to create the illusion of turning night into day. It might seem like all you have to do is leave the camera shutter open for a long time, but there is a little more to it than that. You can use equivalent exposures to determine what your setting should be by first setting your camera to get the shot in as little time as possible. Then you can adjust the exposure settings to get the final values, and take the photo with a little more confidence that it will come out as you want it to. I have always loved photographing at the beach, even at night. This lifeguard hut in Figure 10-13 sits unused, as this image was taken at 9:30 pm on a moonless night, even though the color and exposure make it look like it was taken in the morning hours. The image was color corrected to make the sand look natural.
10-13
ABOUT THIS PHOTO The empty lifeguard hut waits for daytime when the beach will be crowded. Taken at 20 minutes, f/10, and ISO 200.
There is still a fair amount of guesswork to be done because there is no reliable way to meter a scene to get this result. The idea here is to make sure that the night sky no longer looks like the night sky. Settings will change as the moon waxes and wanes and with the amount of light pollution in the image. The steps to get an approximate exposure are as follows:
1. Set the aperture as wide as possible.
2. Set the ISO as high as possible.
3. Take a photograph at any shutter speed. I use 1/30 second as my starting point.
4. Check the image and adjust the shutter speed.
5. Create the equivalent shutter speed setting using the aperture and ISO you want.
6. Take the photograph.
For example, if the original test shot is taken with ISO 3200 and an aperture of f/2.8, then you need to work out the equivalent settings: 3200 goes to 200, so you have to adjust the aperture by 4 full stops.
To create the effect that the image was taken during the day, I have found that the image needs to be either correctly exposed or overexposed by a stop (or more). The light of the moon and the illumination it provides are really variable and change from one night to the next. Sometimes you might have to take the same shot numerous times to get the one you want.
Above all, have fun and experiment.
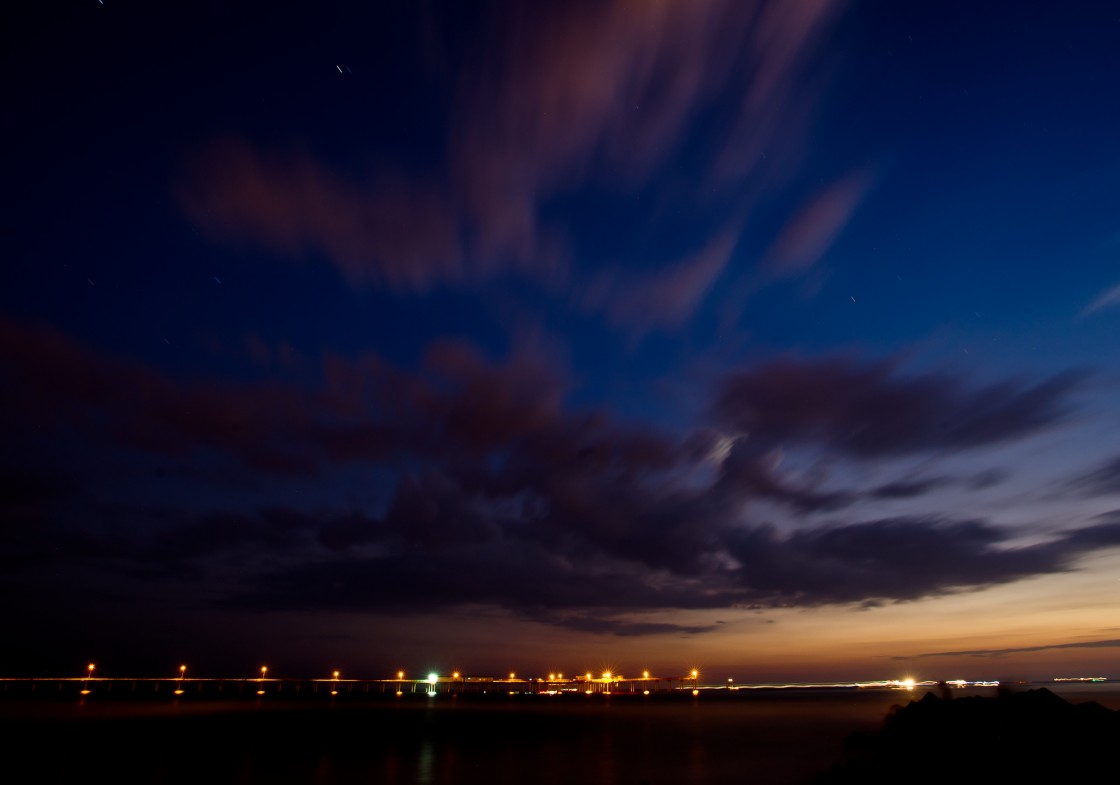
Assignment
Use a very long shutter speed to capture a night scene
Preparation is key to getting great photos when capturing long exposures at night, which is exactly what you need to do to complete this assignment. One of the most important parts of this preparation is getting the right location and composition before it’s too dark. That way, you can see where you are setting up the tripod as well as what will be in your scene. At times you will have to visualize what the scene will be like after the sun has set. For this image I wanted to capture the clouds over the ocean with the lit up pier in the background. I used a 118-second exposure at f/10 and ISO 200 to get the look I wanted. The clouds are slightly blurred showing the movement during the 118 second exposure.
There are some basic guidelines that apply to all landscape photography, not just photos that are taken in low light or at night:
• Make sure you have a subject. Just taking a photo at night doesn’t make it great, so make sure that there is a clear subject.
• Consider the sky, even at night. Most of the time, a clear sky is a boring sky. When you have a bland, boring sky, change the focus of the image and make the foreground the focus by placing the horizon line one-third down from the top of the frame.
• Change the point of view. This could mean getting lower and shooting across the scene or getting a different vantage point and shooting down on the scene.
• Shoot using the RAW file type. Using the RAW file type makes it easier to correct any unwanted colorcasts in postproduction.

Remember to visit www.pwassignments.com after you complete the assignment and share your favorite photo! It’s a community of enthusiastic photographers and a great place to view what other readers have created. You can also post comments and read encouraging suggestions and feedback.