CHAPTER TWO
BUILDING WHEEL SKILLS
IF YOU’RE LOOKING for a shortcut to becoming a master on the wheel, I have some bad news: the only way to refine your techniques and design sense—and thus, to make better pots—is to practice. However, that doesn’t mean you’ll be bored as you hone your skills. There are many different forms of practice, and you’ll no doubt find that your growth as a potter is not a simple linear path.
For example, on my own journey I’ve noticed that progress in various areas doesn’t necessarily happen all at once. At times, my throwing skills surge forward as I refine a technique or form. Other times, my concepts and thinking show more potential as my creativity flourishes. This back and forth nature of progress is normal and should be embraced. The goal is to establish a pattern of sustainable growth that keeps you challenged and excited.
For potters at the beginning of their ceramic journey, this chapter starts by troubleshooting common problems in the throwing process. Your first few months on the wheel might be the most frustrating you ever have as a potter. I encourage you to embrace what educators call the zone of proximal development. This is the area that lies between nagging boredom and a fierce frustration that manifests in a desire to quit. This book and the exercises in this chapter are geared towards pushing you out of your comfort zone. If you find yourself struggling, try to remember that struggle is a necessary part of your development. Sitting with the discomfort of not being good at something is a key that will eventually unlock new territory for growth. With practice, you will overcome these problems, and with time you might even find yourself hooked!
This chapter will also introduce you to trimming, throwing’s reductive counterpart, where you’ll shape the exterior of a form by removing excess clay. The balance you strike between the interior void and the exterior clay wall will largely determine the heft and shape of your final piece. You’ll find many straight-walled forms can be nearly completed during throwing, with minimal trimming of the foot on the wheel. Curved forms, on the other hand, will often require significant trimming so that an articulated foot can give them visual lift.
For most forms, you will only trim the bottom third. With that focus, remember to consider the way the base of a piece terminates on the table. You should also consider the silhouette of an entire form. How will the silhouette look when viewed from ten feet away versus when the user holds the pot in his or her hands? I, for one, don’t want to make a pot that looks great only when it’s viewed on a pedestal.
OVERCOMING COMMON PROBLEMS
Before we get to skill building, let’s first take a look at common problems that you might experience as your skills are progressing. Many problems arise from a lack of awareness of your body and its affect on the clay. This section will help you be mindful of your body position, wheel speed, and techniques leading to a more graceful throwing process.
WHEEL SPEED
Wheel speed is a variable you can easily control. With a slight push on the pedal, you can speed up or slow down the wheel to help command the throwing process. Ironically, this is the area many young potters struggle with the most. Generally speaking, the throwing process should start with the wheel moving the fastest during centering and then gradually slowing until you finish shaping the pot. I divide wheel speed into four quarter speeds, which you can see detailed below.
4/4 Speed: This speed might be used when centering more than 25 pounds of clay. Otherwise it’s not needed in the normal course of throwing.
3/4 Speed: When you’re coning up and down, you can get the wheel up to three-quarters speed, or slightly slower.
1/2 Speed: While you’re opening, pulling the walls, and shaping, keep the wheel at about half speed. Some potters prefer a slightly faster speed.
1/4 Speed: Finishing touches, like rim completion or soft texturing, should happen at quarter speed.
Problems with speed control often happen as a response to fear. For example, it might seem better to slow down if you are nervous when pulling a tall cylinder, but it often leads to uneven pulling. If the speed you pull up does not match the repetitions of the wheel, you will create a corkscrew effect that throws your pot off center. Conversely, it’s easy to get the wheel going too fast if you are not paying attention. In fact, beginning students often experience the race car effect, which is an unconscious acceleration that happens as they become nervous. For whatever reason, there seems to be a correlation between the increased speed of the thrower’s heartbeat and the speed their wheel spins!
If you find yourself going too fast or too slow, take a deep breath and readjust your wheel speed based on the chart above. If your wheel has a regulated pedal option, it can be helpful to set your wheel speed and take your foot off the pedal. This will keep you from unconsciously changing your wheel speed.
DIFFICULTY CENTERING
Centering is, of course, the first hurdle that potters face. Yet much of the distress that new potters will experience is based on improper body position. When you start to center, you should be in a three-point stance with your back as straight as possible. This will include having your hands linked together by touching the clay and your forearms resting on your splash pan or your knees. In the three-point stance you should be relaxed, with your posture firm enough that someone could push sideways on your shoulders and your torso wouldn’t move. A The goal of centering is to move the clay into shape—not for the clay to cause your body to move.

Instability often comes from deviating from this position. If your elbows are up in the air, it increases the potential for movement in the wrist and hands, which will result in a pot that is hard to center. B To better understand stability, think about the connection between your elbows, wrists, and fingers as links in a chain. All will experience movement if one link is affected. If you are having trouble keeping any part of the body still, try closing your eyes. Concentrate on the individual body parts discussed above and then realign your body to isolate movement.

PULLING AT AN UNEVEN RATE
Another common problem is an uneven pulling of the pot’s wall. This happens when there’s a mismatch of your wheel speed and the rate you pull up. Whether your wheel speed is slow or fast, you must keep your fingers in place long enough to make sure you are touching the clay for one full revolution of the wheel before moving farther up the pot. If your wheel speed is slower than you pull, the pot will be uneven. Likewise, if your wheel speed is too fast, you might not keep up. Or you may find you’re generating excessive friction, causing the pot to torque.
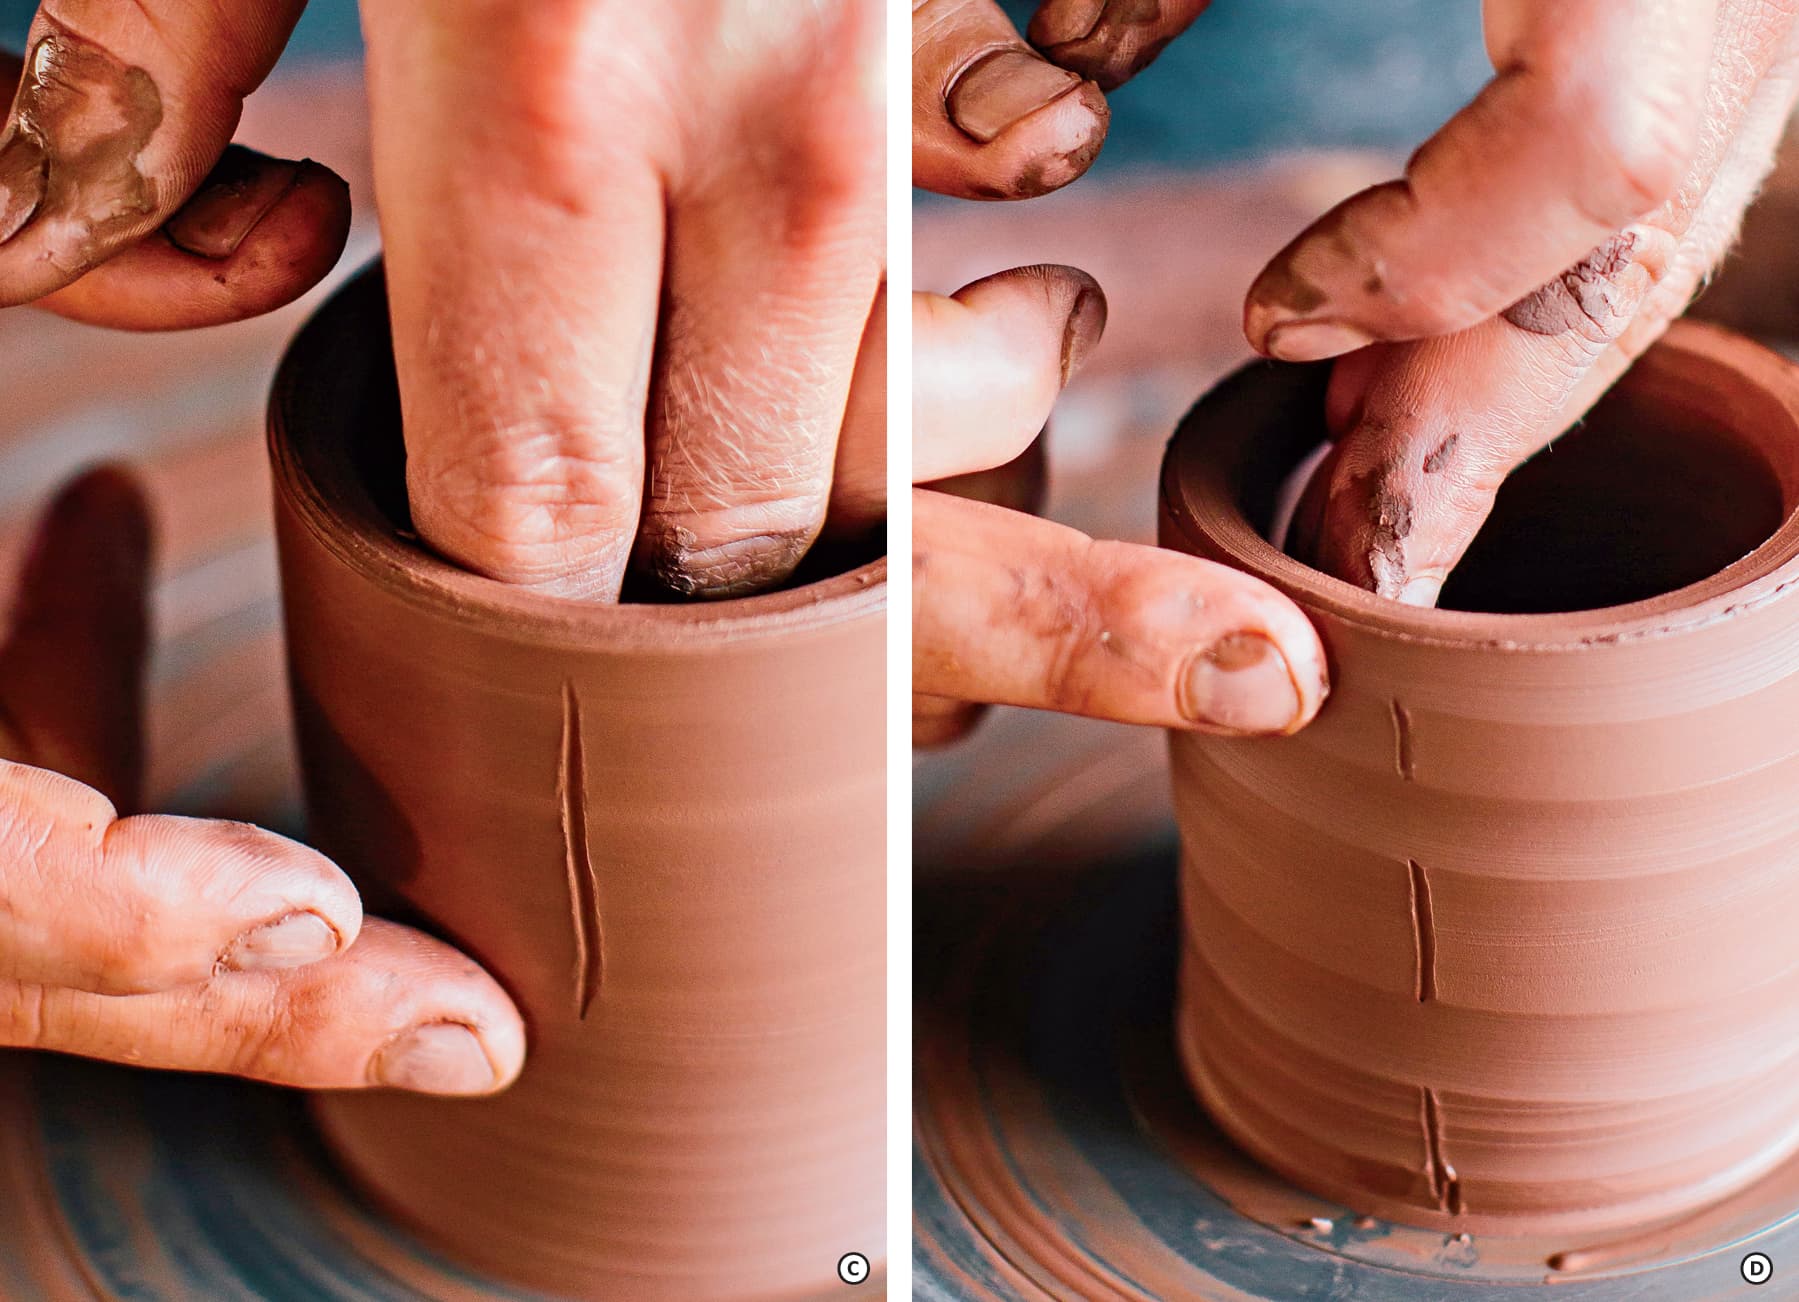
To learn how to accurately match the speed of your hands to the wheel, I recommend performing a line test. With the wheel stopped, draw a faint line in the surface of the pot. C Pull up as you normally would and then observe how the line is affected. A properly matched pull will erase the line completely. If you are pulling up faster than the wheel is spinning, you will notice the line is now dotted. D If you are pulling too slowly, you will feel friction develop, and the pull will result in a torque in the pot’s wall. Repeat the line test at a variety of speeds so that you get a better feel of when you are pulling too fast or too slow.
TOO MUCH WATER
Clay has a porous structure that changes during the throwing process. To properly hydrate your clay, hold a wet sponge on the surface as the wheel is spinning. There is no need to dump water all over the pot. E This type of overhydrating will make pulling up more difficult.

Another problem with overhydrating is that it makes the clay more susceptible to deformation due to centrifugal force. I often see overhydrated cylinders turn into bowls if the person doesn’t decrease wheel speed accordingly. The best fix for overhydrating is combining awareness of the problem with using a much smaller bucket for holding water. If you bring a 2-gallon bucket to the wheel, you will be subconsciously encouraged to use a lot of water. Try bringing a 1-pint container to the wheel and see if that changes the amount of water you use.
AIR BUBBLES
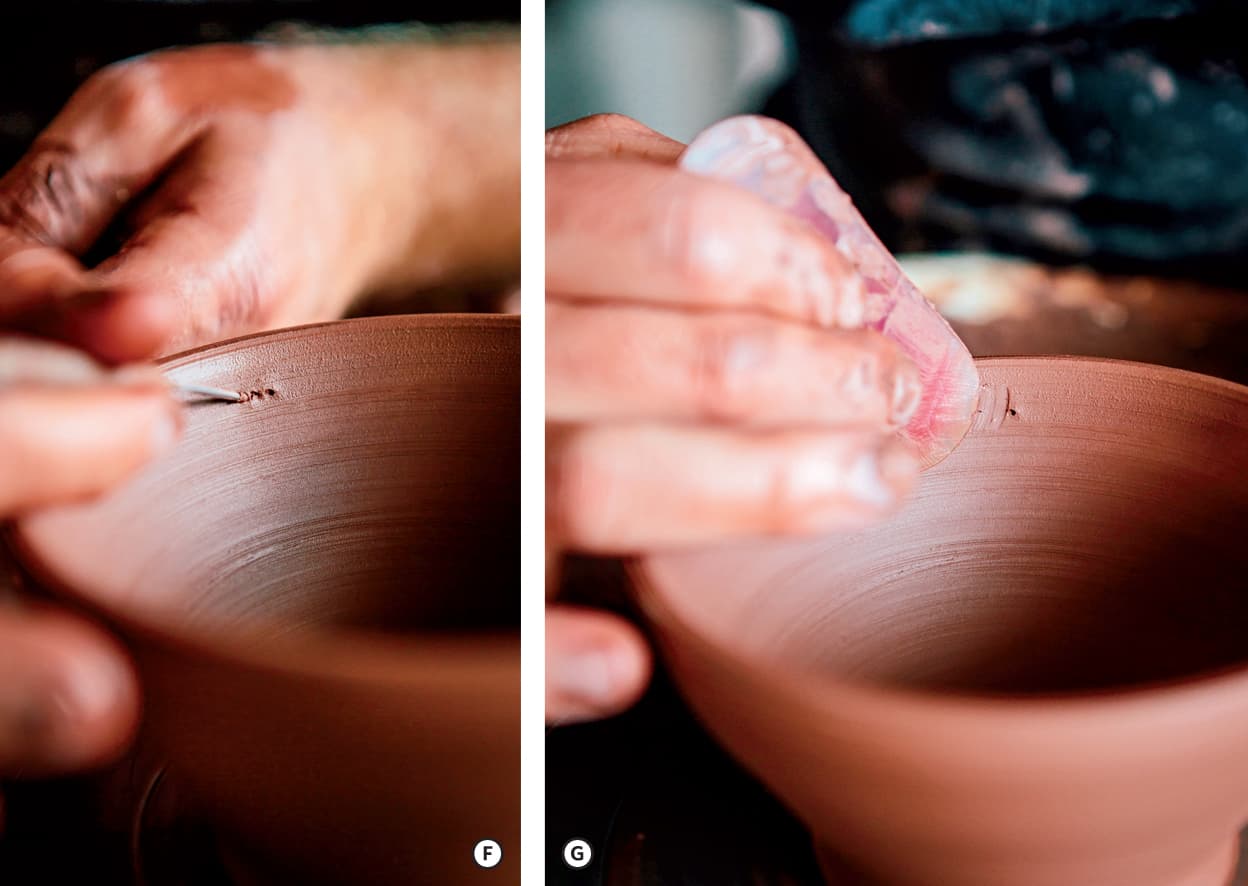
Air bubbles can be mixed into your clay from improper wedging or pugging. You will feel them as a lump when you are pulling up the walls of your pot. To pop an air bubble, poke a series of three holes in the surface with a pin tool. F Compress air out of the bubble by moving a rib across the clay from left to right. G As you continue throwing, you might feel the indent caused by the cavity. Pull evenly through the area or compress with a rib to make sure the area is smooth.
If you’re noticing frequent air bubbles, the culprit is likely improper wedging. It’s a sign that you are folding the clay over on itself at some point in the process. To fix this, during the conical or ram’s head method, make sure you are not pushing too hard and creating a thin section that is then folded back into the main ball of clay. The movement should be a smooth rocking motion, not a jerking roll and fold motion.
Also, before wedging it is helpful to clean your table of any debris. Bone-dry bits of clay can be accidentally picked up as you wedge soft clay. These hard bits could cause cracks when the soft clay around them shrinks more quickly than the hard clay will. The table you wedge on should be clean but not wet. Your clay should roll onto the table without sticking.
BUILDING SKILLS AND THROWING FITNESS
Okay, we’ve addressed the problems. Now let’s work on the fun part: making you a stronger and more highly skilled thrower! The goal in this section is to refine your hand-eye coordination and increase your understanding of proportions. The exercises are general challenges that will lay a foundation of skills that you will build on as you progress through the book.
REFINING SETS OF TEN
Weigh out ten 1-pound balls of clay. Throw ten cup forms, varying the proportions to create ten unique pots. Choose one cup that you like best from the ten to save, but draw all ten cups in your sketchbook before rewedging the nine you didn’t choose back into balls of clay. (I highly recommend you keep an active sketchbook to document all your explorations. In this exercise, the cup designs you didn’t choose might be perfect for a future body of work!) Using new clay, repeat the same process but create ten new forms mirroring the proportions of the cup you chose. A Trim, fire, and glaze the ten cups to completion.

When working in a series of ten, try to complete the exercise in one sitting. Over the course of a few hours, you will have made nineteen forms, with ten being finished to completion. Giving yourself time to experiment, rewedge what you don’t like, and make more of a form you do like will help you refine your preferences. One of the hardest beliefs to conquer in the studio is that every pot that you make should be kept—and often sold. That belief might encourage efficiency, but it will inhibit the risk-taking that is needed for your creativity to flourish. This exercise has risk built in, while still allowing you to keep ten pots. If you use this exercise with more complex forms, I suggest decreasing the number of forms per round as the design becomes more complex.
USING A DIAGRAM AND TEMPLATE TO UNDERSTAND FORM
The previous exercise used repetition to refine form. Another approach is to start with a two-dimensional diagram of a form and work methodically toward a three-dimensional pot. This will be useful for complex forms or ideas that are in the early stage of development. I use this in my own studio for designs that pop into my head fully formed with no obvious physical object to refer to in the making process.
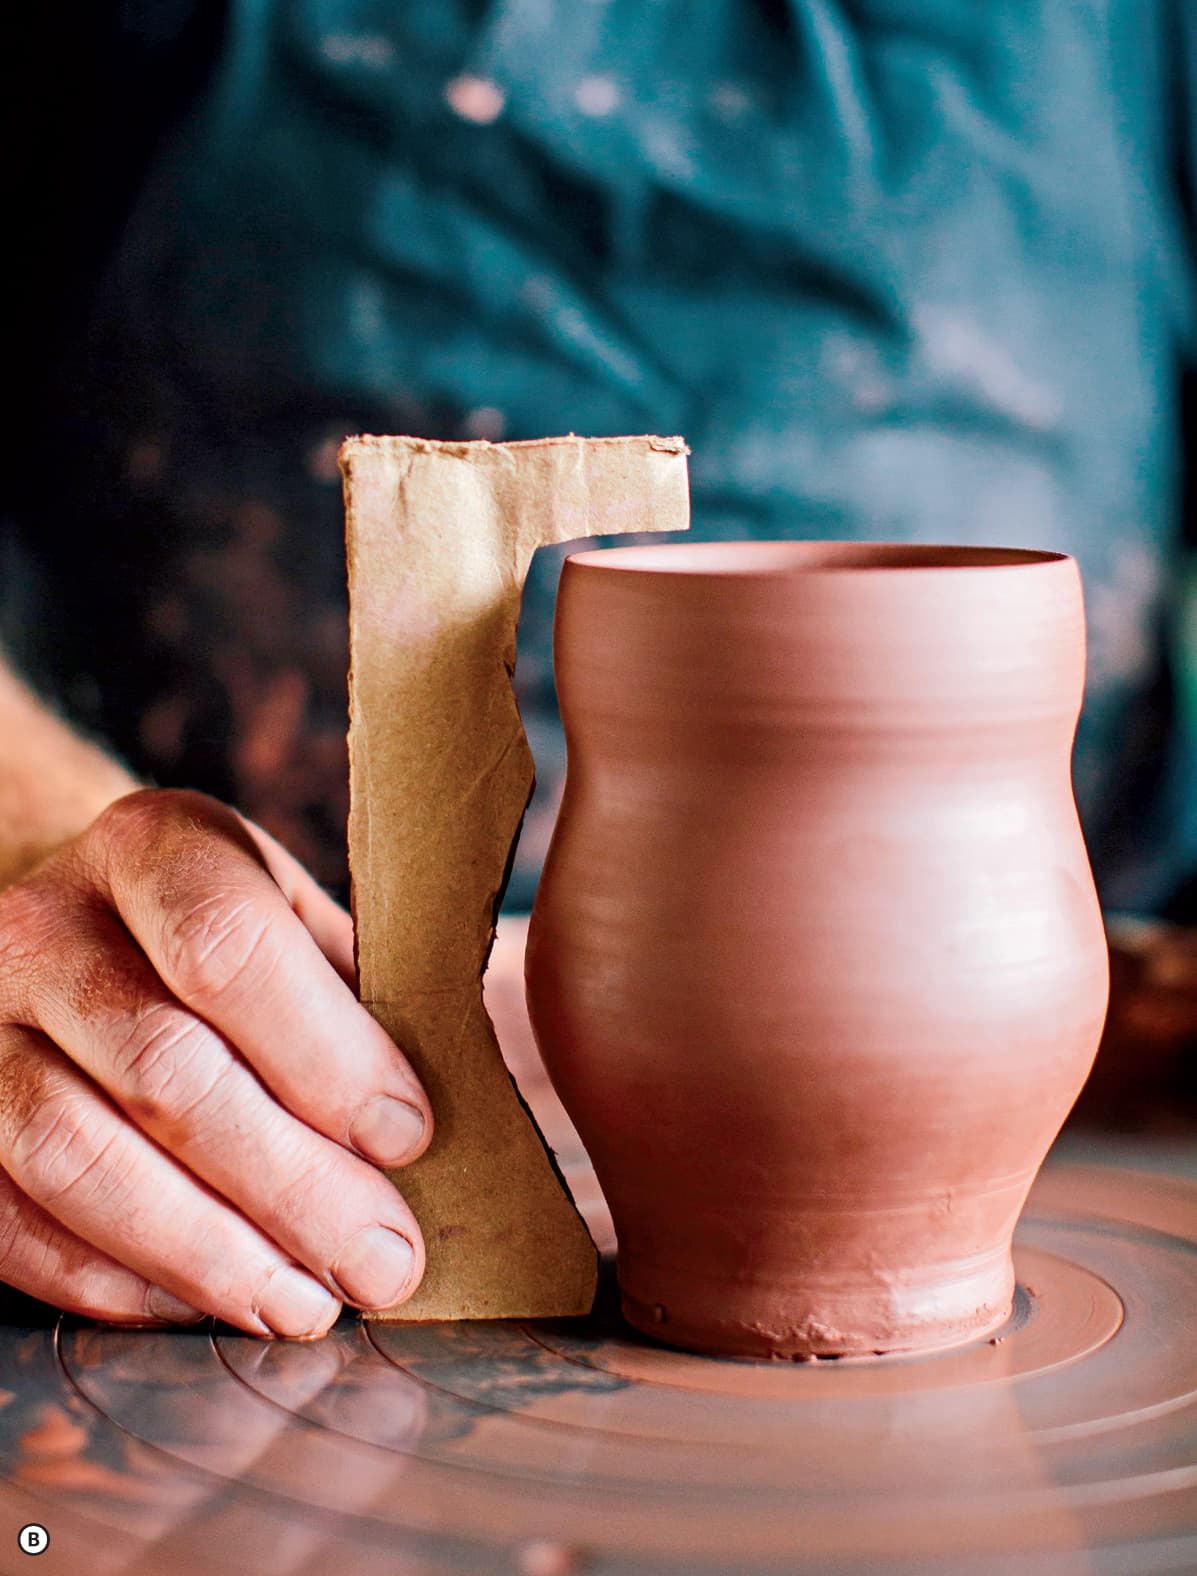
After sketching the pot in your sketchbook, draw horizontal and vertical lines through the pot. Diagram the proportional relationships between the rim, body, and foot. The goal is for you to find the core components of your idea. When you have broken down the form into its smallest parts, create a cardboard template of the silhouette. With your drawing and template in front of you, make an initial round of three versions of the form. Comparing the forms, drawing, and template, try to isolate the problem areas. For me, the angle or fullness of curves always seems to need improvements, so the template is helpful in pointing that out. B Make additional rounds of forms until you replicate the exact silhouette of your drawing.
WORKING WITH INCREASED WEIGHTS
Similar to a body builder building strength with progressively heavier weights, this exercise will challenge you to step up your scale and expand your comfort zone. Weigh out 1.5-, 3-, and 6-pound balls of clay. Starting with the 1.5-pound ball, throw a form with well-defined proportions. Using the 3-pound ball, throw a larger pot with the same proportions. Continue with the 6-pound ball, focusing on making the same form at a larger scale. C
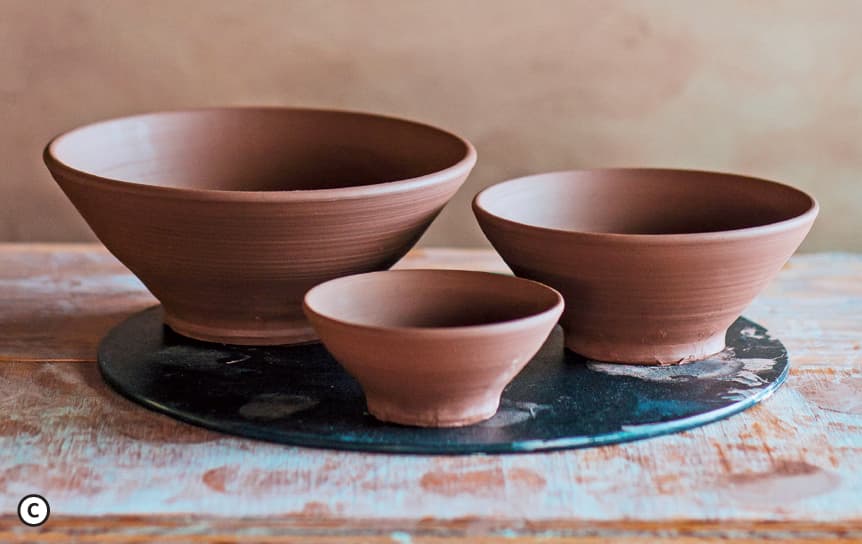
If you are making horizontal forms, such as plates or bowls, stack the pots within each other to observe your progress. If you are making vertical forms, like cups or pitchers, line them up and observe how their heights change. If you are struggling to maintain the same proportions as you increase scale, try using calipers or other measuring devices to ensure you maintain correct proportions. As your skills increase, you will be able to increase the scale of your forms and gain command over larger amounts of clay. Once you master these weights, try the same exercise starting with 8-pound balls and working up to 16 pounds.
FORM AND STRUCTURE
Let’s pause for a moment and look at some of the principles of ceramic design that you’ll see repeated across cultures and time periods. They are not rules for making but parameters you can use to make your forms. Feel free to break these parameters, but do so consciously to create a new way of looking at and thinking about pottery.
WALL THICKNESS AND WEIGHT
When comparing a wheel-thrown mug to a slip-cast mug, you will notice the pots feel different when you pick them up. They might hold the same amount of liquid, but they are weighted differently due to the distribution of clay through the pot wall. Wheel throwing creates variation from top to bottom, while slip casting—or even slab building—creates an even wall thickness. This is not inherently bad, but it does create the feeling that a slip-cast object is only a silhouette of the form. However, subtle variations that are possible in a thrown form are both silhouette and structure.
During one of my early jobs as a production potter, I was encouraged to make pots with thin, even walls throughout. After leaving that job, I realized this notion was a false pursuit. My machine-like precision was a point of pride, but it often left the pots feeling stiff and expressionless. Clay has a knack of recording the feelings of the maker, and my pots became more relaxed as my approach to throwing did. I now strive to make pots that are balanced but not necessarily light and definitely not with even walls.
Balance should vary based on the form. For example, balanced vertical forms have slightly more weight at the bottom of the pot. They shouldn’t have so much weight that the form feels full of liquid, but they should have enough that it doesn’t feel top-heavy when handled empty. Horizontal forms, on the other hand, will feel balanced with more weight towards their central axis. This also helps keep them stable and can prevent them from tipping during use.
Besides the sense of balance, the main concern with wall thickness is that the pot be durable in the places it will come into contact with other surfaces during use. For instance, serving bowls are best left thicker at their foot and rim so that they can withstand the bumps and knocks of the table and serving utensils. The rest of the pot can be trimmed or thrown thinner to decrease the overall weight of the pot. There are also times when a thicker rim might have other advantages over a thin rim. For example, it might keep a porcelain pot from deforming in the kiln. This added thickness counteracts the pyroplastic nature of the material.
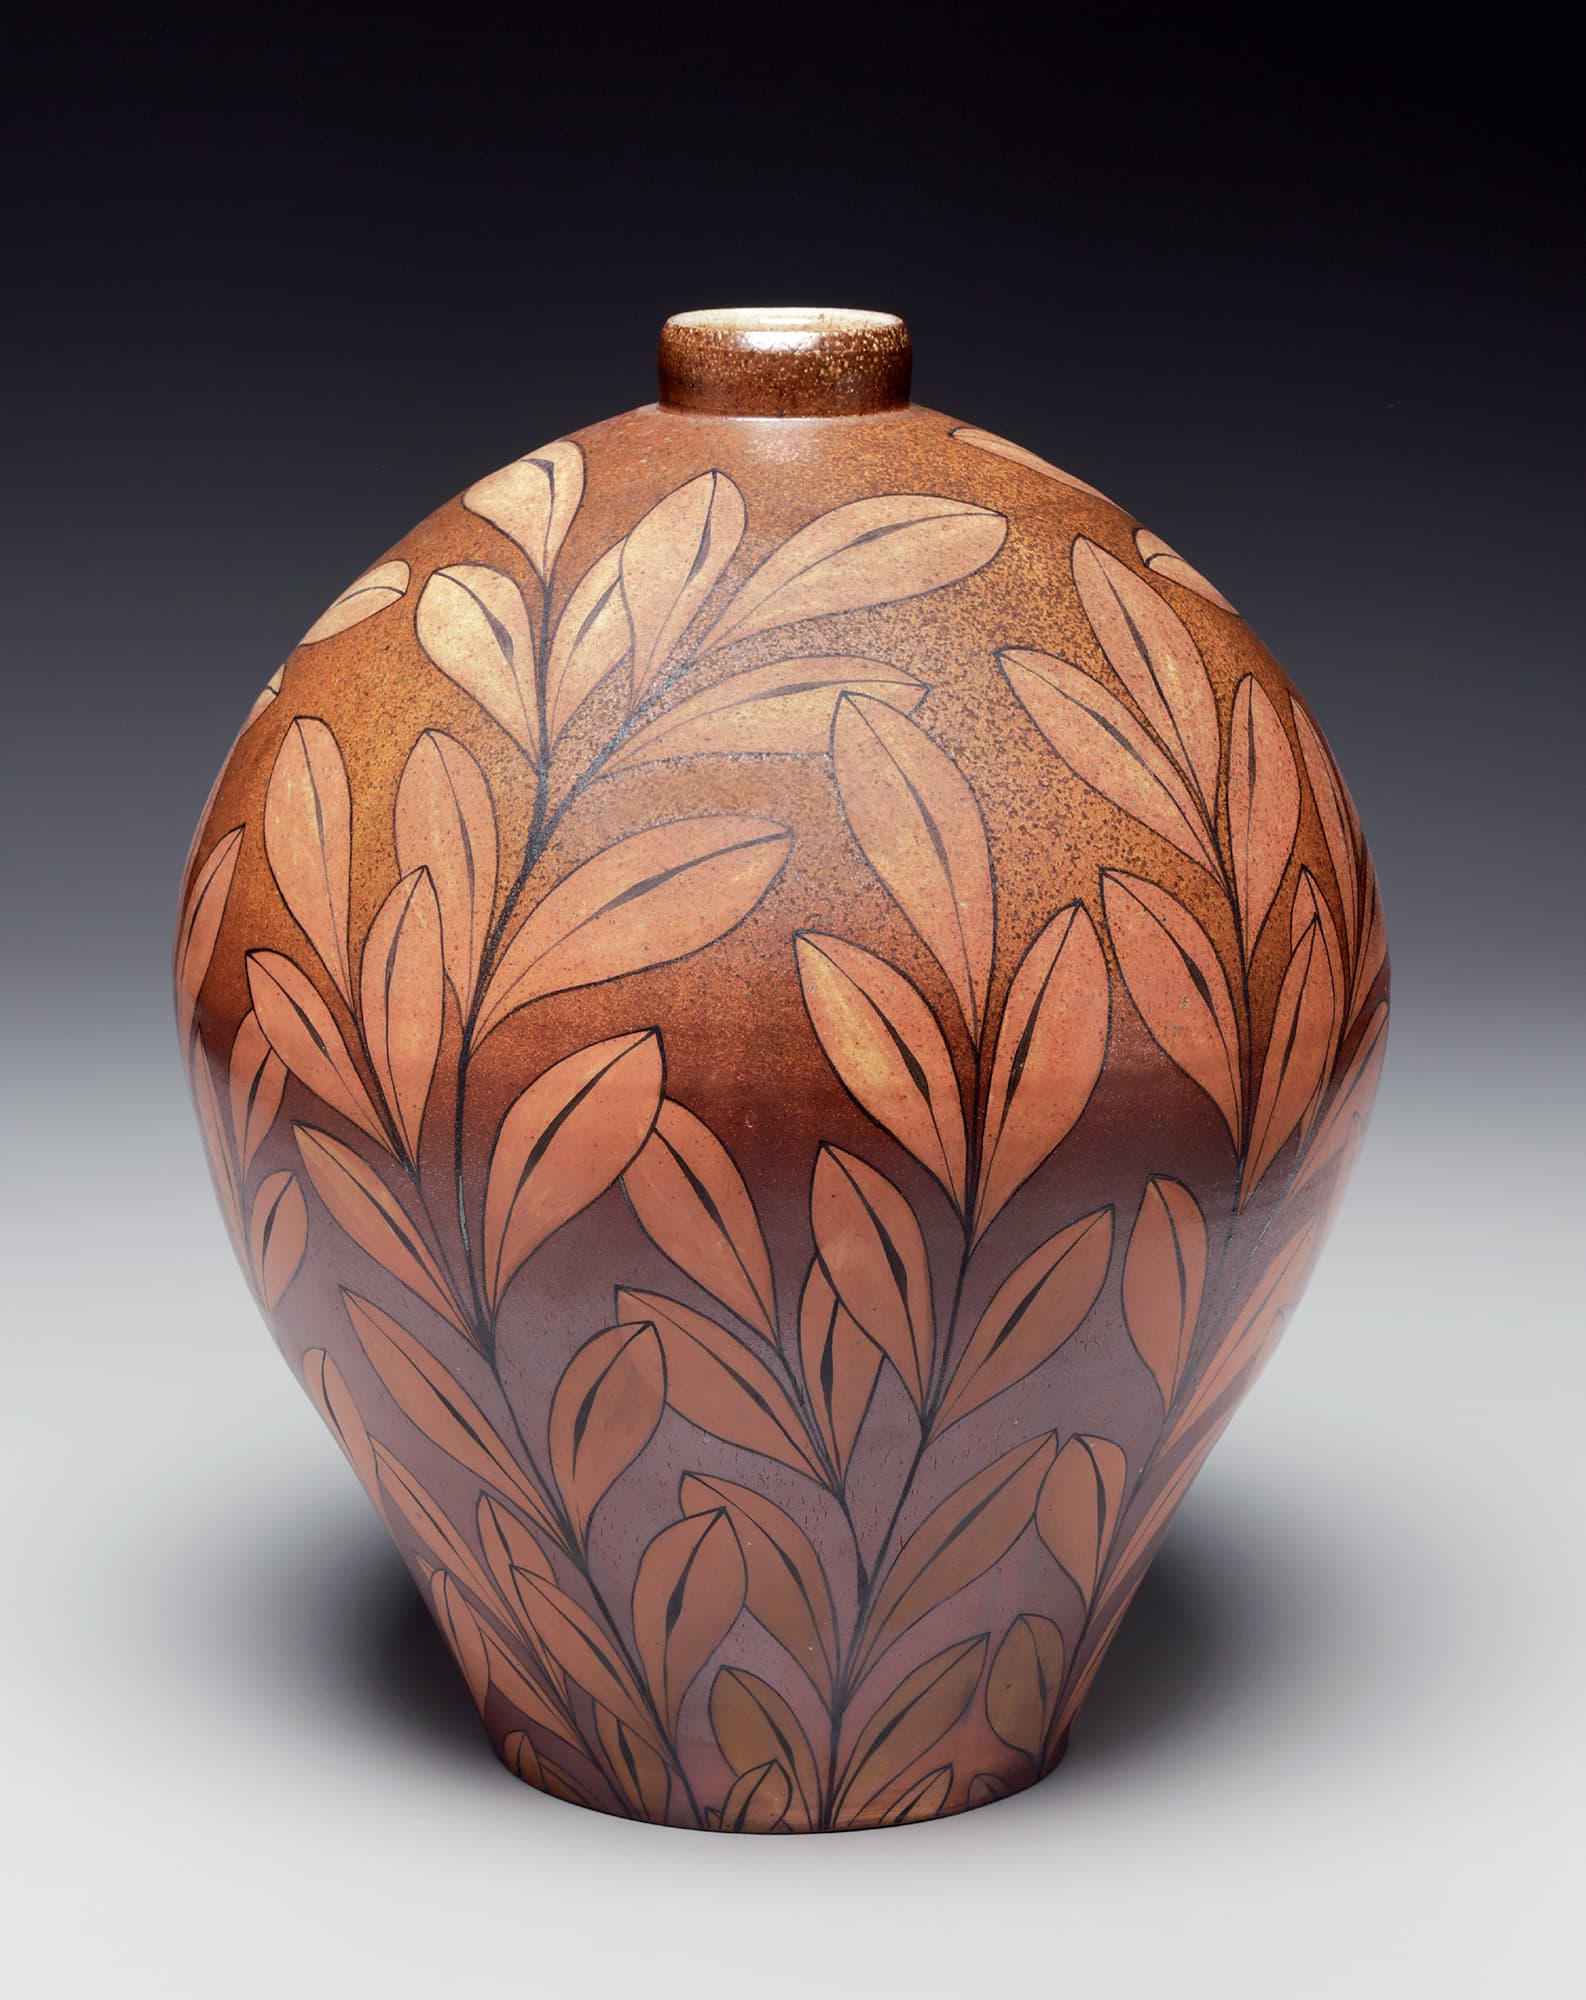
This large bottle by Kyle Carpenter is a good example of a balanced form that has variations in its wall thickness. Towards the base of the bottle form, the walls will be thicker while the wider shoulder will be thinner. Variations in wall thickness are one of the characteristics of wheel-thrown pottery that gives each pot a unique sense of weight and balance. Photo courtesy of the artist
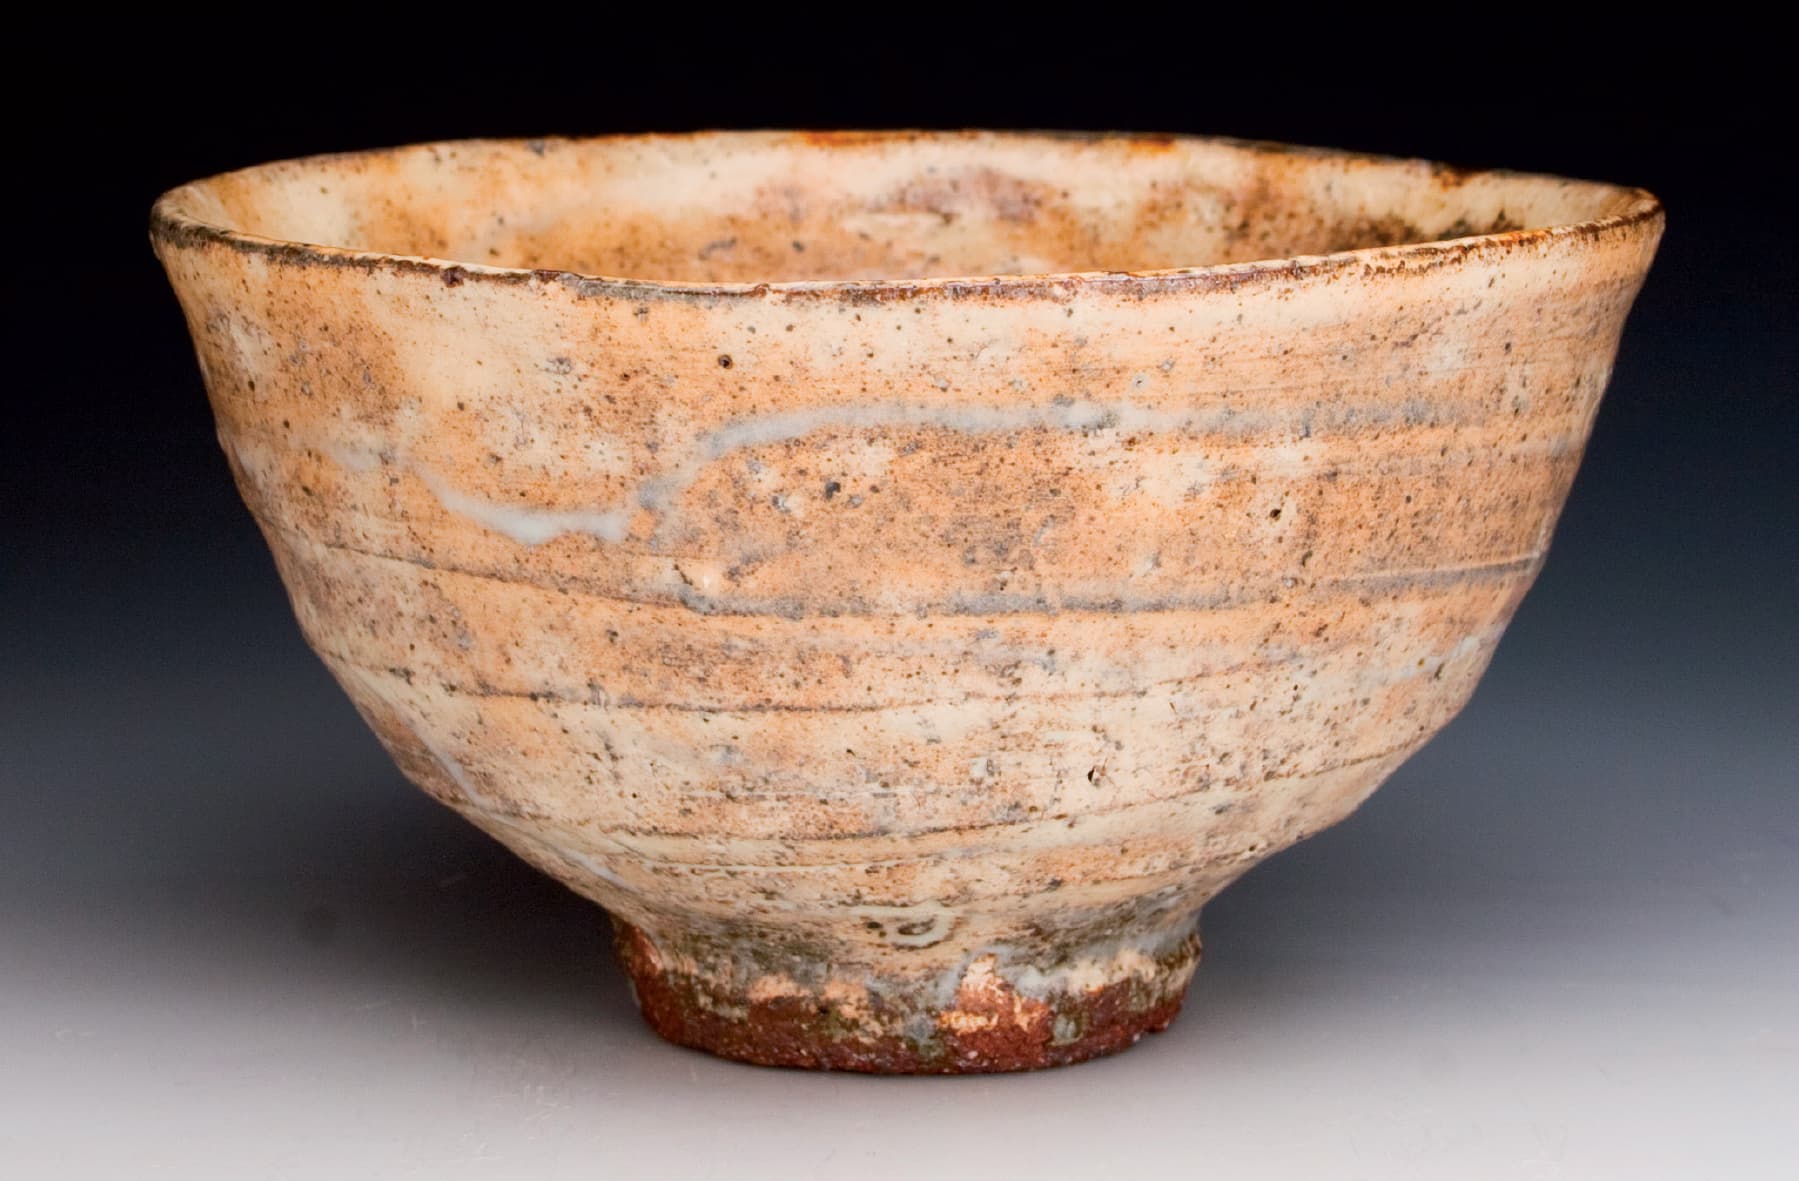
A closer look at this Michael Hunt and Naomi Dalglish soup bowl reveals much about its creation. Notice how the rim undulates and trim lines can be seen through the slip and glaze. Both characteristics are present because they have accentuated process marks that are common to a slow-moving kick wheel. Photo courtesy of the artist
WHEEL SPEED, THROWING RIBS, AND TIGHTNESS OF FORM
As pottery wheel designs changed from hand-driven to kick wheels to the electric wheel, the internal structure of pots have changed. This is due to the increase in velocity of electric wheels and the variation in techniques used between different styles of wheel. There are no hard and fast rules for wheel speed, but I have noticed the techniques used on a slow-moving wheel create pot walls with more variation than those thrown on a fast-moving wheel.
This is largely due to the effect increased speed has on the way tools touch the clay’s surface. When using a rib on a slow-moving wheel, the rib forms a depression into the clay, altering the interior and exterior of the form at the same time. The same rib on a fast-moving wheel affects only the exterior as it skims across the surface. You might recognize a similar hydroplaning effect with boats as they move across water. The faster the boat moves, the less you feel waves because you are jumping between crests of the wave and not settling down into the water. The subtle difference due to wheel speed is not negative or positive, but it will change the way you perceive the form.
Another contributing factor that will appear to tighten or loosen the form is the application of ribs. At times, potters rib both the interior and exterior of their pots to remove throwing lines. This creates a completely smooth surface that can make the pot feel tighter. Pots made without ribs have a less compressed surface and often appear to be looser. Either way is correct, and master potters finish pots both ways. Any preference for the ribbed versus non-ribbed style is up to you. It is one of many characteristics to consider as you refine the way you touch clay on the wheel.
IMPLIED COMPLETION OF CURVES
When designing a form, think about the way the body of the form’s curve visually terminates in space. Imagine an inflated balloon resting on a metal ring. Even without lifting the balloon, you know the balloon’s curve continues beyond the connection point it makes with the ring. When designing a form, engineer the angle of the curve so that it terminates in space above the plane it is resting on. Many designers see this implied continuous curve as an attractive attribute for a functional pot.
This principle can be applied to a round-versus flat-bottomed form. When a cylinder rises out of a flat bottom, its form will always be visually segmented where it rests on the table. If properly accommodated for in the pot’s design, this segmentation can ground the pot on the table. Depending on the height of the foot and the angle of the curve, a round-bottomed form has the potential to imply completion as it rests on the table. Some potters prefer this because the pot appears to have lift from the table surface. The difference between round-and flat-bottomed forms is a matter of preference, but don’t get caught unaware when designing the form. Make a conscious decision to terminate your round forms above the plane they rest on or balance the weight of the flat plane with another design element in the overall design.
SHAPING THROUGH INTERNAL VERSUS EXTERNAL FORCE
When shaping a pot, you can exert force from the inside or outside to create a curve. Pots that are shaped from the inside appear to be expanding in space, while pots shaped from the outside seem to contract. To balance this shrinking feeling, make your last shaping movement come from the inside of the pot. This will elicit the feeling that the pot is taking in a deep breath of air.

Linda Arbuckle’s lidded jar is an example of a piece that is designed with a flat bottom. The walls of the form are perpendicular to a flat plane that is parallel to the table. In contrast, a round-bottomed form, such as a bowl, might have a continuous curve on its interior that terminates above the surface of the table. Photo courtesy of the artist
THROWING OFF THE HUMP
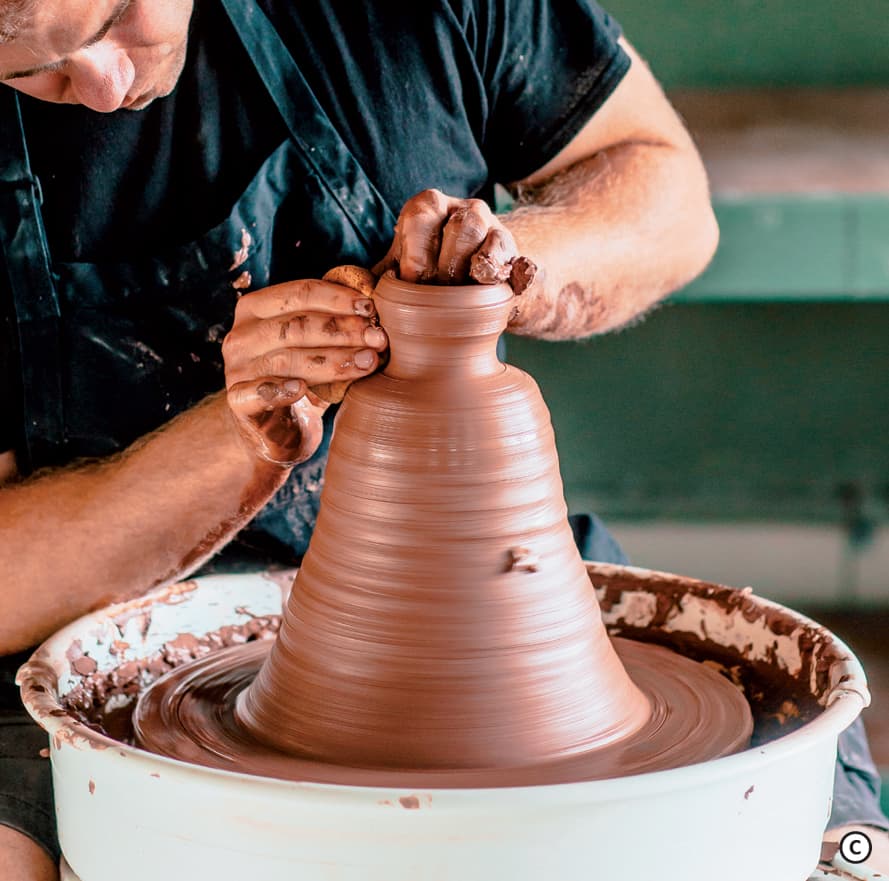
Much of my instruction so far has been geared towards throwing a singular form out of one ball of clay. This can be an effective way to judge how your skills are improving as you try to throw larger pots out of a set amount of clay. Another method, throwing off the hump, allows you to make multiple pots out of one larger lump of clay. Small pieces can be made quickly, so many potters use this method for making dozens of similar forms in one throwing session. I often make knobs and lids with this technique.
1. Center 3 pounds or more of clay. Initiate the centering process by coning up and down as you normally would for a large pot (see here). Start to cone up a second time but only use the top 3 inches of clay. A For the rest of the process, this 3-inch segment of clay will be your only concern. The clay below the top section will be used for other pots.
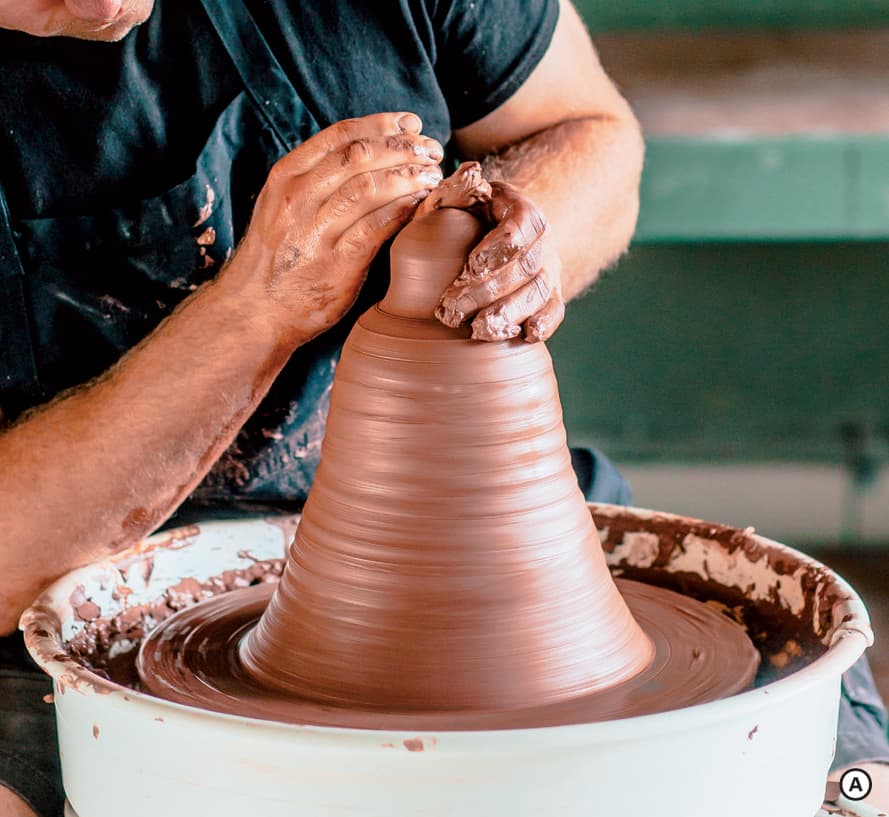
2. Push down to open and establish the pot floor. B As you are opening, make sure not to push too deep as the bottom of your clay segment can be hard to judge. With practice, you will be able to tell how deep you have opened with a quick glance. Continue on to pull the walls, making the same considerations for thickness and shape as you would on a form thrown directly on the wheel head. C D

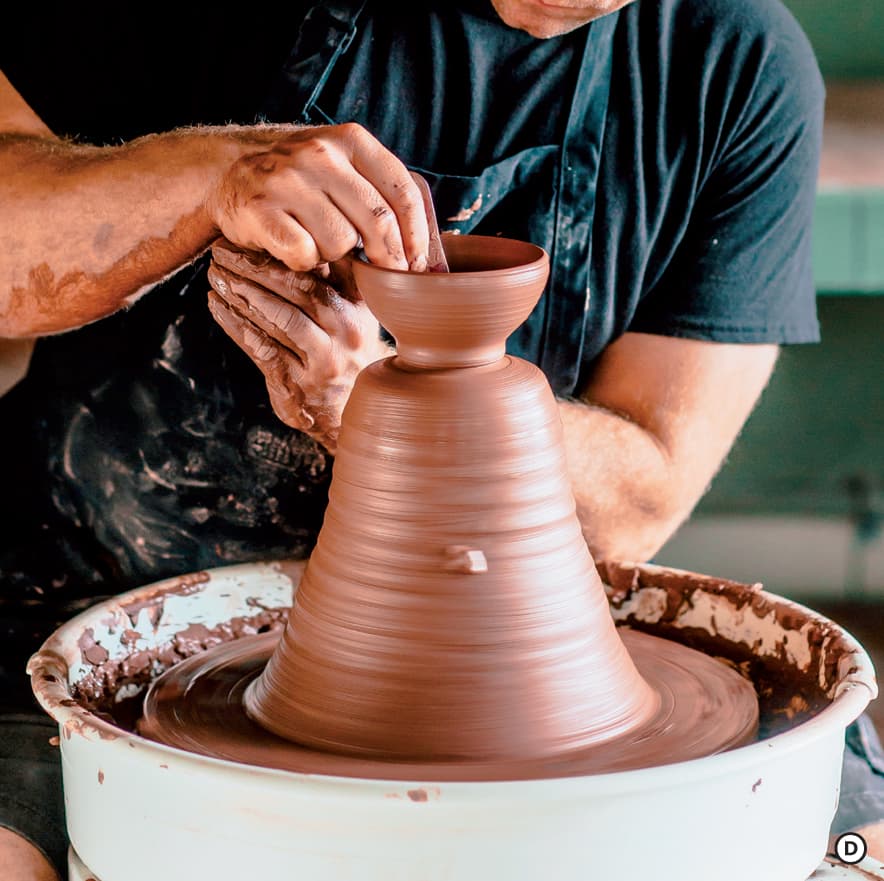
3. When you’re ready to remove the piece, clean up the bottom edge of the foot with a wooden fettling knife or other trimming tool. E Drag a wire tool underneath the piece and lift up to remove it from the hump of clay. F If the pot seems stuck, try pulling up lightly from the base of the form as you start to turn the wheel slowly.

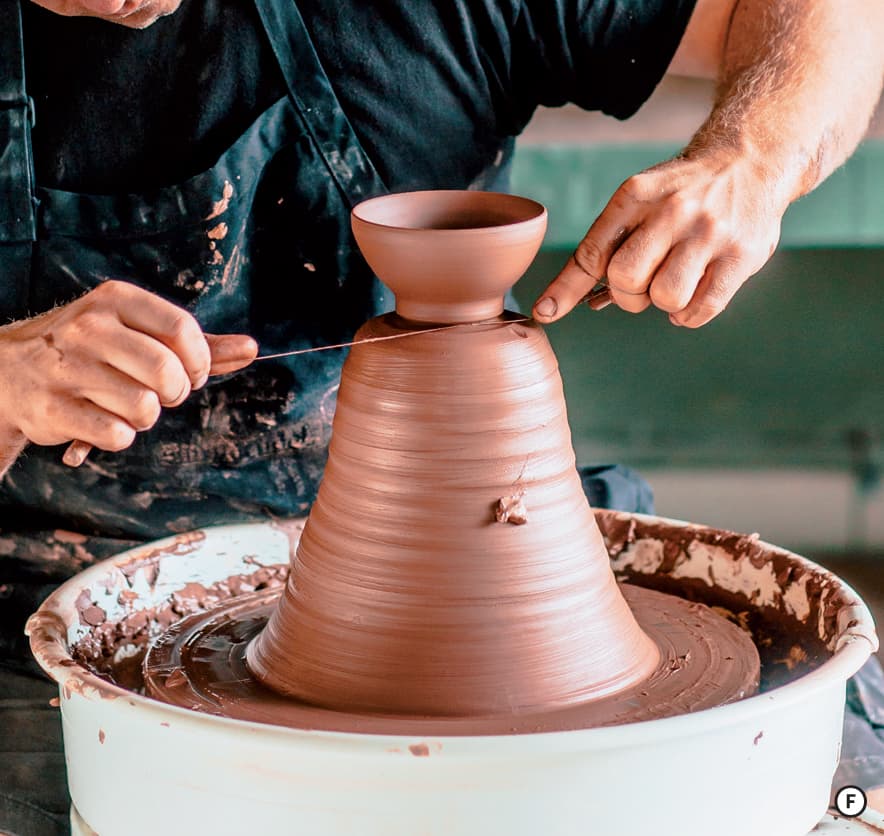
4. If you are making multiples of the same form, re-center a small amount of clay roughly equivalent to your original amount. To help replicate the starting amount of clay, I often use calipers or other measurement tools. Following the steps listed above, make as many pieces as you can before running out of clay. If you start with 8 pounds on the hump and you normally make 1-pound mugs, then you should get eight mugs out of that amount of clay.
FOUNDATIONS OF TRIMMING
While it is possible to trim a pot before removing it from the wheel, most of your trimming will be done at the leather-hard stage, after the pot has been set aside to dry. The specific level of moisture at which it is appropriate to trim is largely a matter of personal preference. I often trim my earthenware pots when they are wet so that I can rewedge my trim scraps. On the other hand, the porcelain pots of Jingdezhen, China, are trimmed at bone dry due to the thixotropic nature of the clay, which will collapse if trimmed at leather hard. This brings up a good point: let the clay and the form you have made dictate when and how you trim. Wide plates will need to be on the hard side of leather hard so that trimming won’t collapse their interior curve. Tall vases, on the other hand, can be trimmed when the foot is soft because their rim will be dry enough to hold their shape. There are no hard and fast rules, but I don’t suggest trimming a form if the rim is still pliable. Beyond that, let your relationship with the clay tell you when it’s appropriate to trim.

This collection of Michael Hunt and Naomi Dalglish yunomis are freshly trimmed and awaiting a coat of slip. Photo courtesy of the artist
Foot placement is determined by the relationship between the horizontal and vertical walls. The outside edge of the trimmed foot should rest below the point at which the horizontal and vertical walls meet. Beginning potters often trim through their pots or, conversely, leave too much weight in the form. To avoid these problems, I find it helpful to mark the depth and width of the foot before it is re-centered upside down on the wheel. To do this on a flat-bottomed form, run your hand across the interior until you hit the sidewall. Holding the pot horizontally, mark a small line on the bottom of the piece that corresponds to the point where the side wall starts. A Then tilt the piece vertically and place a mark on the form that corresponds to your interior finger, thus marking the depth of clay that is available for shaping into a foot. B When marking forms with round interior curves, you have more leeway with foot placement, but the general principle is that the foot will sustain the curve of the body if its outside edge is below the vertical/horizontal transition point.


Now that it’s marked, the piece must be centered upside down on the wheel head. To accomplish this, you can tap center, gently striking the pot as the wheel spins slowly until it’s on center. C Alternately, you can use the concentric circles on the wheel head as guides D or use the record needle approach, lightly touching a wooden tool to the surface of the pot as it spins to gauge how far it is from center. E With any method it is important to realign the central axis of the pot with the central axis of the wheel. This ensures that the trimmed foot will be located directly underneath the pot.
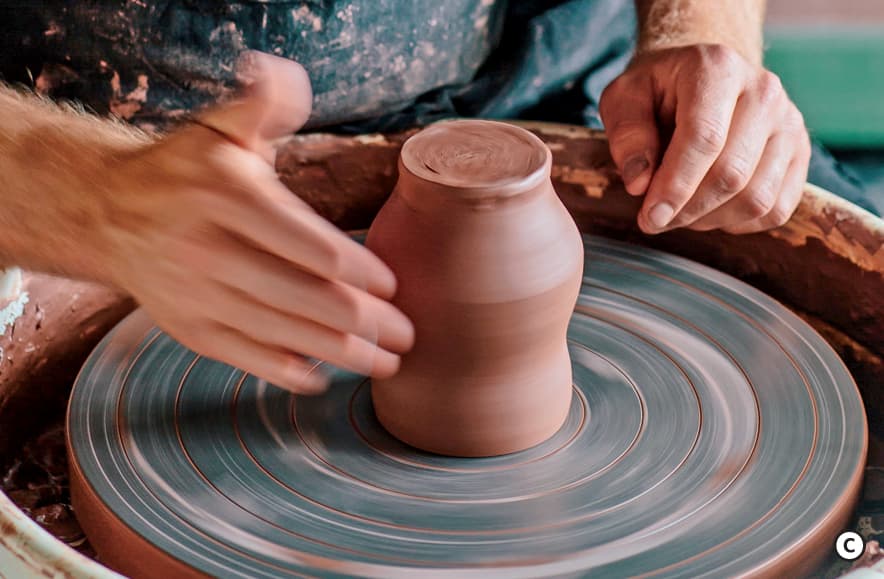


The last step before you begin to trim is to place coils of clay around the rim of the pot to hold the form in place. When attaching coils, make sure to push the coil down and not into the piece. F The rim of the pot is fragile and can be unintentionally altered with too much inward pressure.
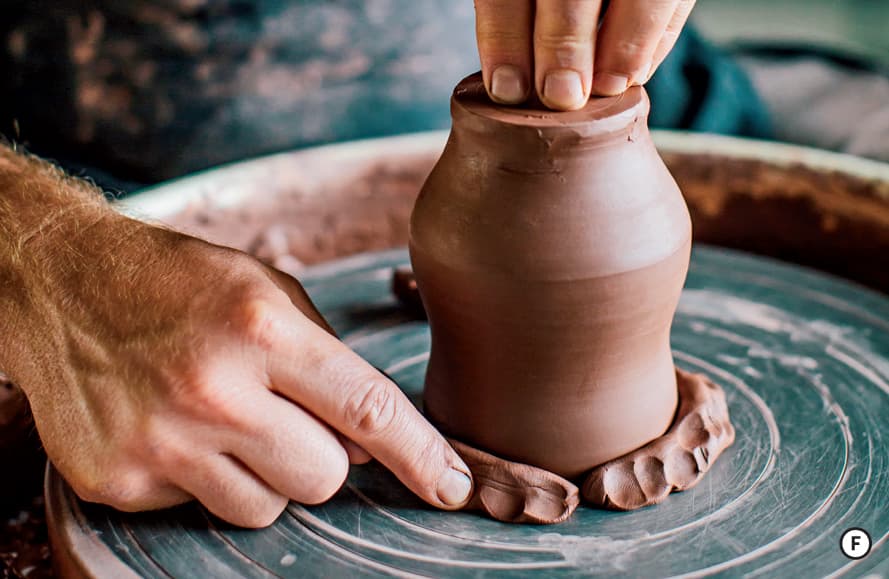
Once the piece is centered and held in place, get the wheel spinning at 1/2 speed. Now you’ll experiment by pressing metal or wooden tools against the surface of the pot to remove clay. Most potters use a wide metal loop tool to remove unwanted clay and define the exterior of the foot. G When the shape of the foot is roughed out, you can then trim an exterior curve in the body that matches the interior curve.
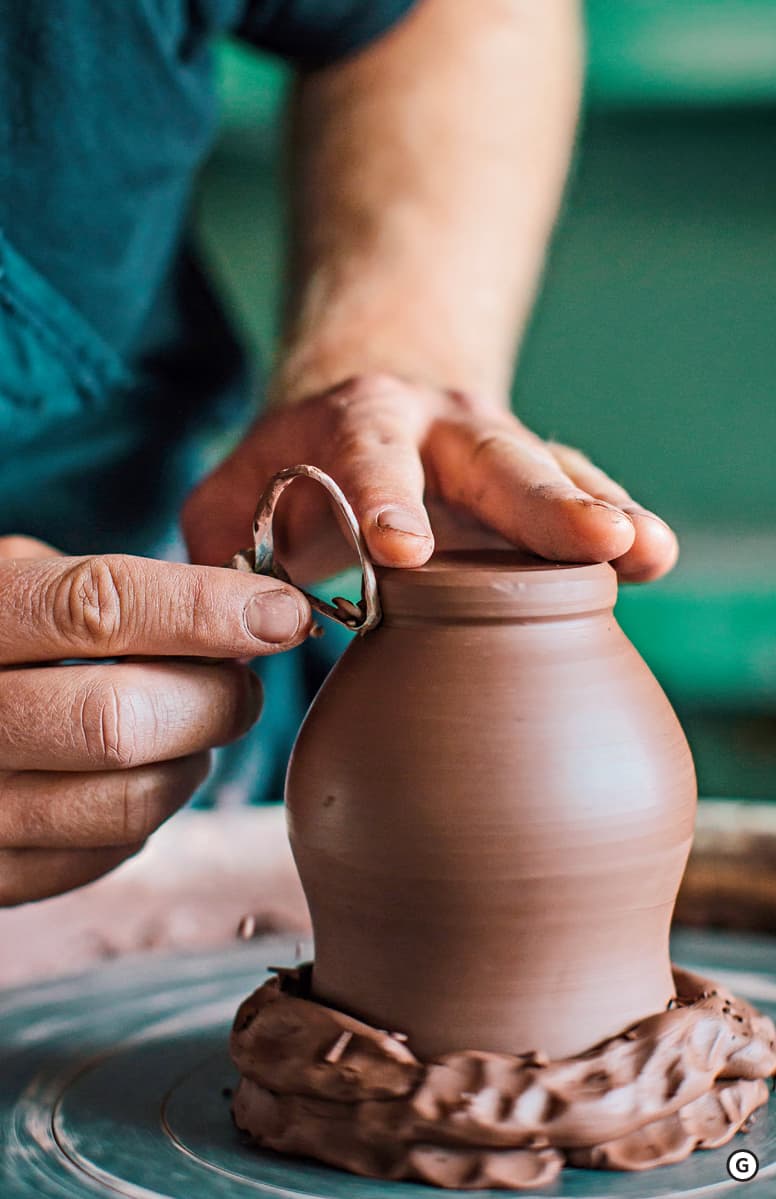
Moving on, most potters trim the inside of the foot ring with a small loop tool or angular turning tool. H Trim down until the base of the interior foot curve forms a unified curve with the exterior of the pot. I


In general, you’ll find the speed of the wheel and the sharpness of the tools will determine how much clay is removed at one time. To remove small pieces of clay, increase wheel speed and apply light tool pressure. Decrease wheel speed to remove larger ribbons of clay. Slower speeds often create visible trim lines, which can be incorporated into the aesthetic of the pot.
As a last, optional step you can refine the foot with smaller precise trim tools, including loop or angular trim tools. Consider how you might unify the trimmed and thrown surface of the pot. Holding a wet sponge or plastic rib against the pot as it spins can mimic the thrown surface. If you choose to leave the rough trimmed surface of a heavily grogged clay, consider how the texture will be affected by the glaze you choose. A transparent clear glaze will show every pit and crevice caused by trimming whereas a satin opaque glaze will cover all of the texture.
GOING FURTHER WITH FEET
There are a variety of profile shapes that appear in the canon of ceramic history. Regardless of culture or time period, four core profiles continue to occur: concave, convex, straight, and sculptural. When considering feet, think about how the profile will reinforce other design elements in the form. A round foot with a reciprocal convex curve might enhance the curvilinear nature of a wide bowl, while a straight squared foot might stand as a strong point of contrast with the form. Harmony and contrast can be effective in establishing a strong form, as well as setting up surface decoration in the later parts of the making process.

Here you find three styles of trimmed feet commonly used on functional pottery: straight, convex, and concave. Experiment with all three, or develop your own variations.
When looking at three of the four core profile shapes pictured above, think about how you might alter their transitions to create variations on the theme. A thin band of clay left at the transition point of a convex curve enhances the perception that the pot is sitting on a pedestal. This same band of clay can be carved into a lotus or geometric shape to enliven the form.
The curve at the end of a foot should also be considered as a point of articulation. A round curve is the most resistant to chipping during use. Pots that will be passed around the table will need a round curve, while pots that will be sedentary during use could have a flat angle that meets the table’s surface. While a flat angle is more susceptible to chipping, it is an aesthetic that could complement a particular way you serve food.
The thickness of a foot should always be considered during trimming. The balance of weight in a pot will be affected by how much clay you choose to leave in the finished foot. Utilitarian pots for daily use can benefit from the durability of a thicker foot while the lightness of a thinner foot might establish the delicacy of a serviceware pot that is only used on special occasions. When first designing a pot, I recommend you make three identical shapes with the only variation being foot shape and thickness. When the pots are complete, judge their aesthetic and weight balance both in your hand and on the table. To better feel the balance of weight, close your eyes and pass the pot between your hands. Take note of which foot profile makes the piece easier to hold.
There are times when you will not need a trimmed foot to enhance the form. With or without the foot, you will need to consider how you refine the base of the pot. When throwing a piece without a foot, you can open the form deeper than you would with a footed piece. The extra clay you save without a foot will allow you to make a larger piece. Make sure to adequately compress the bottom of the piece, ensuring that no water is left in the base when it is removed from the wheel. Consider using a throwing stick or rib to create a tight, well-compressed bottom. These steps will help reduce S cracks and other compression problems.
CARVING AN OVAL FOOT BY HAND
There are circumstances where you might need to carve a foot without the assistance of the wheel. For example, forms that are not round can be trimmed by hand to create a non-round foot.
To do this, carve away excess clay freehand with a metal ribbon tool. If you need to plan the foot first, I recommend creating a paper template to establish an outline for the foot shape you want to create. Also, no matter how you plan to carve the foot, you’ll find it helpful to place the piece upside down on a soft foam bat, which will hold the pot in place for carving without damaging the rim.
WET TRIMMING AND THROWING A FOOT
While most trimming is done at the leather-hard stage, there are altered forms that can benefit from wet trimming. First, make sure that the rim of your pot is dry enough to stabilize the pot when turned upside down! You do not want to trim a pot that will lose its shape and collapse when trimming. A good way to gauge if the pot is ready is to see if it’s at the point when your fingers will not leave prints on the surface of the pot.
After re-centering the pot on the wheel you can trim as you normally would. However, pay close attention to the pressure you are exerting with your trim tool as the clay is more responsive at this softer consistency. I also find it helpful to sharpen my trim tools on a bench grinder or rasp before soft trimming. This helps to create deliberate, precise pressure that will remove only the clay you want to affect.
Once you have created a basic foot shape, you have the option to rethrow the clay you have available. When throwing the foot off of the pot, make sure to hydrate only the clay that you will throw. Be mindful of water that might run down the sides of the piece, which can cause weakness in the form.
When throwing the foot, think about how you might create a non-round shape as a point of contrast for your form. With the clay being soft, you can alter the foot into square, oval, or triangular shapes. If a large pedestal foot is desired, you might consider adding an additional coil to give you enough material to throw a foot with a larger profile. After the foot has been thrown, take the pot off the wheel and let it dry upside down. When the thrown foot is at the soft leather-hard stage, flip the piece over to make sure the foot sits parallel to the table. Slight pressure on the high side of the pot might be necessary to rebalance the pot.

Val Cushing, jar. Photo courtesy of the artist
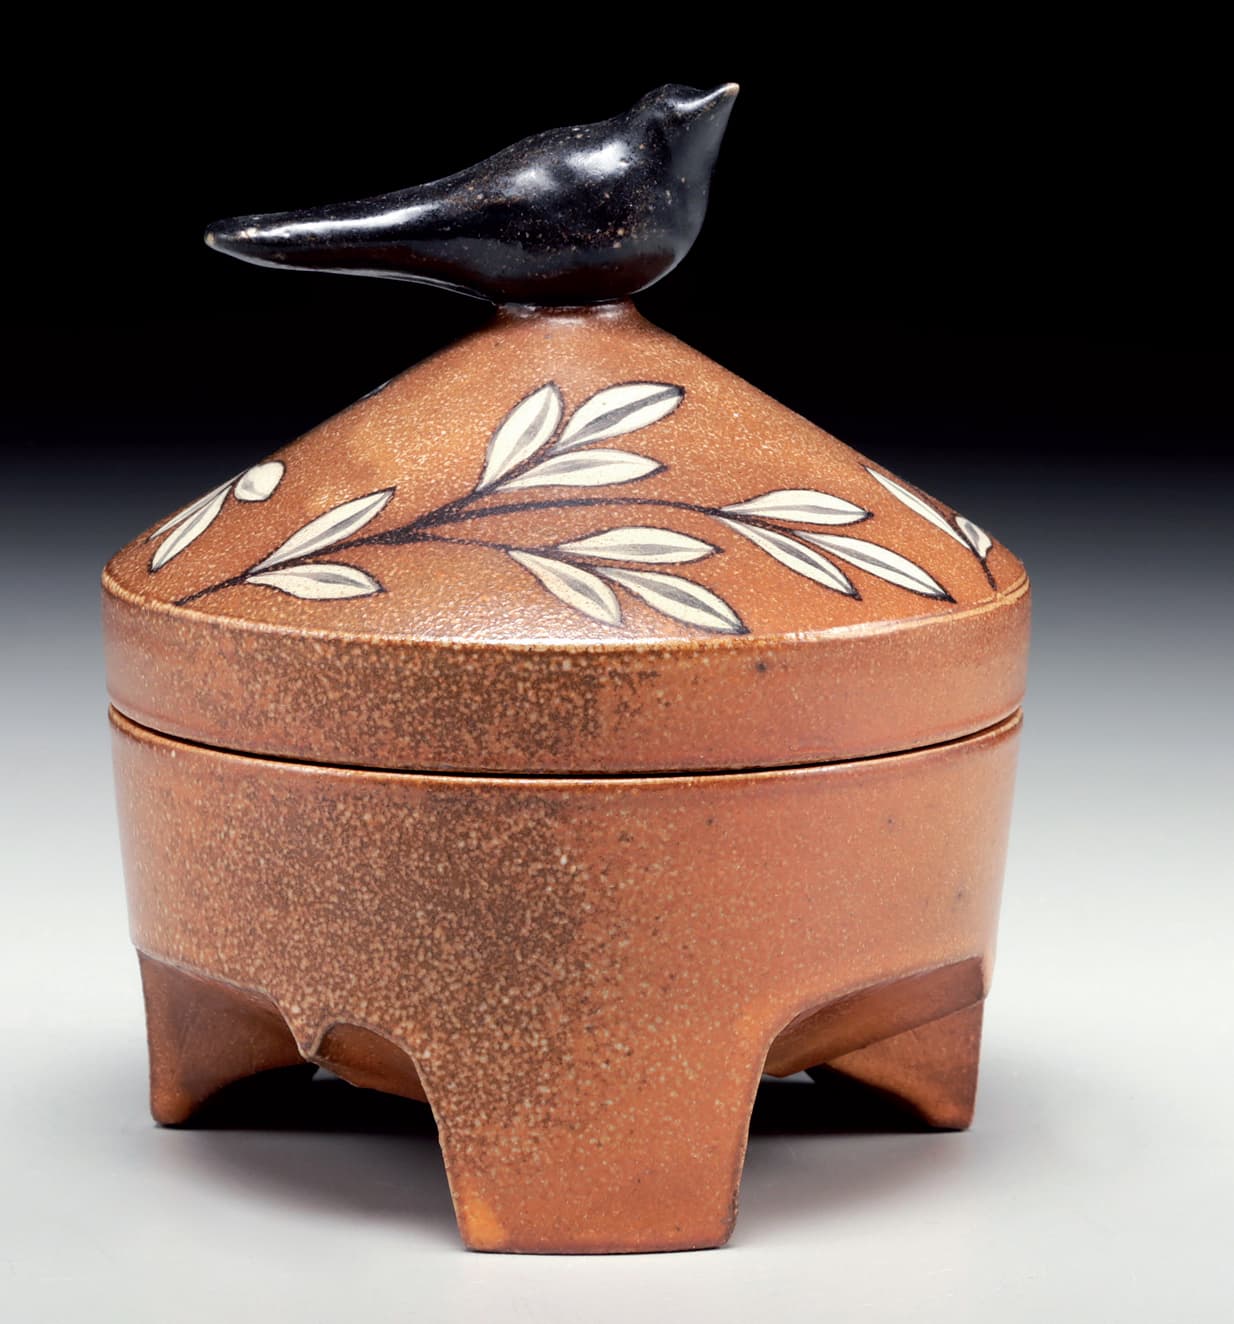
Kyle Carpenter, bird jar. Photo courtesy of the artist

Martha Grover, creamer set. Photo courtesy of the artist
THROWING OR HAND-BUILDING A FOOT SEPARATELY
When designing complex forms, it might be easier to throw your foot separately from the form and then attach it at the leather-hard stage. Trial and error will help you determine the exact amount of clay needed to throw a foot. If in doubt, start with more clay than you need and cut the excess off later. As a starting point, try using a fifth of the starting weight of a vertical pot and a third of the starting weight of horizontal form.

An elevated bowl of this type has a separate thrown foot that is attached at the leather-hard stage. Use this technique to create contrast between the soft quality of the altered foot and the hard-edge silhouette of the bowl.
To create a foot on the wheel, you will center your clay and then open a cylinder all the way to wheel head. Open the clay to a diameter where the top edge of the foot will connect to the pot.
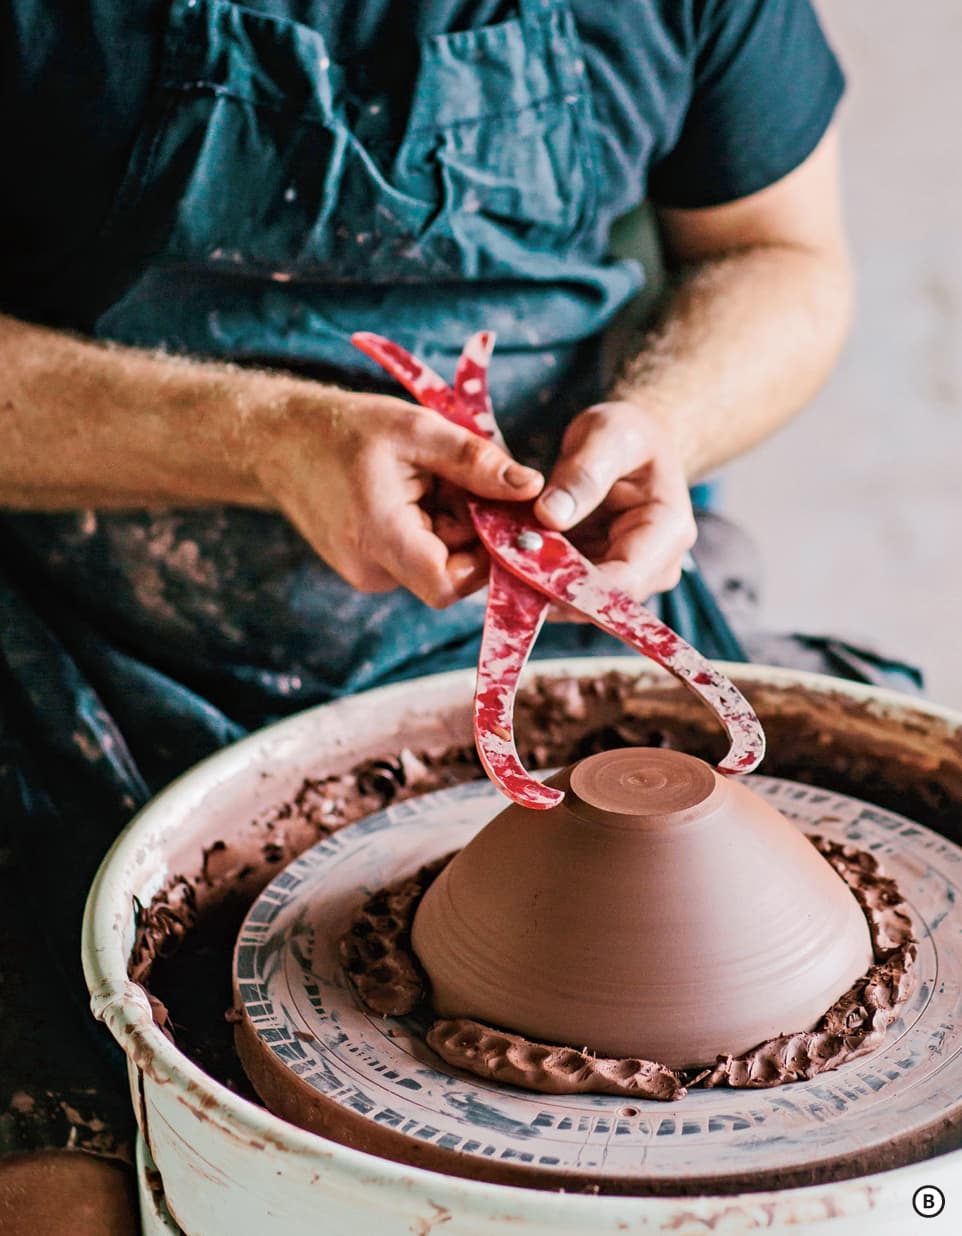
Pull the walls to the maximum height and alter the foot into shape. If the piece you’re going to attach to is round, make sure to bevel the top edge of the foot to match the angle of the piece. Use calipers to precisely measure the top of the foot and the bottom of your post. A B Consider using a heat gun, or blow torch, to harden the shape, which will make it easier to remove from the wheel head.

Place your piece upside down on a banding wheel or the wheel head. Re-center the foot above the form. Trace a line around the edge of the connection where the foot meets the body. Lift the foot, slip and score the surfaces, and apply the foot. C Wiggle the piece back and forth to ensure a good connection before refining the transition with a rubber tipped sculpture tool. D
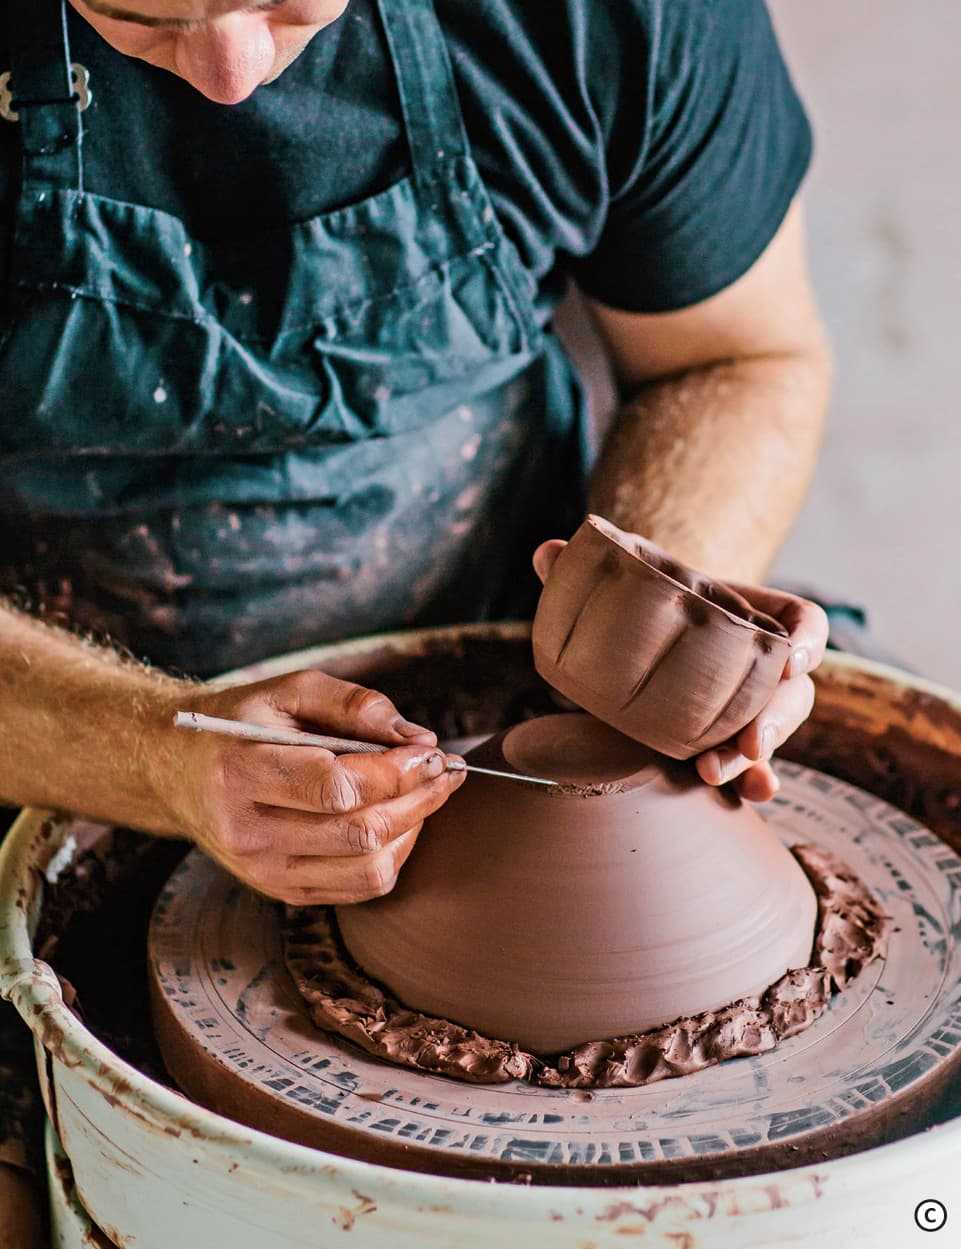
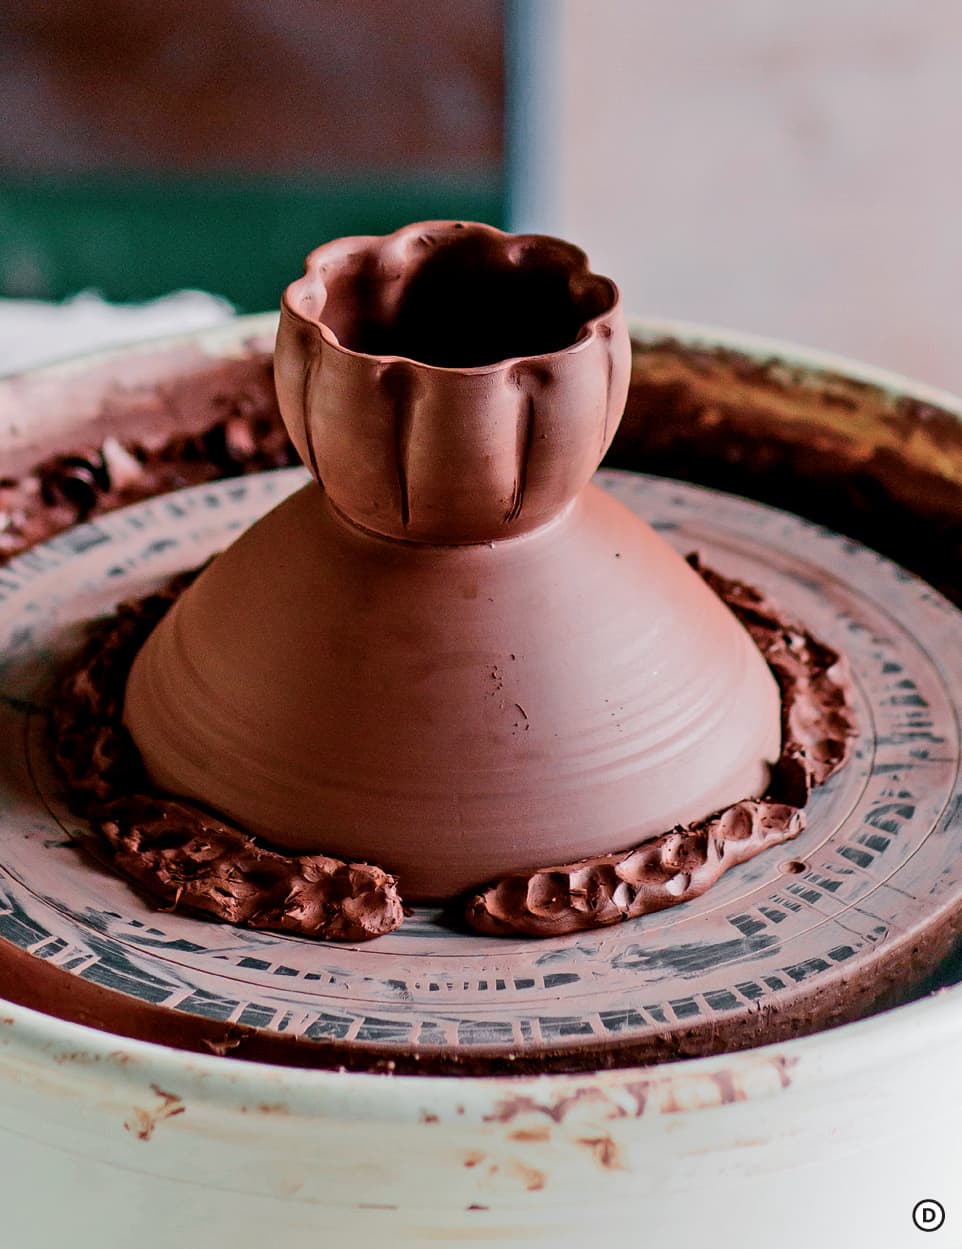
The same principles apply to a hand-built form. Sculpt your foot using coiling, slab-building, or press-molding methods. Apply the leather-hard foot to your pot before turning the piece right-side up.
Note: When adding a separate foot, you might need to surform the foot to make sure it sits flat on the table.
GALLERY

Mackenzie Smith, plate. Photo courtesy of the artist

Jim Smith Chinoiserie, vase set. Photo courtesy of the artist

Janet Deboos, gourd vase. Photo courtesy of the artist
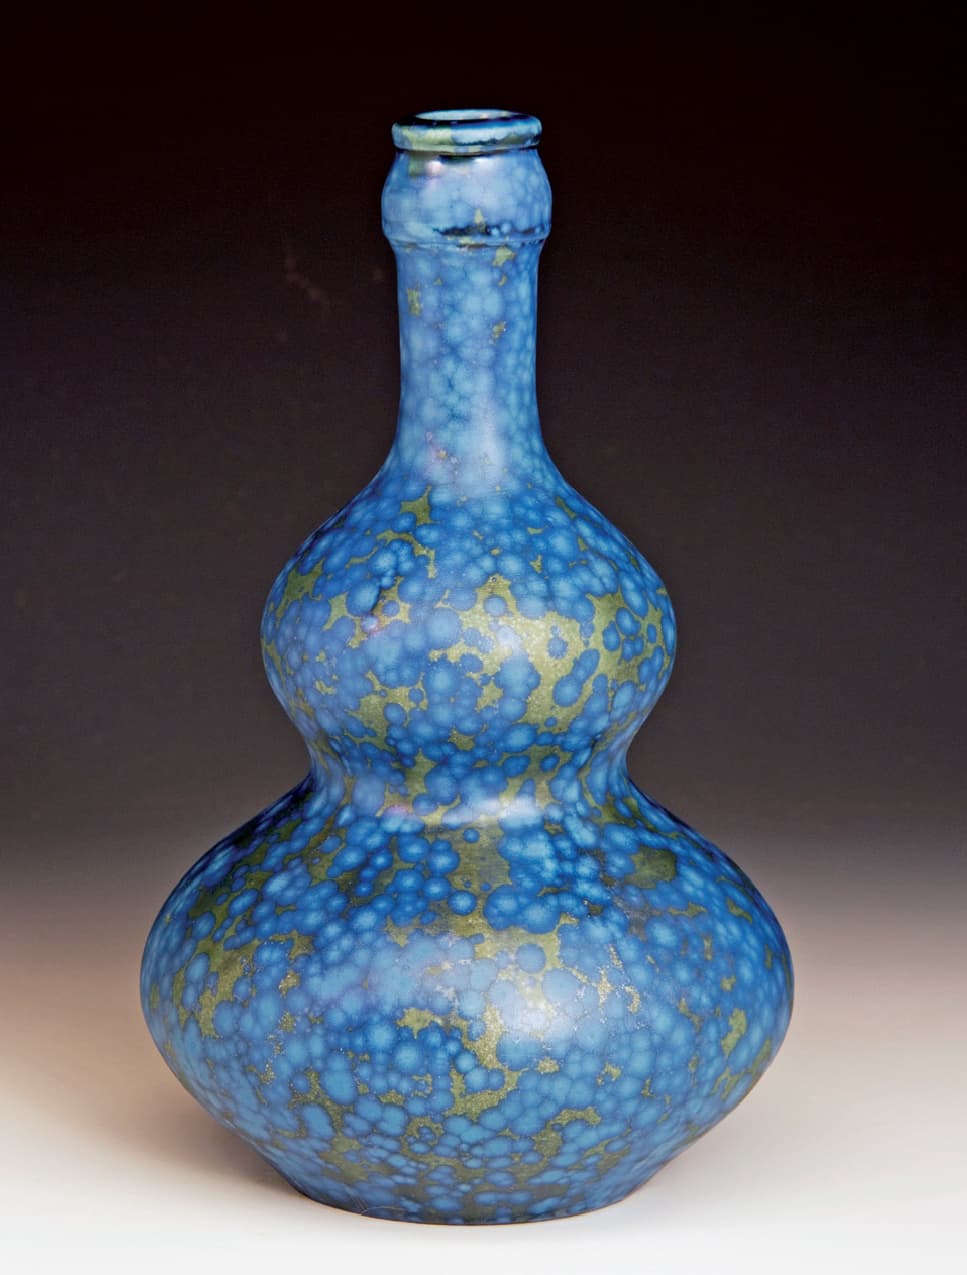
Bruce Gholson of Bulldog Pottery, blueberry matte gourd vase. Photo courtesy of the artist

Michael Kline, jar. Photo courtesy of the artist

Sue Tirrell, red and orange bowl collection. Photo courtesy of the artist
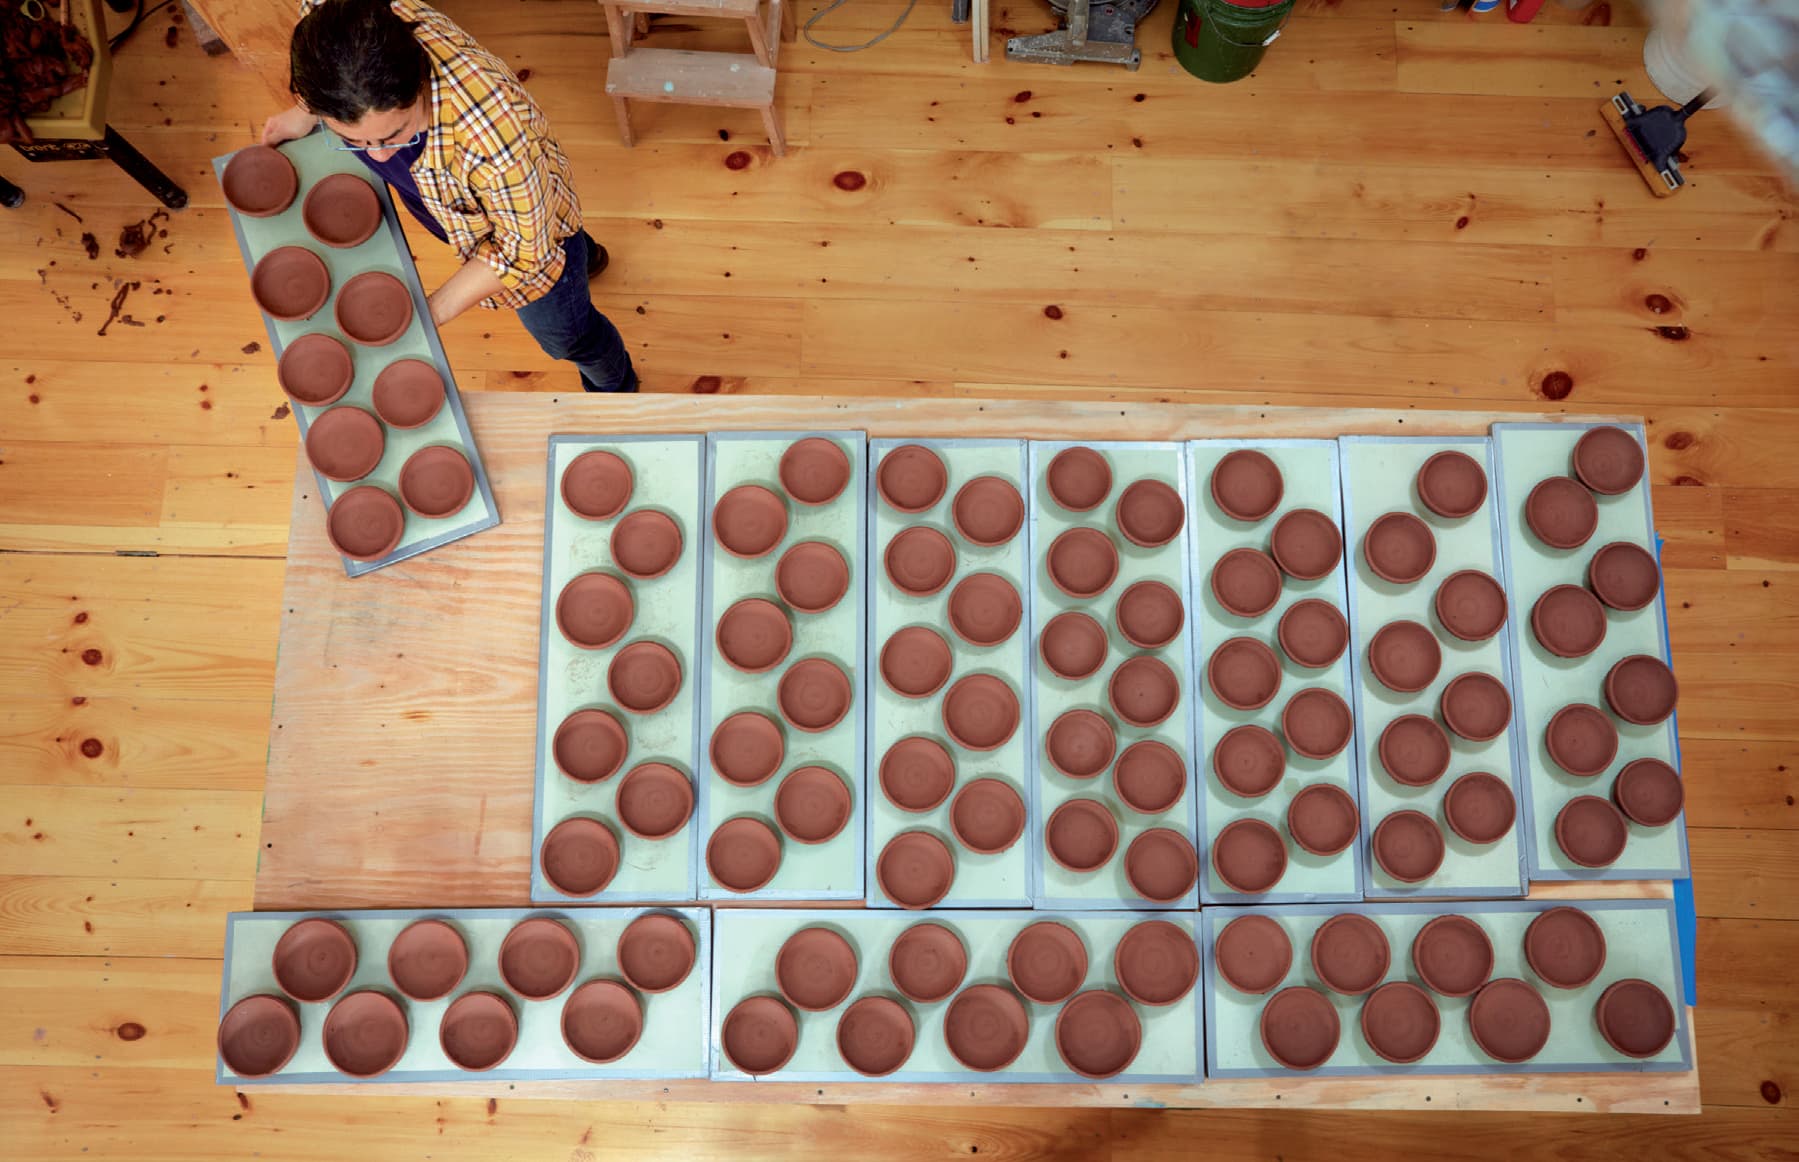
Ayumie Horie making one hundred bowls. Photo by Michael Wilson, courtesy of the artist