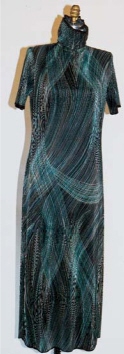
Slinky
Easy
Slinky is an elastic acetate knit. Available in different qualities, weights, and stretch, it is sometimes combined with spandex to eliminate bagging. It is comfortable to wear, has a soft, supple hand, and drapes attractively. It is easily damaged by hot irons.
Similar Fabrics: Beaded slinky, bubble knit, crystal pleating, slinky crepe, stretch crepe, stretch ottoman.
Uses: Dresses, pants, skirts, blouses.
Design Elements: Minimal seaming, slip-on designs, loose-fitting sleeves, elastic casings, turtleneck collars, bindings, ribbings. Avoid close fitting garments.
Sewing Checklist
Essential Supplies
Needles: Stretch (HS), universal (H), twin needle (HS); sizes 70/10-90/14.
Thread: All purpose (polyester, cotton covered polyester), textured thread. Serger: lightweight serger thread, textured nylon.
Cutting: Rotary cutter/mat, serrated shears.
Marking: Chalk, clips, erasable pens, pins, safety pins.
Miscellaneous: Flower pins, quilting clothes pins, lightweight invisible zippers, firm non-roll elastic, clear elastic, tissue, water soluble stabilizers.
Interfacings: Sewin’ Sheer™; avoid fusibles.
Linings/Underlinings: None.
Machine Setup
Stitch Length: Zigzag W,.5-L,1; W,2-2.5;L,2.
Tension: Lightly balanced; light pressure.
Machine Feet: Embroidery, roller, zipper, zigzag.
Sewing Basics
Test Garment: Rarely needed.
Fabric Prep: Machine wash/dry.
Layout: Nap – double layer.
Seams: Narrow plain (zigzag closed), safety stitch serged, taped.
Hems: Topstitch, twin needle, lettuce edging, hand (catchstitch).
Seam/Hem Finishes: Serged, zigzag.
Edge Finishes: Facings (self fabric, lining), bindings, ribbings, elastic casings.
Closures: Buttonholes (machine), buttons or loops, zippers (invisible). Avoid hook and loop tape.
Pressing: Low heat; test press to avoid damage.
Garment Care: Machine wash/dry. Store flat; do not hang.
Workroom Secrets
Fabric Prep: Preshrink to relax fabric. Machine wash/dry.
Layout/Cutting/Marking: Before cutting, compare the amount of fabric stretch with the amount required for the design. Mark the right side of the fabric with small safety pins.Slinky stretches in the length more than most knits; do not allow it to hang off the table when cutting. Anchor with weights; cut using a rotary cutter and mat. If necessary, lay out on tissue paper, pin, and cut through all layers.
Stitching: To reduce creeping underlayer, use light pressure or serge using differential feed. To baste, use flower pins or quilting clothes pins. To begin, stitch onto a piece of stabilizer, then onto the fabric. Stitch with an embroidery foot to reduce stretching. If the fabric does not feed well, stop regularly; raise the foot and smooth the fabric; then continue.
Seams: Use polyester thread and zigzag for more elastic seams. Stitch long, straight seams with a long zigzag (W,.5-L,2-2.5); stitch short seams, which will be stressed, with a short zigzag (W,.5-L,1.5). To handle easily, cut and stitch seams with 5.8" (1.5cm) seam allowances; then serge and trim to 1.4" (6mm). Stitch with the slinky on the bottom when joining to a stable fabric. Stabilize shoulder seams, necklines, and long side seams when needed with clear elastic.
Edge Finishes: self fabric bindings, stretch foldover braid, and ribbings are attractive edge finishes. Cut the ribbing and binding strips on the crossgrain 25 to 30 percent shorter than the edge. To apply slinky ribbing, join the ends of the strip; then fold it in half lengthwise with wrong sides together. Mark the ribbing and garment edge in quarters and stretch the ribbing to fit. Stitch to the right side; serge the edges. To apply a binding, join the ends. With right sides together, stitch one edge of the binding to the edge, stretching as needed. Wrap the ribbing around the edge, and ditch-stitch, using a zipper foot. For elasticized waists, choose a firm, non-roll elastic to support the weight of the fabric.
Closures: Most closures will interfere with the garment drape. When using a zipper, choose a lightweight invisible zipper. Machine stitch buttonholes parallel to the ribbing.
Hems: When marking hems, mark 10"above finished hemline. Lay flat; connect the marks; measure and mark at hemline. Fold hem to the wrong side and topstitch with a twin needle (HS) and textured thread in the bobbin. Loosen the needle and bobbin tensions. Trim away excess.

Ideal for travel, this dress will retain its shape and arrive wrinkle free. (Photo courtesy of Pamela Howard.)