On the surface, exception handling in languages such as Java and C# may look very similar to Swift's new error handling pattern; however there are some significant differences. Developers accustomed to exception handling with these languages will notice these differences as they read this section. Before we explore how this error handling works, we need to see how we represent errors in this new error-handling pattern.
In Swift, errors are represented by values of types that conform to the ErrorType protocol. Swift's enumerations are very well suited for modeling these error conditions because, generally, we have a finite number of error conditions to represent. We can also use associated values to add additional information about our errors.
Let's look at how we could use an enumeration to represent an error. For this, we will define a fictitious error named MyError with three error conditions: Minor, Bad, and Terrible:
   enum MyError: ErrorType {
       case Minor
        case Bad
       case Terrible
   }
In this example, we define that the MyError enumeration conforms to the ErrorType protocol. We then define the three error conditions: Minor, Bad, and Terrible. We can also use the associated values with our error conditions to give additional information about the error that occurred. Let's say that we wanted to add a description to one of the error conditions; we would do it like this:
   enum MyError: ErrorType {
       case Minor
       case Bad
       case Terrible (description: String)
   }
Those who are familiar with exception handling in Java and C# can see that representing errors in Swift is a lot cleaner and easier. Another advantage that we have is that it is very easy to define multiple error conditions and group them together; so all the related error conditions are of one type.
Let's see how we would represent the error conditions for our Drink type:
enum DrinkErrors: ErrorType {
    case insufficentVolume
    case tooHot
    case tooCold
}
We begin by defining that the DrinkErrors enumeration conforms to the ErrorType protocol. Within the DrinkErrors enumeration, we define our three error conditions that could occur within our Drink structure. As we mentioned earlier in this section, we can use associated values with our ErrorType enumerations. With associated values, we could rewrite our DrinkErrors enumeration like this:
enum DrinkErrors: ErrorType {
    case insufficentVolume
    case tempOutOfRange (Description: String)
}
This is a perfectly acceptable way to define errors in Swift; however, it is not recommended to define them in this way. When an error is thrown in an application, we want to make sure we can catch the specific error so we know how to react to it. In this example we would be able to catch the tempOutOfRange error as it was thrown but we would then need to do an additional lookup to find out if the temperature was too high or too low. Having to do this additional lookup would not be ideal and would add additional complexity that is not necessary.
If we are going to use associated values with our error types, the associated values should be used to add additional information about the error condition rather than being used to specify the type of error that occurred. For example we could use associated values to return the actual temperature as shown in the following example:
enum DrinkErrors: ErrorType {
    case insufficentVolume
    case tooHot (temp: Double)
    case tooCold (temp: Double)
}
Now that we have seen how to define errors, let's look at how we would throw an error if an error condition occurred.
When an error occurs in a function, the code that called the function must be made aware of it; this is called throwing the error. When a function throws an error, it assumes that the code that called it, or some code further up the chain, will catch and recover appropriately from the error.
To throw an error from a function or method we use the throws keyword. This keyword lets the code that called it know that an error may be thrown. Unlike exception handling in other languages, we do not list the specific errors types that may be thrown.
Let's look at how we would throw errors in Swift. We will start by seeing how we would throw an error for our drinking() method. This method will throw an error if we do not have enough volume left in our drink. The error that is thrown will be the insufficentVolume error:
/**
This method will take a drink from our drink if we have
enough liquid left in our drink.
- Parameter amount: The amount to drink
- Throws: DrinkError.insufficentVolume if there is not
enough volume left
*/
mutating func drinking(amount: Double) throws {
guard amount < volume else {
throw DrinkErrors.insufficentVolume
}
volume -= amount
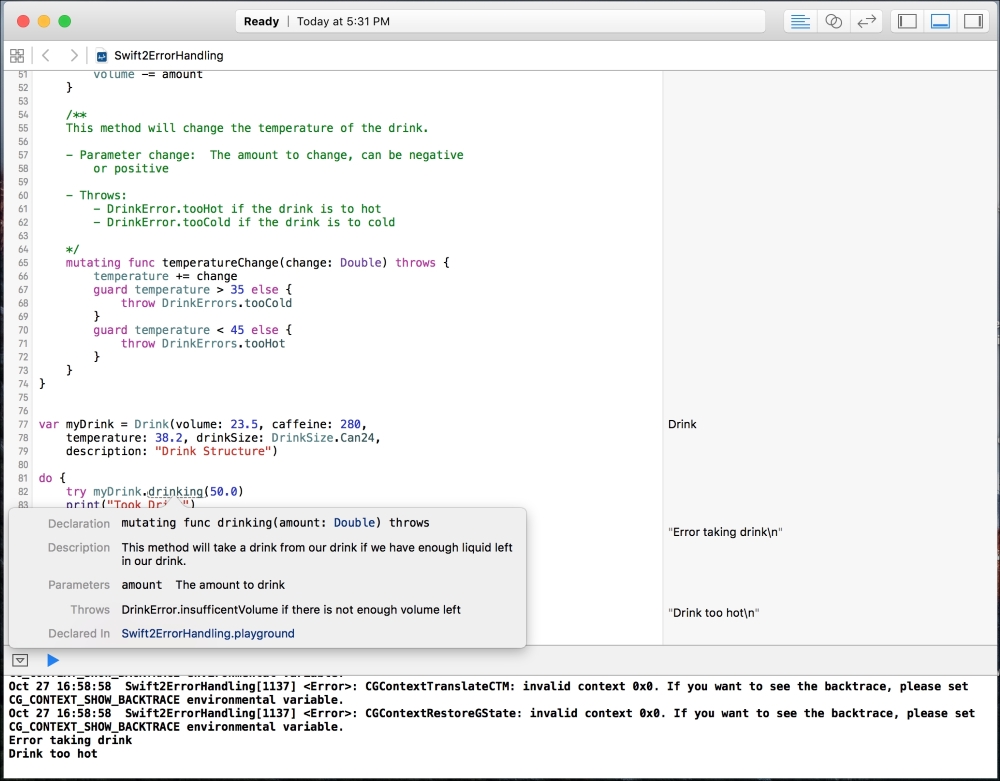
}Notice how we start the drinking() method with a comment. This comment block starts off by describing what the method does. We then describe what the amount parameter is and finally we list the errors that could be thrown by this method. When we use comments as shown in this example we are able to hold down the option key and then click on the function name anywhere in our code. Xcode will then display a popup with the description of the function, as shown in the following screenshot:
Using comments in the way we have just demonstrated will help us document what our method does, what type of parameters they accept, the return value, and what type of errors are thrown from the method. Remember earlier we mentioned that we do not specify the types of errors thrown from our functions, methods, or initializers but, if we document our code as shown here, we can document the error types that could be thrown and what the errors mean.
When we define the drinking() method we define it with the throws keyword at the end of the declaration. The throws keyword indicates that a function, method, or initializer can throw an error. If our function or method had a return type, the throws keyword will appear after the parameter list but before the return type. The following example shows how we would use the throws keyword if we had a return value:
func myFunc(parm: String) throws -> String
Within the drinking() method, we use the guard statement to verify that we have enough volume left to take our drink. If we do not have enough volume left we throw the DrinkErrors.insufficentVolume error. To throw an error, we use the throw keyword followed by the error we wish to throw. When an error is thrown, control is returned to the code that called the function or method.
Now let's look at how we would write the temperatureChange() method that could throw either the DrinkErrors.tooHot or DrinkErrors.tooCold error:
    /**
    This method will change the temperature of the drink.

    - Parameter change:  The amount to change, can be negative
        or positive

    - Throws:
        - DrinkError.tooHot if the drink is too hot
        - DrinkError.tooCold if the drink is too cold

    */
    mutating func temperatureChange(change: Double) throws {
        temperature += change
        guard temperature > 35 else {
            throw DrinkErrors.tooCold(temp: temperature)
        }
        guard temperature < 45 else {
            throw DrinkErrors.tooHot(temp: temperature)
        }
    }
In the temperatureChange() method, we use comments similar to how we use them in the drinking() method to document what the method does and also what errors could be thrown. Within the method itself, we begin by adjusting the temperature of the drink. We then use two guard statements that verify whether the temperature of the drink is still within the acceptable range. If the temperature is outside the acceptable range, we throw either the DrinkErrors.tooHot or DrinkErrors.tooCold error.
Now let's look at how we would catch the errors that are thrown.
When an error is thrown from a function, we need to catch it in our code; this is done using the do-catch block. The do-catch block takes the following syntax:
do {
    try [Some function that throws an error]
} catch [pattern] {
    [Code if function threw error]
}
When we call a function or method that throws an error, we must prefix the call with the try keyword. The try keyword helps us quickly identify the code that could potentially throw errors.
If an error is thrown, it is propagated out until it is handled by a catch clause. The catch clause consists of the catch keyword, followed by a pattern to match the error against. If the error matches the pattern, the code within the catch block is executed.
Let's see how we would catch the errors thrown from the drinking() method:
do {
    try myDrink.drinking(50.0)
} catch DrinkErrors.insufficentVolume {
    print("Error taking drink")
}
In this example, we surrounded the call to the drinking() method with the do-catch block and we also prefixed the call to the drinking() method with the try keyword. The catch statement attempts to match the DrinkErrors.insufficentVolume error since that is the error thrown by the drinking() method.
If the DrinkErrors.insufficentVolume error is thrown from the drinking() method we then print the message Error taking drink to the console.
We do not have to include a pattern after the catch statement. If a pattern is not included after the catch statement or we put an underscore, the catch statement will match all error conditions. For example, either one of the following two catch statements will catch all errors:
do {
    // our statements
} catch {
   // our error conditions
}

do {
    // our statements
} catch _ {
  // our error conditions
}
If we are unsure of the errors that may be thrown from a function or method it is a good idea to include a catch statement that will match all error conditions to avoid having an error at runtime that is not caught. If we have an error at runtime that is not caught the application will crash.
If we want to capture the error, we can use the let keyword, as shown in the following example:
do {
   // our statements
} catch let error {
   print("Error:  \(error)")
}
Now let's see how we would catch the DrinkErrors.tooHot and DrinkErrors.tooCold errors from the temperatureChange() method:
do {
    try myDrink.temperatureChange(20.0)
} catch DrinkErrors.tooHot(let temp) {
    print("Drink too hot: \(temp) degrees ")
} catch DrinkErrors.tooCold(let temp) {
    print("Drink too cold: \(temp) degrees ")
}
In this example, we have two catch statements where each catch statement matches a different error condition. In addition we also capture the associated value for the error by using the let statement within the parentheses, as shown in this example.
When I am working with exceptions in languages such as Java and C#, I see a lot of empty catch blocks. This is where we need to catch the exception because one might be thrown; however, we do not want to do anything with it. In Swift, the code would look something like this:
do {
   try myDrink.temperatureChange(20.0)
} catch {}
Seeing code like this is one of the things that I dislike about exception handling. The Swift developers have an answer for this: the try? keyword. The try? keyword attempts to perform an operation that may throw an error. If the operation succeeds, the results, if any, are returned in the form of an optional; however, if the operation fails with an error being thrown, the operation returns a nil and the error is discarded. We would use the try? keyword like this:
try? myDrink.temperatureChange(20.0)
If the function or method had a return type, we would use optional binding to capture the value returned, as shown in the next example:
if let value = try? myMethod(42) {
       print("Value returned \(value)")
}
As we can see, the try? keyword makes our code much cleaner and easier to read.
We can also let the errors propagate out rather than immediately catching them. To do this, we just need to add the throws keyword to the function definition. For instance, in the following example rather than catching the error, we let it propagate out to the code that called the function rather than handling the error within the function:
func myFunc() throws {
   try myDrink.temperatureChange(20.0)
}
If we need to perform some clean up action, regardless of whether we had any errors or not, we can use the defer statement. We use the defer statement to execute a block of code just before code execution leaves the current scope. The following example shows how we would use the defer statement:
   func deferFunction()  {
    print("Function started")
    var str: String?
    defer {
       print("In defer block")
        if let s = str {
            print("str is \(s)")
        }
   }
   str = "Jon"
   print("Function finished")
}
If we called this function, the first line that is printed to the console is: Function started. The execution of the code skips the defer block and Function finished would be printed to the console next. Finally, the defer code block will be executed just before we leave the function's scope, and we see the message: In defer block. The following is the output from this function:
   Function started
   Function finished
   In defer block
   str is Jon
The defer block will always be called before execution leaves the current scope, even if an error is thrown. The defer block is very useful when we need to perform some clean up functions prior to leaving a function.
The defer statement is very useful when we want to make sure we perform all the necessary clean up, even if an error is thrown. For example, if we successfully open up a file to write to, we will always want to make sure we close that file, even if we have an error during the write operation. We could then put the file-closed functionality in a defer block to make sure that the file is always closed prior to leaving the current scope.
In this chapter we have seen three ways that we can do error handling in Swift, but which one should we use?