Ever since I bought my first computer, a Commodore Vic-20, at the age of thirteen, I have been continuously learning new computer languages. I cannot count the number of computer languages that I have learned through the years on my fingers and toes. Even when I was working as a network engineer and security specialist, I learned languages such as Perl, Python, PHP, and Shell scripting to automate my administrative tasks. Learning all of those languages has taught me that the best way to learn a new programming language or a programming paradigm is to come up with several small projects and figure out how to implement them in the language or programming paradigm that I was trying to learn. With that in mind, in this chapter we will take three small projects and see how we would implement them using Swift and the protocol-oriented programming paradigm. I would recommend that you read the requirements for the project and then try to implement your own solution prior to reading our solution. Then you can compare your solution to ours. This will help you to begin thinking about application design using the protocol-oriented programming paradigm. I do have one hint for you: don't forget to use design patterns in your solutions for these projects.
In this chapter you will learn about the following topics:
- How to apply the protocol-oriented programming paradigm in real-world situations
- How to use design patterns with protocol-oriented programming to create real-world solutions
Protocol-oriented programming isn't just about using protocols, protocol extensions, or value types. It is about how we code and architect our applications and frameworks. Protocol-oriented programming with design patterns focuses on ensuring that our code base can be easily expanded and maintained.
Focusing on how we will maintain and expand our applications and frameworks in the future may sometimes seem like a waste of time with the tight deadlines we are always on. However in the long term, the time spent on making sure our code base is easily expandable and maintainable always ends up saving us time because requirements will change and new features will be added. We need to ensure our code base is prepared for these changes.
In this chapter we will be looking at three real-world case studies to see how we can apply the protocol-oriented paradigm with design patterns to write solutions for real-world projects. These three case studies are:
- Creating a logging service for our applications
- Creating a data access layer for our applications using SQLite
- Creating a basic calculator application
In the first case study, we will look at how we would use the protocol-oriented programming paradigm to create a logging framework that can be easily maintained and expanded by our users. In the second case study we will see how we can use the protocol-oriented programming paradigm to add a SQLite database to our application using the SQLite.swift framework. The final case study will show us how we can use the protocol-oriented programming paradigm to create a very basic calculator that we can easily expand to add additional functionality.
Let's start by looking at how we can create a logging service for our application.
If I counted the lines of code that I have written and used in each language over the course of my life it would probably show that Java is the language that I have used the most. Java definitely has its good and bad points but one of the things that I really liked about developing applications in Java is all of the different logging frameworks that are available for it.
These logging frameworks make it incredibly easy to turn on log messages to make debugging very easy while we are developing our application. We can then turn those debugging messages off when it is time to build the production release of our application. To do this, these logging frameworks let us define how and where we wish to log messages for predefined log levels. We can also set them to ignore certain logging levels if we do not need them. The log levels ranged from info (used purely for debugging) all the way up to fatal (something really bad happened).
Some of the logging frameworks that I have used with Java are Log4j, Java Logging API, and Apache Commons Logging. For this project we will create a logging service similar to these but with the Swift language. The first thing we need to do is to define the requirements for our logging service.
Our logging service has several requirements as defined in the following list:
- We will need to have multiple log levels. The log levels that our framework will support are: Fatal, Error, Warn, Debug, and Info
- We will need to have multiple logging profiles. The framework will define two profiles by default:
LoggerNullandLoggerConsole. TheLoggerNullprofile will do nothing with the log message (it will pretty much ignore the message and not log it anywhere) while theLoggerConsolewill print the log message to the console. - The user will have the ability to add their own logging profile so they can log messages to a database, a
UILabel, or any other location they want. - We must have the ability to configure the logging framework when the application starts and keep that configuration throughout the life cycle of the application. We do not want to force the users of our framework to reconfigure the framework every time they need to use it.
- We can assign multiple logger profiles to a single log level to give the user the ability to display or store the logs to multiple profiles.
Before reading further, based on these requirements, see what type of design you come up with. Once you have worked out your design then continue reading and compare your design to ours.
We are going to break our design into two sections. The first section will be the logger profile section that will contain the types that do the actual logging of the messages to a storage medium or display them. The second section will be the logger section that will contain the types that our applications interface with. The logger types will determine the log level of the message and then pass the message to the appropriate logger profiles to log the message. Let's start off by looking at the logger profile section.
We will begin the logger profile design by creating a protocol named LoggerProfileProtocol. This protocol will define the interface that our logger profile will present and any type that conforms to this protocol can be used to log messages. Our framework, out of the box, will provide two types that conform to the LoggerProfileProtocol protocol. These types are the LoggerNull and LoggerConsole types.
By starting our design with the LoggerProfileProtocol protocol and using the interface exposed by the protocol to write log messages to the display/storage medium, we are implementing polymorphism. This will allow users of our framework to add additional logging profiles, as they need. To add these additional logging profiles all our uses need to do is to create additional types that conform to the LoggerProfileProtocol protocol. These types could provide a means to log messages to any display or storage medium that meets their requirements such as a database, file, or even a UILabel.
Let's look at a diagram that shows how we implement the LoggerProfileProtocol protocol design. The diagram shows that we extend the LoggerProfileProtocol protocol to add a method named getCurrentDateString(). This method will return a formatted string that contains the current date and time. The diagram also shows the LoggerNull and LoggerConsole types that conform to the LoggerProfileProtocol protocol:
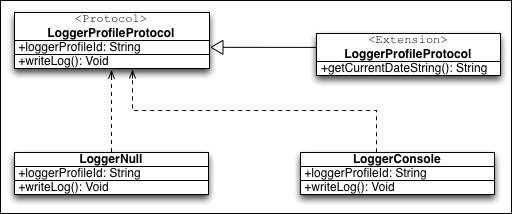
Let's look at how we implement this design. We will start off by looking at the LoggerProfileProtocol protocol and the LoggerProfileProtocol protocol extension:
protocol LoggerProfileProtocol {
    var loggerProfileId: String {get}
    func writeLog(level: String, message: String)
}

extension LoggerProfileProtocol {
    func getCurrentDateString() -> String{
        let date = NSDate()
        let dateFormatter = NSDateFormatter()
        dateFormatter.dateFormat = "MM/dd/yyyy hh:mm"
        return dateFormatter.stringFromDate(date)
    }
}
The LoggerProfileProtocol protocol defines one property and one function. The property is named loggerProfileId, which is of the String type. This property is used to uniquely identify the logging profile. We will use this property in our framework to ensure that we do not add the logger profile to any log level more than once. The method defined by our protocol is named writeLog() and will be called to write the log message to the display or storage medium defined by the profile.
We created a protocol extension to the LoggerProfileProtocol protocol to add a method named getCurrentDateString(). This method returns a formatted date string of the current date and time. While types that conform to the LoggerProfileProtocol protocol can elect to not use the getCurrentDateString() method provided by the protocol extension, it is recommended that they do to ensure that all logger profile types provide a date and time string with a consistent format.
Now let's look at the LoggerNull and LoggerConsole types:
struct LoggerNull: LoggerProfileProtocol {
    let loggerProfileId = "hoffman.jon.logger.null"
    func writeLog(level: String, message: String) {
        // Do nothing
    }
}

struct LoggerConsole: LoggerProfileProtocol {
    let loggerProfileId = "hoffman.jon.logger.console"
    func writeLog(level: String, message: String) {
        let now = getCurrentDateString()
        print("\(now): \(level) - \(message)")
    }
}
Both logger profiles have a unique id defined in the loggerProfileId constant. We use a reverse DNS notation as the format for this id. Reverse DNS notation is a naming convention that is commonly used to name components, packages, and other types. A reverse DNS notation string is usually based on a registered domain name but the names are in reverse order. For these examples I am using my name rather than a registered domain name.
In both types we also provide an implementation for the writeLog() method that is required by the LoggerProfileProtocol protocol. For the LoggerNull type the writeLog() method does not do anything because this type is designed to not actually write the log anywhere. The LoggerConsole type retrieves a string that represents the current date and time using the getCurrentDateString() method provided by the LoggerProfileProtocol protocol extension and then writes the log message to the console.
The next part of our logger service will be the logger type which will keep track of what logger profiles are assigned to the various log levels. Our applications will primarily use the interface provided by the logger type as the means to configure the logger service and also to log messages.
The logger types will conform to the LoggerProtocol protocol. While the initial design of our framework will only contain one logger type, we will still want to begin the design with the protocol to give us the ability to add additional logger types in the future. It will also give our users the ability to add additional logger types if they need to. It may not seem like that big a deal right now but, two or three years down the road, as requirements change and new features are added, we will be glad that we used the protocol. Trust me on this one.
The first thing we need to do is to define the log levels that our framework will offer. We will use an enumeration to define these levels since there is a finite number of log levels. The following enumeration defines the log levels for our logging framework:
enum LogLevels: String {
case Fatal
case Error
case Warn
case Debug
case Info
static let allValues = [Fatal, Error, Warn, Debug, Info]
}
The LogLevels enumeration defines five log levels. We also provide an array that contains all five levels. This array can be used to retrieve all values in the enumeration if needed. Now let's look at our LoggerProtocol protocol:
protocol LoggerProtocol {
    static var loggers: [LogLevels:[LoggerProfileProtocol]]
        {get set}
    static func writeLog(logLevel: LogLevels, message: String)
}
The LoggerProtocol protocol defines one property named loggers. This property is defined to be of the Dictionary type whose key is a log level that is defined in the LogLevels enumeration and whose value is an array of types that conform to the LoggerProfileProtocol protocol. We also define one method in our LoggerProtocol protocol named writeLog() . This method is called within our applications to write a message to the logs and it takes two arguments. The first argument is the log level to write the log message for and the second is the log message itself.
We define both the loggers property and the writeLog() method as static so we can access them without having to create an instance of the LoggerProtocol type. Properties and methods that are defined with the static keyword are known as type properties and type methods. Another reason we create these as static is that one of the requirements for our logger framework is to be able to configure the framework once and have the ability to keep that configuration throughout the life cycle of our application. By creating these as static there will be one (and only one) instance of them throughout the life cycle of our application thereby fulfilling this requirement. We could have used the singleton pattern to fulfill this requirement; however using type methods/properties would seem to work better in this situation. We will see the advantage of this when we look at how we will use our logging framework.
Now let's look at the methods that our LoggerProtocol protocol extension provides to types that conform to the LoggerProtocol protocol. Our protocol extension will provide six type (static) methods:
logLevelContainsProfile(logLevel: LogLevels, loggerProfile: LoggerProfileProtocol) -> Bool: Will check the log level and returntrueif it already contains the logger profile.setLogLevel(logLevel: LogLevels, loggerProfile:LoggerProfileProtocol): Adds a logger profile to the log leveladdLogProfileToAllLevels(defaultLoggerProfile: LoggerProfileProtocol): This will add the logger profile to all log levelsremoveLogProfileFromLevel(logLevel: LogLevels, loggerProfile:LoggerProfileProtocol): Removes the logger profile from the log level if it is defined for that levelremoveLogProfileFromAllLevels(loggerProfile:LoggerProfileProtocol): Removes the log profile from all log levelshaveLoggersForLevel(logLevel: LogLevels) -> Bool: Returnstrueif there is any logger profile configured for the log level; otherwise it returnsfalse
Now let's look at the code for the individual methods. We will start off by looking at the logLevelContainsProfile() method.
static func logLevelContainsProfile(logLevel: LogLevels,
       loggerProfile: LoggerProfileProtocol) -> Bool {
    if let logProfiles = loggers[logLevel] {
        for logProfile in logProfiles where
                logProfile.loggerProfileId ==
                loggerProfile.loggerProfileId {
            return true
        }
    }
    return false
  }
This method will return true if the log level contains the logger profile. This method is used by the setLogeLevel() and addLogProfileToAllLevels() method to ensure that we do not add a logger profile to a log level more than once. We begin this method by using optional binding to retrieve a list of logger profiles assigned to the log level. We then use the for-in statement with the where clause to loop through the list of logger profiles where the loggerProfileId property matches the loggerProfileId property of the profile we are looking for. If any item in the array matches the loggerProfileId property of the profile we are looking for we return true; otherwise we return false.
The next method we will look at is the setLogLevel() method.
static func setLogLevel(logLevel: LogLevels,
    loggerProfile: LoggerProfileProtocol) {
    if let _ = loggers[logLevel] {
        if !logLevelContainsProfile(logLevel,
      loggerProfile: loggerProfile) {
            loggers[logLevel]?.append(loggerProfile)
        }
    } else {
        var a = [LoggerProfileProtocol]()
        a.append(loggerProfile)
        loggers[logLevel] = a
    }
}
The setLogLevel() method will use the logLevelContainsProfile() method to verify that the logger profile is not already assigned to the specified log level; if it isn't then it will add the logger profile to that level. We begin this method by using optional binding to retrieve the list of logger profiles assigned to the log level. We do this simply to verify that there is a valid array assigned to the log level. We then use the logLevelContainsProfile() method to verify that the logger profile is not already assigned to the level and, if not, we add it.
If the optional binding fails at the start of the method then we create a new array, add the logger profile to it, and assign the array to the log level within the loggers dictionary.
Now let's look at the addLogProfileToAllLevels() method.
static func addLogProfileToAllLevels(
    defaultLoggerProfile: LoggerProfileProtocol) {
    for level in LogLevels.allValues {
        setLogLevel(level, loggerProfile: defaultLoggerProfile)
    }
}
The addLogProfileToAllLevels() method is used to add a logger profile to all log levels. This can be used to initialize the logger framework by adding a single profile to all levels. In this method we loop through each of the log levels and then call the setLogLevel() method to try to add the logger profile to each of the individual log levels.
The next method we will look at is the removeLogProfileFromLevel() method.
static func removeLogProfileFromLevel(logLevel: LogLevels,
loggerProfile:LoggerProfileProtocol) {
    if var logProfiles = loggers[logLevel] {
        if let index = logProfiles.indexOf({$0.loggerProfileId
== loggerProfile.loggerProfileId}) {
            logProfiles.removeAtIndex(index)
        }
        loggers[logLevel] = logProfiles
    }
}
The removeLogProfileFromLevel() method will remove the logger profile from the specified log level. This method starts off by using optional binding to retrieve the list of logger profiles for the log level. We then use the indexOf() method to locate the index of the logger profile that matches the logger profile that we want to remove (it will return nil if it cannot find a match). If we find the profile we then remove it.
The next method is the removeLogProfileFromAllLevels() method.
static func removeLogProfileFromAllLevels(loggerProfile:LoggerProfileProtocol) {
    for level in LogLevels.allValues {
        removeLogProfileFromLevel(level,
loggerProfile: loggerProfile)
    }
}
The removeLogProfileFromAllLevels() method will attempt to remove a logger profile from all log levels. This method will loop through all of the log levels that we have defined and call the removeLogProfileFromLevel() method in an attempt to remove the logger profile from the level.
The final method in our LoggerProtocol protocol extension is the haveLoggersForLevel() method:
static func haveLoggersForLevel(logLevel: LogLevels) -> Bool {
    guard let _ = loggers[logLevel] else {
        return false
    }
    return true
}
The haveLoggersForLevel() method returns true if the log level contains any logger profiles; otherwise, it returns false. This method uses optional binding with a guard statement to retrieve the list of logger profiles assigned to the log level. If the optional binding statement fails then a false value is returned; otherwise a true value is returned.
Now let's look at our Logger type, which will conform to the LoggerProtocol protocol.
struct Logger: LoggerProtocol {
    static var loggers = [LogLevels:[LoggerProfileProtocol]]()

    static func writeLog(logLevel: LogLevels, message: String) {
        guard haveLoggersForLevel(logLevel) else {
            print("No logger")
            return
        }

        if let logProfiles = loggers[logLevel] {
            for logProfile in logProfiles {
                logProfile.writeLog(logLevel.rawValue,
message: message)
            }
        }
    }
}
The Logger type is the type that we use in our application for configuration of our log levels and also for logging our messages. The Logger type conforms to the LoggerProtocol protocol by implementing the requirements defined by the protocol.
The Logger type has one property named loggers that is a dictionary whose key is a log level defined in the LogLevels enumeration and whose value is an array of types that conform to the LoggerProfileProtocol protocol. The writeLog() method is used within our applications to write a message to the log and it takes two arguments. The first argument is the log level to write the log message for and the second is the log message itself.
The writeLog() method checks to see if we have any log profiles assigned to the log level and if so we loop through the list of profiles and call the writeLog() method on each profile, passing it the message we wish to log.
We could now use our logger framework like this:
Logger.addLogProfileToAllLevels(LoggerConsole())
Logger.writeLog(LogLevels.Debug, message: "Debug Message 1")

Logger.setLogLevel(LogLevels.Error,
loggerProfile: LoggerDataBase())
Logger.setLogLevel(LogLevels.Fatal,
loggerProfile: LoggerDataBase())
Logger.writeLog(LogLevels.Error, message: "Error Message 1")
In this sample code, we begin by adding the LoggerConsole logger profile to all of our log levels. This will cause all log messages, no matter what the log level is, to be logged to the console. We then write a log message ( Debug Message 1) with the log level set to Debug. This log message will be printed to the console.
In the next couple of lines we add the LoggerDatabase logger profile (this would be a user created profile) to both the Error and Fatal log levels. The LoggerDatabase logger profile would be a profile that would log messages to a database such as SQLite and will need to conform to the LoggerProfileProtocol protocol. We then write the log message ErrorMessage 1 with the log level set to Error. This will write the log message to both the console and database since both logger profiles are assigned to the Error log level.
In this example, we can see that we do not need to create an instance of the Logger type to configure it or to log messages. The reason for this is that we made the properties and methods static (type methods and type properties). When we are creating frameworks that should have a very small footprint, for instance our logger framework, using type methods and properties to avoid instantiation of our types can make our frameworks significantly easier to use.
The basis of both the logger profiles and the logger itself are protocols. We also use protocol extensions to add functionality to types that will conform to our protocol; therefore it is very easy to add additional profiles and loggers by creating new types that conform to these protocols. These new types also automatically receive the functionality defined in our protocol extensions. Designing our framework in this manner allows us to very easily add functionality and new features as we receive new requirements. It also allows users of our framework to expand it to suit their needs.
When designing frameworks or applications, one thing that all good architects keep in the back of their mind is not only implementing the current requirements but also how they can expand the framework or application to meet future needs. This is the idea behind using protocols and using the interface provided by the protocol rather than concrete types. If we use the interface provided by the protocol, we have the ability to use any type that conforms to the protocol, giving us the ability to very easily expand the framework or application to meet future needs.
Now let's look at how we can add a SQLite database to our application using the SQLite.swift framework.