Serious training for the side of the body—especially the side of the waist—is nothing new. Check out statues of ancient Greek or Roman heroes and you’ll notice that they all had impressive, cut up obliques and side-waists. These statues were based on athletes and warriors—those men needed powerful lateral chains, for throwing the discus and javelin. They were originally battlefield weapons, remember. To the ancients, athleticism and fighting power were the same thing. A tiny, underdeveloped waist was the opposite of what the Greeks admired. If you didn’t have strong-looking obliques, you just weren’t a man.
Writers often talk about the “Greek ideal” of a physique—wide shoulders with a tiny waist—but the concept of the petite waist as masculine was never a Western idea at all. It’s found in ancient Egyptian art, but that’s only because—to the Egyptians—their pharaohs and gods were not warriors or athletes. They were rulers. They didn’t sully themselves with something so mortal as actual battlefield combat. They didn’t need strong waists.
Strong sides are not just crucial for warriors. Trunks which are muscular and strong around their entire circumference are essential for high levels of real-world strength. Some men can seem incredibly strong in the gym because they hoist huge weights, but when you ask them to help you move house, they have trouble picking up a fridge or TV that’s a fraction of the weight. Why is this? Because the weights in the gym—whether on machines or barbells—are symmetrical. Balanced. Real life objects like desks and human beings are impossible to pick up “evenly”. One side is always heavier, often in a random or fluctuating way. The big gym guy’s front and back muscles are strong, but his side muscles are the weak link.
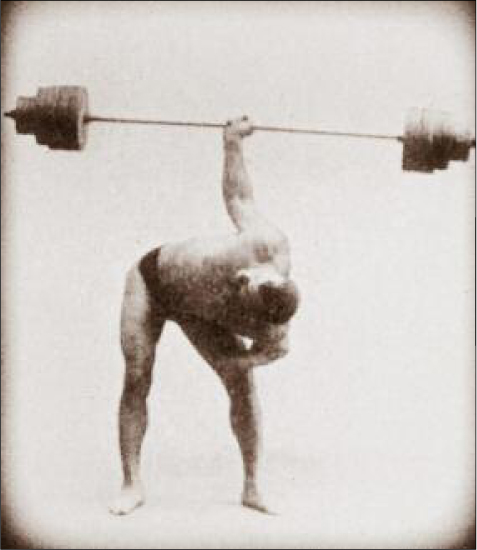
Old time strongmen understood this real well. They didn’t shy away from training the muscles along the side of their waists and hips, like modern lifters. Their staples were lifts like the bent press and one-arm deadlift, movements which built incredibly powerful side-waists. Over a century back, the legendary strongman Arthur Saxon bent pressed 370 lbs under official conditions—although he did 385 unofficially. Can you imagine how strong his hips and flanks were? These days, you’d be lucky to find an elite-level lifter who can lift half that amount! One thing’s for sure—Saxon didn’t need any help moving house.
Arthur Saxon demonstrates the first stage of the bent press.
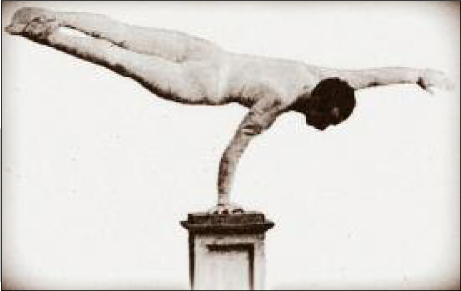
The great Professor Paulinetti performs a one-arm plank. Only a man with sides of steel could ever hope to perform a feat like this.
Strong side muscles are also essential for bodyweight strength feats. Look at an acrobat performing tricks, or observe a gymnast on the pommel horse. Whenever the legs are swung out or supported to the side, all the muscles of the hips and waist come into play. Due to the length and weight of the legs, this means powerful side-waist muscles are essential.
If you want to reach this high level of bodyweight strength and control, I can show you how to do it. It starts with the clutch flag.
Before you get going on the clutch flag, you need to find a vertical base to train on. Ideally, you need a sturdy, smooth cylinder of a regular thickness. As for “how thick?”, I’d say at least the diameter of your palm, although even thicker is usually easier to hold. Here are some ideas:
• Light poles
• Signposts
• House beams
• Slim pillars
• Smaller trees
• Park equipment (pullup columns, etc.)
These objects are all around us—they’re just invisible most of the time, because we’re not looking for them. If you want to get good at the flags, you need to think like a parkour athlete and start viewing everyday architecture in a new way. You’ll soon discover that, in fact, there are training tools all around you. Ironically, the one place you’re not likely to find a good base for clutch exercises is in the gym. This is no bad thing. Getting your ass away from the gym is probably the number one thing you can do to start kicking your gains up a notch.
Whatever vertical base you choose, make sure it is stable and strong enough to take your weight, and check that it has no shiver or jagged edges to catch on. You’re my buddy, and I don’t want you hurting yourself. (See how I got your back? Next, I’ll set you up with my sister...)
Before we get to the clutch flag progressions, I want you to review a few training ideas first. These will help you advance more efficiently.
• Hold it: The clutch flag works better as a static, isometric technique than an isotonic, moving technique (a “hold” as opposed to a “move” as we said in prison). You pop up into the position shown as best you can, then hold. If you’re used to moving calisthenics, be aware that this change of pace requires a different psychology. The hold is brief and the set up is technical, with less room for error than is true for most moving sets. Think focus and awareness.
• Holistic strength: You can learn to perform flag holds as part of any training routine, and it will strengthen your lateral chain and boost your ability to use your body as an integrated unit. But results will come faster if you are already training in the Big Six exercises I described in Convict Conditioning. Not only will the basic calisthenics moves teach you better coordination skills, they will also increase your posterior and anterior chain strength, and this will really give you a head start if you are looking to master the flag.
• Skipping steps: In this tutorial, I’ve included an eight step series of progressions for the clutch flag. I like giving multiple progressions, because it allows for plenty of wiggle room. It also helps athletes visualize the path to success, something that’s crucial for fostering self-belief and motivation. But remember, there’s nothing magic about the number eight. It’s great to experiment with every step and see how useful it is, but not every athlete will need all eight steps. If you can handle a step easily (holding it for at least ten seconds) and the next step is within your power then feel free to move on up to the next step. (This applies more to isometric holds like the flag than it does to regular exercises like the Big Six.)
For some helpful rules of thumb on how to program clutch flags into your current training, check out the table below.
Now you know the score. Hopefully you’ve got some ideas about where to train; and you now know how to program clutch flag workouts. But before you can start progressing through the steps I’ll show you, you have to master the most fundamental element of this type of flag—the best technique for holding onto the base. That’s up next.
Ready for a side-waist designed by Ferrari and built by Smith & Wesson? On to the training.
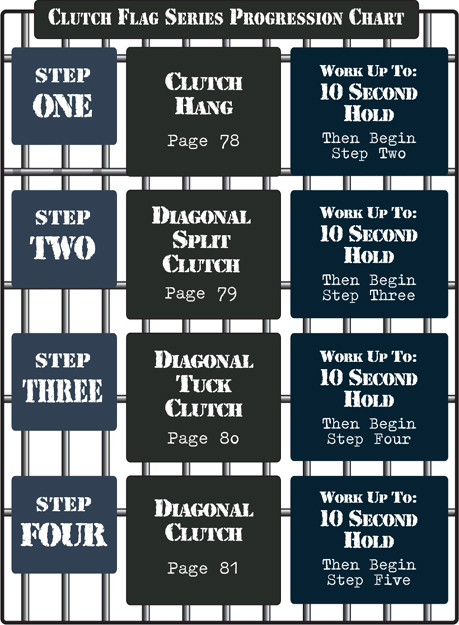
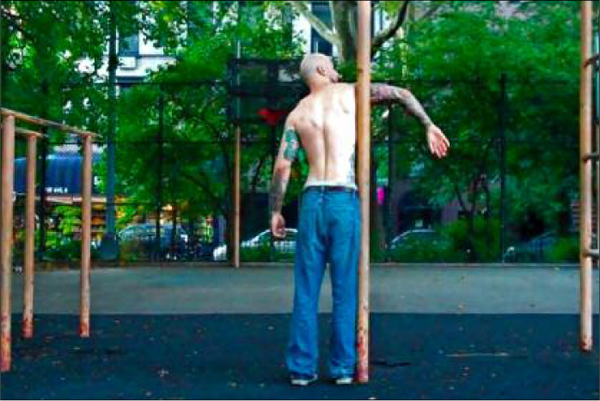
Before I show you the progressions, let’s look at the most basic element of the clutch flag—the clutch hold. There are four basic steps to getting this:
1. Approach your vertical base (whether a column, pole, post, beam or whatever). With your right arm extended, place your armpit/upper lat firmly into the base. This will help give you your initial positioning.
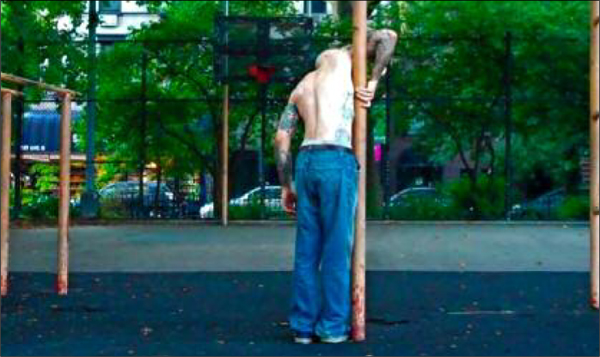
2. Curl your right arm back and round the base, bending the elbow and placing your hand firmly on the base. Your index finger should point down, but the other fingers can hug the base if it’s the right shape for that. However your place your fingers, the palm-heel should be solidly against the base.
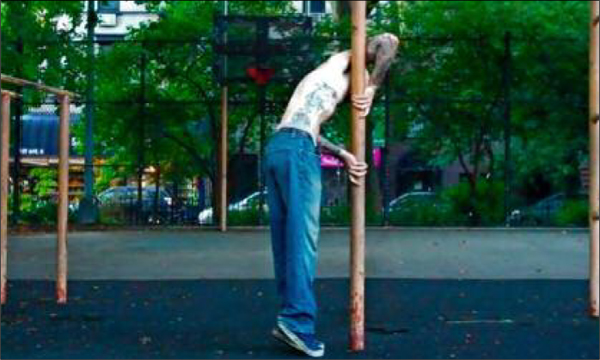
3. Place your left hand against the base. It should be at approximately hip level, with the elbow bent. Push really hard against the base, with as much tension as you can generate. This will be the hand that stops you falling later on, so it has to be tight.
4. Position yourself back slightly by taking a mini-step back and/or bending at the waist. This is to give you space to position your left elbow firmly into your waist, a little above the left hip. At this point, your left forearm should be close to diagonal. Now brace everything for take-off!
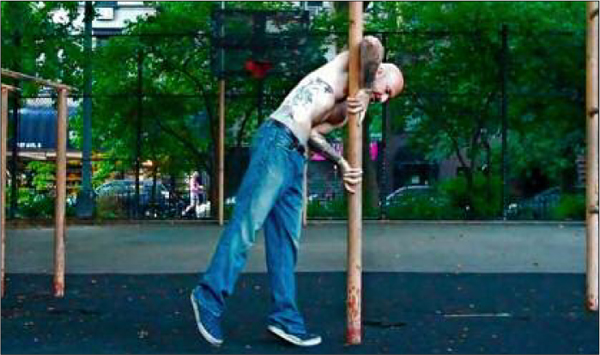
There you go—this is the basic clutch hold you’ll need for all the following steps. (For a clutch hold on the opposite side, just substitute “left” for “right” and so on.) Over time you’ll find that these four separate motions become one fluid movement. As you progress, you’ll also find your hold technique varies slightly from what I’ve laid out. That’s fine—diff’rent strokes, baby.
Approach your vertical base, and begin to get into the basic clutch hold (pages 75 to 77). Hug the base strongly, pushing in as hard as you can with your hands, and using the elbow in your waist like a lever. Once you feel you’ve generated enough tension, slowly lift your feet off the floor—one at a time at first. Don’t try to lift your legs out to the side just yet. Relax your lower body, and let your legs hang straight down, with your knees bent. The objective of this step is to help the athlete gain enough strength and confidence to support the body’s full weight in the clutch hold.
Lift your feet off the ground by bending your knees and lifting your feet slightly behind you, rather than by raising your knees up at the hips. This first step is meant to be an upper body exercise, not an abdominal exercise.
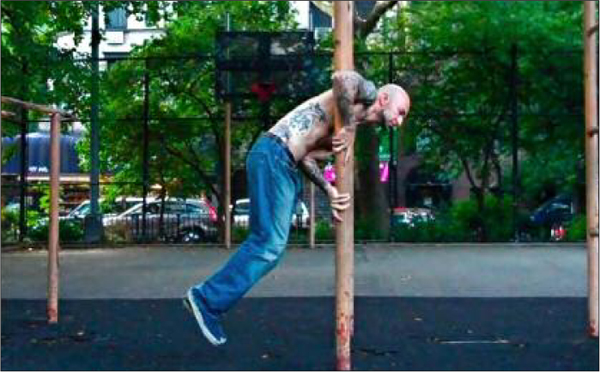
The objective of this step is to help the athlete gain enough strength and confidence to support the body’s full weight in the clutch hold.
STEP TWO: DIAGONAL SPLIT CLUTCH
Approach your vertical base, and get into the basic clutch hold (pages 75 to 77). Your elbow should be securely positioned in your waist above the hip. This elbow position will push your hips off-center and out to the side a little. From here, hop out to the side as you bend the knee of your right leg and draw it up as high as possible. Simultaneously, straighten out your lower leg. Try to control the alignment of your body, so that your trunk and lower leg form a diagonal line. Hold the position, breathing normally.
Keeping your upper leg in a tuck position makes aligning your body diagonally easier, but some will find that the body still droops. This is entirely due to weakness in the lateral chain—most people, even athletes, aren’t used to testing their lateral chain strength. Keep trying.
Try to control the alignment of your body, so that your trunk and lower leg form a diagonal line. Hold the position, breathing normally.
STEP THREE: DIAGONAL TUCK CLUTCH
Approach your vertical base, and get into the basic clutch hold (pages 75 to 77). From here, get into a diagonal split clutch (step 2). Once your right leg is tucked as close to your trunk as possible, draw up your left leg so that it’s next to your upper leg. Both legs should now be in a mild tuck position, and your trunk and shins should form a diagonal line. Hold the position, breathing normally.
If you have been working on the diagonal split clutch, this maneuver won’t prove to be too much of a strain on your waist. But it’s an important technical stepping stone on the path to the horizontal tuck clutch. If you find the knees-in tuck difficult, some work on knee tucks (see Convict Conditioning) will help you master this.
Both legs should now be in a mild tuck position, and your trunk and shins should form a diagonal line. Hold the position, breathing normally.
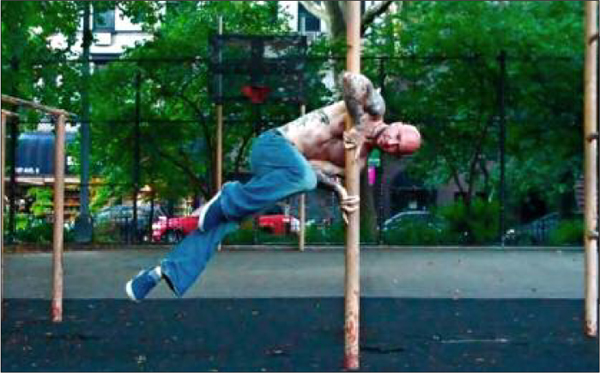
Approach your vertical base, and get into the basic clutch hold (pages 75 to 77). From here, get into a diagonal tuck clutch (step 3). Once you are in position, keep your trunk diagonal and extend both legs outwards until they are perfectly straight. At this point, your trunk and straight legs should form a diagonal line. Hold the position, breathing normally. This step is a useful way to begin working to the clutch flag, because the less strenuous diagonal position can often be held well by athletes even if they don’t yet have the strength to hold the full clutch flag with a horizontal body.
This is a key step and it’s one you shouldn’t skip. If the diagonal clutch is too tough to hold at first, approach it gradually; begin holding for ten seconds with both legs bent, and straighten them out as you get stronger.
At this point, your trunk and straight legs should form a diagonal line. Hold the position, breathing normally.
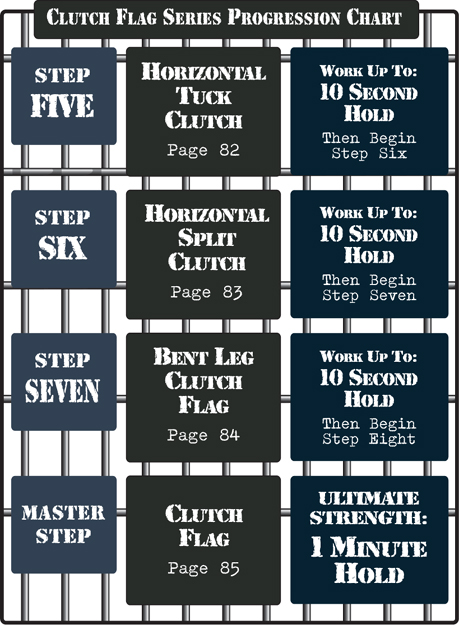
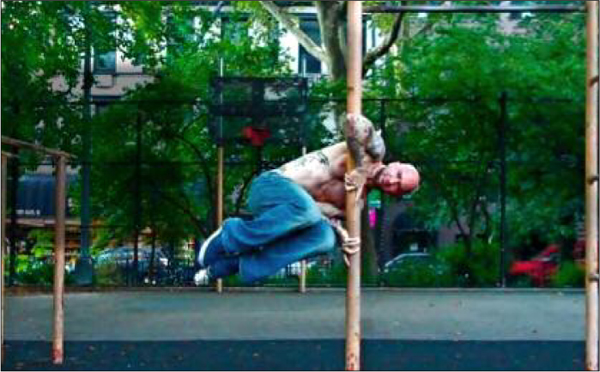
STEP FIVE: HORIZONTAL TUCK CLUTCH
Approach your vertical base, and get into the basic clutch hold (pages 75 to 77). Brace yourself and hop up onto your lower forearm, simultaneously bringing your knees up opposite your hips (the tuck position). At this point, your trunk and shins should form a horizontal line. Hold the position, breathing normally. This step represents a big achievement; the first time an athlete holds a horizontal clutch position. We’re getting somewhere!
This is a crucial step for learning the correct upper body positioning required for the harder horizontal holds. So far in this series, the forearm of your lowest arm has acted like a lever. For this step, you’ll notice that it’s more like an angled strut jammed into the side of your waist. The upper forearm should be flat against the base, pressing hard to take your weight.
At this point, your trunk and shins should form a horizontal line. Hold the position, breathing normally.
STEP SIX: HORIZONTAL SPLIT CLUTCH
Approach your vertical base, and get into the basic clutch hold (pages 75 to 77). Initiate the hold by getting into a horizontal tuck clutch (step 5). Keep the knee of your upper leg bent and opposite your hips. Simultaneously, straighten out your lower leg. Retain the alignment of your body, so that your trunk and lower leg form a horizontal line. Hold the position, breathing normally.
Now that an athlete can perform a horizontal clutch in the tuck position all that remains to achieve the full clutch flag is to extend both legs. Steps 6 and 7 represent the most gradual way to do this. In many cases, where a good horizontal split clutch has been attained, the athlete can get to the Master Step fairly rapidly. Most of the core work has been done by now.
Simultaneously, straighten out your lower leg. Retain the alignment of your body, so that your trunk and lower leg form a horizontal line.
STEP SEVEN: BENT LEG CLUTCH FLAG
Approach your vertical base, and get into the basic clutch hold (pages 75 to 77). From here, get into a horizontal split clutch (step 6). Once your position is fixed, slowly draw in the lower leg by bending at the knees and hips. Simultaneously extend your bent right leg until both feet meet. At this point, the legs should be extended about ¾ straight, or less. Although the joints bend, the body line (trunk and legs) should remain completely horizontal. Hold the position, breathing normally.
Extending the leg’s mass away from your centre-point increases the difficulty level of all flag movements, which makes this kind of hold very useful. It’s also real easy to adjust the intensity of this hold; more bend in the legs makes the leverage easier, straighter legs makes the exercise tougher.
Once your position is fixed, slowly draw in the lower leg by bending at the knees and hips. Simultaneously extend your bent right leg until both feet meet. At this point, the legs should be extended about ¾ straight, or less.
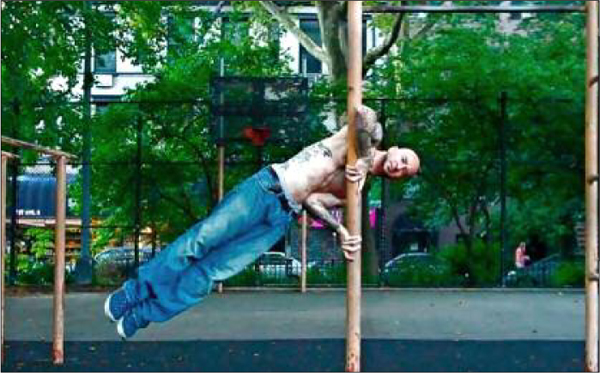
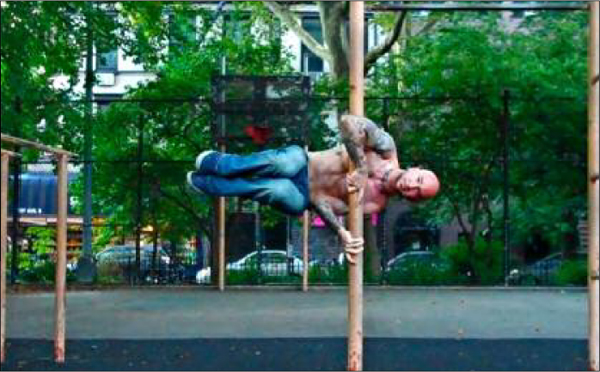
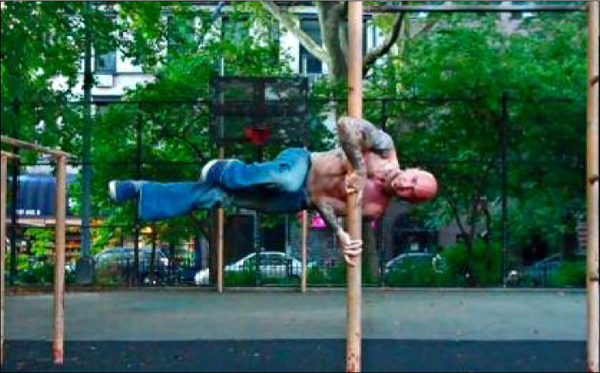
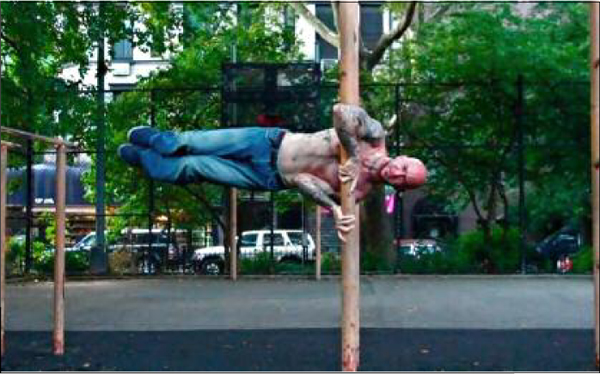
Approach your vertical base, and get into the basic clutch hold (pages 75 to 77). From here, get into a horizontal tuck clutch (step 5). Once your position is fixed, smoothly extend the legs outwards until they are locked out. At this point, your trunk and body should form a perfectly straight horizontal line, with no sagging. Hold the position, breathing normally.
During the full clutch flag, your gut should face outwards—not up. If your stomach turns up, towards the sky, it means that your lateral chain is weak, and your abs (anterior chain) are trying to compensate. Stay side on. As you become more comfortable in this hold, you’ll find you don’t need to get into a tuck clutch before straightening out into the flag; you’ll be able to start with straight legs, and slowly lever them up using pure lateral chain power.

Once your position is fixed, smoothly extend the legs outwards until they are locked out. At this point, your trunk and body should form a perfectly straight horizontal line, with no sagging.
REALITY CHECK: thousands of reps of side crunches won’t do jack for your overall strength and appearance. An athlete fed on a diet of crunches and similarly useless modern midsection nonsense would get the shock of his life if he tried the clutch flag—a hold which requires genuine strength and athletic ability.
Despite this, the clutch flag will be relatively easy to learn for most athletes, provided they are committed, sensible, and not too overweight. Begin by mastering a good, tight clutch hold. From there, explore the progressions I’ve laid out. Many of you won’t need all eight—no problem. Some of you will experiment and invent your own progressions and pass them on to others—even better!
Once you get to the point where you can perform a strong clutch flag, you can be sure you have no weak links in your lateral chain. Perform the hold two or three times a week—perhaps as part of your regular training sessions—and you’ll find your side-waist tightening up a hundred times faster than on a course of daily crunches.
For many, that’ll be enough. That’s fine—you can do something most bodybuilders can’t. For those who want to join the ranks of the bodyweight elite, there’s a further option—the press flag. If you’ve got the balls, I’ll show you how next.