FREE HEAT
PASSIVE SOLAR AND HEAT PUMPS
For nearly 25 years I lived in a rather cold climate, 8,000 feet above sea level in Evergreen, Colorado, in the foothills of the Rocky Mountains. Our winters were long and cold, with evening temperatures falling well below freezing week after week. It was not unusual to have negative 20 degrees Fahrenheit for two weeks in a row. In contrast, our summers were short and cool, and spring occurred in a flash between the long cold winter and the short, cool summer. If you blinked, you might miss it. Fall passed quickly, too, morphing rapidly into winter long before many of us were willing to let it go.
Despite the chilly nature of our climate, I had no heating bill. Why?
My home was heated passively by the sun — with a cord of wood for backup heat to take the edge off those cold winter nights and to provide heat for long cloudy spells. Based on what my neighbors paid for heat, I estimate that I saved $18,000 to $20,000 in the 14 years I lived in my solar house — money I’ve tucked away for my retirement. You too can rack up huge savings in fuel bills by tapping into the sun’s generous supply of energy. And you don’t have to live in the sunbelt to take advantage of solar energy. Even if you live in a cold, cloudy region of North America — areas like Buffalo, NY or Portland, OR (places we in the solar industry refer to as the “Gloom Belt”), you can supply up to half of your annual heat requirement from the sun, perhaps even more.
How can you do this?
Through active and passive solar retrofits — the subject of this chapter and the next two chapters. If you have a good southern exposure, you can discover what the ancient Greeks and the Anasazi Indians of North America learned thousands of years ago: the sun is an amazing source of free heat.
WHAT IS PASSIVE SOLAR HEATING ?
Passive solar heating is a heating system that has only one moving part: the sun. (Of course, the sun doesn’t move; it’s the Earth’s rotation that accounts for sunrises and sunsets.) Passive solar can provide space heat for all kinds of buildings, from homes to offices to fire stations to airports to schools. My new office at The Evergreen Institute is heated passively now that I’ve retrofitted the building. You name the building, and passive solar can be used to warm the interior.
Passive solar design relies on ordinary visible light and near infrared radiation (heat radiation at the end of the infrared spectrum that is nearest to visible light) from the low-angled winter sun. These low-angled rays penetrate south-facing windows during the heating season. Inside buildings, the sun’s rays are absorbed by floors, walls, and other solid materials. There it is converted to heat that provides warmth on the coldest of winter days.
Unlike active solar systems, passive solar design does not rely on complicated equipment or sensors. It relies on ordinary building elements, such as south-facing windows, overhangs (eaves), insulation, and airtight design. Competent designers incorporate several additional features too, for example, additional mass (concrete, stone, etc.) inside a building to absorb heat during the day. Absorbing excess daytime heat prevents a home from overheating during the day. This heat stored in mass, technically referred to as thermal mass, releases its stored heat at night, helping to maintain comfortable interiors day and night.
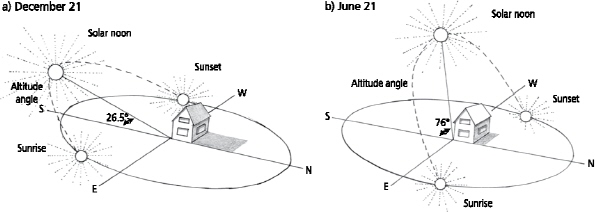
Passive solar heating relies on the fact that the sun angle from the horizon (the altitude angle) varies during the year, as shown in Figure 4-1. In the summer, the sun is high in the sky. It beats down on the roofs of our homes, so very little penetrates windows. Overhangs keep it from shining in and heating our homes in the summer. During the winter, the sun carves a low arc across the sky. The low-angled winter sun penetrates south-facing glass, warming our homes and places of work.
Passive solar heating is ideally suited to new home construction because architects can design the entire house around this simple and effective concept, coordinating all features of the design to achieve maximum year-round performance and comfort. It can also be incorporated into existing homes, as I explain in this chapter and in Home Power magazine, Issue 138.

Fig. 4-1: In a passive solar home, the low-angled winter sun penetrates south-facing windows to heat the home. During the summer, the high-angled sun shines on the roofs of houses, reducing heat gain.
One of the most important aspects of passive solar design is orientation. By orienting a new home properly, so that its long axis runs east and west, a solar designer can ensure maximal solar gain. This orientation ensures you will have plenty of south-facing wall, which can be fitted with windows to allow the winter sun to enter. Performance depends on additional windows on the south side of the home to let the sun in and a reduction in north-facing windows, which can lose lots of heat in the winter. To ensure that the building stays cool in the summer, designers add overhangs to protect the south-facing glass but also reduce the number of windows on the east and west sides to reduce solar heat gain from the sun as it courses through the sky.
Performance also hinges on the inclusion of thermal mass to absorb heat, as noted above. Sealing up the cracks in the building envelope and high levels of insulation — very high levels — are also essential to effective passive solar design.
All these simple but effective measures add up. The net result is a house that can easily acquire 50 to 80 percent of its heat naturally from the sun. In some climates, like sunny New Mexico and Arizona, you can achieve even higher performance.
My concern in this book is primarily with passive solar retrofits — adding passive solar features to existing homes that have a decent solar exposure (Figure 4-2). For those who are building anew, I suggest you read my book, The Solar House: Passive Heating and Cooling.
Passive solar provides many benefits. One of them is that much of what you do to passively heat a building also reduces cooling loads (the amount of energy used to keep a home cool). Put another way, many of the design features of state-of-the-art passive solar homes help keep buildings cooler — much cooler — in the summer, dramatically cutting cooling costs.
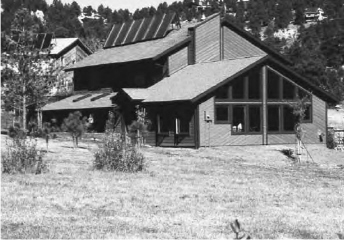
Fig. 4-2: This passive solar addition provides heat and additional living space. Although it looks nice, the two tiers of glass tend to cause overheating in the spring and fall because the lower tier of glass is not shaded. Two-story glass walls also provide an avenue for excessive heat loss in the winter. Be sure to insulate the glass at night with thermoshutters or quilted window shades.
Retrofits can also help many families reduce their electrical bills if their homes are heated with electricity. In addition, passive solar design increases natural light, known as daylighting, further cutting electrical demand. Thus, passive solar retrofits can help wean our society from its costly dependence on natural gas, fuel oil, and nuclear energy. In sum, passive solar creates a win-win-win situation for everyone, except for the big energy companies. That is, it is good for people, good for your personal economy, and it is good for the environment.
IS PASSIVE SOLAR FOR YOU?
To determine if a passive solar retrofit is feasible for your home, you’ll need to begin by assessing your home’s solar resource — specifically, how much sunlight strikes your home during the heating season (that part of the year that requires heat). Good solar exposure is essential from October through March, April, or May depending on your location. In most cases, you will need to heat starting in the late fall or early winter into early or mid spring.
As a basic rule, your home needs to be in a location that ensures good solar exposure on its south-facing wall from around 9 a.m. in the morning to 3 p.m. in the afternoon during the heating season. This time slot is the main “window of opportunity,” that is, the main period during the day for collecting sunlight during the heating season. Earlier and later hours, though they may be sunny, won’t provide as much solar energy, so don’t sweat if your house is shaded from sunrise to 8 or 9 a.m. or is shaded after 3 p.m. The 9-to-3 window will avail you of about 85 percent of the sun’s radiation.
Good solar exposure also means that the south-facing wall (preferably the longest wall of the building) is not shaded by neighboring buildings, privacy fences, evergreen trees, or anything else. Without a good clear view of the sun, retrofitting for passive solar just won’t work as well. (If your south-facing wall is shaded, but your roof is exposed to the winter sun, however, you may be able to heat your home with one of two active solar systems — a solar hot water or solar hot air system — described shortly.)
As just noted, an ideal home from a passive solar perspective should be oriented so that its long axis runs from east to west. This orientation allows for the largest surface area of exposed wall and window to the low-angled winter sun, which permits maximum solar gain. Determining the orientation of a building is not as easy as you might think. Here’s what you do: First, take a compass to the south side of the building. Hold the compass in your hand, very level. The compass needle will point north and south. This is magnetic south. For proper orientation, however, you want true south. True south corresponds to the lines of longitude, which run from the North Pole to the South Pole. Interestingly, true south and magnetic south rarely line up. This phenomenon is known as magnetic declination. In Figure 4-3, the lines on the map indicate magnetic deviation. If you look in the very center of North America, say at St. Louis, you will see the line is labeled with the number 0. This indicates that, in this location, true south and magnetic south line up perfectly. As you head east or west, however, the numbers increase. This indicates that as you move away from the center of the continent, the deviation between true south and magnetic south increases. If you are in Denver, Colorado, for instance, true south is 10 degrees off from magnetic south. But which way? East or west?
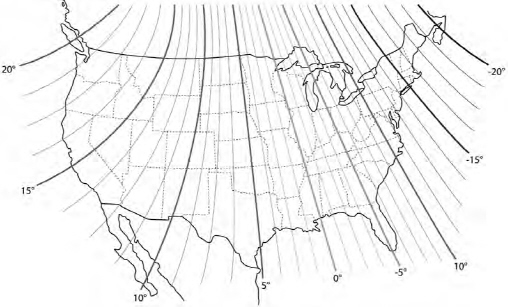
Fig. 4-3: Magnetic declination in North America.
In all the locations west of the center line, true south is east of magnetic south; this is called an easterly declination. So, in Denver, true south is 10 degrees east of magnetic south. As one travel east, say to western Pennsylvania, true south is 10 degrees west of magnetic south.
So, be sure to take magnetic declination into account when trying to determine the orientation of your home — or a new home you are about to build. For best solar gain in the winter, and lowest solar gain in the summer, it’s best if the building is oriented exactly to true south. Deviations will decrease the solar gain in the winter, when you need it the most, and also increase solar gain in the summer, when you need it the least. Both will increase annual fuel bills.
Unfortunately, many streets in cities and towns run north and south, and many home builders, over the years, have oriented the homes they’ve built so that the long axis of the houses face the street — so they point east or west. Because many homes are rectangular, the south-facing walls are small compared to the east- and west-facing walls. Making matters worse, many homes are packed in suburbs like sardines in a tin, so there’s not sufficient sunlight on south-facing walls to make a passive solar retrofit worthwhile.
If your house is oriented toward the street, all is not lost. You may still be able to retrofit it for solar heat, provided the south side is not shaded, for example, by a neighbor’s home or fence or trees. But don’t expect to heat your whole home. You may only be able to passively heat the south-facing rooms. You may only be able to acquire 10 percent or so of your heat from the sun. If your home is oriented east or west, you won’t achieve huge reductions in your annual heating bill. That said, if you have dutifully sealed air leaks, super-insulated your home, replaced energy-inefficient windows or added storm windows, added insulated window shades, and taken other conservation and efficiency measures I outlined in Chapter 2, the combination of the conservation and solar could easily slash your heating bills by half. As always, don’t retrofit until you have made all of the vital improvements in energy conservation and efficiency.
TYPES OF PASSIVE SOLAR DESIGN
If your home meets the criteria just described and you’d like to try passive solar, you will have three basic choices for a passive solar retrofit: direct gain, indirect gain, and isolated gain. Although that may sound mind-boggling, it’s really not.
Direct Gain Retrofits
Direct gain passive solar is the most common type of passive solar design for new construction (Figure 4-4a). It has limited uses in retrofits, however. In a new home incorporating direct gain design, the long axis of the home is oriented east and west, creating the largest possible southerly surface for solar gain. As noted earlier, the designer concentrates windows on the south side to absorb the low-angled winter sun — but not too many! See the sidebar “Window Allocation for Passive Solar Homes” for recommendations on the amount of glass to use. Sunlight enters the south-facing windows and, as noted above, is absorbed by solid surfaces in the house. It is then converted to heat — or infrared radiation, as it is known by scientists. The heat warms the room. Some heat is absorbed in thermal mass inside the home for nighttime heating. In this design, heat is gained directly by the structure, hence the name, direct gain.

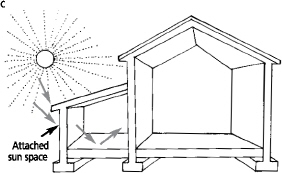
Fig. 4-4: Solar options: (a) direct gain, (b) indirect gain (Trombe wall or thermal storage wall), and (c) isolated gain attached sunspace. Homes can be retrofitted using all three designs, although adding a thermal storage wall can be difficult and costly.
To retrofit a home for direct gain, you’ll very likely need to add a few windows along the south side of the home or install larger windows to maximize solar gain. Adding windows is a job best reserved for professionals. It typically involves construction or reinforcement of rough window frames to ensure that windows won’t crack and walls won’t collapse. You may even need to obtain a building permit from your local building department for this work. They’ll send an inspector to check out the work at various stages. A professional usually handles such details, pulling the permits and arranging for inspections. For direct gain to be successful, you need to install windows with a high solar heat gain coefficient, a topic discussed in Chapter 2.
Window Allocation for Passive Solar Homes
For new passive solar homes, south-facing glass should fall within the range of 12 to 18 percent of the total square footage of the home, depending on the climate and the amount of solar gain you desire. A 1,000-square-foot home should have 120 to 180 square feet of south-facing glass. North- and east-facing glass should not exceed 4 percent of the total square footage, and west-facing should not exceed 2 percent. These guidelines are for homes with 9-foot ceilings. If you are building a home or retrofitting a home with vaulted ceilings, you need to take into account this fact. A room with an 18-foot ceiling will require twice as much solar glazing (south-facing glass) as a room with a 9-foot ceiling.
Retrofitting for direct gain may also require you to increase the size of the overhang, or add an overhang or some other kind of shade structure, if there is none. Overhangs shade windows and walls and protect a home from overheating during the summer. In some cases, you may need to reduce the size of overhangs to optimize solar gain. A contractor can help you with this, too, although it’s not going to be cheap.
Direct gain retrofitting is a great way to invite the winter sun into a home or business to provide free, natural heat and to reduce one’s demand for fossil fuel energy. It does, however, involve careful planning to avoid sacrificing privacy. Also, be sure that you are not letting in so much sunlight that you decrease the utility of the rooms in your home. Bright sunlight streaming in during the daytime, for example, can render a home office where computers are used during the day almost useless. Too much light causes glare on computer screens that can lead to severe eyestrain. Even window shades won’t help unless they completely block out the sun.
Solar direct gain retrofitting is tricky and presents many challenges. But there are ways to make the job easier. Rather than retrofit an existing wall, you can build an addition that incorporates direct gain passive solar design features, as shown in Figure 4-2. The addition contributes heat to adjoining rooms. If you are thinking about adding a room or two to your existing home, and the room faces south, why not heat it passively — for free?
No matter what you do, be sure that solar glazing (south-facing glass) in retrofits or additions can be insulated at night — either by rigid foam insulation internal shutters, as shown in Figure 4-5, or by a quilted fabric like those used to make Warm Windows insulated shades, available at fabric stores. Good window insulation dramatically improves the performance of a passive solar home! Remember, the sun only shines into south-facing windows, at most, 8 hours a day in the dead of winter. Windows are a weak point in the thermal envelope of a home. Most of the day, heat flows out of windows. So, be sure to stop that flow by installing and using insulated shades.
When retrofitting a home for passive solar, you’ll want to be certain that you don’t end up overheating it. Overheating can be prevented by several measures, for example, by installing overhangs. A two- to three-foot overhang works in many climates. Overheating can also be avoided by installing window shades and by installing additional thermal mass. (Thermal mass usually consists of masonry materials such as concrete, tile, or bricks that absorb sunlight and hold heat.) You can boost thermal mass in an existing home by removing wall-to-wall carpeting to expose wood floors. (Although wood is not as good as masonry material, it does provide thermal mass in a home.) Floors exposed to direct sunlight can be tiled to improve the performance of your retrofit.
When retrofitting your home for passive solar, it is important to proceed carefully. Work out a plan before you start adding new windows and think through the repercussions of each change you want to make. Pay special attention to thermal mass. If the total square footage of the solar glazing will exceed 7 percent of the floor space, you’ll very likely need to add thermal mass. If not, the incidental mass, that is, the thermal mass in drywall, framing, floors, cabinets, and furniture, usually suffices to absorb heat and prevent overheating. To determine how much thermal mass your home will need, you may want to contact a local passive solar designer/architect or hire a solar consultant. Or, you can pick up a copy of my book, The Solar House, for guidance on the subject, too.
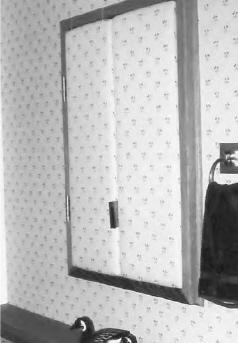
Fig. 4-5: Thermoshutters like these are made of rigid foam insulation and plywood, covered with a decorative fabric. Closing the thermoshutters at night or on cold, cloudy days greatly reduces heat loss.
Indirect Gain Retrofits: Thermal Storage Walls
Indirect gain passive solar is so named because it involves an intermediary structure that absorbs the sun’s energy, converts it to heat, and then transfers the heat to the house (Figure 4-4b). That intermediary is a Trombe wall (pronounced “trom”) named after a French engineer who invented this innovative passive solar design feature. Trombe walls are also called thermal storage walls, a term I like to use.
Thermal storage walls are built from solid materials such as poured concrete, cement blocks, bricks, adobe blocks, or even rammed earth (the latter two are natural building materials). These materials store considerable amounts of heat. Thermal storage walls are located along the south side of buildings. The outside of the wall is fitted with glass — usually double-paned glass mounted three to six inches away from the thermal storage wall. Low-angled winter sun penetrates the glass and is absorbed by the surface of the mass wall. It is then converted into heat that warms the surface of the wall. The heat then migrates slowly into the mass wall, eventually reaching the interior surface from which it radiates into the adjoining room.
The thickness of the mass walls is specified so that the heat conducting through the wall during the day reaches the interior of the wall early in the evening, around sunset. The wall will continue to radiate heat into the room throughout the night. For daytime heating, builders often install a window or two in the wall. This allows for direct gain, and permits views of the outside.
Daytime heating can also be achieved by placing vented openings in the thermal storage wall, as shown in Figure 4-4b. These openings allow room air to circulate through the space between the wall and the glass, drawing off heat.
Thermal storage walls work well in many climates, but because they are so massive, they’re not an option for retrofitting most homes. That’s because most foundations in existing homes are not designed to support the weight of the mass wall. If you want to retrofit your home to include this effective passive solar design, you’ll very likely have to beef up the foundation, a procedure that is not only tricky, but costly.
So why mention the thermal storage wall at all?
If you are building a new home or building an addition, a thermal storage wall is a wise choice. It works well in a variety of climates, from warm to extremely cold. For details, you may want to take a look at the section on thermal storage walls in my book The Solar House.
Isolated Gain Retrofits: Attached Sunspaces
The final option for passive solar design is the isolated gain system, more commonly referred to as the attached sunspace or solar greenhouse (Figure 4-4c). Attached sunspaces are passive solar heat collectors built onto the side of buildings. They are heated by the sun; the heat they generate is then transferred to adjoining rooms. Hence the term, isolated gain. (Heat is gained in an isolated space.)
Attached sunspaces are relatively easy to build onto many homes, provided there’s adequate solar exposure. All-glass attached sunspaces are available in kits, and there is no shortage of installers who can put one in for you. Unfortunately, this design is fraught with problems.
All-glass designs — that is, attached sunspaces with glass walls and glass roofs — tend to overheat in the summer and fall, causing severe discomfort in the home. They may even overheat in the winter. But isn’t this structure designed to collect heat and transfer it to the house in the winter?
Absolutely, but don’t expect to be able to use the space for much else. Overheating renders the sunspace much too hot to enjoy during daylight hours in the winter. Moreover, all but the hardiest of plants (cacti and succulents) find the intense heat oppressive. Most plants need to be kept below 85°F (29°C) for optimal growth; photosynthesis grinds to a halt at 100°F (37°C).
Despite the fancy brochures and advertisements you receive in the mail touting the value of all-glass attached sunspaces, you’ll very likely be disappointed if you go this route. I recommend that you think long and hard about the downsides of this retrofit. You’re basically buying a solar oven. To prevent overheating, you’ll need to cover the glass much of the year in most climate zones. The results can be quite hideous, as Figure 4-6 demonstrates.
A more effective attached sunspace design is shown in Figure 4-7. This design has a solid roof, which permits solar gain during the late fall, winter, and early spring, when the sun is in an intermediate and low position in the southern sky. Sunlight penetrating the south-facing windows warms the interior of the attached sunspace; the warm air created in the sunspace can then be transferred to adjacent rooms. During the summer, the solid roof all but eliminates unwanted solar gain.
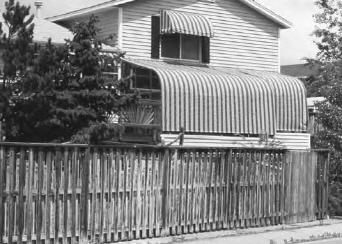
Fig. 4-6: Attached sunspaces are an easy way to retrofit a home for passive solar, although they often don’t perform well. This all-glass attached sunspace must be covered during the late spring, summer, and fall to prevent overheating. All-glass attached sunspaces also tend to lose lots of heat at night and therefore must be isolated from living spaces by doors.
While attached sunspaces of this nature are the best option in new and existing homes, you still need to design them very carefully to ensure optimal performance, especially in terms of maximum heat transfer into the house; otherwise, they’ll basically heat themselves and provide very little, if any, additional heat to your home.
Here’s what you need to do to make an attached sunspace work optimally: First, install openings in the wall between the sunspace and the adjoining rooms to permit warm air to flow into the house. To promote passive air movement, install openings near the floor and the ceiling of the wall between the sunspace and the adjoining room. This helps to create a convection current that circulates warm air into the house. (Note that a door opening into the space rarely suffices for heat transfer.)
To improve heat transfer from the sunspace to the house, I recommend installing a thermostatically controlled fan in the window or in an opening between the sunspace and the house. (Be sure to install a quiet one. Look for a low-sone fan with a rating of around 1.0.) DC fans can be powered by a 20- to 50-watt photovoltaic module. When struck by sunlight, the module generates DC electricity, powering the fan. When the sun sets or is covered with clouds, the fan shuts off. You won’t need any fancy switches or controllers of any sort with this sort of system.
Second, be sure that the openings can be closed off at night to prevent heat from escaping into the cooler sunspace.
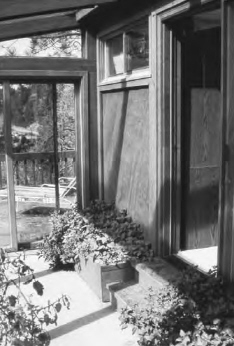
Third, be sure the wall between the attached sunspace and your home is insulated to prevent heat inside the house from escaping at night into the cold interior of the sunspace. You may also want to consider building a mass wall between the two, as I did on a home office I retrofitted for passive solar (Figure 4-7).
Fourth, be sure the ceiling and foundation of the attached sunspace are well insulated. Ceiling insulation should be in the range of R-50 to R-60 in most areas. To make the floor, I’d recommend pouring a four- to six-inch concrete slab or excavating and backfilling with crushed rock. Insulate around the perimeter of the foundation and under the slab to retain heat. Use rigid foam insulation rated for underground applications. Two to four inches of blueboard or pink board (extruded polystyrene) will generally suffice. Fifth, for best performance, use low-e double-paned glass (described in Chapter 2). Be sure the glass has a high solar heat gain coefficient, which means that it permits lots of sunlight to enter the structure. Ratings of around 0.5 or higher are ideal for many locations. In southern regions, like Florida, solar heat gain coefficient should be much lower, around 0.35 or so. A knowledgeable glass supplier will know what you mean when you tell him this and should be able to help you select the best glass. If he or she doesn’t know what you are talking about, call someone else. You’d be amazed at how many window installers don’t understand their product.
DAN CHIRAS
Fig. 4-7: This mass wall in the attached sunspace I designed for my previous home heats up during the day and radiates heat into the adjoining room at night.
Sixth, for the absolute best performance, insulate the glass at night. I recommend that you use rigid foam insulation panels placed against the glass between the framing members to reduce heat loss. Or you may want to install insulated shades. (Of the two, rigid foam panels are better; they have a higher R-value.) Rigid foam insulation panels will require additional work on your part each day; you’ll have to take them out in the morning and put them back at night. Raising and lowering shades will also require some extra effort, but it’s less work than inserting foam insulation panels. Either way, the additional labor on your part is a small price to pay to keep the interior of an attached sunspace warm at night. The sunspace will also warm up much more quickly the next day, resulting in more heat gain in your home — where you want the heat!
Seventh, be sure to install some operable windows in the attached sunspace to bleed off hot air during the summer and fall. To ventilate naturally, that is, without fans, you’ll want to create a convection current by installing a couple of opening windows low in the structure and a couple opening windows up high — or include a roof vent. Because warm air rises, it will escape through the upper windows or roof vent, drawing cooler air in through the lower windows. You can purchase openers that operate automatically — opening a vent when the temperature reaches a certain level.
DAN CHIRAS
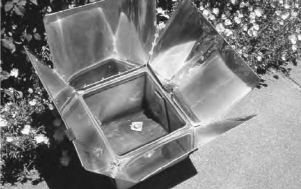
Fig. 4-8: Solar cookers like this one can be used to bake cookies or bread, or make a variety of one-pot meals. You can build your own cooker inexpensively by using aluminum foil, glass, and a cardboard or wooden box.
As noted above, attached sunspaces are the “easy option” for solar retrofits. They’re pretty easy to integrate into an existing home and relatively easy to build. They’re not very expensive, either, and they go up quickly, providing instant savings and comfort.
Attached sunspaces also provide a space for a solar cooker like the one shown in Figure 4-8. A solar cooker is a remarkably simple device consisting of a box with reflectors that concentrate the sunlight striking the device, a dark interior to convert sunlight to heat, a glass lid to hold in the heat, and a shelf to hold cooking pots or cookie sheets. You can purchase one online through Gaiam Real Goods or make your own. Numerous plans to build your own are available online at solarcooking.org/plans.htm.
Attached sunspaces of the type I’m recommending generally perform much better than the all-glass variety. They stay cooler in the summer, provide more usable space, and provide adequate levels of heat during the winter. Still, they do have some downsides.
For one, they make lousy growing spaces. If you are hoping to grow vegetables year round in an attached sunspace with a roof, forget it. You’ll be disappointed by the results. That’s because many vegetables do best when the sunlight comes from above. A lack of summer sunlight often causes plants like tomatoes to become tall and thin — we say they become “spindly.” Spinach and lettuce like overhead light, too. Although such plants may thrive in the sunspace during the winter, especially if you can keep the temperature up at night via the insulation strategies I’ve mentioned, they’ll languish in the shade inside the sunspace in the summer, because the sun is high in the sky, beating down on the roof and overhangs. As a result, very little sunlight will penetrate the structure. To offset this problem, you can install a few standard skylights in the roof. Unfortunately, this could lead to summertime overheating. In addition, skylights lose huge amounts of heat on cold winter nights, causing the space to chill down, thwarting plant growth. Another option for providing overhead light in the summer is the solar tube skylight, shown in Figure 4-9. Solar tube skylights consist of a small glass or plastic dome-shaped lens mounted on the roof that collects sun and directs it into a polished aluminum tube that extends from the roof to the ceiling. (The polished aluminum ensures maximum light transmission.) Light enters the room through a ceiling fixture, a diffuser that disperses light.
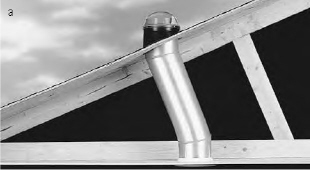
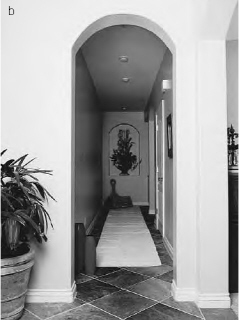
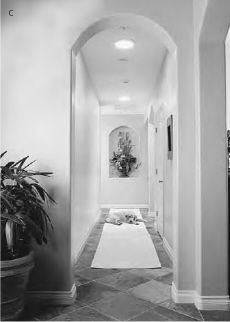
Fig. 4-9: (a) Tubular skylights allow light into a home, thus reducing daytime lighting and electrical demand. They lose much less heat than conventional skylights at night. (b) Hallway before installing tubular skylight. (c) Hallway after installing tubular skylight.
Solar tube skylights let in lots of light from a rather small opening — much smaller than standard skylights; as a result, they minimize unwanted heat gain caused by conventional skylights. This in turn considerably reduces the threat of summertime overheating. Because they utilize a small opening, tubular skylights also minimize wintertime heat loss at night, a huge problem with conventional skylights.
Another problem that you may find with an attached sunspace is that it won’t be habitable during the winter, except perhaps during the morning before the sun has warmed it. Once the sun begins beating in, however, you’ll fry.
Like other forms of solar retrofitting, you will have to obtain a permit from the building department for an attached sunspace. They’ll inspect the project at various stages and upon completion of the project.
GETTING THE HELP YOU NEED
Passive solar retrofits, combined with energy efficiency modifications, can help propel you and your loved ones toward energy independence. Although I’ve outlined many of the ideas and methods to achieve this laudable goal, be sure to research these options in more detail. My books, Solar Home Heating Basics, The Solar House, and Green Home Improvement provide a wealth of additional information on energy efficiency and solar heating.
Also, don’t be afraid to ask for help. Although it may cost you a bit, the assistance of a skilled and knowledgeable solar architect or builder can help you avoid costly mistakes. Don’t assume that just any architect can help you, however. Even ones who claim to be interested in doing more solar may not have the experience you need.
I strongly recommend that you work with an architect who can perform a computerized energy analysis of your home to determine how the changes you and he are proposing will affect energy consumption. Running an analysis on your home with the proposed efficiency and solar retrofits in mind will not only give you an idea of how the changes will improve the performance of your home, they may enable you to discover more ways to save on fuel and increase comfort. Bear in mind, though, that some of the more sophisticated energy analyses, like Energy-10, can be costly.
To reiterate, whenever possible hire an architect or builder who has experience in passive solar design. I recommend working with designers and architects who actually live in passive solar homes, although, regrettably, not many that I’ve encountered practice what they preach.
Why hire someone who lives in a solar house?
Architects and designers who live in solar homes often develop a strong appreciation of the art of building comfortable, energy-efficient structures. Without this day-to-day experience, it’s my belief that many designers miss key points. They may, for example, fail to include sun-free zones — areas where family members can relax, work, or watch TV without being blasted by bright sun. (Sun-drenching has rendered many a new passive solar home unlivable on bright, sunny winter days.)
Bear in mind, too, that one design does not fit all. A passive solar design or a passive solar retrofit that works in Minnesota might overheat in Kansas or Tennessee. You and your architect need to design specifically for your region using computer software that allows you to assess the performance of a design — before you build it. Your job in retrofitting your home is to do the most for the least, but don’t cut corners. Use high-quality windows, for instance, and insulate, insulate, insulate. Before you insulate, however, seal up the many air leaks in the building envelope of your home or business. They’re robbing you blind!
SOME FINAL THOUGHTS ON PASSIVE SOLAR RETROFITS
Passive solar retrofits offer many advantages, as I’ve noted. For additions, direct gain systems are really quite economical. If you and your architect are smart, you can design and build a direct gain passive solar addition for little more than a conventional addition would cost. You will be blessed with totally free heat immediately.
Retrofitting an existing home or business will always cost money, however. For direct gain systems, you’ll need to tear out and replace existing windows. For isolated gain systems, you’ll need to build an attached sunspace. Unfortunately, I’ve never seen any figures on the economics of various retrofits that determine costs and savings or determine the return on these investments. That leaves the task up to you. My suggestion is to compute the costs of the retrofit, then estimate your savings on fuel bills, being sure to take into account the rising cost of fuel. Divide the savings by the cost and you’ll have the return on investment. If a retrofit costs $2,000 and will save you $200 a year on heating and cooling costs, your return on investment is $200/$2,000 or 10%. This may help to guide your decision. Bear in mind, however, when calculating the costs and benefits of a passive solar retrofit, that not only will increasing fuel costs make the economics more favorable, you will also benefit aesthetically and increase your home’s value. For example, adding windows will provide better views, create a roomier feel to your home, and provide natural daylighting. Of course, passive solar retrofits will also make your home warmer and more comfortable. In addition, a passive solar retrofit could add to the curb appeal of your home, making it more desirable should you decide to sell it. An attractive, energy-efficient passive solar home with much lower fuel costs than similar homes is likely to be much more attractive to potential buyers, especially if fuel prices continue to escalate. The resale value of your home could increase dramatically as a result of your lower fuel bills.
HEAT PUMPS
Another renewable energy option that you may want to consider is a heat pump. A heat pump is an ingenious device designed to extract heat from the ground or the air around a home in the winter, concentrate it, and then transfer the heat into the interior of the structure. Heat pumps can be used as the primary heat source for new or existing homes. They’re ideal for sites that aren’t conducive to solar energy retrofits.
What makes heat pumps so special is that they don’t burn fossil fuel like many conventional home heating systems. They operate entirely on electricity. (Electricity that may be generated from fossil fuels, however, and usually is.) Moreover, heat pumps can be run in reverse during the summer to extract heat from our homes. Heat pumps fit into two basic categories: air-source and ground-source. Both are discussed below.
Ground-Source Heat Pumps
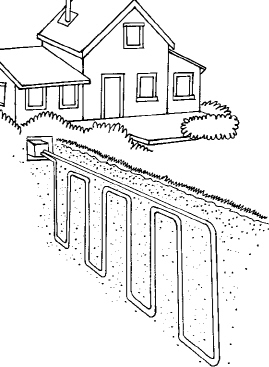
Ground-source heat pumps (GSHPs), as shown in Figure 4-10, extract heat from the Earth around a home and transfer the heat into the house in the winter, providing space heat. Ground-source heat pumps consist of three parts: (1) pipes buried in the ground to draw heat from the Earth, (2) the heat pump, and (3) a means of distributing heat in a house (a conventional heating system such as a radiant floor or forced air).
In the winter, ground-source heat pumps gather heat from the subsoil, well beneath the frost line where temperatures remain about 50°F (10°C) year round. Heat is collected from this massive heat sink by water or propylene glycol pumped through the underground network of pipes. The heat is then concentrated by the heat pump and transferred into a home. How do heat pumps turn 50°F ground heat into 80° or 90°F (27° or 32°C) space heat?
Ground-source heat pumps rely on refrigeration technology — refrigerants, gases, compressors, and pumps. Without getting too technical, the heat delivered to the heat pump causes the refrigerant in the unit to vaporize and expand. The refrigerant is then sent to a compressor. Compressing the vaporized refrigerant releases heat. This heat is captured and transferred to the heating system, and the refrigerant gas is recompressed and reused. Heat pumps can also be used to draw heat from the groundwater or even surface waters, for example, a nearby lake or pond. These units are known as water-source heat pumps.
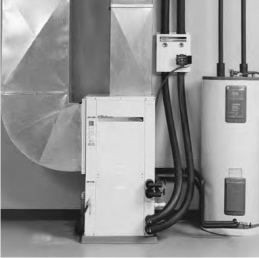
Fig. 4-10: Ground-source heat pumps draw heat from the Earth, concentrate it using refrigeration technology, then pump the heat into the house. Pipes are laid horizontally in the ground 4 to 6 feet below the surface or vertically where they extend 100 to 400 feet below the surface. Water or a mixture of water and an environmentally benign antifreeze circulates through the pipe, gathering heat in the winter. A small electric pump provides the propulsive force.
Pros and Cons of Ground-Source Heat Pumps
Ground-source heat pumps have many great features. Perhaps the most important is that they are extremely energy efficient. According to the United States Department of Energy (DOE) and the Environmental Protection Agency (EPA), ground-source heat pumps are the most efficient, environmentally benign, and cost-effective space heating and cooling system on the market today. These systems use relatively small amounts of electricity to power their pumps and compressors — about 25 to 50 percent less than conventional heating and cooling systems. Moreover, ground-source heat pumps require no additional fuel other than the heat they extract from the Earth, which is free. Because of this, ground-source heat pumps offer the lowest carbon dioxide emissions of any conventional heating and cooling system on the market today.
Yet another advantage of ground-source heat pumps is that they can be installed in virtually any climate. Although they’re more expensive to install than conventional heating and cooling systems, efficiency gains pay for the additional costs in two to ten years. In addition, ground-source heat pumps carrying the EPA’s Energy Star label can be financed with special Energy Star loans from banks and other financial institutions. Some of these loans offer a lower interest rate than you’d be able to get for a conventional heating system. Others allow longer repayment periods. Some combine both features. (For information on Energy Star loans, call 1-888-STAR-YES).
Another advantage of ground-source heat pumps is that they are more compact than conventional heating and air conditioning systems. They also have relatively few moving parts and typically require less maintenance than conventional heating and cooling systems. Underground piping is often warranted for 25 to 50 years.
Yet another advantage of ground-source heat pumps is that they are much less likely to set your home on fire, as they contain no flames. The absence of combustion also eliminates indoor air pollution. And, as if that’s not enough, ground-source heat pumps operate fairly quietly. Further adding to the list of advantages, residential ground-source heat pumps can be fitted with a device that transfers waste heat from the compressor pump to a storage water heater. In the summer, while the unit is cooling the house, waste heat from the ground-source heat pump provides 100 percent of a home’s hot water; in the winter, it provides about 50 percent.
Ground-source heat pumps do have a few disadvantages, however. The main problem is that they use a refrigerant known as hydrofluorocarbon- 22 or HCFC-22. This chemical is less stable than ozone-depleting CFCs and, therefore, tends to break up in the lower atmosphere, so it does reach the ozone layer where it can destroy ozone molecules. As most readers will know, ozone provides a protective shield against ultraviolet-B radiation, which causes cataracts and cancer, and injures plants. Although HCFCs destroy far fewer ozone molecules than CFCs — 5,000 per molecule of HCFC compared to 100,000 per molecule of CFC — ozone loss is still significant. Fortunately, ground-source heat pumps come with factory-sealed refrigeration systems that, according to manufacturers, will seldom or never have to be recharged. This reduces leak potential and ozone destruction.
And then there’s the issue of cost. As noted earlier, ground-source heat pumps cost more than conventional heating and cooling systems, largely due to the fact that they require extensive excavation, although bore holes can be drilled vertically to eliminate this problem.
Be sure to call your local utility to see if they offer any rebates or other incentives for installing a heat pump.
Air-Source Heat Pumps
Air-source heat pumps operate the same way as ground-source heat pumps, but capture heat from the air rather than the ground. In the summer, they operate in reverse. That is, they strip heat from the house and dump it outside. As illustrated in Figure 4-11, the air-source heat pump extracts heat from outside coils filled with refrigerant. The refrigerant absorbs heat from the air, even at very low temperatures.
How?
The refrigerant is cold, sometimes as cold as 0°F (18°C). Because it is cooler than ambient air, the refrigerant can absorb heat from it. Figure 4-11 illustrates how this device operates.
Although sales of air-source heat pumps outstrip sales of ground-source heat pumps, air-source heat pumps are not as efficient. Nor can they be installed in as many places. As a rule, air-source heat pumps work best in warmer climates, such as that of the southeastern United States, where the cooling load exceeds the heating load. However, there are a few cold temperature air-source heat pumps on the market now that work in temperatures as low as 10°F (–12°C). Of the two choices, however, a ground-source heat pump is probably a better choice. They use half as much HCFC as the air-source heat pumps and deliver more heat (or cooling) per unit of electricity consumed. If you’d like to learn more about heat pumps, I strongly recommend John Lynch’s article, “Heat from the Earth” in Home Power, Issue 98.
CONCLUSION
In closing, although heating oil and natural gas are heading toward extinction, we have many options to heat our homes that make sense economically and environmentally. Passive solar is great for new and existing homes, as are heat pumps. In the next chapter, I’ll tackle active heating systems: solar hot air and solar hot water systems.
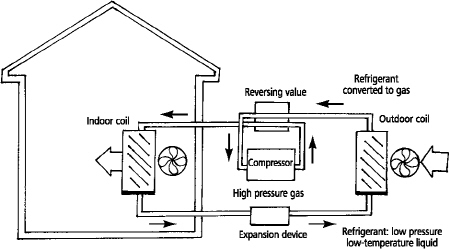
Fig. 4-11: An air-source heat pump consists of an indoor and an outdoor portion. After giving off its heat inside a house, the cool refrigerant passes from the house to the outside. Here, the pressurized liquid enters an expansion device and is converted to a low-pressure, low-temperature liquid, which then enters the outside coil. A fan blows outside air over the cold coils. Heat is transferred from the outside air into the coils where it warms the refrigerant, causing it to transform from liquid to a gas. As the gas expands, it absorbs heat. Next, the heated refrigerant gas passes through a compressor, reducing its volume. The heated, high-pressure refrigerant then enters the house. Because it is hotter than the inside air, it gives off heat in the inside coil. A fan blows across the coils, stripping the heat away. When cooling a house in the summer, the process is identical, except the heat is obtained from inside the house and transferred to the outside.