CHAPTER 1
Canning Basics
Here’s everything you need to know to get started canning—the types of methods, ingredients, equipment—and exactly how to keep your food delicious and safe to eat.


Follow these basic rules exactly to ensure food safety and success.
1 KNOW WHICH CANNER TO USE The boiling-water canner—basically a big pot with a lid and a rack in the bottom—is used for high-acid foods, which naturally resist bacteria growth. Pressure canners are used with low-acid foods and recipes that are especially prone to harboring harmful microorganisms. They heat food hotter than boiling-water canners.
The recipe will specify which type of canner is appropriate. In this book, all of the recipes use a boiling-water canner.
2 CHOOSE THE RIGHT JARS Use jars made specifically for canning. Don’t use glass jars from purchased food, even if they look like canning jars. Don’t use jars that look different from the canning jars currently on the market. And avoid jars with chipped edges because that can affect the seal.
Use the size jar specified in the recipe.
3 USE LIDS PROPERLY Use the special two-piece lids manufactured for canning. Reuse rings, but do not reuse lids, which have a sticky compound that seals the jar.
Don’t screw lids on too tightly or they won’t create a vacuum seal properly. Heat the lids in very hot but not boiling water or the compound won’t seal. Test for sealing on each jar after it has cooled.
4 CHOOSE THE RIGHT RECIPE Modern canning recipes are safer than those from just 20 years ago. Foods may be processed longer or hotter. Always use tested recipes from reliable, current sources—and follow the recipes exactly. Don’t alter ingredients. Alterations can compromise food safety.
5 KEEP IT CLEAN AND KEEP IT HOT Keep everything scrupulously clean. Wash and sterilize jars. Pack hot food into hot jars one at a time—not assembly-line style. Take only one jar out of the canner at a time and as soon as it’s filled, place it back in the simmering water in the canner.
In canning, the acidity level of foods is critical. High-acid foods are naturally less likely to harbor harmful microorganisms, while low-acid foods require either more acid or more heat for safe canning.
Foods for canning are basically divided into two groups: low-acid and high-acid.
HIGH-ACID FOODS These are the simplest to process. Their high acidity levels create a difficult environment for microorganisms and enzymes to thrive, so processing them in the lower heat of a boiling-water canner is safe.
HIGH-ACID FOODS have a pH of 4.6 or lower. Lemon juice, lime juice, and vinegar are very acidic. For that reason, most pickles and most salsas are high-acid, even though they may contain foods that are otherwise low-acid, such as green beans and carrots.
LOW-ACID FOODS These foods have a pH greater than 4.6. Most vegetables are low-acid, as are most soups, stews, and meat sauces. Unless large amounts of an acidic ingredient (such as vinegar) are added, these low-acid foods must be processed in the higher heat of a pressure canner.
ACIDITY BOOSTERS Adding highly acidic elements such as lemon juice and vinegar to low-acid foods greatly broadens the types of foods you can process in a boiling-water canner because they control bacteria that can’t thrive in acidic environments.
That’s why canning recipes for tomatoes, which have a fairly neutral pH, often call for adding of a teaspoon of lemon juice.
It’s also why green beans in a vinegary brine can be processed in a boiling-water canner (which doesn’t get as hot and doesn’t kill microorganisms as effectively as a pressure canner). Plain green beans, on the other hand, must be processed in the higher heat of a pressure canner.

| PROCESS IN BOILING-WATER CANNER | |
|---|---|
| PH LEVEL | FOOD |
| 1.0 to 1.9 | Limes |
| 2.0 to 2.9 | Lemons, strawberries |
| 3.0 to 3.9 | Gooseberries, rhubarb, pickles, oranges, peaches, sauerkraut, apples, apricots, cherries, plums, blueberries, raspberries, blackberries, pears |
| 4.0 to 4.6 | Grapes, most tomato recipes |
| PROCESS IN PRESSURE CANNER | |
|---|---|
| PH LEVEL | FOOD |
| 4.7 to 4.9 | Plain green beans, eggplant, some tomato recipes |
| 5.0 to 5.9 | Asparagus, carrots, pumpkin, sweet peppers, beets, turnips, sweet potatoes, cucumbers, onions, cauliflower, cabbage, okra, zucchini |
| 6.0 to 7.0 | Peas, lima beans, corn, spinach |
Wide-mouth or regular-mouth? Quart or pint? There are many different types of canning jars available, each with its advantages and disadvantages. Choose the right jar for the recipe.
Home canners have a wide selection of jars from which to choose for food preservation.
Larger jars come as either wide-mouth or regular-mouth. Wide-mouth jars are ideal for packing large pieces, such as whole peaches, into a jar. Regular-mouth jars are fine for recipes such as soups and sauces.
Recipes often specify jar size. The following jars are the most widely available for home canners:

Most of what you need to can you already have in your kitchen (see “Everyday Kitchen Tools”), but a few specialty canning tools—such as a handy magnet to fish lids out of boiling water with ease—make the job much easier.
These few special tools make canning simpler and more efficient.
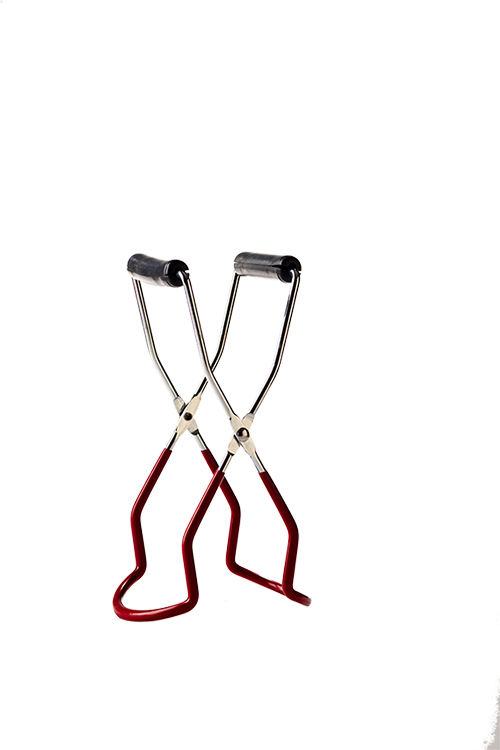
1 JAR LIFTER This tool lifts jars firmly and securely in and out of hot water. Use two hands and squeeze firmly. You can use kitchen tongs, but they are not as secure.
2 COMBINATION RULER/SPATULA The notched end is calibrated to match the most common headspaces.
The tool is also somewhat flexible with a tapered end, making it the ideal tool for slipping in along the side of filled jars to release air bubbles.
3 MAGNETIC WAND This magic wand enables you to drop lids and rings into the hot water of the canner (no need to heat them in a separate pan) to sterilize and soften them and then easily lift them out from among jars and racks.
4 JAR FUNNELS Much wider and shorter than other funnels, these come in both wide-mouth and regular-mouth versions. They’re invaluable for preventing spills when filling jars.

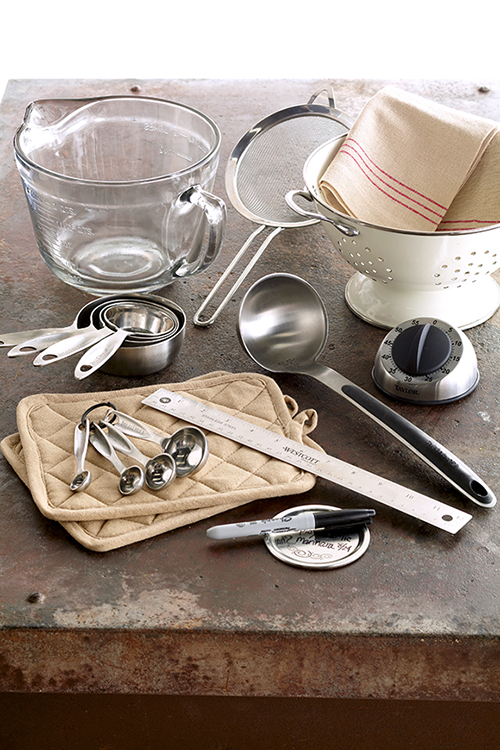
Most of the tools you need for boiling-water canning are the same ones you use when you do any kind of basic cooking or baking—tools for measuring, stirring, straining, scooping, and timing.
These basic kitchen tools are necessary for successful canning.
1 8-CUP LIQUID MEASURING JAR Essential for measuring large amounts of chopped or sliced produce and for measuring large amounts of water and other liquids. It also makes a handy mixing bowl.
2 LARGE SIEVE Use this like a small colander. Rinse off small amounts of berries or set over a bowl to strain bits from liquids. Or line with cheesecloth to finely strain small amounts of liquid.
3 KITCHEN TOWELS These have many uses when canning besides drying wet utensils. Use to wipe rims of jars. Lay a dry towel on the counter to set hot jars on (never directly on the counter; they may crack) or set on a wire rack. And, of course, use them to wipe up spills.
4 COLANDER Useful for washing produce and draining juice from sliced or cut-up produce. Line it with cheesecloth and set over a bowl to finely strain juices for canned juice or jellies.
5 MEASURING CUPS Use measuring cups for dry goods, such as sugar. (Use glass measures for liquids; they measure differently.) Metal is more durable and finely ground food slides out of it more easily with no static cling. Most come in sets of 1 cup, ½ cup, 1⁄3 cup, and ¼ cup.
6 LADLES Canning involves transferring liquids from one container to another, and a ladle does that quickly and precisely. Metal is ideal because it won’t melt if left too close to a burner. If you use plastic, select a black one; light-color plastic tends to stain.
7 TIMER A timer is important for keeping track of cooking and processing times. The timer built into a stove works fine, but a portable timer can be tucked in your pocket while you leave the room.
8 RULER If you don’t have a combination ruler/spatula, use it to measure headspace when filling jars or when a recipe specifies produce cut in certain lengths.
9 MEASURING SPOONS Most sets have 1 tablespoon, 1 teaspoon, ½ teaspoon, and ¼ teaspoon. Quality metal spoons cost just a bit more and, like metal measuring cups, better release finely ground foods that might otherwise cling.
10 HOT PADS One pair is essential, but two is better so that you always have a clean, dry pair. Or try silicone hot pads—they clean up in a snap.
11 PERMANENT MARKER Use to write on metal, paper, plastic, and glass. Once the ink is dry, it is fairly resistant to fading and moisture.

Canning uses some specialty ingredients that improve the quality (and, in some cases, safety) of food. Some are as basic as salt—others are more specialized.
Most ingredients for canning are already in your pantry—that’s the beauty of home preservation. You aren’t using chemicals or additives whose names you can’t pronounce and that you don’t understand.
That doesn’t mean each ingredient isn’t important. Each has its role in the canning process, interacting with other ingredients, so don’t vary or substitute unless the recipe specifies. A few key specialty ingredients that help ensure quality canned goods:
1 VINEGAR This highly acidic liquid is key to making pickles, salsas, and other preserved goods. Recipes usually specify what type of vinegar to use. However, when in doubt, use white vinegar, which you can purchase by the gallon, because it’s clear and won’t discolor produce.
Apple cider vinegar is also commonly used in canning recipes.
2 SUGAR Sugar, obviously, helps flavor foods. However, when simmered, it also affects the texture of canned goods, making them thicker. Sugar interacts with pectin, so follow any recipe that calls for both exactly to avoid a preserve that’s too thick or too runny. Do not substitute honey unless the recipe specifies it.
3 LIQUID PECTIN Available in a variety of formulations, pectin adds body and gel to jams and jellies. Liquid pectin speeds the dissolving process. Use low-sugar pectins to reduce sugar in jams and preserves. (Follow a low-sugar recipe or follow the directions on the product; don’t just reduce the sugar, or texture will be affected.)
4 PECTIN POWDER Use traditional powder types by first mixing them with sugar, then mixing them with the fruit and other ingredients. Stir or cook fruit to dissolve the pectin. Freezer-jam pectins dissolve quickly and create optimal texture in freezer preserves, which tend to be slightly softer than traditional preserves.
5 ASCORBIC ACID This powder protects color and flavor of fruits, such as apples and peaches, and vegetables that darken when peeled or cut.
Dissolve the powder in water. Then briefly soak cut-up produce in the solution.
6 BOTTLED LEMON JUICE Fresh lemon juice and grated lemon peel are added to some recipes for flavor. But in other recipes (such as those containing tomatoes) that just call for lemon juice, use only bottled lemon juice.
In those recipes, lemon juice is added to boost acidity for a safe product. Use bottled lemon juice because it has a consistent acidity, unlike that of fresh lemons, which vary in acidity.
7 SALT A variety of salts can be used in canning recipes, but for best results use canning salt. It has a fine texture and will dissolve readily. Its fine texture also makes it measure differently than coarser salts, so use it for the most accurate measuring in canning recipes. Also, canning salt is free from anticlumping additives that can cause cloudiness in brines.
Salt is one of the few ingredients in canning that you can adjust in all recipes to taste.

Food is loaded into jars in one of two ways—the hot-pack or the raw-pack method. Here’s how to determine which is better for your situation.
To achieve ideal flavor and texture, a recipe will follow either a hot-pack or raw-pack method.
Although the recipe might not refer to these names, it will instruct you to put food into a jar raw and top it with hot liquid or to cook the food first and pack it, still hot, into jars.
For food that is firm and processes well, this method is preferred. It’s the better method for most fruits and vegetables, meats, poultry, and seafoods.
Simmer food in brine, water, juice, or syrup for a few minutes. Then load the food, still hot, into hot, sterilized jars.
Precooking the food this way breaks it down more to eliminate air so it’s less likely to spoil and so food doesn’t float. Also more produce can be loaded into fewer jars and processing time is less because the food is already hot—a significant advantage if you’re processing large amounts of food.
Also called cold pack, this method is better for foods that are more delicate and that would have a tough time standing up to a cooking process followed by the heat-intensive canning process.
Food is placed into the jar while still raw and packed in firmly but not crushed. Boiling brine, syrup, juice, or water is added if additional liquid is needed (the recipe will specify).
This method is fast and easy and helps preserve texture. However, it also may result in some shrinkage as food is processed, causing some foods to float to the top of the jar.

With the hot-pack method, food is simmered and then ladled, still hot, into hot jars.
Before filling, jars and lids need to be heated and sterilized in the canner or other hot water to ensure safely canned foods. The process isn’t difficult, but follow these directions to do it correctly in record time.
All jars must be cleaned and sterilized before using.
You can simply dip them in a large pan of simmering water for a few minutes and then load them, still hot, with food.
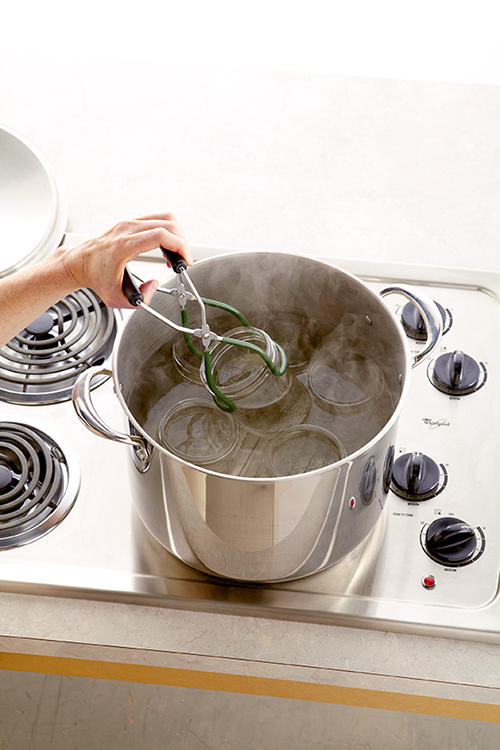
A more efficient way is to use the canner, which already has hot water in it. After filling the canner halfway and bringing the water to just below a simmer, put the jars in it, filling each jar with some hot water to prevent floating. If the canner has an adjustable rack, position it in the highest position. Cover with the lid to get the jars hot and steamy. They don’t need to be submerged; the steam will sterilize them. After a few minutes, the jars are ready to fill.
Take out just one jar at a time, fill it, put on the lid, and return it to the canner to keep everything hot. Then take out another jar and fill it: one jar out, one jar in.
Before using lids, heat them to soften the sealing compound. Put the lids in the canner with the jars as you sterilize them. Or heat them in a saucepan by themselves if you wish.
Regardless, the water must be very hot (180°F) to soften the compound but must not boil or the compound will start to break down.
Rings can also be sterilized, but it’s not necessary. Instead you can wash them in hot, soapy water and rinse thoroughly.

This method really couldn’t be much simpler. Prepare the food and put it in jars, then submerge jars in simmering water for a specified time. Tomatoes are shown here, but the overall steps are the same for other foods.
STEP 1 PREPARE THE FOOD While you’re preparing the food to be canned, heat water in the canner. Fill the canner about halfway with water and position the rack. Set jars in the canner to sterilize.

SCORE THE TOMATOES Make an X in the blossom end of each tomato with a small sharp knife.

BLANCH Heat a large kettle of water to boiling. Drop in the tomatoes to simmer for 1 or 2 minutes.

COOL AND PEEL Immediately plunge the tomatoes into icy water to loosen the skins. The skins will slip off easily. Cut out the stem ends with a small, sharp knife.
STEP 2 FILL THE JARS The cold-pack method for tomatoes is shown here, but follow the exact process specified in the recipe you are following.

FILL Pack the jar as tightly as you can with the food without crushing it. Top with any hot liquid as specified in the recipe.

REMOVE AIR BUBBLES Insert a special canning tool or a thin, flexible spatula down along the sides of the jar to remove any air bubbles. Measure headspace, adding or removing liquid as needed.

WIPE Wipe rim and threads of jar with a clean, damp cloth to remove any residue that might interfere with the seal.

PUT ON LID Set lid on jar and screw on band no more than fingertip-tight, just tight enough that you could turn the band another ¼ to ½ inch tighter. This is important for a proper seal.
STEP 3 PROCESS THE JARS Submerging the jars in boiling water heats and sterilizes the food inside and is the first step in creating a sealed jar.

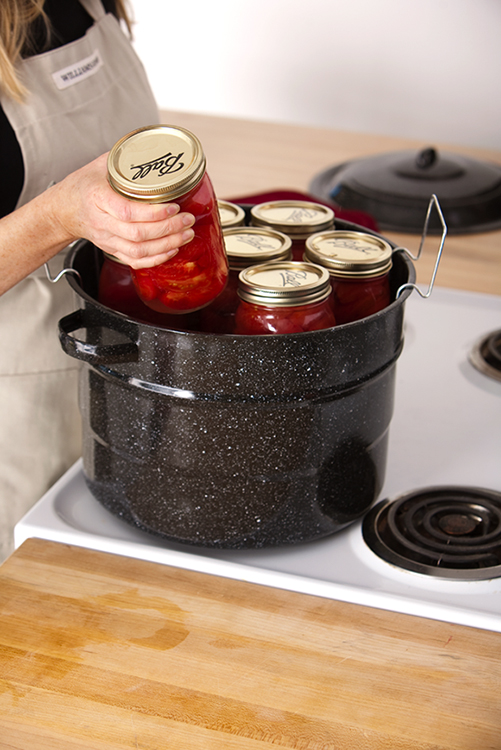
PLACE JARS IN CANNER As you fill each jar, set it back in the canner filled with simmering water. The canner shown has a rack with handles to hang on the canner rim so that jars sit halfway in the water.

PROCESS JARS When all jars are filled, lower them into the canner. They should be covered with 1 to 2 inches water. Add more boiling water if needed to achieve this. Start processing time from the moment the water starts to boil. Keep at a low, rolling boil.

REMOVE JARS When processing time is up, turn off heat. Using pot holders, lift up the rack and rest handles on the side of the canner. Allow the jars to cool in place for a few minutes.
STEP 4 COOL Remove jars from canner and set on a wire rack or a towel on the countertop (cold, bare countertops can crack jars). Do not tighten bands. Allow to cool 12 to 24 hours. After that time test the seal by firmly pressing your finger on the center of the lid. It should not give. If it makes a popping sound, it is not properly sealed. Store in the refrigerator and eat the food soon. Otherwise, store jars in a cool, dry place for up to one year.

Of the two methods of canning—boiling-water canning and pressure canning—the former is the simpler of the two. While it may not be as versatile as pressure canning, it is a terrific place to start.