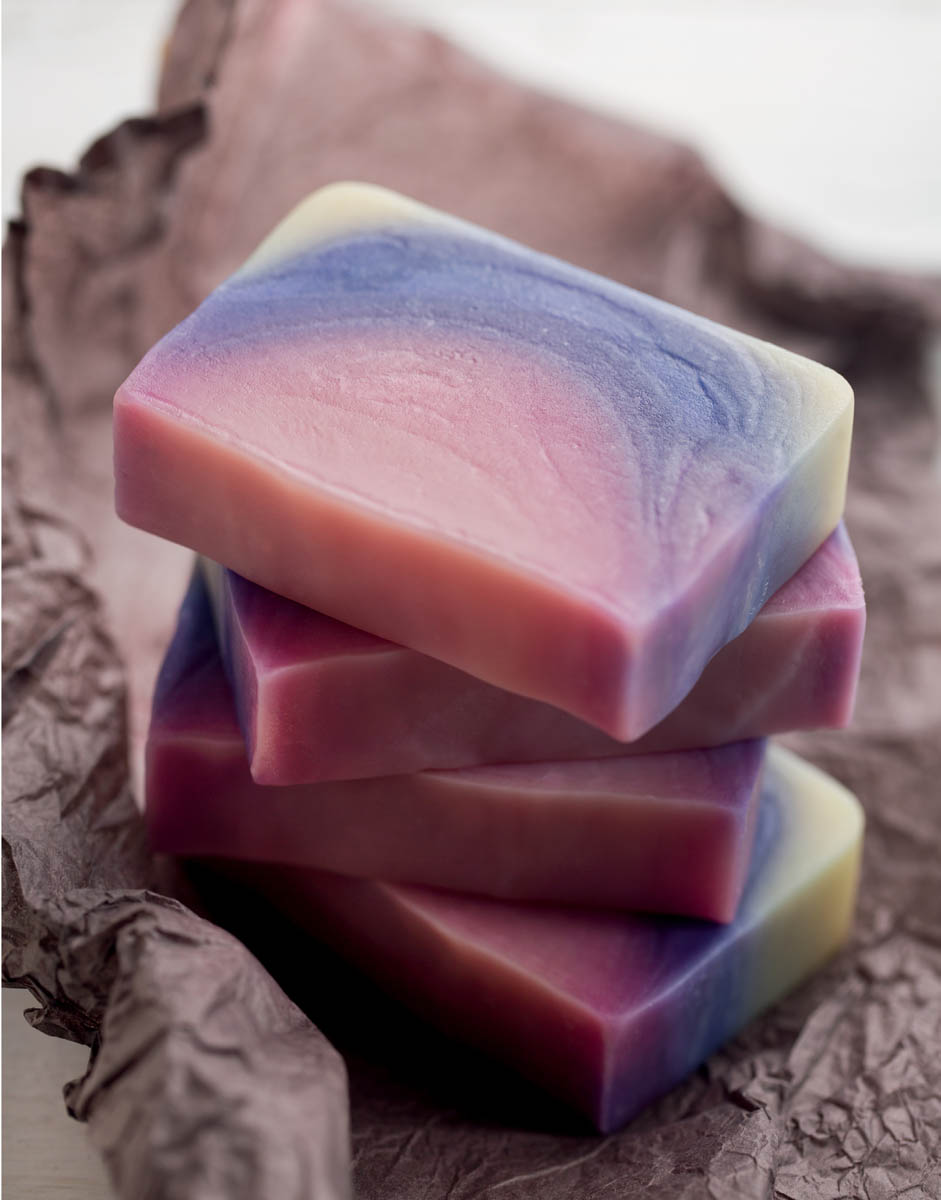
LabColors Ombre
Ombre is a French word meaning “shade” and is most commonly used to reference a dip-dyeing technique currently popular in the fashion industry. Using the LabColors’ inherent tendency to bleed in an attractive way, this recipe takes the idea to another level of design with an inverted ombre look — the darkest part is in the center of the design instead of on the edge. The addition of hemp seed oil and mango butter make for a super-luxe bar to pair with this trendy technique.
Approximately 8 bars
Ingredients & Equipment
Lye-Water Amounts
- 3 ounces sodium hydroxide (lye)
- 7.26 ounces distilled water
Base Ingredient Amounts
- 3.3 ounces palm oil
- 4.4 ounces coconut oil (76°F)
- 1.1 ounces mango butter
- 1.1 ounces hemp seed oil (refined)
- 12.1 ounces olive oil
Colorants
- 12 mL diluted Royal Purple LabColor
- 9 mL diluted Fuchsia LabColor
(See Working with LabColors, page 44.)
Fragrance
- 1.5 ounces Cranberry Fig fragrance oil (or any oil that gives you lots of time to work)
Equipment
- Standard equipment (see list on page 21)
- 2-pound wood log mold
Soap Safely!
- Work in a well-ventilated area. Do not breathe any fumes!
- Wear long sleeves, long pants, and closed-toe shoes.
- Don safety goggles (regular glasses are not sufficient protection) and rubber gloves during the entire soapmaking process.
- Keep children and pets away from your workspace.
Prepare the Mold
Line the wood log mold with freezer paper, shiny side up.
Make the Soap Mixture
- 1. Add the lye to the water (never the other way around), stir gently, and set aside until clear.
- 2. Melt the palm oil in its original container, mix it thoroughly, and measure into a bowl large enough to hold all the oils and the lye-water with room for mixing. Melt and measure the coconut oil and add it to the bowl. Cut the mango butter into chunks and add to warm oils. Stir until melted, then add the hemp seed and olive oils.
- 3. When the oils and the lye-water are both below 130°F, add the lye-water to the oils, pouring it over a spatula or the shaft of the stick blender to minimize air bubbles. Tap the stick blender a couple of times against the bottom of the bowl to release any air trapped in the blades. Do not turn on the stick blender until it is fully immersed. Pulse the stick blender until the lye-water and oils are just incorporated.
- 4. Add the Cranberry Fig fragrance oil and stick-blend until a light trace (the consistency of a melted milkshake) is achieved.
Tip: For the most accurate pours, set the mold on a scale, tare the scale, and measure each pour by weight.
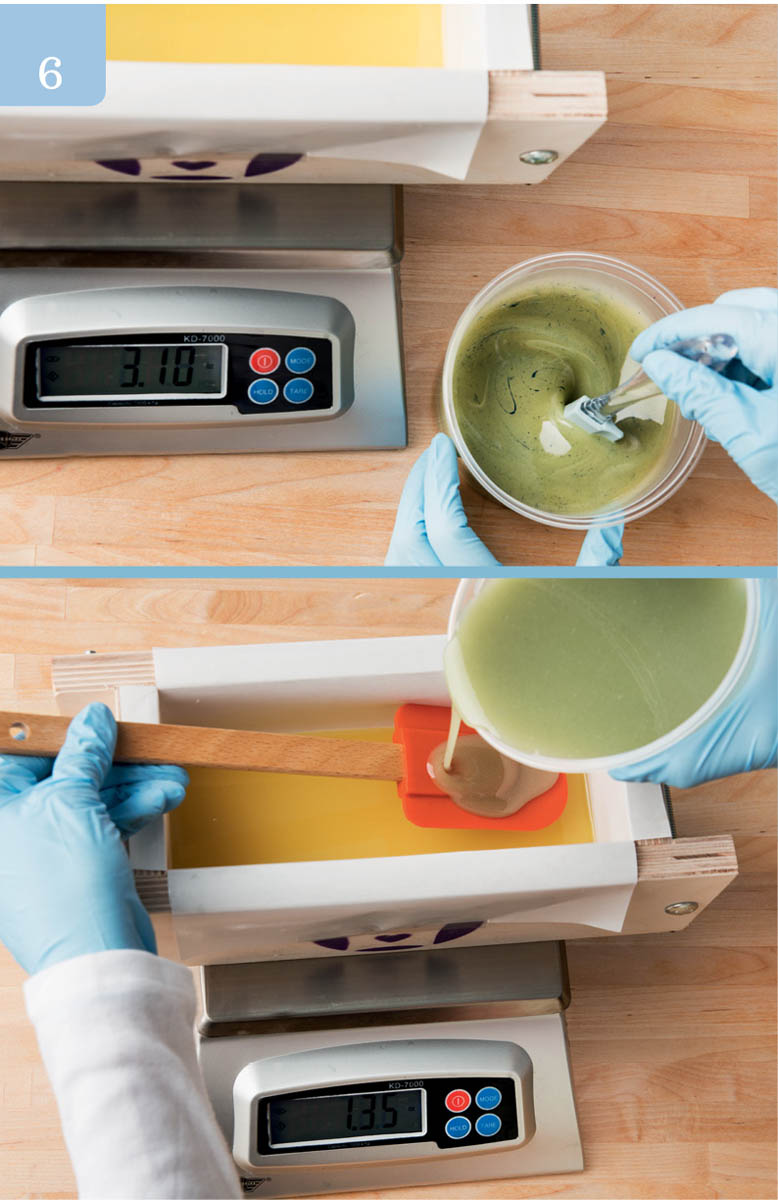
Pour and Layer
- 5. Split off 12 ounces of the soap base (approximately one third of the total) and set the larger amount aside until step 10. Pour approximately 25 percent (3 ounces) of the smaller container into the mold.
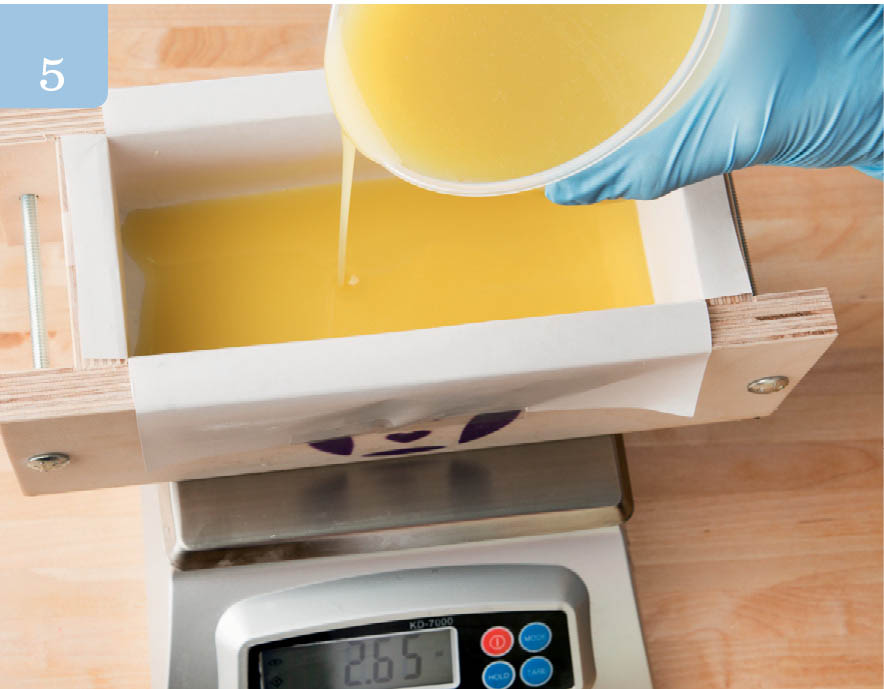
- 6. Color the remaining soap base with 3 mL of Royal Purple LabColor, using a whisk to mix. (Don’t be surprised if the batter doesn’t appear purple at first; the color will change.) Pour approximately 33 percent (3 ounces) of the colored soap base into the mold, pouring over a spatula so as not to break through the first layer.
- 7. Color the remaining soap base with an additional 3 mL of Royal Purple LabColor, and pour approximately 50 percent (3 ounces) of that colored soap base into the mold over a spatula so as not to break through the other layers.
- 8. Color the last of the soap base with 2 mL of Royal Purple LabColor, and pour into the mold over a spatula so as not to break through the other layers.
- 9. If using the scale for steps 5 to 8, remove the mold from the scale. Tamp the mold on the work surface to flatten the layers and remove any air bubbles.
- 10. Split the reserved 20 ounces of uncolored soap base into 4 equal batches. Color the batches as follows, stirring with a whisk to incorporate:
- 4 mL Royal Purple LabColor and 3 mL Fuchsia LabColor
- 3 mL Fuchsia LabColor
- 2 mL Fuchsia LabColor
- 1 mL Fuchsia LabColor

- 11. Pour each batch, starting with the darkest color and going to the lightest, into the mold over a spatula so as not to break through the previous layers.
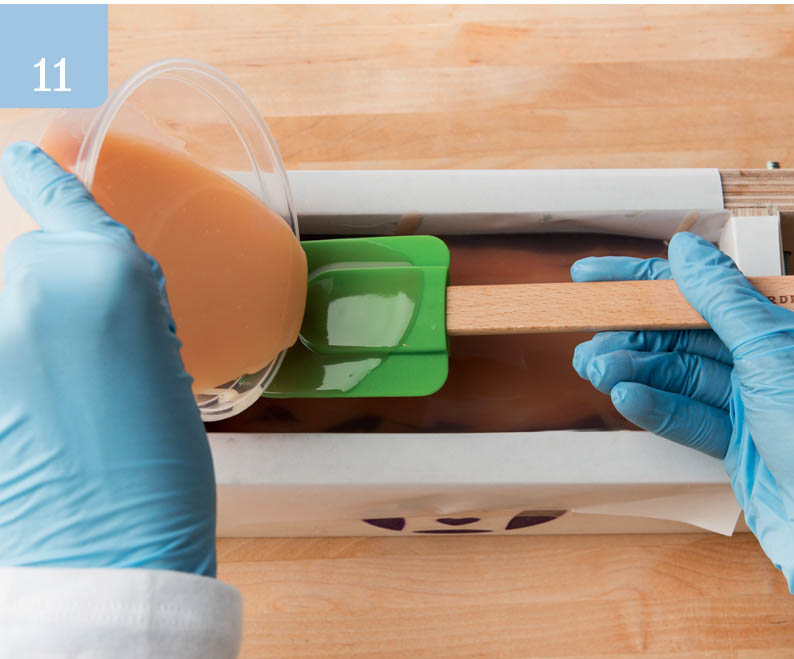
- 12. Tamp the mold on the work surface to flatten the layers and remove any air bubbles.
Final Steps
- 13. Spray the surface of the soap with 91% isopropyl rubbing alcohol two or three times over a 90-minute period to help decrease soda ash, then cover with a lid fashioned out of cardboard.
- 14. Insulate the entire mold by wrapping it in a large towel and set it aside for at least 24 hours at room temperature before unmolding. Unmold within 3 to 4 days.
- 15. Cut the soap into bars and allow to cure in a well-ventilated area for 4 to 6 weeks, turning the bars over every few days to ensure that they cure evenly.