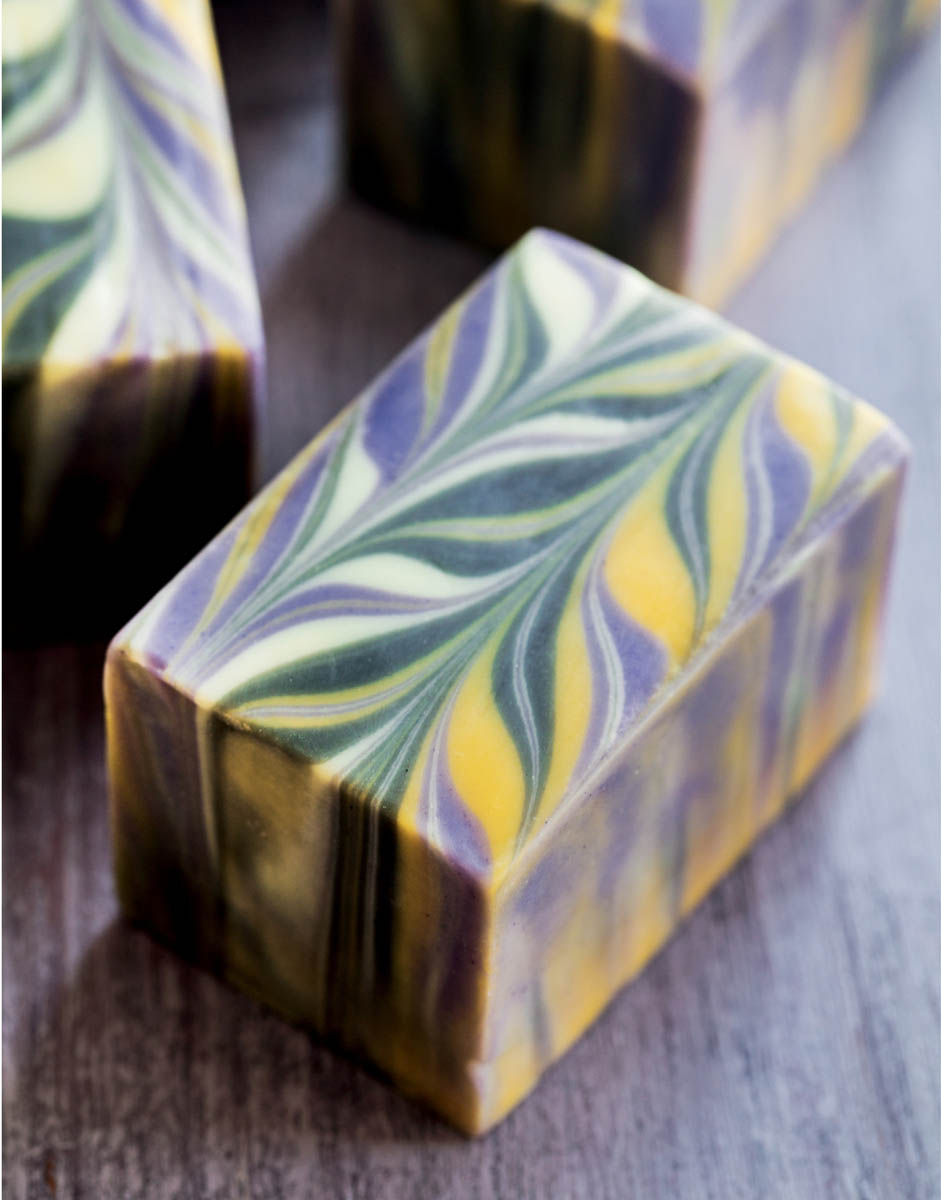
Linear Swirl with Oxides
The nature-identical mineral colorants known as oxides are a wonderful option for cold-process soap. Overall, oxides tend to perform well and will produce bold, vibrant colors. However, oxides tend to clump and need to be dispersed in a carrier oil before being added to soap batter; otherwise the batter may reach a thick trace before the oxides are fully incorporated.
This recipe uses brightly contrasting colors to create an eye-popping swirl. When designing a swirl, look at a color wheel and choose colors directly opposite each other for the most dramatic effect.
Approximately 9 bars
Ingredients & Equipment
Lye-Water Amounts
- 6.0 ounces sodium hydroxide (lye)
- 14.4 ounces distilled water
Base Ingredient Amounts
- 6.5 ounces palm oil
- 8.7 ounces coconut oil (76°F)
- 2.2 ounces cocoa butter
- 2.2 ounces mango butter
- 2.2 ounces hemp seed oil (refined)
- 21.8 ounces olive oil
Colorants
- 1 teaspoon Titanium Dioxide
- 1 teaspoon Yellow Oxide
- 2 teaspoons Ultramarine Violet Oxide
- 1 teaspoon Black Oxide
- 4 tablespoons sweet almond oil (or other liquid oil)
Fragrance
- 2.6 ounces White Tea and Ginger fragrance oil
Equipment
- Standard equipment (see list on page 21)
- Mini-mixer
- 9-bar birch-wood mold
Soap Safely!
- Work in a well-ventilated area. Do not breathe any fumes!
- Wear long sleeves, long pants, and closed-toe shoes.
- Don safety goggles (regular glasses are not sufficient protection) and rubber gloves during the entire soapmaking process.
- Keep children and pets away from your workspace.
Prepare the Colorants
Prior to starting the soapmaking process, mix each color in 1 tablespoon of sweet almond oil, using the mini-mixer. Push the powder under the surface of the oil with the tip of the blade to saturate the powder before you begin, or you’ll stir up a messy cloud of pigment. Mix the colorants thoroughly for the most even color results.

Make the Soap Mixture
- 1. Add the lye to the water (never the other way around), stir carefully, and set aside until clear.
- 2. Melt the palm oil in its original container, mix it thoroughly, and measure into a bowl large enough to hold all the oils and the lye-water with room for mixing. Melt and measure the coconut oil and add it to the bowl. Measure and melt the cocoa butter and add it to the bowl. Cut the mango butter into chunks and add it to the warm oils, stirring until it melts. Add the hemp seed and olive oils.
- 3. When the oils and the lye-water are both below 120°F, add the lye-water to the oils, pouring it over a spatula or the shaft of the stick blender to minimize air bubbles. Tap the stick blender a couple of times against the bottom of the bowl to release any air trapped in the blades. Do not turn on the stick blender until it is fully immersed. Stick-blend until light trace (the consistency of a melted milkshake) is achieved, about 2 minutes.
- 4. Add the White Tea and Ginger fragrance oil. Switch to a whisk for mixing so that the soap doesn’t trace too quickly.
Tip: When you know how a fragrance oil will react in soap, you can add it directly to the base oils rather than at thin trace. This is suggested only for fragrances that perform perfectly in cold-process soap.
- 5. Split the batch into four parts for swirls. Weigh out 22.4-ounces (40 percent of the total batch) for the base color, and three parts at 11.2 ounces (20 percent of the total batch each). It’s okay if you don’t measure these out exactly. The main thing is to use almost half of the recipe for the base color.
- 6. Add the colorants as follows:
- 1 tablespoon of the Titanium Dioxide mixture to the 22.4-ounce batch
- 1⁄2 teaspoon of the Yellow Oxide mixture to one of the smaller batches
- All of the Ultramarine Violet Oxide mixture to another small batch
- 1⁄4 teaspoon of the Black Oxide mixture to the last small batch
Use a whisk or spoon to mix each of the colorants into the soap without accelerating trace. You will end up with a little extra colorant, which you can keep for another project or wash down the sink (see Ceramic Sinks: A Cleanup Caution, page 45).
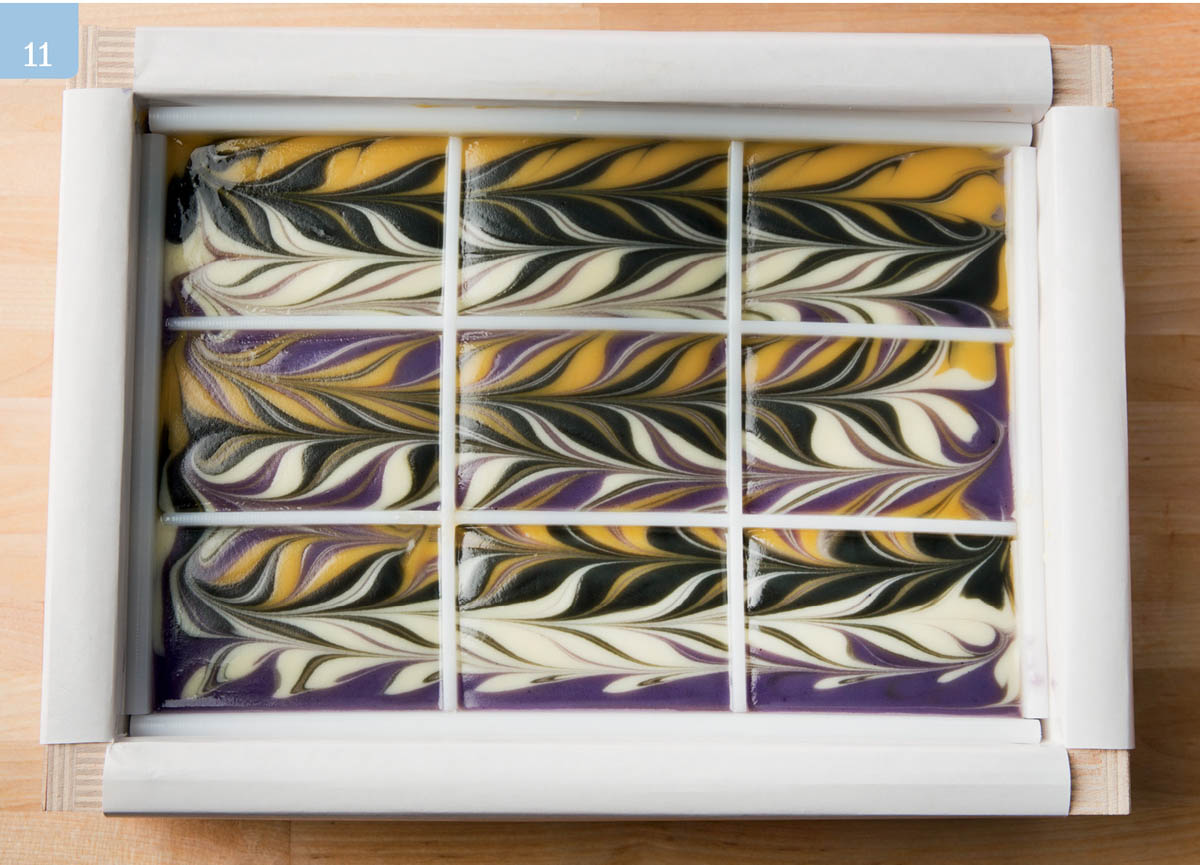
Pour and Swirl
- 7. Splash 1 to 2 ounces each of the Yellow Oxide, Ultramarine Violet Oxide, and Black Oxide colored soap batter on the bottom of the mold in any design to add a dash of color to the bottom of each bar. Pour half of the white soap batter over these spots.

- 8. Line up the colored batches in the order you want to add them to the base soap. Pour the first color in long S-curves lengthwise across the soap, taking care to keep the tip of the pour close to the surface of the soap so that the color does not sink into the white soap (8a). With the next color, create another long S-curve that follows but does not overlap the first color. Repeat with the third color (8b).
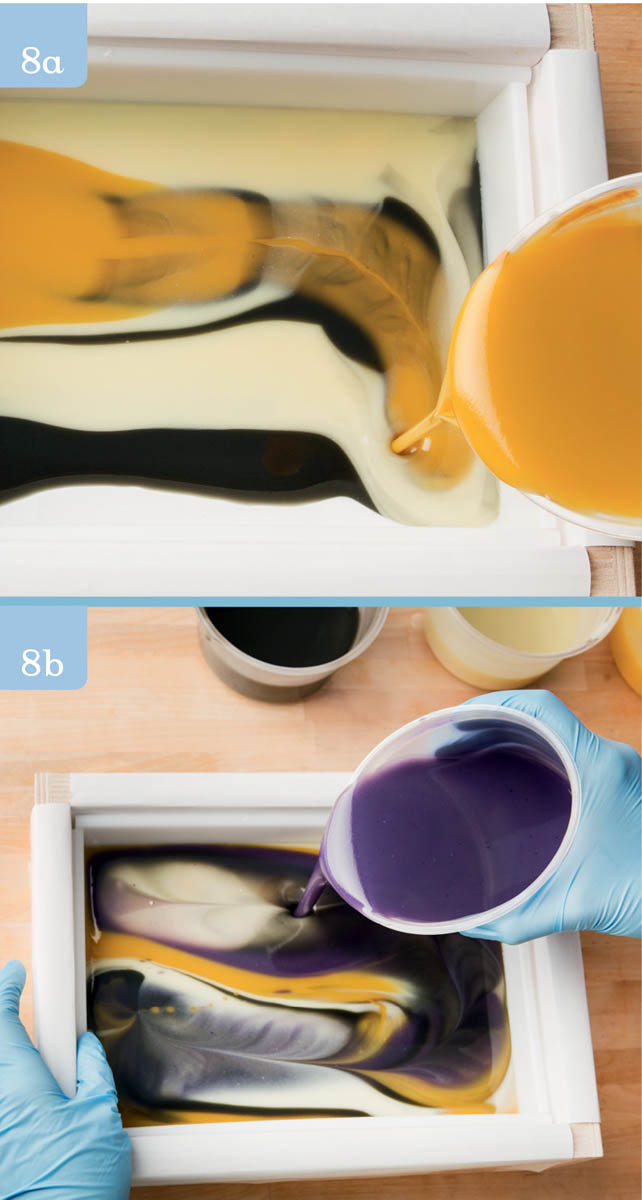
- 9. Now repeat with all of the colors, including the white, pouring directly over the first line of the same color until all of the containers are empty. You will have several pours of each color, depending the thickness of the lines and the trace of the batter.

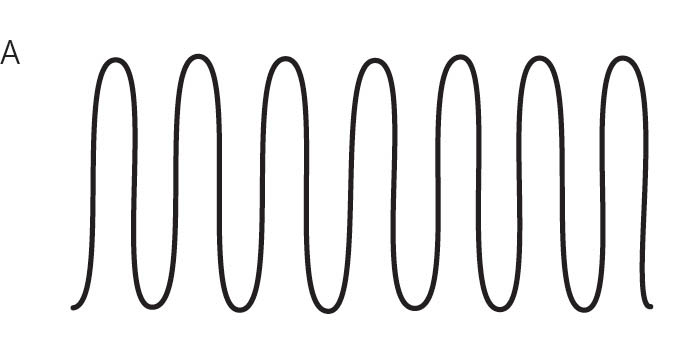
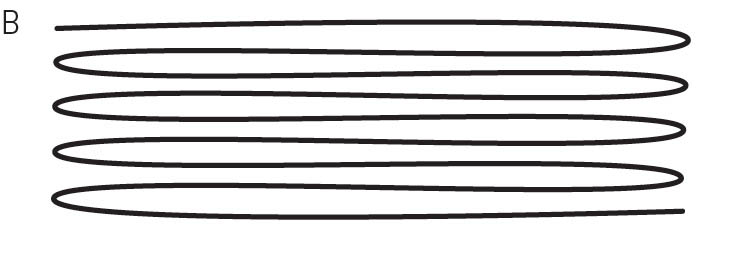
- 10. With a swirl tool (such as a skewer or chopstick), drag vertically across the lines of soap you just poured (A). Remove the swirl tool from the soap, scoot over about a 1⁄2 inch from where you just pulled out the tool (but still against the wall of the mold), and drag the swirl tool in the opposite direction, back to where you started the swirl (B). Repeat this until you have gone across the entire surface of the soap.

- 11. Slowly and carefully insert plastic soap dividers, which will drag the design down the side of the bars. Leave the dividers in until you are ready to unmold the soap.
Optional: If you don’t care for the drag marks on the side of your bars, you can leave the dividers out and just cut the soap once it has set up.
Final Steps
- 12. Spray with 91% isopropyl rubbing alcohol two or three times over a 90-minute period to help decrease soda ash.
- 13. Cover the mold with the lid that comes with the mold. Insulate the entire mold by wrapping it in a large towel and set it aside for at least 24 hours at room temperature before unmolding. Unmold within 3 or 4 days by pulling the dividers out with needle nose pliers or turning the mold over and pushing the soap out. Do not pull the dividers away from the soap as this may tear the surface.
- 14. Allow to cure in a well-ventilated area for 4 to 6 weeks, turning the bars over every few days to ensure that they cure evenly.