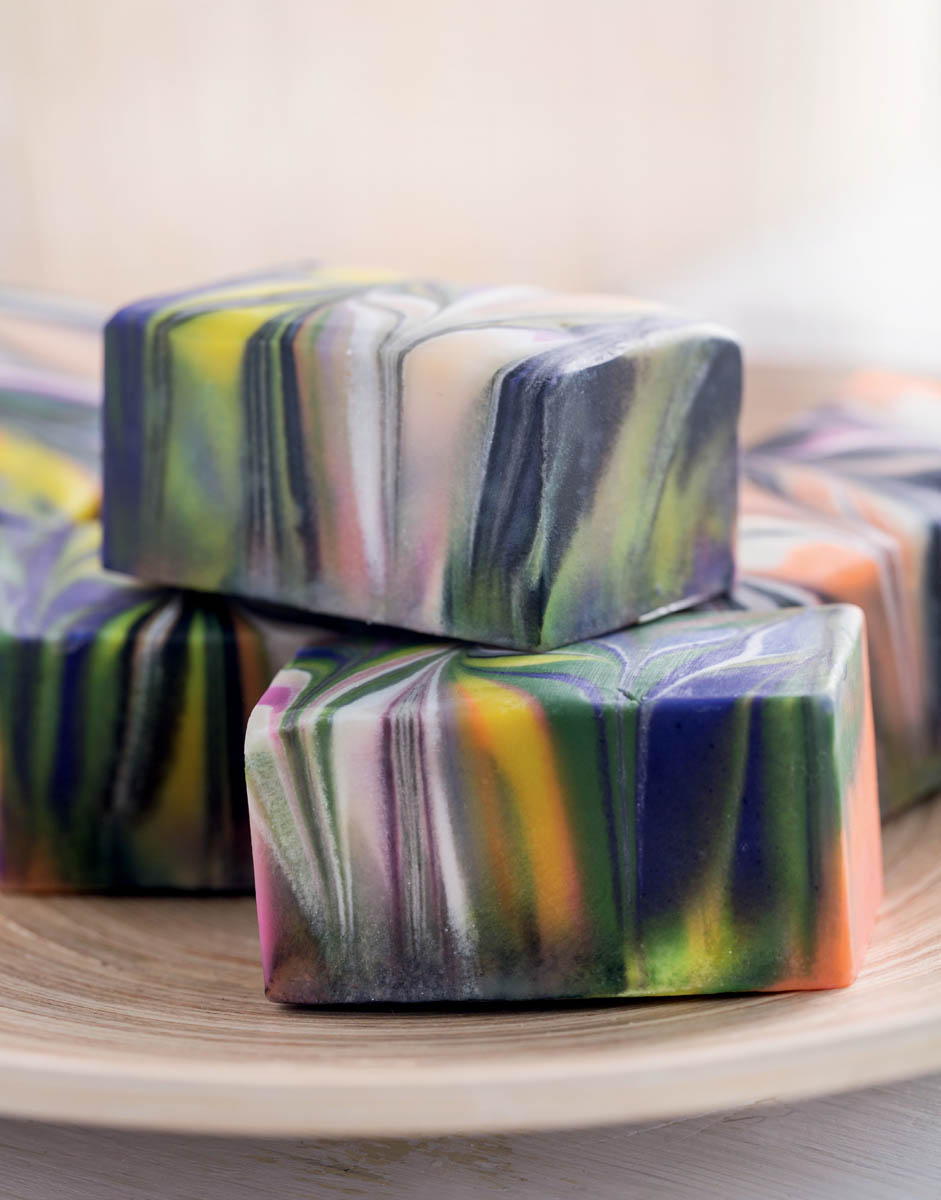
12-Color Linear Swirl
Soap designs don’t have to be limited to one or two colors. For the particularly ambitious, this recipe includes 12 different colors to create a gorgeous swirl. When working with this many colors, you have to keep a couple of things in mind.
First, to keep lines and swirls crisp and clean, only use colorants that won’t bleed into each other. This recipe uses a variety of colorants to make sure that none of the colors will bleed.
Second, to ensure that there is enough time to mix and pour all of the different colors, choose a tried-and-true fragrance oil. Your supplier should be able to answer any questions about fragrance oils’ performance in cold-process soapmaking.
Approximately 18 bars
Ingredients & Equipment
Lye-Water Amounts
- 10.5 ounces sodium hydroxide (lye)
- 24.8 ounces distilled water
Base Ingredient Amounts
- 18.8 ounces palm oil
- 18.8 ounces coconut oil (76°F)
- 2.3 ounces castor oil
- 5.3 ounces avocado oil
- 15.0 ounces olive oil
- 15.0 ounces rice bran oil
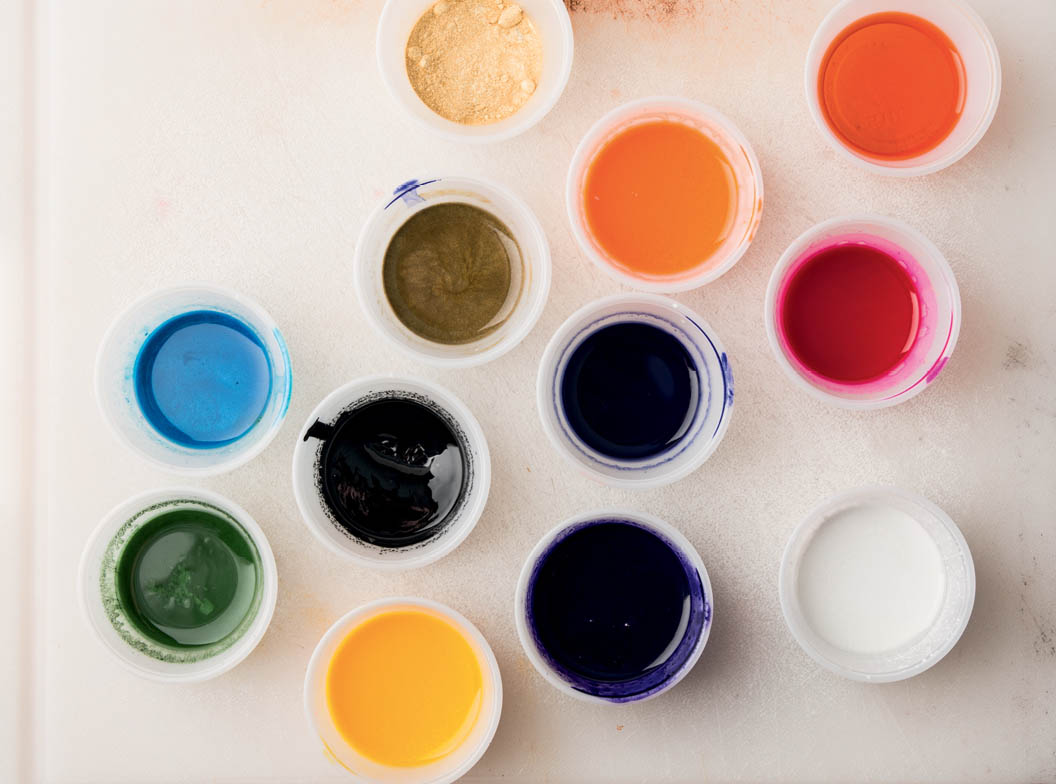
Colorants
- Paprika infusion (2 teaspoons paprika + 5 tablespoons sunflower oil; see page 194)
- 1 teaspoon Green Chrome Oxide
- 1 teaspoon Cellini Blue Mica
- 1 teaspoon Ultraviolet Blue
- 1 teaspoon Electric Bubble Gum
- 1 teaspoon Black Oxide
- 1 teaspoon Titanium Dioxide
- 1 teaspoon Cellini Yellow Mica
- 2 teaspoons Ultramarine Violet Oxide
- 2 teaspoons Tangerine Wow!
- 2 teaspoons Fizzy Lemonade
- 13 tablespoons sunflower oil (or other liquid oil)
- 1⁄2 teaspoon Sparkle Gold Mica
Fragrances
- 5.2 ounces Yuzu fragrance oil
Equipment
- Standard equipment (see list on page 21)
- Heat-sealable tea bag
- Mason jar
- Double boiler, crockpot, or heavy-bottom pan
- Mini-mixer
- 12 small containers (about 18 ounces each) for mixing colorants into batches
- 18-bar birch-wood mold
Soap Safely!
- Work in a well-ventilated area. Do not breathe any fumes!
- Wear long sleeves, long pants, and closed-toe shoes.
- Don safety goggles (regular glasses are not sufficient protection) and rubber gloves during the entire soapmaking process.
- Keep children and pets away from your workspace.
Instructions
Prepare the Mold
Prepare the mold by lining it with freezer paper, shiny side up, or using a mold liner.
Prepare the Paprika Infusion
Measure 2 tablespoons of paprika into a heat-sealable tea bag, and follow the manufacturer’s instructions for sealing the bag. Pour 5 ounces of sunflower oil in a mason jar, and set the tea bag into the oil. Seal the mason jar and let sit in a double boiler, crock pot, or heavy-bottom pan (filled with enough water to reach almost the top of the mason jar) on a low setting for approximately 2 hours. Allow to cool before using in soap.
Prepare the colorant
Prior to starting the soapmaking process, mix each color (except the Sparkle Gold Mica) in 1 tablespoon of sunflower oil, using the mini-mixer. Mix the Tangerine Wow!, Fizzy Lemonade, and Violet Oxide in 2 tablespoons of sunflower oil rather than 1. Push the powder under the surface of the oil with the tip of the blade to saturate the powder before you begin, or you’ll stir up a messy cloud of pigment. Mix each colorant thoroughly for the most even color results.
Make the Soap Mixture
- 1. Add the lye to the water (never the other way around), stir gently, and set aside until clear.
- 2. Melt the palm oil in its original container, mix it thoroughly, and measure into a bowl large enough to hold all the oils and the lye-water with room for mixing. Melt and measure the coconut oil and add it to the bowl. Add the castor, avocado, olive, and rice bran oils. Add the Yuzu fragrance oil to the base oils.
Tip: When you know how a fragrance oil will react in soap, you can add it directly to the base oils rather than at thin trace. This is suggested only for fragrances that perform perfectly in cold-process soap.
- 3. When the oils and the lye-water are both below 120°F, add the lye-water to the oils, pouring it over a spatula or the shaft of the stick blender to minimize air bubbles. Tap the stick blender a couple of times against the bottom of the bowl to release any air trapped in the blades. Do not turn on the stick blender until it is fully immersed. Stick-blend until light trace (the consistency of a melted milkshake) is achieved, about 2 minutes.
- 4. Split the batch into 12 containers. Each batch should weigh about 9 ounces.
- 5. Using a whisk or spoon, add the following colorants (1 color per container):
- 1⁄2 tablespoon Green Chrome Oxide mixture
- 1⁄2 teaspoon Cellini Blue Mica mixture
- 2 tablespoons Tangerine Wow! mixture
- 11⁄2 tablespoons Fizzy Lemonade mixture
- 1 teaspoon Ultraviolet Blue mixture
- 1 tablespoon Electric Bubble Gum mixture
- 2 tablespoons Ultramarine Violet Oxide mixture
- 1⁄2 teaspoon Sparkle Gold Mica
- 1 teaspoon Black Oxide mixture
- 1 tablespoon Titanium Dioxide mixture
- 1 tablespoon Paprika infusion
- 1 tablespoon Cellini Yellow Mica mixture + 1⁄4 teaspoon Ultraviolet Blue mixture
Use a whisk to stir any soap that appears grainy during the pouring process.

Pour and Swirl
- 6. Pour a line of colored soap lengthwise into the mold, making straight lines or pouring in a U-shape (there are no wrong answers here!). Pour another line from a different colored soap in a different spot in the mold, still going lengthwise. Continue pouring lines of soap lengthwise down the mold, alternating colors, until the mold is full. You may want to differentiate the colors more clearly as you reach the halfway point of the mold, to make a more distinctive pattern when you swirl them.
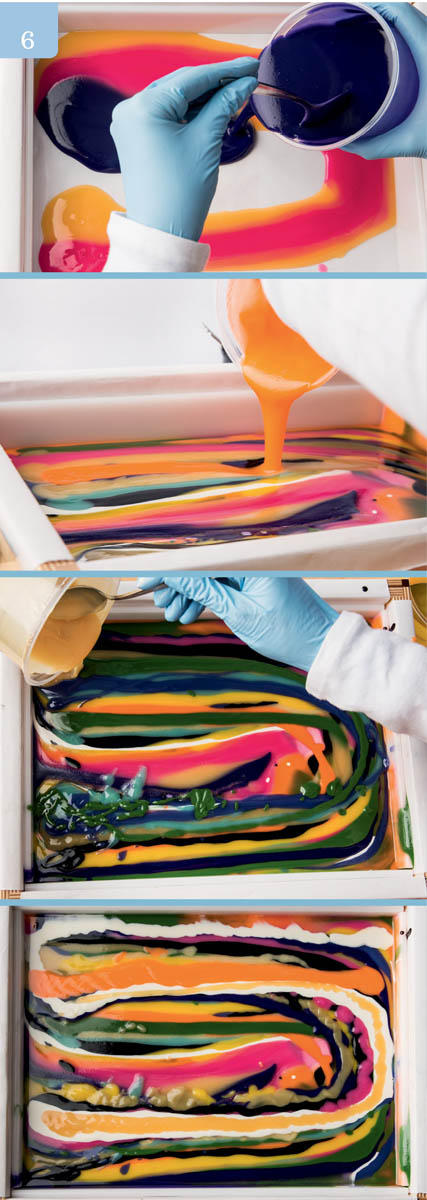
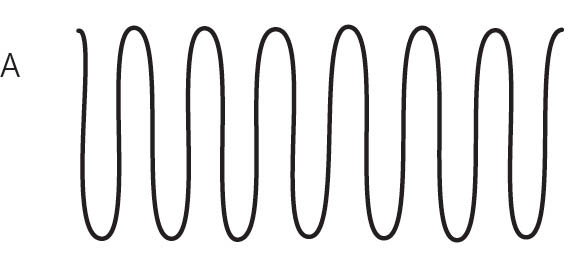
- 7. Tamp the mold on the work surface to remove any air bubbles. With a swirl tool (such as a skewer or chopstick), start on the short side of the mold and drag the tool from corner to corner so that it crosses the lines created by the soap perpendicularly. Go up and down in an S-curve for the length of the mold (A).
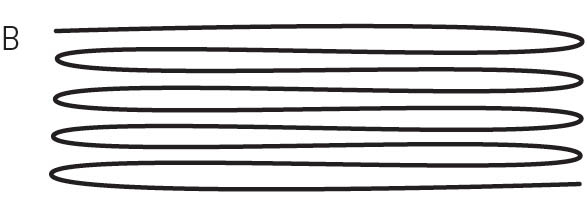
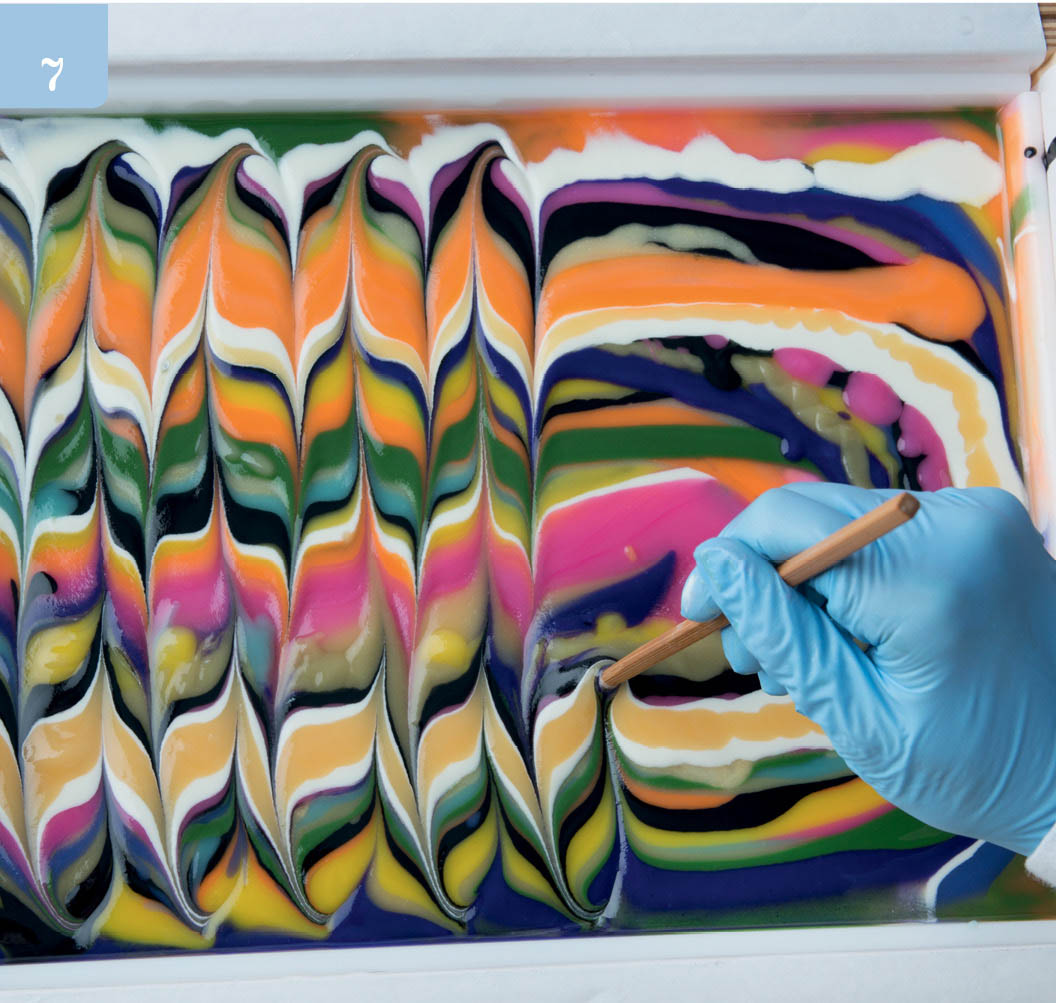
- 8. Wipe excess soap off of the swirl tool. Starting in the corner of the long side of the mold, drag the swirl tool so that it intercepts the first swirl created perpendicularly. Go up and down in an S-curve for the length of the mold (B).
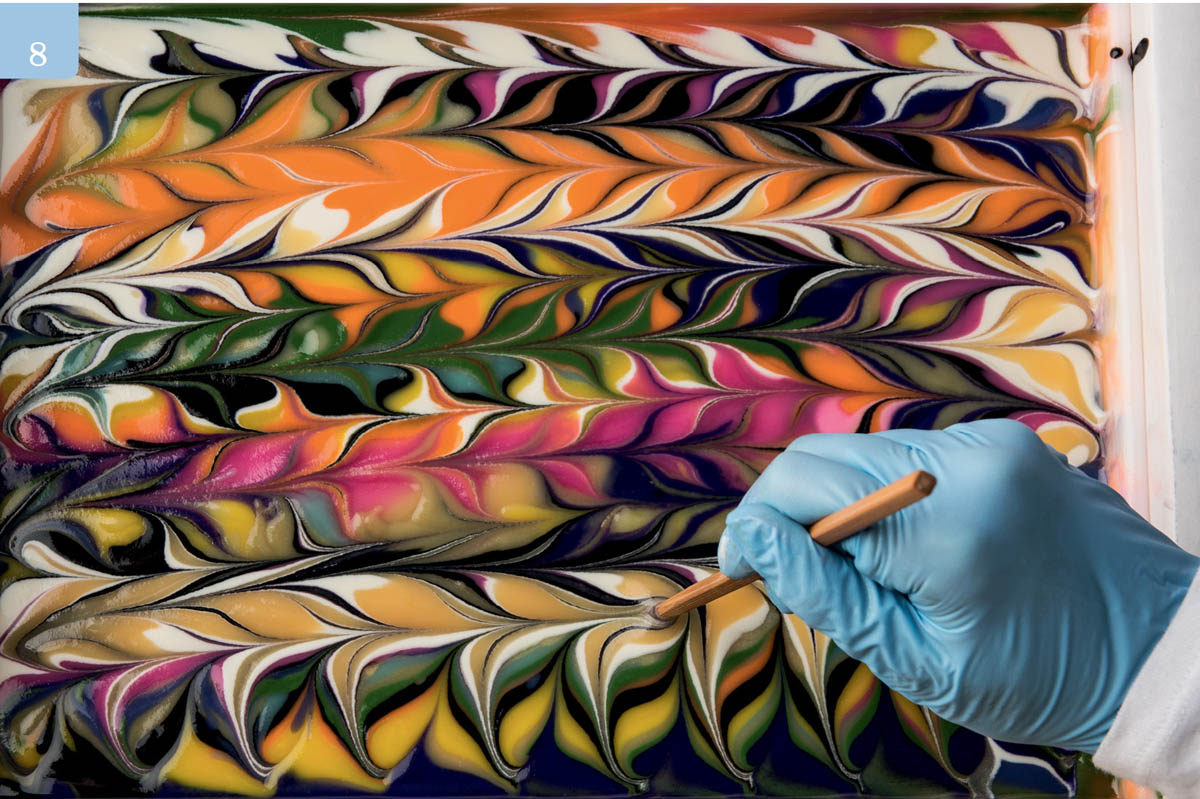
- 9. Slowly insert the dividers into the soap so that the dividers reach the bottom of the mold in every section. This drags the design down the sides of the bars.
Final Steps
- 10. To help decrease soda ash formation, spray the entire surface with 91% isopropyl rubbing alcohol two or three times over a 90-minute period, then cover the mold with either plastic wrap or a lid fashioned out of cardboard.
- 11. Insulate the entire mold by wrapping it in a large towel and set it aside for at least 24 hours at room temperature before unmolding. Unmold within 3 to 4 days by pulling the dividers out with needle nose pliers or turning the mold over and pushing the bars out. Do not pull the dividers. They may tear the surface of the soap.
- 12. Allow to cure in a well-ventilated area for 4 to 6 weeks, turning the bars over every few days to ensure that they cure evenly.