Automatic lookups are, in the author's opinion, one of the coolest features in Splunk. Not only are the contents of the lookup added to events as if they were always there, but you can also search against the fields in the lookup file as if they were part of the original event.
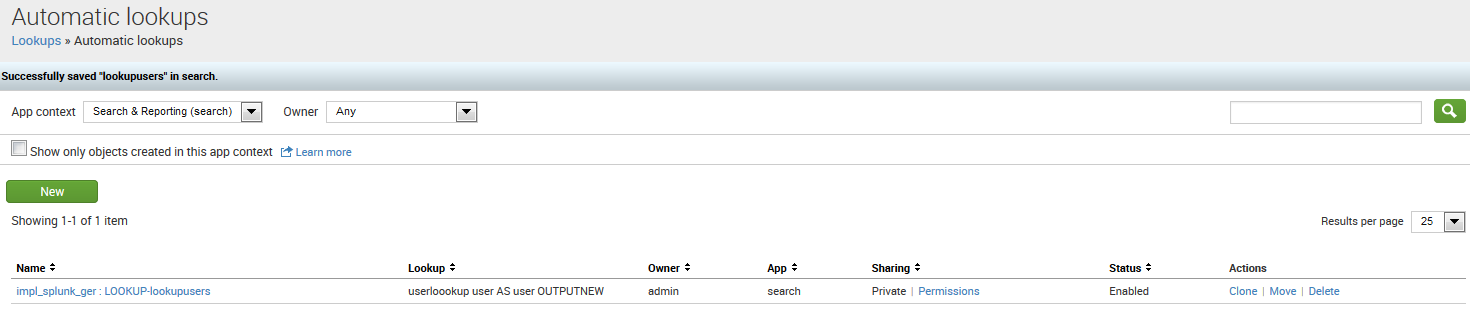
To define the automatic lookup, navigate to Settings | Lookups | Automatic lookups and click on the New button:

Let's step through the fields in this definition:
- Destination app: This is the application where the definition will live. We'll discuss the implications of this choice in Chapter 8, Working with Apps.
- Name: This name is used in the configuration. It should not contain spaces or special characters. We will discuss its significance in Chapter 11, Configuring Splunk.
- Lookup table: This is the name of the lookup definition.
- Apply to: This lets us choose which events are acted upon. The usual case is sourcetype, which must match a sourcetype name exactly. Alternatively, you can specify source or host, with or without wildcards.
- Lookup input fields: This defines the fields that will be queried in the lookup file. One field must be specified, but multiple fields can also be specified. Think of this as a join in a database. The left-hand side is the name of the field in the lookup file. The right-hand side is the name of the existing field in our events.
- Lookup output fields: This section lets you decide what columns to include from the lookup file and optionally override the names of those fields. The left-hand side is the name of the field in the lookup file. The right-hand side is the field to be created in the events. If left blank, the default behavior is to include all fields from the lookup, using the names defined in the lookup file.
- Overwrite field values: If this option is selected, any existing field values in an event will be overwritten by a value with the same name from the lookup file.
After clicking on Save, we see the listing of Automatic lookups. Initially, the Sharing option is Private, which will cause problems if you want to share searches with others. To share the lookup, first click on Permissions:
This presents us with the Permissions page. Change the value of Object should appear in to All apps. We will discuss these permissions in greater detail in Chapter 11, Configuring Splunk:

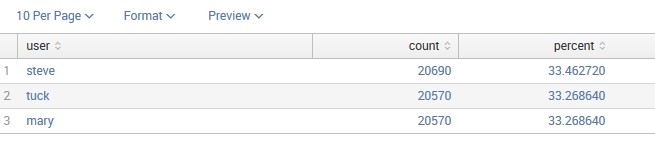
We now have a fully automatic lookup, enriching our sourcetype based on the value of user in each event. To show the power of this lookup, let's search for a field in the lookup file as if it were part of the events:
sourcetype="impl_splunk_gen_SomeMoreLogs" department="HR" | top user
Even though department isn't in our events at all, Splunk will reverse lookup, find the values of user that are in department, and run the search for those users.
This returns the following result:
Let's combine this search with an event type that we defined earlier. To find the most recent failed login for each member of HR, we can run the following code:
sourcetype="impl_splunk_gen_SomeMoreLogs" department="HR" eventtype="failed_login"
| dedup user
| table _time user department city state
This returns the following:

The purpose of the dedup command is simply to keep only one event for each value of user. As events are returned in the most recent first order, this query will return the most recent login for each user. We will configure more advanced lookups in later chapters.