10 Hugging the Planet Earth: Opening from the Belly into Front-Extension Postures
How can core creativity be channeled for birthing new possibilities in life?
WE BEGIN THIS GROUP OF INQUIRIES by making a primary distinction between lengthening the front side of the body through front extension versus compressing the lumbar spine in back bending. What is the difference between a backbend and a front extension? Someone watching you enter into the Cobra, Bow, or Camel pose might not notice that you are entering these postures from the perspective of extending the front side of your body, as opposed to doing what looks like a backbend.
Traditional yoga often emphasizes movements that arch the low back rather than lengthen the line from the pubic bone to the sternum on the front side of the body. The shift in orientation to lengthening the front side of the body can make an important difference in the health of your spine. Chronic low-back pain is a primary contender for on-the-job disability in the American workplace; the inquiries in this chapter can provide relief, support, and education for strengthening this potential “hot spot” in your body.
A backbend encourages the spine to overarch in the low back and the neck, the spine’s most flexible (and therefore most vulnerable) areas. The vertebrae of the middle back support the ribs, which wrap around each side of the spine and connect to the sternum on the front side of the body; the rib structure prevents the middle back from bending as much as the low back and the neck.
Picture the discs between the vertebrae, whose job it is to cushion the pressure between bones and to provide lubrication for fluid movement. The discs are round and red, plump and juicy—like water balloons. When you arch backward the fluids in the discs are squeezed flatter on the backside, causing the front side of the discs to bulge. Some squeezing and bulging can be favorable to spinal health—compression and release tones the elastic walls of the discs and stimulates the replenishing of fluids and nutrients to the discs. But repeated, long-term compression can cause the discs to lose their tone and fluidity or to rupture when the spine is overarched. The good news is that low-back conditions, including those that involve the discs, are highly responsive to movements that stimulate physical reeducation.
The energetic differences between these two orientations under discussion are highlighted when you think about the times in your life when you “bent over backward” to please someone. There is a loss of self when you lose connection with your center; the emphasis becomes about what is happening behind your back. When awareness is grounded in your center and you lengthen into an opening from the front side of the body, you sense that you are engaging in life from the inside out, investing your life force and creativity into projects that embody your passion and talent. Rather than haphazardly backing into life, expanding your awareness through your pelvis, belly, and heart encourages you to consciously connect with your interests and take responsibility for your creations. Extending from the womb of the self deep in your belly gives room for the possibility of connecting with an energetic umbilical cord to a continuous and reciprocal flow of nurturance from the universe.
We begin the inquiries in this chapter by humbling ourselves down onto our bellies to hug the planet Earth. The second group of inquiries open the belly and extend the front side from a kneeling position, the posture often associated with prayer.
Lengthening the Front Side to Hug the Planet
Inquiry: How does it feel different to open the front side from the belly versus bending over backward?
In this first exploration you will notice that releasing into gravity in a belly-down position already begins to passively lengthen the front side of the body. As in the gravity scan on your back, Hug the Planet explores the use of gravity and deep relaxation to begin naturally realigning the body. Sphinx brings awareness to the details of lengthening the line from your pubic bone to your sternum, awareness applicable to yoga poses such as Camel, Bow, Cobra, and Wheel. Frog opens the hips and pelvis, allowing for more freedom to lengthen in front extensions. Iguana coordinates upper-body strength with front extensions, preparing the way for yoga postures that require pushing into the hands and arms, poses such as King Cobra and Downward Dog. In these explorations you may be reminded of the movement an infant makes when first learning to push up off of her belly. Spiraling Up to Sitting provides a joyous transition from the belly into the Seated Pinwheel, further establishing your ability to remain in contact with your abdominal strength while rolling up to Pinwheel from another orientation to gravity than you have heretofore experienced in the inquiries.
Exploration 1: Hugging the Planet Earth
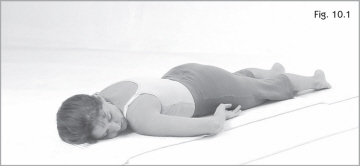
1. Lie on your belly on the ground (fig. 10.1). Make any adjustments that encourage your body to settle in this position. Observe the contact your belly makes with the ground. Can you sense your abdominal pulse? Can you feel the pulse of the Earth Mother? Suggest to your mind that this is a time for slowing down and attuning to the sensations that arise within your body. When you have settled into the belly-down position, give yourself the message that for the next few minutes you will be scanning your body to observe the way you have organized your body to be on the ground.
2. Bring your awareness to your feet and notice what surfaces of your feet are touching the ground. Observe the differences between the ways the two feet contact the ground. Sense how far apart your legs are.
3. Moving up to your knees and kneecaps, notice what surface of your knees are in contact with the ground. Notice the difference between how comfortable or uncomfortable each knee feels.
4. Can you sense whether one hip bone is closer to the ground than the other? Do you feel holding in the joint at one or both hips?
5. Observe the way you have organized your arms and hands to be on the ground, particularly noting the difference in the way the arms and hands are each placed on the ground.
6. Now bring your awareness to your head. Notice how your head is placed and what surfaces of your chin, cheekbones, or head are touching the ground.
7. Letting your consciousness travel to your low back, can you sense the rising and falling of the lumbar area as you inhale and exhale? Notice the expansion in the middle back and back of the rib cage as they move in response to the breath.
8. Moving to a deeper level of awareness, scan your entire body and experience the impression your body makes into the ground. Allow your bones to become very heavy; sense your bones gliding down through layers of muscle and tissue in response to the pull of gravity. Observe any pulsing, tingling, or streaming sensations that arise.
9. Slowly reposition your arms, stretching them out to your sides in a T position. Lift your head and turn it to place the left side of your face on the ground (fig. 10.2). Experience the sensation of being in this position. Observe how your breath is altered by positioning your arms and shoulders in this way. Notice that you are now in a position to feel the gentle curve of the planet earth beneath your embrace.


10. Imagine someone placing sandbags on your shoulders. Experience how much of the weight of your world you can release down toward the ground. Over the course of the next few breaths, allow the shoulders to melt down into the ground.
11. Lift and turn your head, now placing the right side of your head on the ground. Walk your fingertips and palms away from you, lengthening your arms from the shoulders. Imagine stretching your arms from your heart. Place imaginary sandbags on your shoulders again and experience how heavy you can let your shoulders become over the next few breaths (fig. 10.3).
12. Lift and turn your head once more, placing the left side of your head on the ground. Relax your jaw and the muscles of your face. Do you notice any difference in the ease of turning and in the quality of the stretch in your neck and shoulders than when you first placed your head in this position?
13. Now bring your awareness down to your feet and legs. Slowly draw your inner ankles together. Squeeze the inner ankle-bones together as you inhale and hold for a moment, then release the heels to roll out to the sides. When you let the heels roll out to the sides, position your big toes so that they are in contact with one another.
14. Lift and turn your head, placing the left side of your head on the ground. Squeeze the inner ankles together as you take in a deep breath. Squeeze the inner knees and the inner thighs together—keep holding the breath. Now exhale and let your heels roll out to the sides. Allow the entire weight of your legs and feet to release down into the ground. Pause here and observe the rising and falling in your low back as you inhale and exhale. Do you notice any difference in the movement from when you first began?
15. Lift and turn your head, placing the right side of your head on the ground. Bring up a strong squeeze at the inner ankles, the inner knees, and the inner thighs and squeeze the lower buttocks together. Hold the squeeze along the entire inner surface of your legs and lower buttocks as you breathe in and out. Exaggerate the squeeze as you imagine pointing your tailbone down toward your heels. Do you notice how the pubic bone gets pressed into the ground? Take a final deep breath in as you squeeze a little more. Then exhale and allow the entire weight of your legs to release into the ground as your heels roll out to the sides.
16. Notice how much relaxation you feel after you release the squeeze. Can you sense the pulse in your belly getting stronger? Observe the quality of relaxation in your lower buttock muscles. Imagine the lower buttocks opening, like opening a book.
17. Lift and turn your head, placing the left side of your head on the ground. Allow your shoulders to get heavy. Take a deep inhaling breath and bring up the squeeze in your inner ankles, knees, thighs, and lower buttocks. Point your tailbone down toward your heels and press the pubic bone into the ground. Observe the sensation of contracting the lower buttocks and anchoring the pubic bone to the ground. Notice how the low back is lengthened in this exaggerated position. As you exhale, release the legs, rolling the heels to the outside. Release completely.
18. Scan your body and observe any pulsing, streaming, or tingling sensations. Observe the rising and falling of your low back in response to the breath. Experience the way your whole body is opening and lengthening to hug the Earth. Envision the curve of the Earth’s surface gently tractioning your spine as you let go into deeper and deeper levels of relaxation.
Exploration 2: Sphinx
1. Lie down on your belly and bring your arms into a T position (fig. 10.4). Slowly slide your arms toward you, lifting the crown of your head toward the ceiling so that you can place your elbows on the ground directly under your shoulders. Adjust your position so that your arms are in contact with your ribs and your forearms and palms are stretched out and parallel on the ground in front of you (fig. 10.5). Notice whether you have contracted the lower buttocks; relax the buttock muscles and settle into this position.
2. Lift your head out of the basket of your shoulders. Press your shoulders down away from your ears and press your elbows down into the ground without allowing your wrists to arch up off of the ground. Take a deep breath in and then relax in this position for a moment.
3. The elbow push-up happens when you press your elbows into the ground and lift your head out of the basket of your shoulders, lengthening the crown toward the ceiling. Experiment with this subtle push-up a few times. First press into the elbows, elongating the crown, and then sink your head back into the sling of your shoulders. In this exploration you want to develop the awareness of keeping the head moving up out of the shoulders as you simultaneously press the elbows down into the ground.

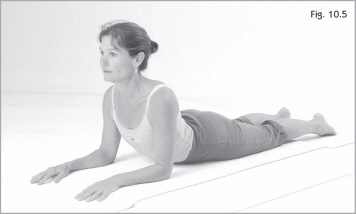
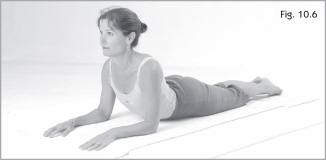

4. Continue holding the Sphinx with the elbow push-up engaged. As you hold the pose, roll the inner ankles together and bring up a squeeze to the inner knees, thighs, and lower buttocks. Aim the tailbone down toward the heels and press the pubic bone into the ground (fig. 10.6). Exaggerate the squeeze as you continue to take long deep breaths in and out.
5. Continue holding the Sphinx as you release the squeeze in the lower body, allowing the heels to roll out and the big toes to remain in contact with each other. Pay attention that the elbows are still pressing into the ground and the crown is lifting toward the ceiling. Your chin is parallel to the ground; softly focus your gaze on the horizon. As you hold this position notice any pulsing, streaming, or tingling sensations, particularly in the kidneys or low back.
6. Take a deep breath in and then press into your elbows and lift your sitz bones back to sit on your heels in Child pose. Draw your arms alongside your body and completely let go of the weight of your torso onto your thighs (fig. 10.7).
7. Can you sense the pulsation in your lower belly? Scan your body, noticing any sensations of heat and cold. Has any part of your body become warm and glowing? Observe your mood and internal feelings. As you release into deeper levels of relaxation in Child pose, consider how you have opened the front side of your body with your belly in close contact with the earth. How does it feel to curl into the fetal position to rest?
Exploration 3: Opening the Inner Thighs—Frog
1. Come into the Sphinx position. Allow the time it takes to lengthen the front side of your body while angling the tailbone down between your heels. Notice how pressing your pubic bone into the ground and sending the tailbone toward the heels lengthens the low back. For this exploration, you may want to place a cushion under your belly to elevate your hips and decrease the amount of stretch in the inner thighs until you find your comfort zone in this pose (fig. 10.8).

2. Position your legs wider than your hips and bend your knees to bring the soles of your feet together behind you (fig. 10.9). Pivot the lower legs like windshield wipers (fig. 10.10). Experiment with letting them go in the same direction for a while, then allow them to come in and out together. How much of the weight of your feet and ankles can you release into this movement? Do you notice how the inner groin and inner thigh muscles begin to release as you allow the movement to become more playful?
3. Now give yourself some applause for a job well done by clapping the soles of your feet together behind you. Are you ready to open your knees wider apart? The wider your knees, the easier it is to clap.
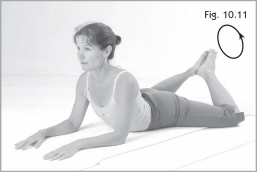
4. With the soles of your feet touching, press your feet together. Place an imaginary paintbrush between your feet and paint a circle on the wall behind you (fig. 10.11). Can you sense how this movement opens your ankles, knees, and hip sockets? Reverse the direction of the circles. Now make figure 8s. All of these movements awaken different working relationships between the muscles of the lower body and release unconscious holding patterns in your hips.
5. Keeping the soles of your feet together, lower your inner ankles toward the ground, coming to touch the ground if you can (fig. 10.12). This is Frog pose. Breathe all the way down into the lower belly while you hold this position for as long as it is comfortable to do so.
6. When you are ready to release, come back into Child pose by pressing into your hands and sitting back on your heels. Release your torso to hang over your thighs (fig. 10.13).
7. Can you sense the pulsation in your lower belly? Scan your body, noticing any sensations of heat and cold. Has any part of your body become warm and glowing? Observe your mood and internal feelings. As you release into deeper levels of relaxation in Child pose, consider how you have opened the front side of your body by encouraging the hips and inner thighs to come into closer contact with the earth. How does it feel to curl into the fetal position to rest?




Head Lifting into Baby Cobra
Here is an experiment that will bring awareness to lengthening your head away from your spine in such a way that you won’t have to arch or crunch your neck when you go into front-extension postures. These steps are similar to the manner in which an infant learns to lift his head off the ground and push through the hands to come up into the baby’s expression of Cobra.
Lie down on the ground and slide your palms under your shoulders, fingertips facing the wall in front of you and your elbows tucked in close to your ribs. Extend the back of your neck by bringing your forehead and scalp line to the floor (fig. 10.14). Take a few long and deep breaths and notice how it feels to be lengthening the back of your neck in this position.
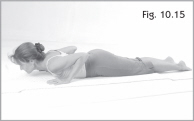
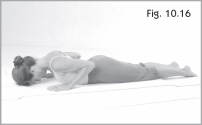
Looking with your eyes, begin to focus your gaze on the floor and slowly follow an imaginary line forward on the floor. Notice how your nose and chin brush the floor as the head follows the movement of your eyes (fig. 10.15). Look only as far forward on the imaginary line on the floor as you can see with your chin on the ground. Keep your shoulders relaxed and your arms and palms passive on the floor. Take a deep breath in and hold for a moment. Then, exhaling, look with your eyes back toward your chest and curl the chin and nose back in toward your collarbones (fig. 10.16).
Imagine a movement you made as a tiny baby when you were learning to lift your head. An imaginary ladybug begins to inch along the floor away from you. See it moving away from you toward the bend where the floor meets the wall. Pause to take in a deep breath, and then exhale and slowly let your gaze travel back in toward your chest.
Repeat the same movement, this time following the movement of the ladybug with your gaze as the ladybug travels up the wall to the place where the wall joins the ceiling (fig. 10.17).

As your chin scoots along the ground and your head begins to lift slightly off the ground, notice how the back of your head lengthens away from your shoulders. Pause to take in a deep breath; as you exhale, return all the way back to the starting position in one breath (fig. 10.18).
Now allow the movement to take your head all the way off the ground, lengthening the crown away from your shoulders as you watch the ladybug move up the wall and onto the ceiling above you (fig. 10.19). Keep your shoulders relaxed and your arms and palms passive on the floor. Take a deep breath in, hold that breath, and then in a single exhaling breath lower your head, following the movement of your eyes back in to look toward your chest. (fig. 10.20). Over the next few breaths repeat this movement, allowing the repetition and rhythm of the movement to take over. Keep your eyes engaged as the initiator of the movement. Stay relaxed in your shoulders and allow your forearms and palms to remain passive on the floor.
Now lower your elbows back down to the ground, stretching out your arms in T position (fig. 10.21). Remaining in this relaxation position, notice the effects of this movement in your low back and belly. Do you sense your abdominal pulse beating any stronger? How is the back side of your body moving as you breathe?


Exploration 4: Iguana
1. Lie on your belly and bring your body into the T position. Extend your arms out to your sides and walk your hands apart. Bend your elbows and plant your palms on the floor in line with your shoulders. Turn your hands so that your middle fingers are pointing at each other (fig. 10.22). Play with this unusual position. Notice how your elbows angle out toward the walls on both sides.
2. Slide your hands further and further apart until your elbows form right angles with the floor. Your fingertips remain facing each other and your palms are relatively flat, although you do not want to force or strain the stretch in your wrists or shoulders in any way.
3. Leaving your elbows angled out and your palms on the floor, lower your head, placing the scalp-line of your forehead on or toward the ground. Your chin curls in toward your collarbones (fig. 10.23). Leaving your head in this position, alternately press one elbow and then the other forward and back in a winglike motion.
4. Lift and turn your head, placing your left ear on or toward the ground. Look under the window of your right elbow (fig. 10.24). Leaving your head in this position, again play with the winging motion in your elbows. Do you notice how one shoulder rolls down toward the ground and the other rolls up toward the sky? Exaggerate that rolling motion in the shoulders.
5. Now lift and turn your head, brushing your nose along the floor and placing the right ear on or near to the ground. Look under the window of your left elbow. Play with the winging motion in the elbows and the rolling motion in your shoulders.
6. Release your arms and return to the T position for a stretch (fig. 10.25). Notice any pulsing, streaming, or tingling sensations in your shoulders or neck. Lift and turn your head to bring the left ear toward the ground. Notice the way your spine moves as you breathe.
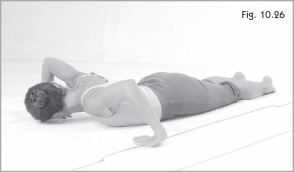
7. Bend your elbows at right angles, fingertips facing each other and your palms on the ground. Lift and turn your head, placing your left ear on or near the ground. Slide your head under the window of your right elbow and see your right leg and foot along the floor (fig. 10.26).
8. Lift and turn your head, placing your right ear on or near the ground. Slide your head under the window of your left elbow and see your left leg and foot along the floor. Bend your left knee and drag your left knee along the floor toward your gaze (fig. 10.27). Press into your palms for leverage. Only drag the knee as far forward as is comfortable.


9. Pause for a moment and experience the interesting sensations in your shoulders, hips, and legs.
10. In a rhythmic motion, push the left knee away from you again, turn your head brushing your nose along the ground, and look under the window of your right elbow as you simultaneously begin to drag the right knee along the ground toward your gaze.
11. Pause and experience the sensations generated from being in this position.
12. Alternating from side to side, moving like a giant lizard or iguana, begin to experience the rhythmic motion of looking under one elbow at the oncoming knee, then switching to the other. When the movement becomes familiar to you, begin to use your breath to power the action so you do not strain and can experience an effortless, iguana-like motion.
13. Release the movement and return to the T position for a rest. Turn your head to one side and then the other to experience the sensations that are arising throughout your body.
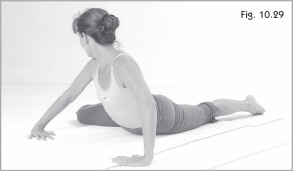
14. For the final phase of the exploration, return to the movement that you have been making—looking under the window of each elbow and dragging your knee toward you. When this motion is well established, begin pressing your hands into the floor and looking up and over the shoulder toward the oncoming knee (figs. 10.28 and 10.29). Start slowly from side to side; let the movement build. As you return through the middle each time, let your chest and head come back down to the ground and brush along the floor before springing up to the other side. Use your breath to power the movement.
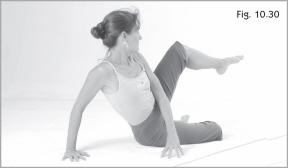
15.The next time you come up to look over your left shoulder, stay there for a moment. Roll slightly further so you can balance your weight on your right hip and the outside of your right thigh (fig. 10.30). Bend your left knee in as close to your left shoulder as possible. Play with any movement that wants to happen in your right leg as you remain in the position for a few more breaths.
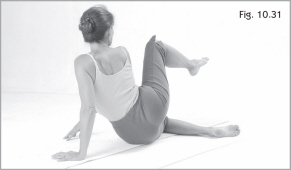
16. Finally, sweep back through the middle and over to look past your right shoulder. Roll slightly further so you can balance your weight on your left hip and the outside of your left thigh. Bend your right knee in as close to your right shoulder as possible (fig. 10.31). Play with any movement that wants to happen in your left leg as you remain in the position for a few more breaths.


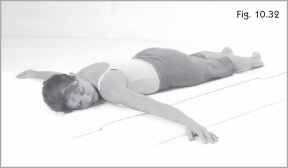
17. Now lower your legs back down to the ground and stretch out your arms to a T position. Lift and turn your head, placing your right ear on or toward the ground (fig. 10.32). Experience the pulsing, tingling, or streaming sensations through your body. Notice how your lower back lifts and lowers in response to your breathing.
18. Lift and turn your head, placing the left ear on or toward the ground. Do you observe any difference on the two sides of your body? Allow yourself to sink into deeper and deeper layers of relaxation.
Integration: Spiraling Up to Sitting
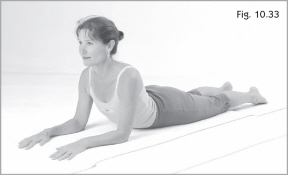
1. Begin in Sphinx position, with your arms in contact with your ribs and your forearms and palms stretched out and parallel on the ground in front of you (fig. 10.33). Notice whether your lower buttocks are contracted. Relax the buttock muscles and settle into this position.
2. Balancing on your elbows, bring your hands together and interlace your fingers. Notice the thumb and index finger that are on top; this is probably your habitual way of interlacing your fingers. Unlace your fingers and interlace them with the other thumb and index finger on top, and all of the other fingers falling into the new pattern (fig. 10.34).

3. Close your eyes for a moment and experience the sensation of having your fingers interlaced in the nonhabitual pattern. Does it feel as if you are holding someone else’s hand? Does one hand feel thicker than the other? Suggest to yourself that adapting to this new pattern will stimulate a new awareness of the body-mind interactions in your upper body.
4. Holding your hands in this new pattern, turn and look over your right shoulder to see your legs stretched out behind you, then turn and look over the left shoulder to see your legs (fig. 10.35).
5. For the next few breaths, turn and look over each shoulder alternately and begin to bend the knee that is the object of your gaze. As you look to the right, bend the right knee and drag it a few inches toward your right shoulder. As you look to the left, bend the left knee and drag it a few inches toward your left shoulder (fig. 10.36).
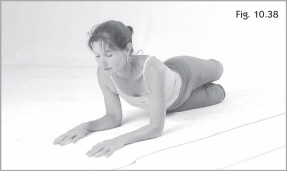
6. Return to the Sphinx position. Bend your legs at the knees and bring your inner ankles together. Imagine that you have a string around your ankles keeping your ankles in close contact with one another. Another string is tied around your knees, keeping your knees together. Without letting your ankles or knees come apart, begin to lower your feet to the floor on your right side (fig. 10.37). Experience how close your feet come toward the ground without straining. Notice how lowering your legs together to the right side lifts your left hip up and off the ground. Exaggerate the lift in your hip (fig. 10.38). Feel the stretch along the sides of your rib cage. Leading with your eyes, turn your head to look over your left shoulder (fig. 10.42). Notice how this rotation in the upper back and neck completes the twist in your upper spine.
7. Inhale and lift your lower legs back up to the midline, paying attention to keep the ankles together and knees together.


Back Twist
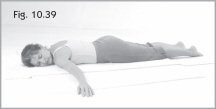
Here is an interesting way to enter a spinal twist from a belly-down position. Lie on the ground and extend your arms from the trunk in a T position. Walk your hands apart (fig. 10.39).
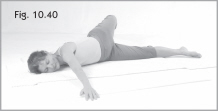
Lift and turn your head, placing your right ear on or near the ground. Bend the left knee and reach your left foot across your body to touch the floor on your right side (fig. 10.40). See how close you can come to touching your right hand; feel the intense stretch and twist occurring in your spine. Lower your left leg back to the ground. Pause and notice the sensations. Observe the difference in the two sides of your body.
Now lift and turn your head, placing your left ear on or near the ground. Repeat the twist on this side, bending the right knee and reaching your right foot across your body. When you bring your leg back to the ground, pause and notice your sensations. Now repeat the movement on each side of your body, alternating back and forth between one side and the other. Notice how much easier the movement becomes after you repeat it a few times.
Take a rest. Notice any pulsing, streaming, or tingling sensations that arise in your body. Slow down and let your breath travel all the way down your spine. Can you sense a change in temperature of your muscles and your skin?
When you feel a return to relaxed and effortless breath, prepare for the final experiment in movement from this position. Bend both knees and, keeping knees and ankles together, reach over to one side of your body with your feet touching or coming close to the ground (fig. 10.41). Return to the center and reach both legs to the opposite side. Go back and forth from side to side until the movement feels familiar and comfortable.
Now lower your legs to the ground and stretch your arms out in a T. Lift and turn your head, placing your right ear on the ground. Experience any pulsing, tingling, or streaming sensations in your body. Notice how your lower back lifts and lowers in response to your breathing.
Lift and turn your head, placing the left ear on the ground. Do you observe any difference on the two sides of your body? Allow yourself to sink into deeper and deeper layers of relaxation.

8. Now lower both legs to the left side and notice how the right hip comes off the ground when you keep your ankles and knees together. Again, notice the stretch along the sides of your rib cage. Leading with your eyes, turn your head to look over your right shoulder. Can you see your feet on the ground behind you?
9. Lift your legs back up to the midline and begin to rock your legs from side to side in a pendulum-like motion; when your legs go down in one direction, your eyes and head turn to look over the opposite shoulder (fig. 10.43). Go slowly enough to experience the sensation of lifting the opposite hip up and off the ground.
10. Allow the movement to build in momentum until it feels natural and comfortable to be swinging your legs from side to side. Continue the movement until you feel as if you’ve let go of the control over your body and that your body and its momentum are moving you.
11. Leaving your feet over to the right side, lift the left leg and, in a scissorlike movement, reach back to Pinwheel, touching the floor with your left foot (fig. 10.44). This movement is going to be useful later in the exploration in helping to propel you up to sitting without using your hands and arms. To familiarize yourself with the way your leg moves from the stacked knees and ankles position to Pinwheel, move the leg back and forth a few times, stacking the left ankle on top of the right ankle and the left knee on top of the right knee and then reaching back to touch the toes of the left foot to the floor.
12. Return to the “stacked” position, lifting the left leg and placing it onto the right leg, stacking the left ankle on top of the right ankle and the left knee on top of the right knee. Keeping your knees and ankles together and bent at the knees, return to the Sphinx (fig. 10.45).
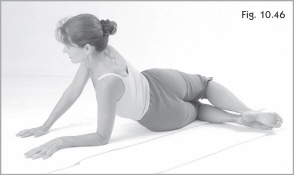
13. Imagine that a string tied around your ankles keeps your ankles in close contact with one another. Another string is tied around your knees, keeping your knees together. This image will help you to learn to use your legs like a pendulum. Without letting your ankles or knees come apart, begin lowering your feet to the floor on the left side (fig. 10.46).


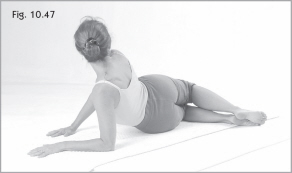

14. Experience how close your feet can come toward the ground without straining. Notice how lowering your legs together to the left side lifts your right hip up and off the ground. Leading with your eyes, turn your head to look over your right shoulder (fig. 10.47). Notice how this rotation completes the twist in your upper spine.
15. Leaving your legs over to the left side, lift the right leg in a scissorlike movement, reaching back to touch the floor with your right toes (fig. 10.48). To familiarize yourself with the way your leg moves from the stacked knees and ankles position to the Pinwheel, move the leg back and forth this way a few times, stacking the right ankle on top of the left ankle and the right knee on top of the left knee and then scissoring back into Pinwheel. Then bring both legs back to the neutral “stacked” alignment.
16. Keeping knees and ankles together, come back to the Sphinx position. Now, in a pendulum-like motion, swing your legs to the right side; the moment they touch the ground, continue reaching with the left toes toward the floor behind you into Pinwheel. This reaching motion will spiral you back so that your elbows and hands will want to come up and off of the ground.
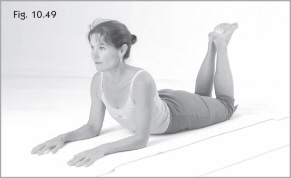
17. To finish, bring the left knee back on top of the right knee and roll down to the floor onto your belly (fig. 10.49). Then immediately swing your legs over to the left side, reaching with the right foot toward the floor behind you (fig. 10.50). See if you can reach your right foot far enough to comfortably begin to lift your hands off of the floor.
18. Continue this same movement, spiraling up to sitting on one side, rolling back down onto your belly in the center, and then spiraling up to the opposite side. Your eyes and head look in the opposite direction as your legs (fig. 10.51).


19. Let the movement build until it becomes playful and fun. Each time you come back through the center, lower your belly further toward the ground, then use your hands like a push-up to spring back up to spiral on the opposite side.
20. Slowly let the movement subside. Lower your legs to the ground and stretch out your arms in a T. Lift and turn your head, placing your right ear toward the ground. Experience the pulsing, tingling, or streaming sensations throughout your body. Notice how your low back lifts and lowers in response to your breathing.
21. Lift and turn your head, placing the left ear on the ground. Do you observe any differences between two sides of your body?
Opening to Life by Engaging the Belly Core
Inquiry: How do I stay grounded in my center while opening into whole-body, front-extension movements?
In this inquiry we transition from front extensions in the belly-down position to front extensions from a kneeling position. Where lying on the ground supplies a surface to press against, there is no such contact with the front side of your body in a kneeling position. This inquiry provides further explorations into ways to enter the traditional backbending postures from the alternative perspective of lengthening the front side, and will help you gain awareness of how to protect yourself from overarching in the low back by extending from the pubic bone to the sternum. Staying anchored in your center allows for deeper relaxation in the midst of any yoga postures or movements that lengthen the front side of the body.
In the first exploration, Kneeling, we explore the details of supporting the low back and neck by focusing awareness on the long, continuous line of the spine as it opens. Sliding Hip Pockets and Windmill prepare the body for gradually entering Camel pose, identifying the limits that are within your safe zone. Forward Lunge combines front extensions with strengthening the legs in preparation for the Standing Runner’s Stretch and all of the Warrior postures. This exploration is particularly effective in gaining familiarity with aligning the feet for maximum safety for the knees when you move into standing postures that combine hip flexibility with front extensions and standing balance. From a Seed to a Tree integrates the full range of motion from being curled into the fetal spiral of Child pose all the way into opening the belly in the Camel. All of these movements provide checkpoints along the way to assure that you remain connected to your center and do not get tempted to overarch the lumbar or spinal curves.


Exploration 1: Kneeling
1. Come up into a kneeling stance. If your kneecaps are sensitive to pressure, use a pad, a cushion, or a folded blanket under your knees.
2. Place your knees directly beneath your hips; make sure your lower legs are parallel to one another. Hook your hands on the outside edges of your hips. Squeeze your hands inward and down toward the ground at the same time. Hold this grip for a few breaths as you close your eyes and “ground” your legs; as you send your legs downward feel the energy in your spine and torso rising upward through the crown of your head. Adjust your chin so that it is parallel to the ground and allows a free flow of sensation through the neck and collarbones (fig. 10.52).
3. Open your eyes and softly focus your gaze at a point along the horizon. Leave your hands hooked on your hips as you become aware of the placement of your lower legs and feet. Notice whether your feet feel stable with the tops stretched out on the floor, or if instead you are more stable with the toes curled under. Experiment back and forth and choose the position that gives you the feeling of balance and stability while kneeling.
4. Bring your right hand to the sacrum, placing the heel of your hand on the upper edge of the sacrum and pointing the middle finger down toward the tailbone. Position your left hand on your lower belly below the navel (fig. 10.53). Slide the back hand down the sacrum as though a downward-moving elevator is descending from the beltline to the tip of your tailbone. At the same time, slide your front hand upward, as though an upward-moving elevator is traveling from the pubic bone to the navel. Repeat this sliding motion a few times to sense how energy moves up the front and down the back of the pelvis, creating stability and groundedness.
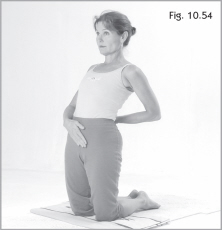

5. Tuck your chin in toward the shelf of your chest. This slight tuck will keep the back of your neck long as you begin to lengthen the front side of your body. Bring up a smile in the crease of the lower buttocks and begin to shift your center of gravity forward by pressing the hip bones forward (fig. 10.54). The head is very heavy; the further forward you send your center of gravity forward, the greater the tendency is to let the weight of your head hang back. Rather than releasing the head to arch backward, the emphasis here isto keep the head growing out of your spine.
6. Inhale as you shift your center forward; hold the breath in for a moment. As you exhale, slowly release the hips and chin to neutral.
7. Experiment to see how far forward you can move the hips without losing stability. As the hip bones move forward the sacrum and tailbone lengthen downward, elongating the lower back. Hold this position for several deep breaths. Imagine a wheel of energy turning in the pelvis, moving up the front from the pubic bone to the navel and circling down the back from the belt line to the tip of your tailbone. Experience the sensation in your center and along the front of your thighs.
8. Before you release this position, take a deep breath in and hold the breath. Keep holding and take in a little more breath, tucking the chin a little more. Then exhale and lower down into Child pose (fig. 10.55).
9. Slide your arms alongside your body and release the weight of your torso onto your thighs. Observe any pulsing, tingling, or streaming sensations. Notice whether your body heat has increased with this movement.
Exploration 2: Sliding Hip Pockets
1. Come up into a kneeling stance. If your kneecaps are sensitive to pressure use a pad, a cushion, or a folded blanket under your knees. Experiment with the position of your feet and place them in a way that makes you feel stable and grounded, either tops stretched out or toes curled under.
2. Place your knees directly beneath your hips and position your lower legs so that they are parallel to one another. Place your hands, fingers pointing downward, on your kidneys, as though your hip pockets were very high (fig. 10.56).

3. Take a deep breath in as you tuck your chin in toward the shelf of your chest. Press both hip bones forward and squeeze the elbows in toward each other behind your back (fig. 10.57). Exhale as you release the press and return to the neutral position. Do you notice how squeezing your elbows together behind your back opens up your heart and chest?
4. Repeat this elbow squeeze and forward hip press several times. Hold the inhale longer each time, releasing the breath on the exhale. The more you press your hips forward, the more you squeeze your chin in toward your chest and your elbows toward each other behind your back.
5. With your hands still positioned on your kidney pockets, become aware of the contact your right hand makes with your back. Imagine that your hand is tucked in a pocket; as you exhale, slowly begin to glide this pocket down the backside of your right thigh (fig. 10.58). Only go as far as is comfortable without straining. Keep your eyes focused on a point along the horizon in front of you and tuck the chin slightly to protect your low back from arching. Release and glide the pocket back up to the kidney position.
6. For a few breaths, glide the pocket down the backside of your right leg, reaching lower each time until you reach all the way down or close to the crease of your right knee. Glide your hand back up to the kidney position.
7. Now become aware of the contact your left hand makes with your left kidney. Imagine that your hand is tucked in a pocket; as you exhale, slowly begin to glide this pocket down the backside of your left thigh (fig. 10.59). Only go as far as is comfortable without straining. Keep your eyes focused on a point along the horizon in front of you and tuck the chin slightly to protect your lower back from arching. Release and glide the pocket back up to the kidney position.
8. For the next few breaths alternate back and forth, sliding the right pocket down the backside of your right leg toward the knee crease, then the left pocket down the left leg. Coordinate your movement so that when one hand is gliding down, the other is gliding upward. Allow as much of the surface of your palms to touch as much of the surface of your legs as possible.


9. When this movement becomes comfortable and familiar, begin to turn and look over your shoulder to watch your hand gliding downward (fig. 10.60). Then look over the other shoulder and watch that hand glide down.
10. Release the movement, bringing the hands and arms to hang along your sides. Close your eyes and experience the sensations moving though your body. Notice what is happening in your feet, knees, and the muscles on the front sides of your thighs.
11. Slowly lower down into Child pose.
Exploration 3: Sliding Hip Pockets to Windmill
1. Do not progress to this variation if the Sliding Hip Pockets exploration above is not comfortable. Repeat that exploration until you are ready to go to the next level with this one.
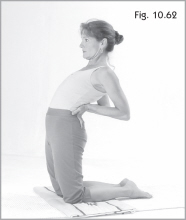
2. Come up into a kneeling stance. Place your knees directly beneath your hips and position your lower legs so that they are parallel to one another. Place your hands, fingers pointing downward, on your kidneys (fig. 10.61). Take a deep breath in as you tuck your chin in toward the shelf of your chest, press both hip bones forward, and squeeze the elbows in toward each other behind your back, opening your heart and chest (fig. 10.62). Exhale as you release the press and return to the neutral position.
3. Repeat this elbow squeeze and hip press forward several times. Hold the breath in longer each time, releasing the breath on the exhale. As you deepen the forward press of the hips, also deepen the squeeze of your chin toward your chest and your elbows toward each other behind your back.
4. Position your hands on your kidney pockets, fingers pointing downward. Begin the hip pocket gliding movement down one thigh, then the other, alternating back and forth and looking over your shoulders (fig. 10.63).



5. If this movement is comfortable, the next time you glide down the right leg to the knee crease, keep sliding your right hand all the way to the heel (fig. 10.64). Then return to the upright neutral position. Repeat the same movement down the left thigh toward the left heel (fig. 10.65).
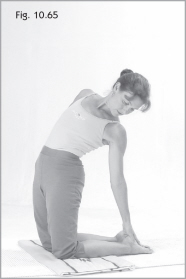
6. Alternate back and forth several times until the movement becomes familiar and comfortable. Remind yourself to look over the shoulder and actually see your hands touching your heels on each side.
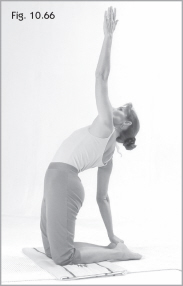
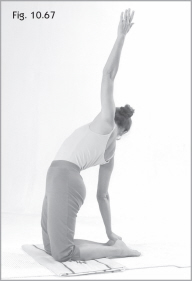
7. The next time you glide down to the right heel, anchor your hand on your foot and stretch through your left arm up toward the ceiling. Stretch like a windmill upward from the little finger side of your arm. Inhale and allow your eyes to look upward at the airborne thumb (fig. 10.66). Exhale and look down at your right hand and heel (fig. 10.67). Keep pressing the hipbones forward. The next time you look up at the left thumb, catch hold of an imaginary skyhook and let the skyhook lift you back up into the upright kneeling position.
8. Close your eyes and experience the sensations moving through your body. Notice any difference in sensation between your two legs.
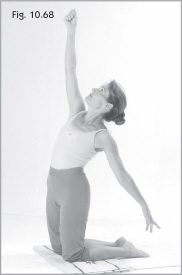
9. Open your eyes and glide your left hand down to your left heel, anchor your hand on your foot, and stretch the right arm upward toward the ceiling. Stretch upward like a windmill from the little finger side of your arm. Inhale and allow your eyes to look upward at the airborne thumb. Exhale and look down at your left hand and heel. Keep pressing the hip bones forward. The next time you look up at the right thumb, catch hold of an imaginary skyhook and let the skyhook lift you back up into the upright kneeling position (fig. 10.68).
10. Bring your arms to your side. Close your eyes and notice the effects of these movements.
11. Slowly lower down into Child pose (fig. 10.69). Sit for a moment and observe the internal effects of this sequence of movements.

Exploration 4: Kneeling Forward Lunge
1. Come up into a kneeling stance. If your kneecaps are sensitive to pressure, use a pad, a cushion, or a folded blanket under your knees.
2. Place your knees directly beneath your hips and position your lower legs so that they are parallel to one another. Hook your hands on the outside edges of your hips. Squeeze your hands inward like a vice grip and downward toward the ground at the same time (fig. 10.70). Hold this grip for a few breaths as you close your eyes and imagine grounding your legs. As you send your legs down, imagine the energy in your spine and torso rising upward, through the crown of your head. Adjust your chin so that it is parallel to the ground and allows a free flow of sensation up through the neck and collarbones.
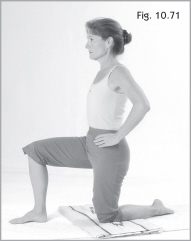
3. Lift your right knee and stand your right foot solidly on the ground in front of you. Keep your hands planted firmly on your hips for stability (fig. 10.71). Moving from your sacrum, imagine a hand behind you gently pressing you forward (fig. 10.72). As your center of gravity moves forward, your spine remains erect and elongated, chin slightly tucked. Notice that your knee glides directly over your right foot, rather than to the inside or outside of your foot. Exhale and return to neutral.
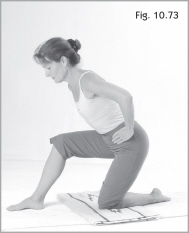
4. For the next several breaths, inhale as you glide forward directly out over the foot and exhale as you glide back to the upright kneeling position. As you come back, you may want to bow forward slightly and reach your sitz bones back toward your left heel (fig. 10.73). Remind yourself to move from your center of gravity or your sacrum and to keep the spine upright as you lunge forward.


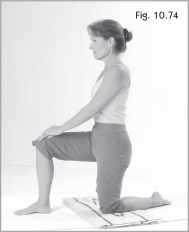
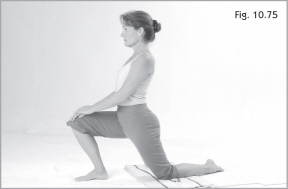
5. The next time you return to neutral, reposition your hands, placing one on top of the other on top of your right knee (fig. 10.74). Again begin the forward gliding motion, but this time imagine that a string is attached to your sternum and that you are being pulled forward by the breastbone (fig. 10.75).



6. Exhale and sit back toward the heel, allowing the torso to bow forward slightly (fig. 10.76). Repeat this forward-and-backward movement until it becomes familiar and effortless. Experiment with how far forward and back you can go without straining or allowing your front knee to wobble from one side to the other.
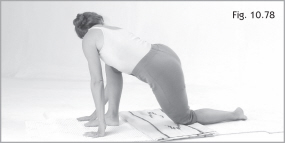
7. Now take a dive forward and plant your hands on the floor on either side of your right foot (fig. 10.77). Turn and look over your left shoulder and see your left ankle on the floor behind you. Turn and look over the right shoulder (fig. 10.78). Deliberately allow the back ankle to roll from the inner anklebone to the outer anklebone as you turn to look from side to side. This rolling of the ankle will release the long upper bone of the leg to rotate more freely in the hip socket.
8. Leave your left hand planted on the floor and extend your right hand toward the sky. Look toward the airborne thumb. Then reverse, planting the right hand on the floor and extending the left arm upward, gazing at the thumb (fig. 10.79).


9. Keeping your hands on the floor, lower the weight of your torso onto your right thigh. Wait until your torso becomes heavy. Release the weight of your head to hang (fig. 10.80). Relax your jaw and the muscles of your face. Keeping your torso very heavy and resting on your thigh, let your thigh take your torso for a ride forward and back (fig. 10.81). Stay heavy and relaxed in the movement.
10. Slowly return to the upright kneeling position, then lower down into the Child pose for a rest (fig. 10.82). Notice the effects of the movement. Observe the difference in the two sides of the body. Do you sense any pulsing, streaming, or tingling sensations?
11. Roll your spine to an upright position and then come up into a kneeling position. Repeat the exploration starting with the left knee and foot forward. Finish in Child pose, sitting for a moment and observing the internal effects of this sequence of movements.
Exploration 5: Kneeling Hitchhiker
1. Come up into a kneeling stance. Place your knees directly beneath your hips with your lower legs parallel to one another. Extend both arms perpendicular to your shoulders in a T position. Curl your fingers into your palms and extend your thumbs as though you were hitchhiking (fig. 10.83).
2. With a soft gaze, watch your right thumb rolling upward in the hitchhiker’s gesture; at the same time roll the left thumb down in the “thumbs down” gesture. Hold this position and exaggerate the rolling in your shoulders (fig. 10.84). The right shoulder is rolling up and back, the left shoulder is rolling forward and downward.

3. Now simultaneously reverse the position of your hands as your gaze shifts to look at your left thumb rolling upward into the hitchhiking gesture. Hold this position as you breathe into the stretch and exaggerate the rolling in your shoulders.
4. Now begin to change gestures from side to side, exaggerating the rolling motion in the shoulders. Look to each thumb as it is rolling upward.
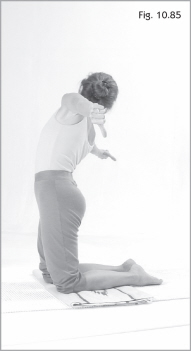
5. Continue the movement but stretch the arms wider and wider apart, as if you were stretching a towel behind your back (fig. 10.85). Feel the shoulder blades widening out from the spine.
6. Now begin to put a little speed into the movement. Allow the elbows to bend and the hips to sway from side to side (fig. 10.86). Imagine the wind is blowing you; let your whole body begin to respond to this wringing, winding, fluid movement. Play with the movement until the movement takes over. Let your body flow freely into whatever form of rolling and twisting emerges.
7. Slow the movement down and return to the neutral kneeling position (fig. 10.87). Close your eyes and experience the effects in your body.
8. Lower down into Child pose.
Reach your palms around to your low back and give the muscles a good massage, releasing any residual tension they may be holding. When you are ready, slowly roll up into a sitting position.
9. Sit for a moment and observe the effects of this sequence of movements.



Integration: From a Seed to a Tree
1. Come up into a kneeling stance. Place your knees directly beneath your hips and position your lower legs so that they are parallel to one another. Extend both arms out from your trunk in a T position. Curl your fingers into your palms and extend your thumbs as though you were hitchhiking (fig. 10.88).
2. Roll both thumbs upward in the hitchhiker’s gesture and then roll both thumbs down into the “thumbs down” gesture (fig. 10.89). Repeat this movement a few times, inhaling as you roll up and exhale, squeezing all of the breath out as you roll the thumbs down. Exaggerate the rolling movement in your shoulders.
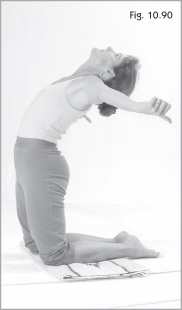
3. Now let your head and eyes begin to move with your shoulders. As your thumbs roll up let your eyes look up, stretching your chin toward the ceiling and pressing your hip bones forward (fig. 10.90). Squeeze the lower buttocks slightly and elongate the low back rather than arching or contracting. When the thumbs roll down, your chin tucks into the shelf of your chest and your upper back rounds forward slightly (fig. 10.91).
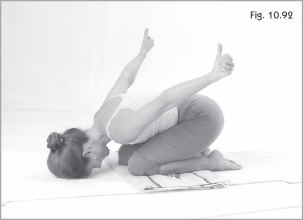
4. Gradually allow more of your body to stretch backward in the thumbs up gesture and more of your spine and torso to curl forward in the thumbs down gesture. As you let the movement build, you will curl all the way down into the Child pose, or the “seed” position, on the exhaling breath (fig. 10.92). On the inhaling breath, sprout from the seed all the way back up into the full-grown tree, opening your chest, rolling your shoulders and thumbs up, squeezing your lower buttocks slightly, and pressing the hip bones forward (fig. 10.93).





5. Continue the movement until the breath and momentum carry you along. Imagine the energy and vibrancy of moving from a tiny seed to the full-blown expression of a whole tree in one burst of movement and in one breath.
6. Allow the movement to slow down until you return to stillness in the neutral kneeling position (fig. 10.94). Close your eyes. Allow your breath to flow in and flow out without any inhibition. Experience the effects of this movement on your whole being. Particularly notice your mood. Do you feel more playful or more energized?
7. Lower back down into Child pose (fig. 10.95). Notice how quickly and deeply you are able to relax in this position. Draw your breath down the entire backside of your body, noticing how you lengthen on the inhalations and relax even more deeply into gravity on the exhalations. In your own time, slowly roll back up into a sitting position, observing from within how each part of your spine moves in sequence.
8. Sit for a moment and observe the effects of this sequence of movements.
Before Moving On . . .
In bringing awareness to the difference it makes for the health of your spine to extend the front side of your body as compared to arching backward into backbending postures, you have established a way to experience the belly- and heart-opening effects of backbends without compromising or straining your low back or neck. The movements you learned in Hug the Planet not only bring relief for overworked and overdeveloped low-back muscles, but provide a balanced way to relax and elongate your low back while also hydrating and toning intervertebral discs. By reeducating your spine in this way you may begin to notice an increase in the efficiency and overall range of movement in your whole spine.
As you have now experienced, the same body mechanics that you apply in the prone position are relevant to the front extensions from a kneeling position as well. Rather than avoid backbends in order to protect your low back and neck, you now have some practical ways to approach all backbends and to receive their rejuvenating and energizing effects.
Do you recall a moment during one of these explorations when you felt a noticeable difference in the flow of energy in the way of increased heart rate or a pulsing in your belly or chest? The counterbalance of moving from front extensions down into the Child pose have the massaging effect of stretching and then compressing all the vital organs in your belly and chest. As you open to increased levels of circulation and stimulation in the belly and chest in this way, you are not only releasing some unnecessary protection; you are also inviting a fresh infusion of energy to be directed toward fulfilling your important priorities with greater ease and confidence.
So far in the progression of these Self-Awakening Yoga inquiries you have now located the belly center and learned ways to energize and move from your belly center while lying on your back, lying on your belly, sitting in Pinwheel, and kneeling. The next chapter explores movements that channel the vital strength from your belly into your arms and legs in Table position. As a child pushes and pulls his way up off of his belly and onto all fours, a new set of possibilities for exploring the world begins to open that require developing strength in the arms and legs.