
13 Making the Hero’s Journey: Traveling the Time Spiral of the Spinal Twist to Arrive Now in Seated Forward Bend
How does the progression of movement from Hero to Spinal Twist to Seated Forward Bend help me stay grounded in the present while opening to the past and the future?
AN OFTEN-QUOTED AXIOM IN YOGA SCHOOLS STATES THAT a healthy spine is a healthy body. Another variation is “a long spine means a long life.” This emphasis on the vertical axis of the spine is more than a physiological metaphor or a health prescription. In bringing awareness to the axis of the spine, we open to the heroic journey of expanded consciousness that the spine not only symbolizes but also makes possible. The spine is the tunneling path through time.
We have seen that the spine has evolved to support the journey from primal organisms in the oceanic darkness to multidimensional beings in quest of vertical ascension into the light. The organismic journey each human being makes from the embryonic stage toward unimpeded, autonomous, balanced movement in every direction plays out in the dialogue between the finiteness of gravity and the infinitude of space. The inquiries in this chapter extend our conversation beyond the physical evolution of the spine, with its neuromuscular and electrochemical structures and functions; it also looks beyond the psychodynamics of an autonomous and individuated complex personality in search of meaning and purpose. The conversation of this chapter begins with the startling discovery that Einstein voiced when he declared that time curves back in on itself. Time and space are paradoxical manifestations of the same phenomenon.
How does the Hero pose get its name? The Hero’s journey begins with a summons to enter the moment through inquiring “who am I?” Practicing the As Is principle supports the courage and humility required to accept my experience as it is actually unfolding in the present. The inquiries of Self-Awakening Yoga offer concrete pathways into exploring the present moment, opening lines of communication between the mind and body by focusing awareness on the messages of the body that come through the language of sensation. Along the way, you have the opportunity to notice levels of thoughts, beliefs, and emotions are associated with various sensations that arise through entering different areas of your body.
What can you do when you encounter layers of experience in your being that are unfamiliar and seem to be not of your own creation? These experiences that may arise during your practice of the Self-Awakening Yoga inquiries present an opportunity to practice what I refer to as the As If principle—you may not ever know how or why you created this previously unconscious pattern that is revealed during the practice of your inquiries, but if you assume responsibility in full for the reality that is arising in your field of experience in this moment, you have the choice to experience it as if you did create it. As the heroine’s and the hero’s journey unfolds into unfamiliar territories within the layers of yourself, the “now” you are experiencing in this moment reveals itself to be a continuous, interconnected, simultaneous event with every other “now” in the past, present, and future. Who you are in this moment is not limited to what you can think, feel, or even perceive through your current understanding and awareness. In the journey of self-awakening, everything that arises is a part of who you are. Paradoxically, it may seem that you will always be returning home inside yourself, arriving at the very place from whence you started your journey. The results and benefits of your inquiry are inherent in the act of inquiry itself.
We shall not cease from exploration
And the end of all our exploring
Will be to arrive where we started
And know the place for the first time.
T. S. ELIOT, FOUR QUARTETS
From Einstein to Eliot, the twisting, turning road of self-awakening occurs both in the bodily time of sensation and beyond time, in the expanded visions we hold of ourselves that connect us to the meaning and purpose that are the motivating forces behind our quest to discover more of who we are. The time you spend in following the twisting and turning road of self-inquiry is mirrored in the fundamental essence of the Seated Spinal Twist, the posture that supports the flexibility in your spine to open toward both sides. The Seated Spinal Twist begins from Hero pose. As you will discover, Hero gets its name from a special quality of surrender to sensation that the posture itself encourages. Regardless of the degree of flexibility or openness you experience in your hip joints, there are infinite degrees of release that you can experience as you approach this posture. In this series of movements, you may discover that the heroine is not a heroine because she has superhuman qualities or possesses superhuman flexibility. The heroine derives her strength from the humility to accept the reality of her own actual experience, as if it were the result of her own creation. When you begin to open your hips through this inquiry, your body will give you ample opportunity to return to the realities of the sensations that are communicated to you, as you are in this moment.
Recall for a moment how you’ve progressed through the inquiries that have opened your hips, creating a grounded foundation that enables you to sit comfortably, either directly on the ground or with the support of cushions in Pinwheel, Butterfly, and Pigeon. The openness you experience in the hinge of the hip joints allows a flow of communication between your lower and upper body.
The inquiries of this chapter begin by initiating increased openness in your hip joints in the Hero pose. Opening the hips in this movement series creates further grounding for the sitz bones to be comfortably seated. By sending your roots into the ground of the present in Hero, the spine has a foundation for opening to receive the past in one direction and the future in another direction. Having opened to receive from your connections to the past and the future in Spinal Twist, the movement into Seated Forward Bend invites surrender to a deep dive into the unknown of the Now. Seated Forward Bend is among the most introspective of all yoga postures, inviting you into internal exploration. You may begin to discover that the stress you experience in life about not having enough time begins to dissolve as you allow yourself the time it takes to fully let go into the sensations in your body that arise from being in Seated Forward Bend. The less you do in this pose, the more you enter the realization that inner peace exists beyond time. Regardless of how much time you spend in this posture, touching into the inner stillness that this posture produces will be a source of calmness and relaxed awareness when you return to the events of your everyday world.
The Paradox of Courage and Surrender in Hero Pose
Inquiry: How do open hip joints allow for greater communication between the upper and lower segments of the body?
The hinge between the upper and lower body that is the hip joints is the point of the greatest intersection of energy in the body. When the hips are open, communication passes freely between the information-processing center in the head, the feeling centers in the heart and belly and the doing centers of the hands, down into the lower center of mobility in the legs and feet. Without this free exchange, issues arise that incapacitate our abilities to think creatively and to take appropriate action. Challenging patterns in the hip joints can be revealed and transformed into novel possibilities for movement through explorations into Hero pose. The courage to begin at the point where your body can comfortably sustain the effort of the exploration may require you to elevate your seat to a cushion, a block, or even a chair for creating support in this position. The theme of these explorations into Hero pose is to get comfortable in being where you are in the moment.
Exploration 1: Butterfly to Hero
1. Sit in a comfortable position on the ground. Bring your feet together and let your knees open out to the sides (fig. 13.1). Imagine that your open legs are the wings of a butterfly. Do not try to force or push your knees toward the ground; let them be where they are. If the stretch is uncomfortable, place a cushion under each thigh to support yourself.
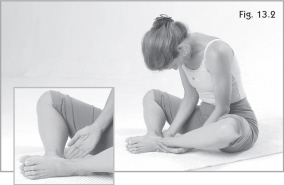
2. Using your hand like a scoop and keeping your thumb next to your index finger, scoop your right hand under your right ankle, letting the outside anklebone rest in the palm of your hand. Scoop your left hand under your left ankle and notice what it feels like to have your ankles and feet resting in the scoop of your palms. Sit in this position and close your eyes. Allow your head to hang forward, your shoulders and your jaw to relax (fig. 13.2). Wait until you experience the sensation of heaviness in the upper body and heaviness of the ankles resting in the palms before you go further. Breathe and relax.
3. Letting your right arm and hand do the work of lifting, lift the right ankle a few inches above the ground and return it back down to the ground. See how heavy you can let the entire left leg and hip remain while your arm does the lifting. Lift and lower a few times.

4. Let your left arm lift your left ankle off of the ground a few inches (fig. 13.3) and then return it to the ground. Does any part of your leg want to “help” with the lift? Ask it to remain heavy and to enjoy the ride as you lift and lower the ankle a few times.
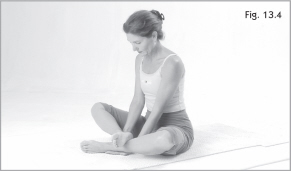
5. Now place the back of your right hand on the top of your left ankle. Lift the right ankle off the ground and place it in your right hand (fig. 13.4). Notice how it feels to have your right ankle resting in your right palm, stacked on top of your left ankle. Wait for the sensation of heaviness before you lift the right ankle and return it back down to the ground.
6. Place the back of your left hand on top of your right ankle. Lift the left ankle off the ground and place it in your left hand. Notice how it feels to have your ankles stacked on this side. Does the left side feel in any way different from the right side?
7. Letting your legs remain heavy and letting your arms do the work, alternate back and forth, placing one ankle on top of the other, returning it to the ground, and then placing the other ankle on top. Go back and forth several times and notice whether the lifting gets easier or if the hip joints seem to get more fluid as you go along. Keep the shoulders relaxed. Use your breath to do the lifting.
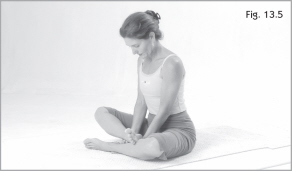
8. Now begin to reach your ankles a little further up on the opposite calves (fig. 13.5). When this becomes effortless, begin to reach the ankles above the opposite knees.
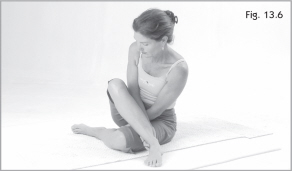
9. Now lift the right ankle all the way over your left knee and place the right foot on the floor beside your left thigh (fig. 13.6). This is Hero pose. Pause and wait for the relaxation into heaviness. Then lift the ankle and place it back on the ground in Butterfly (fig. 13.7).


10. Using your left hand like a scoop, slide your left hand under your left ankle and let the outside anklebone rest in the palm of your hand. Wait until you experience the sensation of heaviness in the upper body and heaviness of the ankle resting in your left palm before you go further. Breathe and relax. Now, letting your left arm and hand do the work of lifting, lift the left ankle all the way over your right knee and place the left foot on the floor beside your right thigh into Hero. Notice where you feel the stretch most vividly—is it in your upper or lower knee? in the inner thighs? in the hip joints? in the calves or ankles? Breathe and send relaxation into your lower body, releasing down into the pull of gravity. Return the ankle to the ground in Butterfly.
11. Repeat this sequence a few times, placing one leg across the other into Hero pose on one side and then on the other. Stay relaxed as you lift. Go slowly and experience the sensations as you move. Keep your face and jaw relaxed and continue to breathe fully into the movement.
12. Return both ankles to the ground and release your hands and arms. Let your arms and hands relax in a comfortable position. Close your eyes. Experience the sensation in your groin and hips. Do your hips and inner thighs feel any different than when you began? Are your knees any closer to the ground without attempting to force them down? Did you notice in entering the Hero that the flexibility of one side is different than that of the other side? Observe any pulsing, streaming, or tingling sensations. Observe the position of your head over your spine and body. Does your head feel lighter? Does your neck feel longer?
Exploration 2: Hero Lifts and Simple Twist
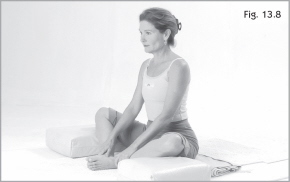
1. Sit in Butterfly pose. Place cushions under your knees for support. If you find your spine rounding, sit on a folded blanket, a cushion, or a block (fig. 13.8). Elevating your hips in the seated positions helps you to remain grounded in your sitz bones.
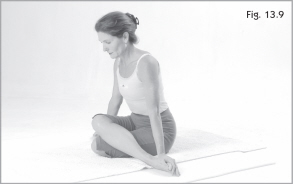
2. Lift your right leg, crossing it over the left into Hero pose. Sit with your palms resting on the soles of your feet (fig. 13.9). Close your eyes and relax into the sensation in your lower body. Can you sense a pulsation in the soles of your feet against the palms of your hands? This position creates a current of energy that moves through your body like a figure 8.
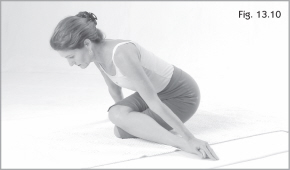
3. Press your palms into your feet and lift your hips off the ground. Experiment with walking your feet a little further apart from your hips (fig. 13.10). Lower your hips back down to sit on the floor or cushion. Repeat this lift and release several times, experiencing the sensation of using the strength in your arms to raise the upper body.
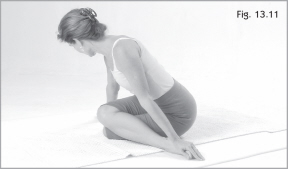
4. The next time you lift, stay up and shift your hips over to bump the right heel, then lift and bump your hips against the left heel (fig. 13.11). This is a pendulum-like motion, with the hips bumping back and forth from one heel to the next.


5. Stay lifted and twist slightly, bringing the right shoulder toward the left foot, then twist bringing the left shoulder toward the right foot (fig. 13.12). This twisting motion is similar to the side-to-side motion a coffee grinder makes.
6. Repeat this twisting movement from side to side several times. Begin to look with your eyes in the direction of the twist and notice how focusing your gaze takes you deeper into the twist (fig. 13.13). Use the exhaling breath to twist a little further in each direction.
7. Lower the buttocks back to sit on the ground or cushion. Interlace your fingers between your toes (fig. 13.14). Notice the interesting sensations of having all of your digits interlaced in this way. Close your eyes and experience the effects of being in Hero pose on this side of your body.
8. Open your eyes and stretch both legs long on the ground. Notice the difference in the way the two legs contact the ground. Now repeat the Hero Lifts and Twist on the other side.
Integration: Hero Whirlwind
1. Sit in Hero pose with your right knee over your left leg. Elevate your hips by sitting on a cushion or block to regulate the amount of pressure in the stretch. Place both hands on your right knee (fig. 13.15).
2. Slowly walk your hands down your right shin, ankle, and foot until both hands are on the ground over to your left side (fig. 13.16). Using the floor for support, lean into your hands and begin to walk them around you to the back. Your feet are going to turn in place as you lift your hips off the ground and allow your body to follow the circular movement along the floor behind you (fig. 13.17).
3. Continue walking the hands all the way around to the other side (fig. 13.18) and back to the front. (fig. 13.19). When you are facing the same direction as you started, bend both knees and sit back down into Hero pose. Your legs are now crossed in the opposite position, with the left knee over the right knee (fig. 13.20).
4. Place both hands on your left knee. Using your hands on the floor for support, begin to walk down the length of your left leg and ankle toward the floor on your right side. Lean into your hands and begin to walk them on the floor around behind you. Your feet are going to turn in place as you lift your hips off the ground and allow your body to follow the circular movement along the floor behind you.

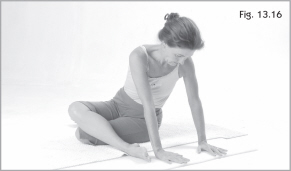
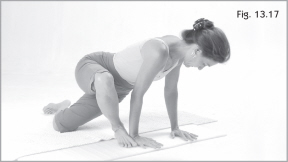


5. Continue walking the hands all the way around to the other side and back to the front. When you are facing the same direction as you started, bend both knees and sit back down into Hero pose. Your legs are now crossed with the right knee over the left knee.
6. Repeat this movement, alternating sides, until the movement becomes familiar and effortless. When it becomes easier, see what happens when you put a little speed into the movement. Can you make the turn without keeping your hands on the floor for support? The faster you go, the easier it is to do the movement without using your hands. Consider the image of a whirlwind turning you from side to side.
7. Let the movement bring you into stillness. Come back to Butterfly pose. Allow your arms and hands to relax in a comfortable position. Close your eyes. Experience the sensation in your groin and hips and legs. Do your hips and inner thighs feel any different than when you began? Are your knees any closer to the ground than when you started? Check this without attempting to force them down. Can you sense how the openness in your hip joints allows for more balanced communication between your upper and lower body? Observe any pulsing, streaming, or tingling sensations. Observe the position of your head over your spine and body. Does your head feel lighter or does your neck feel longer? Do your legs feel more relaxed on the ground?
Integration: Pose of Tranquillity
1. Sit in Hero pose with your right knee crossed over your left leg. Elevate your hips by sitting on a cushion or block. Rest your palms on the soles of your feet (fig. 13.21).
2. Close your eyes and relax into the sensations arising in your lower body. Moving to a deeper level of awareness, notice how your mood begins to shift as you focus on the contact of palms to soles. Can you sense a pulsation in the soles of your feet against the palms of your hands? When your hands are contacting your soles in this position, you are creating a natural magnetic polarity. Using your hands to direct the flow of prana in this way is called creating a mudra; the word mudra means “gesture.” The name of this mudra is Pose of Tranquillity. Relaxing into this position creates a current of energy that moves through your body like a figure 8. As the pulsing becomes stronger, allow your body to sway with the energetic flow.

3. Release your legs from this side and slowly transition into the Pose of Tranquility on the other side, placing your left knee over your right leg. As you bring your palms to the soles of your feet and begin to enter deeper levels of relaxed awareness, notice how quickly and deeply your whole being becomes absorbed in the pulsation of prana.
4. Suggest to your logical mind that you can return to the feelings of being absorbed in the flow of prana at any time under any circumstances in life by recalling the sensations that are coursing through your body in this moment. Notice how your body is continuously generating the flow of prana throughout every dimension of your being.
5. When you are ready, slowly begin your return. Stretch out your legs and allow your body to be moved by the urgings of prana. See what movements want to happen through you in this moment.
Spinal Twists
Inquiry: How does my body enter the spinal twists?
The physiological event of entering a spinal twist induces many dynamics that are easily observed. Opening the hips in Hero provides a foundation of support that allows the whole spine to elongate and rotate into the twist. Twisting has the effect of toning and hydrating the intervertebral discs while also stimulating the flow of fresh blood and oxygen to all motor nerves that branch from the spinal cord. The deep massaging action in the abdomen stimulates digestion, improves peristalsis and elimination, and decongests the kidneys, liver, gallbladder, spleen, and pancreas. With so many of the core organ systems receiving an infusion of energy, it is easy to appreciate how relaxing into sensations while entering the spinal twist boosts our sense of well-being. Anchoring in the present allows for the freedom to turn generously toward the past and the future by integrating thoughts, movements, and feelings along the axis of the spine. Many of these effects are obvious during the posture, but the deeper inquiry opens in the stillness after releasing the movement. Here is an opportunity to follow the spiraling movement internally and receive what is opening.
In a less serious vein, Chubby Checkers said it this way, “Come on baby, let’s do the twist.” Chubby’s rock and roll chant caused an evolutionary movement in the 1960s in which people of all generations from all around the planet began an inquiry into the spinal twist. His dancing version of the twist became a way to “get with the times.”
Exploration: Knee-Down Twist
1. Lie down on the ground. Bend your right knee and place your right foot on your left thigh above the kneecap (fig. 13.22). Gently press down on the thigh with the right foot. Experiment with how much you can let go of any holding in the left leg as you press downward. Send the left heel out along the floor.
2. Extend your left arm straight out from your shoulder on the floor. Bring your left hand up to grasp the knob of your right knee firmly. In a gradual rocking movement, bring the knee over to your left side and back. Keep your foot firmly planted on the thigh while you let the rocking movement get larger and larger. Allow your head to roll in opposite the direction of your knee (fig. 13.23). Send the right shoulder blade down the backside of your body, toward your hip pocket.
3. Stay in this position for several breaths. Make any small adjustments in this position that allow your left hip to remain comfortably on the ground. Roll your head back and forth, looking from ear to ear. Use long, slow breathing to assist in deepening into the twist.
4. Suggest to yourself that there are infinite degrees of release as you hold the twist and breathe into the entire length of your spine. Before releasing, extend out through the left heel one last time.
5. Slowly release the twist (fig. 13.24), bringing your right knee up and then stretching the right leg on the ground. Close your eyes and experience the difference between the two sides of your body. Observe any pulsing, streaming, or tingling sensations in your body.
6. Moving now to the other side, bend your left knee and place your left foot on your right thigh above the kneecap. Gently press down on the thigh with the left foot. Experiment with how much you can let go of any holding in the right leg as you press downward. Extend your left arm straight out from your shoulder on the floor. Bring your right hand up to grasp the knob of your left knee firmly. Send the right heel out along the floor (fig. 13.25).
7. In a gradual rocking movement, bring the knee over to your right side and back. Keep your foot firmly planted on the thigh while you let the rocking movement get larger and larger. Allow your head to roll in the opposite direction of your knee (fig. 13.26). Roll your head back and forth, looking at the place on the ground where your ear would touch. Continue your exploration of the spinal twist on this side.


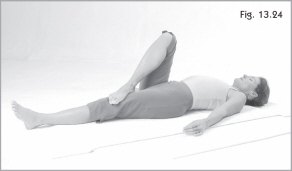

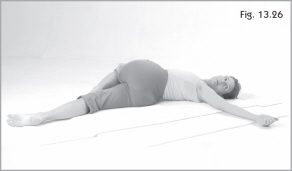

8. Slowly release the twist, bringing your left knee up (fig. 13.27) and stretching the left leg along the ground. Close your eyes and experience any pulsing, streaming, or tingling sensations in your body. Allow your breath to flow in and out without attempting to control or inhibit the breath in any way. Notice any surges of energy moving up and down the spine.
9. Notice any changes or effects that occur as you lie on the ground. Particularly notice the curves beneath your neck and low back. Are they closer to the ground than when you began? How do your shoulders contact the ground? Do you notice a sense of more of your spine and rib cage being on the ground than when you first began this exploration?
Integration: Seated Spinal Twist
1. Sit in a comfortable position on the ground. Extend both legs long in front of you. Pick up the right foot and cross it over your extended left leg, placing the foot on the floor to the side of your left thigh. The closer you can bring your right foot toward your left hip, the more comfortable you will be in this position.
2. Interlace your fingers in the nonhabitual way (see Integration: Spiraling Up to Sitting, page 166) and cup the knob of your right knee in your palms (fig. 13.28). Close your eyes and experience the sensation of holding your right knee in your hands. Allow your shoulders and arms to remain relaxed and heavy. Notice the contact your sitz bones make with the ground.
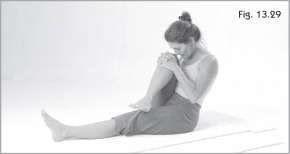
3. Keeping your fingers interlaced, lift your right knee toward your chest and give yourself a good squeeze. Rock back onto your sacrum and slightly curl your spine as you squeeze the knee (fig. 13.29).
4. Keeping your fingers interlaced but turning your palms away from you, press the knee down against the lower extended leg (fig. 13.30). Press and release a few times until you get the sense of allowing pressure to build.

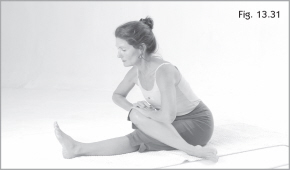
5. Now alternate the movement between squeezing your right knee in toward your chest and then pressing the right knee down onto the left leg. Use your breath and allow a rolling rhythm to build in the spine. As you press the knee down each time, let the torso roll out over the knee, as in the Dolphin movement (fig. 13.31). Experience what is happening in the hinge of your hips. Notice how the lower leg is being supported to release toward the ground.
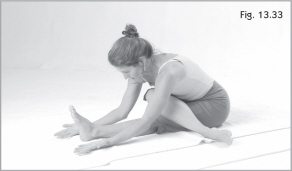
6. Open your palms to the ceiling, as if you were holding a platter in your hands. Put an imaginary ten pounds of weight onto the platter. What would you hold—oranges, shoes, seashells? With your imaginary weight, begin to bend at the hinge of the hips and lengthen your torso over your thighs to place the platter on the ground in front of you (fig. 13.32). Using your exhaling breaths to lengthen and lower further, move to your natural extension (fig. 13.33).
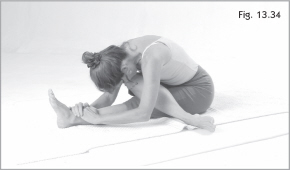
7. Release the imaginary tray and lower your palms to rest on your extended lower leg (fig. 13.34). Do not use your hands or upper body strength to pull or to force yourself down toward your thigh. Allow the natural weight of your torso to hang. Release the weight of your head and shoulders to hang.
8. Breathe into the sensations of the stretch in the lower leg. Rock from sitz bone to sitz bone. See if the rocking allows you to release any of the pressure you may feel in the legs.
9. Slowly release the forward bend by lengthening through the sternum and crown and then walking your hands back up to your right knee (fig. 13.35).


10. Hold the right foot with your left hand and extend your right hand to the ceiling. Lengthen from the little finger side of your arm as you open the right side of your body. Shift your gaze up to see the airborne hand (fig. 13.36). On your next exhaling breath lean into your sitz bones and begin to sweep your arm around behind you, following the movement with your eyes (fig. 13.37).
11. Plant your hand on the floor behind you, walking the heel of your palm in as close to the base of your spine as is comfortable. Lean back into the supporting arm as you roll your right shoulder down and away from you (fig. 13.38).
12. Following your gaze, elongate through the neck and look with your eyes from one shoulder to the other (fig. 13.39), allowing the deepening of your breath all the way down into your belly to help you twist a little further each time you exhale.
13. You have placed your body in a supported position to begin deep three-part breathing into the length of your spine. Exhale all of the breath, following the exhale to the point where your navel moves in toward your spine. Inhale into the lower belly, then into the kidneys, and finally the sternum. Soften your gaze over the right shoulder. At the top of your inhaling breath, tuck the chin slightly and hold the breath in. Then release the exhale from the sternum, then the kidneys, and finally from the lower belly. Continue to hold the twist for another five cycles of three-part breathing.
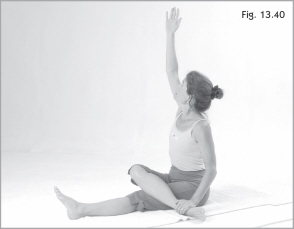
14. Slowly begin your return by lengthening your right arm, sweeping an arc overhead and following your hand with your eyes (fig. 13.40). Rest your palm on your lap. With your eyes closed, sit for a moment and experience the sensations of being in this position.


15. Open your eyes, uncross your right leg, and extend both legs on the ground. Close your eyes and experience the difference between the two legs. Does one leg feel longer than the other? Does one hip, buttock, and thigh feel closer to the ground than the other? Do you notice any difference in the way the two sides of your ribs move with your breath? When you feel ready to transition to the other side, slowly open the window of your eyes.
16. Pick up the left foot and cross it over your extended right leg, placing the foot on the floor to the side of your right thigh. Recalling the details of this movement from the first side, begin to enter your exploration of the Spinal Twist to this side.
Balancing the Upper and Lower Body in Seated Forward Bend
Inquiry: How do we channel awakened energy from whole-body movement into introspection?
All seated postures are forward bends. Even when sitting in a chair the spine and legs are at a right angle, pivoting at the hinge of the hips. Making adjustments that bring your sitz bones to the ground and elongate the spine dramatically affect the quality of your experience of energy flowing throughout the open channel of your body. For example, it requires a lot of work to hold yourself up in a position in which the spine is hunched and you’re rolled back onto your buttocks and sacrum rather than sitting upright on your sitz bones. Increasing the flexibility of the hinge of the hips and toning the abdominal muscles to support the spine allows for relaxed, effortless sitting and opens the communication lines between the upper and lower body
The first exploration below, Basketball Knees, helps to release the hamstring muscles in the back of your thighs. Hara Walk brings energy to the abdominals for supporting the spine. Half Tortoise and Tortoise open the hinge of the hips. When you are ready to relax into Seated Forward Bend, your awareness will be drawn like a magnet into the deep reservoir of inner stillness and tranquility. The posture itself produces a circuit of prana that cycles from the crown of your head through the soles of your feet. In the deep tranquillity arises a clear mind that can bring steady concentration to any point of focus you choose.
The key to opening into these powerful energetic effects lies in one word—relaxation. If you are not comfortable or supported in the posture your attention will be drawn toward managing discomfort. At the beginning of the instructions for Seated Forward Bend are some special directions for creating support. You will be guided through a dynamic phase of entering the Forward Bend and then into a regenerative phase in which you hold the pose.
Exploration 1: Basketball Knees
1. Here is a fun way to begin opening your legs. Come into an easy seated position with your legs extended. Place both of your hands on your right knee and begin to press into your knee as if you were dribbling a basketball (fig. 13.41). If you let go in your leg, the back of your knee will relax into a slight bounce. Play with this movement a bit; when you get the hang of it, your whole leg will move in response to the bouncing basketball knee.
2. Dribble the ball down court by allowing your knee to travel out to your side and back in toward the midline (fig. 13.42). If you lift the knee toward your chest, you can take a jump shot, sending the heel and then the leg back down to the ground in front of you (fig. 13.43).
3. Pause for a moment and feel the difference in the way your two legs contact the floor. Do you notice how the hamstrings and calf muscles have released? When you are ready, move to the other leg. As you get more playful with this exploration, you may want to move your hands along to different positions on your thigh as the contact point.
4. Now dribble both knees at the same time. Get a little outrageous and allow the legs to separate and then come back together. Experience what wants to happen as you let go of your legs in this way.
5. Return to stillness. Allow your eyes to close and experience the release that is happening your legs. Has your mood altered from playing with your legs in this way?


Exploration 2: Sitz Bone Hara Walk
1. From an easy seated position on the ground, extend both legs. Send the heels away from you, which will have the effect of bringing the backs of your legs in closer contact with the ground (fig. 13.44). Rock from side to side and find the contact your sitz bones make with the ground. This movement is a way to energize your abdominal muscles by walking from your sitz bones. It is also called the bun warmer, which should give you some idea as to how you are about to move.
2. Make fists and extend your arms over your legs. Inhale to lift one sitz bone and leg (fig. 13.45); as you exhale, send the whole leg forward, stretching through the heel to land this leg about an inch past its partner.
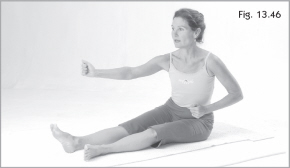
3. Perform the same movement on the opposite leg. On your exhaling breath, begin to make the sound “h-a-a-a-a-a-a-a-a,” which activates your belly center. You can throw a punch with your fists and arms to help you propel forward (fig. 13.46). Reaching one leg and then the other while punching and scooting by the sitz bones, you will begin to travel across the floor.
4. Pick up the pace until you feel as though you are moving from your hara. You will know you are in the ballpark with the energetics of this movement when your forward walk starts to glide your underwear up in a bundle. Before getting too bundled, begin to walk backward, using the same dynamics of sitz bone walking and hara punching.
5. Go back and forth a few times until all seriousness has vaporized and you are having some big fun with the movement.
6. Relax. Let go of the movement and flop back on the ground (fig. 13.47). Without trying to control your breath, allow your breathing to gush in and out. As the breath normalizes, allow your eyes to close and begin to notice the pulsing in your abdomen. Notice how you have been using the core muscles of your lower abdomen to power your whole-body movement. Notice how you have been in a seated forward bend for this whole time, using movement and breath to open your body into the position.



Exploration 3: Tortoise
1. Sit in a comfortable position on the ground. Bring your right knee upright, placing your right foot on the floor. Allow your left knee to be bent and relaxed out to your left side on the floor. Grasp the knob of your right knee with your left hand (fig. 13.48).
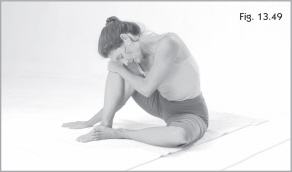
2. Thread your right hand under your right knee and slide your right hand along the floor out to your right side. Lower your right ear on top of your left hand and rest the weight of your head on your upright knee (fig. 13.49). Using your right hand on the floor as an anchor, begin to rock your body from one sitz bone to the other, back and forth. Let the rocking create relaxation in your body as you hold this interesting position (fig. 13.50).
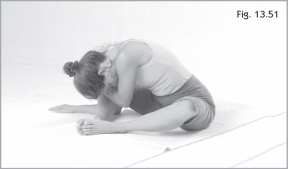
3. Lower your head toward the floor and reach the right hand a little further out on the floor to your right (fig. 13.51). Experiment with how much of your right shoulder you can get underneath the bridge of your right knee. Again, as you reach a comfortable stretch, begin to rock and release any tension in your neck, jaw, or face. Let your head hang heavy. The heavier your head is, the more your shoulder will tuck under your knee.
4. Now reach your right hand all the way around your right hip, placing your palm on or close to your right hip pocket. Lower your head and rock into the position.
5. Release your right knee with your left hand and reach your left hand all the way around behind your left side (fig. 13.52). See if your hands can hold on to each other or make contact. If they do not touch, you can hold on to a sock so you feel the contact of your hands together behind your back. Lower your head once again and begin to rock into this stretch (fig. 13.53).




6. Release your hands and arms, stretch both legs long, and notice the difference between the two sides of your body (fig. 13.54). When you are ready, repeat this sequence of movements on the left side. Feel free to invent variations that help you to explore the opening in your hips.
7. Release your hands and arms, stretch out both legs, and notice the effects.
8. Moving to a deeper level of awareness, begin to press your sitz bones downward into the ground. Does pressing into the sitz bones anchor you to the ground? Do you feel an energetic lift through the spine when you exaggerate the press in your sitz bones?
9. Imagine that your head is a helium-filled balloon. Notice how your head hovers above your spine when you breathe into the balloon of your head.
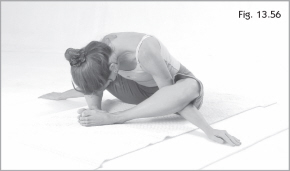
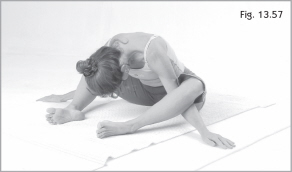
10. Now we will move into Tortoise pose. Bring both knees upright, placing your feet on the ground. Thread your right hand under your right knee and slide your right hand along the floor out to your right side (fig. 13.55). Thread your left hand under your left knee and slide your left hand along the floor out to your left side (fig. 13.56). Lower your head and your torso as low to the ground as is comfortable and begin to walk your hands further and further apart (fig. 13.57). When you reach a comfortable stretch, begin to breathe and to rock, releasing any strain or tension as you hold the stretch. Keep your head as heavy as possible. With your arms peeking out from under your knees, do you get an idea of why this pose is called the Tortoise?
11. Begin to walk your heels out, lengthening your legs and noticing how the weight of your knees begins to bring your arms lower to the ground (fig. 13.58). Do not overstretch, but allow yourself to walk your legs out as far as they can go without straining. From sitz bone to sitz bone, allow your breath to take your torso closer and closer to the ground.


12. When you are ready to come up, walk your heels back in until your knees are once again upright and the soles of your feet are on the ground (fig. 13.59). Just for fun, reach both hands under both knees and see if your hands can make contact with each other behind your back (fig. 13.60). However far you go into the stretch, hold for just a moment. Relax your head, rock, and breathe.
13. Release your hands and arms, stretch both legs long, and lie on your back. Observe the effects of this stretch deep in the hip and shoulder. Do you notice any pulsing, streaming, or tingling sensations? Allow your breath to flow in and out without attempting to control or inhibit it in any way.
Integration: Seated Forward Bend
1. Here is a set of special instructions for supporting your body in this integration pose.
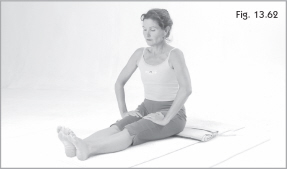
2. Sit on the ground with the support of the padding as outlined above (fig. 13.61). Using your hands, roll the flesh of your buttocks apart, allowing your sitz bones to come in contact with the blanket on which you sit. Again, use your hands to roll your thighs inward toward each other, suggesting to the muscles through your touch that the inner thighs roll inward for the Forward Bend (fig. 13.62).
3. Lengthen through your heels, allowing them to move toward the wall in front of you. Rest your hands on your legs or to your sides. Allow your eyes to close and notice the attention to details that has brought you into this precise preparation. Now you can relax all the fussiness and begin to slow down and enter the time in which your body lives. Suggest to your logical mind that you are entering a posture that allows you to stimulate a flow of sensation that can induce a deep state of clarity, focus, and concentration.
4. Notice the way you are breathing. Begin to relax more fully into the sensation of your breath. Deepen your breath, entering the three-part breath by inhaling into your belly, then your kidneys, and finally into your sternum. Exhale in the reverse sequence. With every inhaling breath, imagine the torso lengthening from the sitz bones to the crown. With every exhaling breath, notice how your sitz bones press into the ground, the muscles of your pelvic floor squeeze upward, and your chest, ribs, and shoulders soften and relax.
5. Place a bolster or a stack of cushions on your thighs. On your next full exhalation, fold your arms behind your low back and release the shoulders away from your ears (fig. 13.63). Pause in this position, noticing how having your arms behind you allows you to center your head over your spine, your spine grounded in the sitz bones. Imagine your head is floating above your spine, hovering like a helium-filled balloon.
6. Keeping the three-part breath going, think of a string being attached to your sternum. As you exhale, squeeze the lower abdominals and begin to lengthen the sternum toward the wall in front of you (fig. 13.64).
7. Moving in gradual increments, notice how lengthening through the sternum allows you to bend from the hinge of your hips. As your torso moves further forward, your buttock muscles roll open and your tailbone lifts out behind you. Your inner thighs roll inward and your heels lengthen away from you. Your head remains a long extension of your spine with your chin slightly tucked, the back of your neck remaining long.



8. Entering deeper levels of concentration, allow your awareness to travel sequentially into every part of your body.
9. When you have reached the full length of your spine, with your torso elongated over your thighs, release your arms from behind your back. Sweep your palms along the floor and lower your torso over the bolster (fig. 13.65). If the bolster is wide enough to support your arms, reach your arms over the bolster. Otherwise let your elbows drop down toward the ground and release the weight of your torso over the bolster.
10. As you settle the weight of your torso over the bolster, make any microadjustments that allow you to enter the regenerative phase in Forward Bend. Bring awareness to the three-part breath; with every exhale release the weight of your head, your shoulders, your ribs, and your abdomen into infinite degrees of relaxation. Notice the sensations that pulse through your body. Allow your awareness to ride the waves of calm, steady sensation. As discomfort arises, make any adjustments that return you to the place of serenity and peace in the center of your being. Surrender into the wisdom of your organism as every dimension of your being is bathed in prana.
11. Allow yourself to receive from every dimension of your universe, becoming integrated and at peace in your center. Suggest to your logical mind that you will be returning with the knowledge and wisdom of being at home and at peace in your center.
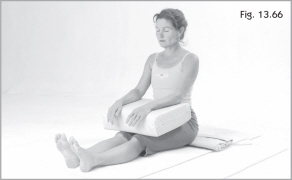
12. Gradually begin your return by deepening your breath. Pressing into the sitz bones and lengthening through the crown of your head, begin to reach through the sternum to lift the long line of your spine back into the upright Seated Forward Bend (fig. 13.66). Allow your shoulders, arms, and hands to glide, hanging heavy and remaining relaxed as you return to sitting.
13. Remain with your eyes closed and experience the natural support of your torso. Notice where you have gone inside yourself. Notice the way you feel when all expressions have melted from your face and you are at home in your center.
14. When you feel ready, allow the windows of your eyes to slowly open. Receive the world into your center. Allow your body to move and stretch, letting emerge any sounds that come with your movement. Find any movement or posture your body is calling for that will provide a counterstretch and will move energy into your limbs.
15. What possibilities are now open for you to walk into a new future generated from accessing all dimensions of your being?
Before Moving On . . .
The inquiries of this chapter have presented movements that open the hip joints for entering Hero, Seated Spinal Twist, and Seated Forward Bend in such a way that you can follow the sensations that arise into deeper explorations of your inner connection to time. Lodged in the core muscles of your body are residual layers of stress that are imposed upon the body when your ordinary state of mind is operating from an urgency around time—that there is not enough time to do everything that needs to be done. In this mode, the body unconsciously becomes a slave to fulfill our ever-growing to-do lists. Entering these postures requires slowing down into the time it takes to feel the sensations that arise in the hips and legs, the spine, the shoulders and neck. The twist offers an opportunity to stay grounded in the sitz bones and pelvis while turning toward the past in one direction and toward the future in another. In Seated Forward Bend you have the opportunity to slow down, to spiral inward to the core of your inner self for even greater introspection into the experience of the present moment. Being willing to slow down to the time in which your body lives is nothing short of a hero’s and a heroine’s journey.
The traveler is heroic from the very beginning of this journey into self-awakening. The courage to inquire into the nature of your inner experience begins in the state of mystery as to what will be revealed. And yet, all that is revealed along the journey are reflections of who you already are. The intention when entering the inquiries of Self-Awakening Yoga is the expansion of consciousness through becoming aware of your body’s own wisdom. In concluding the inquiries of this chapter, you have traveled through a comprehensive network of explorations that have included every part of your body, each revealing an interconnection of patterns that remind your organism of its natural freedom to move. While the movements have been releasing inefficient neuromuscular habits and restoring balanced working relationships among the various segments of your physical body, the intelligence of your organism has been simultaneously communicating directly to your mental perceptions of self through the language of sensation. Awareness of sensation has the effect of amplifying and intensifying the actual movement of energy or prana throughout your body. Prana is the name used for the aspect of this energy that is intelligent and that stimulates the evolutionary impulse in all forms of life. In recognizing the presence of this intelligent force at work in your body, you have expanded your consciousness to include the wisdom that is guiding the unfolding of your organism, the same wisdom that is guiding the unfolding of the universe. In this expansion of the perceptions you hold about who you are, you have the opportunity to witness that the wisdom of the macrocosm is encoded in the microcosm of your world.
All of the inquiries to this point, culminating in Hero, Seated Spinal Twist, and Seated Forward Bend of this chapter, have allowed you to maintain close bodily contact with the ground, enabling you to explore the support of the ground beneath you. Maintaining this low center of gravity provides a safe and supported way to rediscover the working relationships of your body’s movement. Staying close to the ground enables you to retrace the development of your organism from infancy to maturation and to strengthen and balance all of the muscular patterns that interact to maintain your balance in a standing position. The benefits of your inquiries have hopefully made some noticeable differences in your standing postures as you have progressed through these chapters. The miraculous event of standing is the outcome of the learning your organism has undergone in its journey from being bound to the earth on belly or back to coming all the way up into Standing Mountain pose.
In the next chapter we explore Standing Mountain pose. The results of all of the inquiries to this point are now interacting to aid you in the discovery of how you can maintain an upright, balanced standing position, with your weight distributed evenly along the axis of your spine.