
Old piece of printed tin, flattened
10–12 size 6° seed beads
7" (18 cm) of 20-gauge sterling wire
Fine-point Sharpie marker
Metal shears
Sanding block
Metal file
1.5 mm metal hole-punch pliers
1 mm hooked-jaw dimple pliers
Steel ring mandrel
Flush cutters
Round-nose pliers
Chain-nose pliers
11⁄2" (3.8 cm)
1. Trace the template onto the back of the tin and cut out the shape with metal shears. File all sharp edges with the sanding block and metal file if necessary. Repeat for the second earring.
2. Make a hole at both tips of both pieces of tin, 3–4mm from the end, with the hole-punch pliers. With dimple pliers, punch equally spaced dimples all along both edges of both pieces.
3. Gently fold the tin pieces around the large end of the ring mandrel, bringing the ends within 3⁄4" (2 cm) of each other.
4. Cut the 20-gauge wire in half. Grasp one wire 1⁄4" (6.5 mm) from one end with the tip of the round-nose pliers and make a hairpin bend. Make a 90° bend at the end of the hairpin bend with the long wire. Thread the wire through one earring, from the outside of the tin shape to the inside (Figure 1).
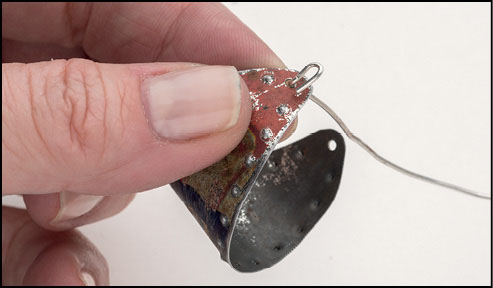
Figure 1
5. String enough seed beads onto the wire to fill the space between each side of the tin hoop (Figure 2). Exit the wire through the opposite hole.

Figure 2
6. Bend the wire straight up against the earring and gently fold the wire over your finger or a ring mandrel to shape the ear wire. Trim the wire short enough to pop into the hairpin bend and tip the end up so it will catch (Figure 3). File the end of the ear wire smooth. Repeat Steps 4–6 for the second earring.

Figure 3
1 mm hooked-jaw dimple pliers: beaducation.com.