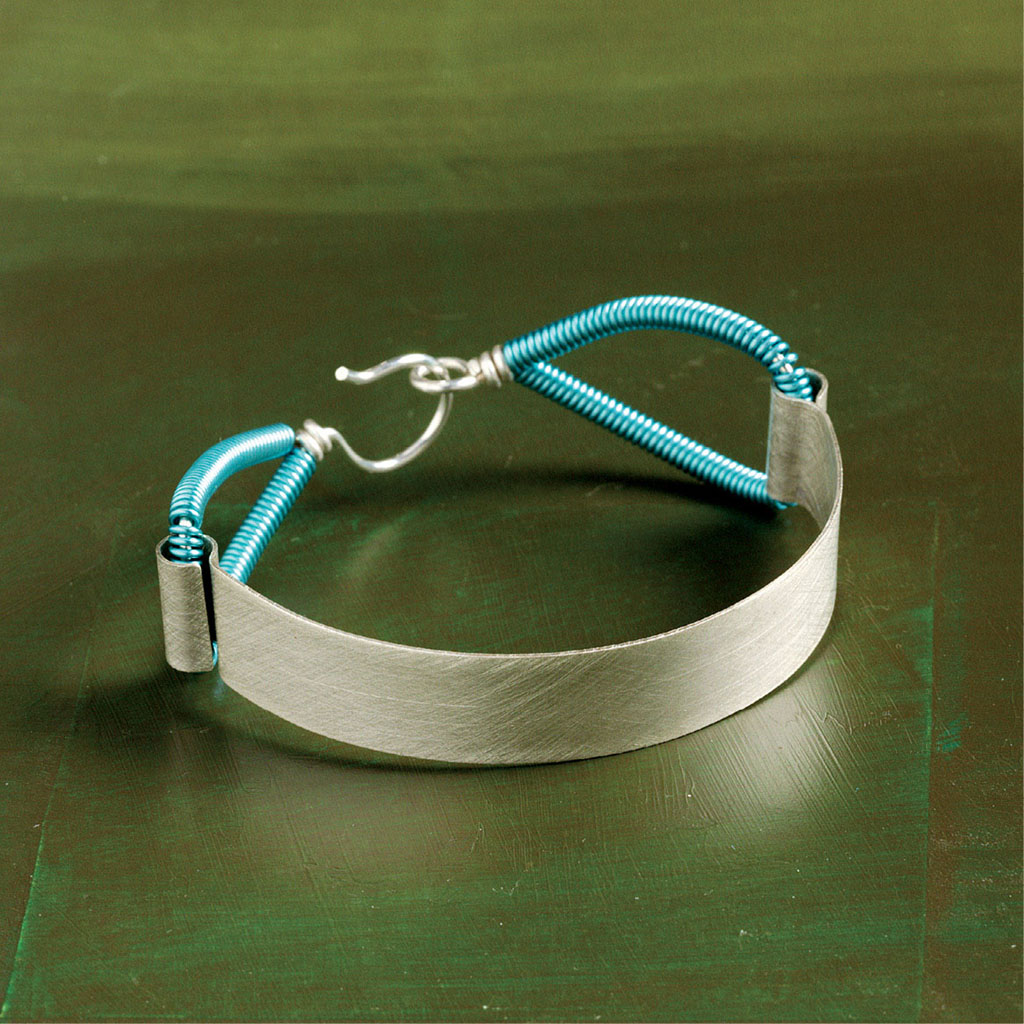
5" (12.5 cm) of 1⁄2" (1.3 cm) wide 24-gauge flat sterling strip or 24-gauge sheet metal
14" (35.5 cm) of sterling 16-gauge round dead soft wire
6’ (1.8 m) of colored copper 20-gauge round wire
Metal shears
Ruler
Metal file
Bracelet mandrel
Nylon mallet
4 mm bail-forming pliers
Sanding sponges, various grits
Coiling Gizmo
Flush cutters
Chain-nose pliers
Round-nose pliers
Chasing hammer
Steel bench block
Rotary tumbler
Mixed stainless steel shot
8" (20.5 cm)
1. Cut a 5" (12.5 cm) length of 1⁄2" (1.3 cm) wide flat sterling strip (or cut a 5" × 1⁄2" [12.5 × 1.3 cm] strip from a piece of sheet metal). File the corners round and smooth the edges.
2. Wrap the 1⁄2" (1.3 cm) strip around the bracelet mandrel and work-harden with the nylon mallet, except for 3⁄4" (2 cm) on each end. Spend several minutes hammering the wire to make it very stiff and hold its shape. Focus the strikes on the back area of the band.
3. Grasp one end of the flat wire in the jaws of the bail-forming pliers. Start to roll the wire around the pliers (Figure 1). Roll about halfway and then flip the wire around and roll again. Repeat on the other end. It is totally personal preference whether your loop rolls toward the inside of the band or toward the outside. I happen to like the shadow line that rolling toward the outside makes.
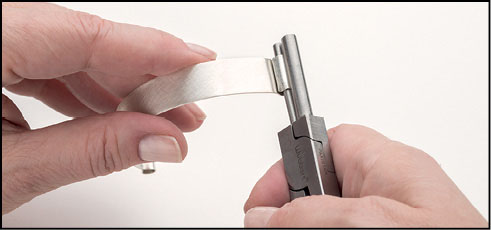
Figure 1
4. For an etched look, use three coarse grades of sanding pads and randomly rub in different directions all over the surface.
5. Using the Coiling Gizmo, make 2 coils from the 20-gauge colored copper wire, each 3" (7.5 cm) long. Slide one of the coils onto a 7" (18 cm) piece of 16-gauge round silver wire. Center the coil on the wire and then pass it through the loop in the flat wire. Center the coil in the loop so that there are equal amounts of coil showing on either side (Figure 2).
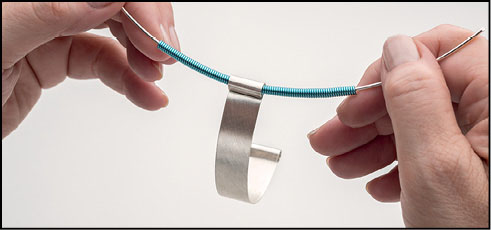
Figure 2
6. Bring the ends of the coiled area together. Wrap one end of the 16-gauge wire around the other just beyond the coil, as if making a wrapped loop. Trim the excess wire and file smooth. Trim the remaining wire to about 5⁄8" (1.5 cm) and use round-nose pliers to form a simple loop. Form a slight arch in the coiled area to follow the curve of a wrist.
7. Repeat the previous steps with the second coil on the opposite side of the bracelet, stopping at the point where you need to form a simple loop. Instead, use the round-nose pliers to shape the tail wire into a hook for a clasp. Trim any excess wire beyond the clasp and file the cut end smooth (Figure 3).
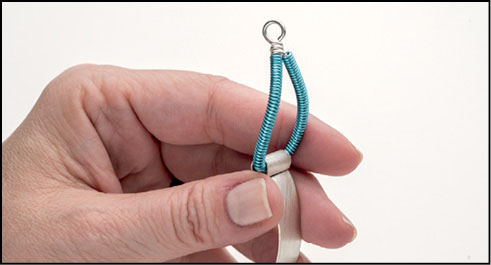
Figure 3
8. With a chasing hammer and bench block, flatten the arch of the hook. Note: So that the clasp hugs your wrist, doesn’t easily come loose, and doesn’t snag on things, be sure to position the hook so it is lying flat against your wrist. The catch side of the clasp—the loop—should be perpendicular to that. The loop is small enough that it shouldn’t stick out too far from your wrist.
9. Tumble for 45 to 60 minutes to further work-harden the metal band and polish all the wire.
Sterling strip or sheet metal: riogrande.com. Colored wire: parawire.com.