What should and should not be ironed … Sprinkling or dampening before ironing … Ironing temperatures … Techniques for pressing, ironing, and steam ironing … Airing the ironing, and avoiding underironing and overironing … Ironing clothes, flatwork, linen, table linens, sheets … How to avoid ironing … Starches and sitings … How to clean the iron
Ironing gratifies the senses. The transformation of wrinkled, shapeless cloth into the smooth and gleaming folds of a familiar garment pleases the eye. The good scent of ironing is the most comfortable smell in the world. And the fingertips enjoy the changes in the fabrics from cold to warm, wet to dry, and rough to silky. There is nothing hke keeping the hands busy with some familiar work to free the mind. You can learn Italian while you iron, as a friend of mine did, or you can simply think.
What to Iron
Untreated cotton and linen woven fabrics almost always need ironing to look their best. Outer clothing made of such fabrics is a top ironing priority. Tablecloths, napkins, curtains and draperies, doilies, dresser scarves, and similar decorative pieces often do not look good without ironing, and since they exist at least half for appearance’ sake, it is worthwhile to iron them.
Sheets, pillowcases, and flat-woven dish towels are a different matter. They need not be seen, and they do not function better if ironed. If you are short on time, you should eschew the luxury of ironed sheets and dish towels. But they are indeed luxuries to enjoy when you can. Crisp, smooth sheets dramatically change the aesthetic appeal of your bed and heighten your sense of repose. Pretty ironed dish towels make the kitchen look cared for when they are hung out, and, when you change them following a morning or evening cleanup, they provide a ready symbol of freshening and renewal. Such things enlarge the vocabulary of your housekeeping, give you more attractive things to say with it. On the practical side, a newcomer to the kitchen can be sure that an ironed towel is fresh.
You need not—and should not—iron terry-cloth towels and washcloths; small rugs and mats; diapers; mattress, crib, and bumper pads; comforters or other filled articles; sweatpants and sweatshirts; spandex stretch tights and other stretch athletic wear; seersucker; or pile fabrics such as velvet and chenille. Some people like to iron men’s cotton knit underwear, woven cotton boxer shorts, and women’s knit and synthetic-fiber bras and panties. This is fine for those who like both the work and the result, but unnecessary.
You may be satisfied with the way permanent-press and wrinkle-resistant clothes and linens look with no ironing at all, but these articles vary in just how wrinkle-resistant they are. Wrinkle-resistance may also decrease after many launderings. Permanent-press treatments are sometimes more accurately called “durable press” because they actually last through about fifty launderings. Many permanent-press clothes and linens look better after some touch-up ironing. You must consult your own priorities and tastes as well as the appearance of the garments to determine whether and how much you wish to iron them.
Try to avoid ironing clothes after they have been worn. This sets in stains and makes dirt harder to remove.
Sprinkling Clothes and Linens
Permanent-press and synthetic fabrics sometimes iron well when dry, and, if they do not, a steam iron will supply all the moisture necessary. These fabrics usually need little or no ironing anyway. When some smoothing is desirable, their thermoplasticity makes them responsive to the warmth of the iron alone.
Untreated cottons, rayons, and silks must be slightly damp to iron out properly. They should feel as though you had left them outside overnight in summer and they became damp with dew Linen should feel even more damp. The easiest way to get things this damp is to remove them from the dryer or line before they have gotten entirely dry. But this is not always convenient to do. When it is not, you can render them damp either by using a steam iron or by sprinkling them with water.
Sprinkling clothes is a little more trouble, but cottons and linens are far easier to iron and look far better after sprinkling than steam ironing alone. When fabrics are properly sprinkled, the moisture has a chance to penetrate the fibers and spread uniformly throughout the fabric. Steam from the iron does not penetrate so deeply or so uniformly.
The best procedure is to sprinkle clothes the night before they are to be ironed so that the moisture permeates the cloth. If you cannot do this, allow at least an hour before you will iron. Clothes that will sit overnight before ironing should be placed in a tightly closed plastic bag and stored in the refrigerator or someplace else cool; otherwise there is danger of mildew. If they will not be ironed within twenty-four hours, put them in the freezer. Chilled, sprinkled fabrics make for smooth and pleasant ironing.
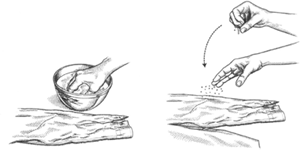
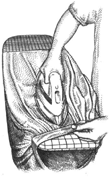
Sprinkling clothes by hand to dampen for ironing
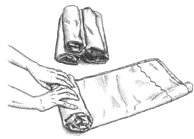
Rolling sprinkled pillowcases for ironing
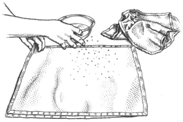
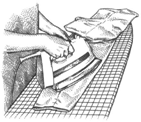
Stacking and sprinkling napkins
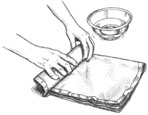
Rolling stacked and sprinkled napkins for ironing
Some people like to spray fabrics with plain warm water from a spray bottle or to sprinkle with a sprinkle bottle. I find spray bottles to be a nuisance in dampening as they tire your hand (though they are good for dampening spots during ironing). You can make a sprinkle bottle by punching holes in the lid of a screw-top jar, testing it until it works to your satisfaction.
If you prefer sprinkling by hand, as I do, fill a basin or sink with the hottest water that is comfortable to your hand (because warmer water spreads more quickly) and dip your fingers in. Then shake them with a snap over the fabric with your palm facing you (as though you were making the familiar hand-and-finger gesture that means something like “I’m impressed”). Whether you use bottles or sprinkle by hand, you very lightly scatter water drops all over the article until it is covered with droplets as evenly spaced as you can manage. Shirts, dresses, pants, pillowcases, and other articles with fronts and backs must be sprinkled front and back, but flatwork, such as sheets, tea towels, or tablecloths, need be sprinkled only on one side. Experience, and nothing else, will finally enable you to judge with great accuracy whether you have sprinkled enough or too much. Linen should be sprinkled damper than cotton.
When the garment has been sprinkled, fold it lengthwise until it is narrow enough to make a conveniently sized roll; then roll it tightly. If the roll is not tight, the moisture will not be able to spread evenly through osmosis and the garment will dry. Store the rolls in a clean plastic bag or cover them with something that will not permit the moisture to evaporate. If you have slightly damp clothes from the dryer or line that you intend to iron, you must roll and cover and store them the same way to avoid their drying prematurely or mildewing.
You can roll up a stack of sprinkled napkins or dish towels. Or if the fabric is thin, as with handkerchiefs, sprinkle only every other one and then roll up the stack. The water will spread from the sprinkled ones to the unsprinkled, and they will not be too damp.
In deciding how damp to make your cloth, allow for the dampening effect of spray starch or sizing, if you plan to use it. If an article is too damp, simply spread it out to the air and let the moisture evaporate a bit while you iron something else.
Ironing Temperatures
The international symbols for ironing temperatures consist of one, two, and three dots.
One dot: cool (low temperature—248°F; 120°C), synthetics
Two dots: warm (medium temperature—320°F; 160°C), silk and wool
Three dots: hot (high temperature—370°F; 210°C), cotton and linen
These suggested temperatures are roughly appHcable to the categories indicated. Consult chapters 16 and 17 with respect to particular textile fibers and “General Ironing Strategies,” below, for more specific information on proper ironing temperatures.
My unscientific impression is that many irons today do not reach particularly high temperatures, even when set for maximum heat, and that it can be hard to get heavier cottons and linens to look good. Higher wattages indicate more heating power. If you can pick up an old iron (with an intact cord and plug) at a second-hand store or tag sale, you might find it useful on clothes or linens that need a really hot iron.
Before Beginning
Your ironing board should be well padded and covered with a smooth, secure, clean, heat-resistant cover. Make sure that there are no mineral deposits inside the iron or in its steam holes and that the soleplate of your iron is clean. Mineral deposits or scorched material on the soleplate will come off on whatever you are ironing. If you have any doubts, heat and/or steam up the iron and test it on a rag. (See “Cleaning and Maintaining Your Iron,” below.)
Also test the iron’s heat before beginning so as to avoid scorching or melting the fabric with an overhot iron. Test on a rag of similar composition or on an inconspicuous place on the garment.
Ironing Techniques
Pressing. The terms “ironing” and “pressing” are often used interchangeably, but they are in fact different things. In ironing, you slide the iron back and forth over the cloth; in pressing, you simply press the iron in one spot and then lift it. Pressing is used on tailored and lined suits, especially men’s, on wool, on some silks and rayons, on net, and on pile fabrics. Pressing is used to avoid crushing the cloth, giving it a shine, or stretching or scorching or otherwise harming it with the heat of the iron. This is done partly by not sliding the iron and partly (and usually) by using a “pressing cloth.” This is simply a cloth that you lay over the fabric, pressing through it rather than touching the iron directly to the garment. Use unbleached muslin, white cheesecloth, or just a clean white dish towel for a pressing cloth. There are translucent pressing cloths that let you see what you are doing. A pressing cloth is sometimes used in ironing as well as in pressing.
Most pressing is best done professionally. At home, we usually wish to do only a little touching up by way of pressing. But it happens that one finds oneself with a wrinkled suit and an appointment when the dry cleaner is closed for the holiday, and home pressing has to be done. On these occasions, the best thing to do is to do as little as possible. First try steaming out the wrinkles, with a hand steamer if you have one or in the shower if you don’t. Then try to press out intractable wrinkles. Using a dampened pressing cloth and working only on the wrinkled areas, apply the iron with a slight pressure and then lift quickly. Press on the wrong side as much as possible. Beware of creating shiny areas or seam marks on seams, lapels, and pockets by pressing too hard or too long. If you should happen to create a shine, try gently brushing with a clothes brush to remove it, or rub gently with a slightly moistened clean sponge or clean white face cloth or towel.
To Press Wool. Put a heavy, nonlinting, nonbleeding terry-cloth towel under the garment to prevent seams and folds from leaving imprints on the garment’s surface. Press on the wrong side using steam or a damp pressing cloth and medium iron. Wool will develop an unpleasant shine if the iron directly touches the right side. Lift the iron after each pressing. Do not go back and forth, as this will stretch the fabric, and iron in the direction of the weave. Do not iron the garment until it is absolutely dry; stop when the fabric is smooth and almost undetectably damp.
To Press Silk Ties. Press on the wrong (back) side. Lay thick silks or ties on a terry-cloth towel. Place a dry pressing cloth over the article. If wrinkles will not come out, place a damp pressing cloth over the dry one.
General Ironing Strategies. Whether you are pressing or ironing, you lay the article on the ironing board and smooth it out. Iron as large an area as you can, then put down the iron so that you can use both hands to rotate the article around the board in preparation for ironing a new area. When you are ironing, one hand works at smoothing the garment and pulling it taut while the other works the iron. When you put down the iron, either stand it on its heel or place it on a nonflammable stand.
In real ironing, as opposed to pressing, you use moderately paced, steady back-and-forth strokes of the iron, with slight downward pressure; you usually press down more heavily on the forward strokes than on the return motion. Today’s irons are very lightweight. Some people, myself included, find that ironing is easier with a heavier iron with a very smooth stroke. The weight means that you have to apply less muscle power.
Ironing a shirt collar
Ironing a gathered skirt
Ironing a pant leg
Steam Ironing. Wait until the iron is hot enough to steam the water. When you have not sprinkled the clothes damp, steam is helpful in ironing practically any fiber. Choose a proper steam level for the fiber—most for linen, down to practically none for 100 percent thermoplastic synthetics. Use the steam button to eject a steam spray on cuffs, collars, and other thick places.
Airing the Ironing; Avoiding Under- and Overironing. It is a basic rule of ironing that you iron things until they are dry. If you leave things too damp, they will feel rough and look rumply afterward. They may also develop a faint unpleasant odor or mildew if you put them away in that state.
But there is dry, and then there’s dry. Some people overiron in an effort to get the article bone-dry. This is a mistake. Scorching, yellowing, or melting of synthetics are some of the obvious effects of overironing. Shininess, brittleness, and a harsh hand can also be produced. You should stop ironing just a fraction of a degree before the flat of the cloth is perfect for use and wear, letting the last tiny increment of moisture evaporate from the heat of ironing. At this point, when the flat has a bare suggestion of dampness in it, the seams will be slightly more damp than this, but that is all right, for now you are going to air the ironing. Airing carries off the excess moisture without the dangers of overironing. One hundred years ago the ironing was aired religiously, usually overnight, often in front of the fire.
To air laundry in this day and age, fold or hang each ironed article carefully, but do not put it away until both flat and seams feel perfectly dry to the touch. Depending on the temperature and humidity of your room, this may take as little as a few minutes or as much as an hour or more. Folded articles may be aired on a table or shelf, but do not stack them on top of one another until the airing is completed. Shirts and dresses can be hung on hangers on a rack in the laundry room or in some other convenient area for airing. If you do not air them this way before replacing them in your closets, they are likely to carry dampness into your closets and create a musty smell that is very hard to get rid of.
Ironing Clothes. When ironing clothes, follow an order in which there will be minimal rewrinkling of the already ironed sections as you proceed. This means following three basic rules.
Some say you should also iron small parts before large parts. But I find that these three rules cover the ground thoroughly.
Ironing Flatwork. Much flatwork can be done extremely well and quickly on an electric rotary iron or “mangle.” These machines have a heated roller that presses the cloth. They take out wrinkles but do not produce quite as fine a result as hand ironing. They are now all but unknown in the United States, but they were common equipment in middle-class homes here until the early 1960s, and they remain popular in some European countries. I am told that Americans are once again beginning to ask for them; you see them now and then in appliance stores. I acquired one several years ago because our household habits produce a great deal of flatwork to iron—sheets and pollowcases, tablecloths and napkins—since we prefer untreated cottons and linens. The rotary iron saves great amounts of ironing time and effort, but it is a fairly expensive machine and uses more electricity than a hand iron.
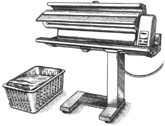
Rotary iron or mangle
Rotary irons, in the hands of skilled operators, can also be used for much clothing, especially casual wear, T-shirts, and children’s play clothes, that benefit from a quick smoothing but do not need fine, close ironing. Skilled users do shirts and dresses, too, perhaps with some hand finishing, but this takes practice. Cutwork and embroidery or other designs that create raised patterns will definitely need hand ironing, although on flatwork with decorated hems and edges you can often do the flat on the rotary iron and then finish the embroidery and lace with a hand iron. These areas need the point of the iron to get close to raised areas in the fabric.
When ironing or mangling sheets or tablecloths or other large items, lay an old but clean sheet or tablecloth on the floor so that items that reach the floor will not be soiled.
Ironing Linen. Some experts now sometimes recommend a warm, not hot, iron for linen. If linen or a blend containing linen has received resin treatments for wrinkle-resistance, it is true that you should avoid a hot iron and follow the care label instructions. (The permanent-press setting may be recommended.) In addition, very sheer and lightweight linens may iron well with a warm iron. Subject to this and other caveats about blends, resins, and finishes, however, linen is not harmed by the temperatures of a hot iron. Not only that, it is quite hard, if not impossible, to iron most linen free of wrinkles on a medium iron. Even cambric or lawn, which may not need a hot iron, will not be harmed by it unless you let the iron rest upon them until they dry and burn. It is not difficult to avoid doing this. Almost any fabric would be injured if you left a hot iron standing on it.
To iron well, linen should be quite damp—damper than cotton needs to be for good results. Steam from a steam iron is adequate for sheer linens, but I find it easier to sprinkle medium-to-heavyweight linen fabric. When you dampen, allow for the additional dampening effect of spray starch if you are using it. Stretch and smooth damp linens into their proper shape before ironing. Ironing on the wrong side, or with a pressing cloth, will prevent a sheen from developing. But on damask and other light-colored linens a sheen is desirable; these you iron first on the wrong side and then on the right side. Darker linens should be ironed only on the wrong side.
Linen is rather brittle when completely dry—and the drier it is, the more brittle—so it should not be ironed bone-dry; stop while there is still a suggestion, barely detectable, of dampness. Be particularly careful not to iron creases too dry or too sharp or the cloth might be weakened along the creases and eventually crack. (This is particularly a danger with ironed linen that is stored flat. It is best to store it unironed unless you plan to use it soon.) Hang ironed linen clothes while they still retain a hint of dampness at the seams or hems, and leave them out to air-dry. Replace them in closets or drawers only when such dampness has evaporated; this will happen quickly.
Good linen tablecloths and napkins stay crisp without starch. But if your table linens or linen clothes have gone limp (even if they shouldn’t have), starch will often restore the look you want. Fancy napkin-folding requires starch.
Table Linens. Ironing instructions are provided here; for folding instructions, see chapter 7.
To iron round tablecloths, begin at the center and work out, turning the cloth as you go.
Iron table napkins flat; do not iron in the creases.
Damasks, especially of linen, are supposed to look glossy or shiny after ironing. They are ironed on both sides, wrong side first. Fold square and rectangular tablecloths in half lengthwise and iron first on the wrong side until half-dry, and then refold and iron until near dry on the right side. Linen is brittle, especially when dry, so take special care to be sure that crease lines are not ironed dry and that you iron along the crease line gently. Remember to move any creases an inch or two at each ironing so that the cloth does not wear out along the crease.
Etiquette forbids creases on the cloth for formal dining or, at best, tolerates one middle crease line lengthwise. A crease across the middle offends the eye. If you are one of those who want no creases whatever on your cloth—not even down the length—after ironing on both sides and avoiding the center, softly fold the cloth into thirds and iron the small unironed strip down the center of the cloth. For informal dining, ordinary checkerboard squares caused by folding will be tolerated by everyone, and some, myself included, think they are pretty and fresh-looking. The rule against any but a lengthwise center crease is of relatively recent vintage; through the eighteenth century, tablecloths were purposely ironed in accordion pleats and checkerboard creases that were valued for their contribution to the table’s beauty as much as the china or silver set upon it.
If it will be some time before they are used, it is best to store tablecloths unstarched and unironed and to iron them just before they are needed. Doing this gives you very wrinkle-free cloths on the table but also creates more work and details to keep in mind at the last minute.
Sheets. The highest traditions, which are by and large extinct, should survive at least in memory. Perhaps some people will wish to adopt them on their wedding night or similarly rare and grand occasions. These dictate that sheets, especially top sheets and more especially linen sheets, be ironed. Some actually like sheets ironed on both sides.
Ironing Flat Sheets.
Long method: Fold the sheet in half crosswise (hem to hem), wrong sides together, and iron on both (right) sides. (If you wished to iron the sheet on both sides, you would first fold it in half crosswise [hem to hem], right sides together, and iron both sides—the wrong sides. You would then go on to refold, wrong sides together, and iron the right sides.) Fold again crosswise (fold to hem), creating quarter folds, and iron both sides. Fold again crosswise (fold to hem), creating eighth folds; iron both sides. Then fold lengthwise, or selvage to selvage. Fold lengthwise again, fold to selvage, twice. The completely folded and ironed sheet is divided into thirty-two sections.
Short method: Iron only once, after the initial folding in half. Then fold as above.
Abbreviated method: Fold in half crosswise (hem to hem). Iron the bottom hem, selvage edges, and eighteen inches of the top hem (the foldover portion). Then fold as above.
Ironing Fitted Sheets. Ironing fitted sheets is not necessary since they are pulled taut by the mattress and are further smoothed by the pressure, moisture, and warmth of bodies upon them. Moreover, they do not show. But some people like the more finished smoothness of ironed fitted sheets. If you are going to iron yours, you can do the fitted corners by stuffing them with a small terry towel. Or you can leave the fitted corners unironed and iron only the flat portions. Otherwise, iron as for a flat sheet.
Caution for those who never iron sheets: When I got married and joined my linen stores with my husband’s, I was initially mystified by the dozens of small but growing holes along the selvages and hems of my husband’s good-quality cotton sheets. I soon determined that the holes were caused by the creases of permanent, natural wrinkles in those places, wrinkles that did not unwrinkle even in laundering. (Cloth weakens along any permanent crease lines.) Even if you do not wish to iron your sheets, you might try ironing out just their selvages and hems now and then, to avoid getting such holes.
Starches and Sizings
Starches are plant starches, usually cornstarch nowadays, but formerly wheat or potato starch, and other substances were commonly used. Starches are used to stiffen; to add crispness, body, and glossiness; to promote sou resistance (dirt particles adhere less easily to smooth, starched surfaces); and to make ironing easier.
If you like cottons, cotton blends, and linens that have not been resintreated for wrinkle-resistance, you may also enjoy them ironed with a bit of starch. Starch is a good idea whenever or wherever you want extra body or stiffness, or when you want a garment to continue to look ironed after you’ve been wearing it for hours. I like a little spray starch on cotton shirts, dresses, and skirts. Sometimes I starch just the collars, cuffs, plackets, and perhaps the shirt fronts. If you want extra body or stiffness on some or all of a garment, use heavy-duty spray starch. Heavy-duty spray starch is also desirable when you want to fold napkins into elegant or unusual shapes. True, starched napkins are not soft to the lips, but they look more formal. Starch should not be used on sheets, underwear, diapers, towels, or filled or stuffed articles. (Back in the 1940s and 1950s, starched pillowcases were de rigueur, and I know one lady who says she still cannot sleep on an unstarched pillowcase. I like the appearance of starched pillowcases and even enjoy their crisp feel. Most people do not.) Fancy handwoven hand towels for guests—lacy, embroidered, damask, etc. (not terry-cloth towels)—are sometimes starched crisply.
Spray starch is applied as you iron. You can put liquid starch in the final rinse of the wash, using the amounts recommended on the label. If you wish to use liquid starch on some but not all of the contents of a load, do the starching separately in a clean basin.
On synthetic fibers and on blends with a high percentage of synthetics, what are called “sizings” are usually preferable. Sizings are also stiffeners. (Technically, starches are sizings too, but in supermarket products the terms are used as I describe them here.) Sizings usually contain sodium carboxymethylcellulose, a derivative of cotton that dries and stiffens when exposed to heat. You spray store-bought sizing on when you iron. Sizing is softer than starch and irons at lower temperatures. That is why it is usually recommended for synthetics, which cannot be ironed at higher temperatures. You can use it on cottons and linens, too, when they do not need much stiffness. You can make an old-fashioned sizing at home using unflavored, uncolored gelatin, available at your grocery store—use one packet to two quarts of hot water. This is good for small, delicate items that need gentle stiffening. Just dip them in, and be sure to get all the parts equally wet. Let them dry, then iron with a steam iron or sprinkle to dampen.
Cleaning and Maintaining Your Iron
Irons with nonstick soleplates usually can be cleaned simply by wiping with a damp cloth when the iron is cold. If yours cannot be cleaned this way, do not resort to abrasives. This will scratch any soleplate, nonstick or not, and make your iron glide less smoothly. The best solution to cooked-on spray starch or other debris is one of the commercial cleaners made for this purpose. These are available in home centers or from iron manufacturers. One home remedy that often works, however, is a paste of baking soda and water. Dip an old, clean, soft toothbrush into the paste and brush the cool soleplate. If you do not have immediate success, let the paste stand for a few minutes and then scrub vigorously. This remedy is indeed a little abrasive, but if used rarely it should do no damage. I have also seen recommendations to use white vinegar for this purpose, but in my experience vinegar is not effective. Whatever you use, it’s best to work on the problem as soon as possible. The longer you wait, the harder it becomes to remove a stuck-on substance, and scorched-on spray starch tends to come off on garments when you are ironing.
TO REDUCE OR AVOID IRONING
Some steam irons specify the use of tap water; others require distilled water. Be sure to use whatever your manufacturer recommends. If your iron frequently becomes clogged, perhaps you are using the wrong kind of water. Many new irons have a self-unclogging feature. If your steam iron lacks this feature and becomes clogged as a result of mineral deposits in your water, you can dissolve them—unless the manufacturer’s instruction booklet says not to—by pouring some white vinegar into the water tank, turning on the iron, and letting it steam for a few minutes. Before using your iron again, iron a clean rag of some sort so that any residues are deposited on the rag. Then cool the iron, refill with cold, plain water, and drain to rinse it. There are also effective commercial products, available in home centers, for cleaning out mineral deposits from steam irons.