Basic home sewing equipment and skills … Sewing basket contents … Threading your needle … Basic hand stitches: running stitch, basting stitch, back stitch, hem stitch, slip stitch, overhand or whipping stitch, overcast stitch, blanket stitch … Four basic machine stitches: regular, basting, backward, zigzag … Basic sewing techniques … Hemming skirts and uncuffed pants. …. . Patching …. Repairing ripped or torn seams and reinforcing seams. …. Sewing on buttons, two—and four-hole, shank, widening and narrowing buttonholes … Snaps and hooks and eyes … Broken zippers
Home sewing is enjoying a renaissance. There is no economic justification for this. In many cases, the sewers spend so much money on high-tech sewing machines and aids, not to mention hours of their time buying materials, cutting, stitching, and fitting, that their sewing is not cost-effective compared with store-bought items. On the other hand, if what you want is not out there to be bought, and you want it badly enough, it makes sense to make it; and only by sewing at home or hiring a tailor can you get clothes made to fit, in precisely the styles, colors, and fabrics you choose, with high-quality workmanship and attention to detail. Now there is even computer software that prints out patterns according to measurements you type in, which makes personalized fit even easier to attain. Most people have never worn well-made, well-fitting clothes, made to taste, in their lives. It is a heady experience. You can also easily make a variety of home furnishings to your exact taste—napkins, curtains, comforter covers, and many other articles.
Sewing itself is more fun, more satisfying, and more challenging than many people would believe without trying it. If you do not know how, there are classes everywhere, and friends are almost always willing to help. Sewing is something that you can do alone or with someone else, a friend or family member.
You need not invest in a lot of expensive equipment if you wish to sew at home. Even advanced sewers can stitch pretty much anything they want on a sturdy portable that does nothing more than go forward and backward. A few “zigzag” stitch patterns and a buttonhole capacity are quite useful but will not get a great deal of use by the casual or beginning sewer. If you hope to go at sewing seriously, however, you want both a good machine with the latest bells and whistles and, probably, a serger, a machine that is credited with having revolutionized home sewing in the past decade. Without exaggeration, you can say that sergers have certainly contributed enormously to its revitalization. Sergers simultaneously trim, stitch, and finish seams with an overcast stitch. They save great amounts of labor and give articles made at home a professional, finished look that until recently very few could achieve. Some sergers are much more versatile and easier to use than others, and the fanciest ones can be very costly. Check consumer information sources before making a choice.
Basic Home Sewing: Equipment and Skills
Some basic skills in sewing are perennially useful; if you have them, you will use them many times in the course of a year. Not being able to sew on a button, hem a skirt or pants, patch a hole or tear, or repair a seam can be terribly inconvenient, as it is far more trouble to track down a seamstress or tailor to do these little jobs than to take a couple of minutes to do them yourself. With limited skill, you can do these jobs or even make a curtain, napkins, comforter covers, and so forth.
Sewing Baskets. A sewing basket or box in every home is indispensable. Either is preferable to a sewing drawer because you want something that you can carry around with you. If you plan on sewing nothing more than a ripped hem or a loose button, your sewing box need not be elaborate. A sewing basket that includes the following items will see you through all the ordinary sewing chores:
Sewing shears and scissors. You may find it useful to have both a pair of larger shears (6 to 8 inches) and a pair of smaller scissors (3 to 6 inches). The handles of sewing shears angle upward so that you can cut fabric easily holding the bottom blade against your cutting surface. They have a small hole for your thumb and a large one for a couple of fingers. Scissors have equal-size handle holes and are straight. (Reserve your sewing scissors for sewing; other jobs, such as cutting paper, will blunt them.)
Pinking shears. These cut zigzag edges on cloth. Pinked edges are sufficient finishing for the edges of cloth that does not unravel badly. (Seam edges should always be finished somehow, with pinking, stitching or serging, or seam binding.)
Seam ripper. The seam ripper is a small cutter with a tiny curved cutting blade used for ripping out seams.
Sewing needles (“sharps”). Buy a package of assorted sizes and lengths. The sizes range from 1 (the thickest) to 12 (the finest), but you will rarely use the very low or high numbers for ordinary household chores. Embroidery needles have long eyes to accommodate several threads. Darning needles have even bigger holes. A variety of lengths is useful.
Straight pins. Medium gauge is the most useful, but use only fine gauge for silks and sheer fabrics. Heavy gauge are necessary for coating, carpeting, and upholstery; lighter ones will break off in the cloth. Those with colored heads are easier to see. You might like Japanese-made straight pins that have larger, colored heads and longer, finer shafts. (I have heard them called “flowerhead pins.”)
Pincushion
Snaps or hooks and eyes
Tape measure
Dressmaker’s chalk
Thimble. Wear the thimble on the middle finger of the hand with which you hold the needle. When it is hard to push the needle through the cloth, do so with the thimble to avoid hurting your finger.
Needle threader. For those who are farsighted or have shaky hands, there are completely automatic ones or simple guides—whatever you need.
Thread
—Heavy-duty cotton or cotton-bound polyester in white and black.
—Fine cotton thread, mercerized, in white and black, size 80. (The higher the number, the finer the thread.)
—Mercerized cotton or cotton-bound polyester, size 50, in an assortment of colors: white, black, gray, brown, off-white, red, pink, purple, light blue, royal blue, dark or navy blue, yellow, dark and light green, orange.
Wool threads or fine yarns. Get an assortment in various colors for mending sweaters and socks. Choose either the same colors as you select in threads, or start with black and white and add colors as is convenient.
Buttons. It is useful to have an assortment of sizes, shapes, colors, and styles: two-hole, four-hole, and shank buttons. When you throw shirts, coats, or dresses away or turn them into rags, cut off the buttons and save them, either in a pocket in your sewing basket or in a button box. They’ll come in handy. Likewise, when new clothing comes with small packages containing thread, yarn, or buttons, save the little packages in your sewing basket so you will have them for repairs.
Rag bag. Save swatches of cloth from old clothes and linens to be used for rags or patches, odd chores, crafts, and so on.
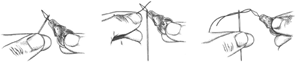
Threading Your Needle. Choose a fine, medium, or heavy thread and needle in proportion to your cloth—very fine needles and thread for organdy, medium for percale, heavy-duty for thick denims. The size numbers for needles and threads are in inverse relation to the thickness of the needle and thread—that is, the finest needles and threads have the highest number. Choose thread color slightly darker than the fabric, as thread appears a bit lighter off the spool.
If you keep a variety of size 50 threads (mercerized if they are cotton) plus a few spools of fine and heavy-duty, you should be able to handle most household chores with what you have on hand. Medium thread will do when medium-heavy or medium-light would be better. But size 50 cotton thread will look bad and create holes and tears in very sheer fabric. If your garment has a satiny or shiny appearance, you will be dissatisfied with the look of mending done in cotton. You can use silk thread on silk, wool, and synthetics with a sheen. Use wool thread to darn wool. There are a variety of threads designed to suit special purposes, too, which you might have occasion to acquire—quilting thread, buttonhole twist, and so forth.
Use a needle threader if you have shaky hands or are farsighted. It makes things easy.
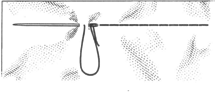
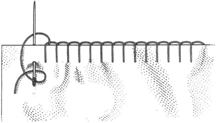
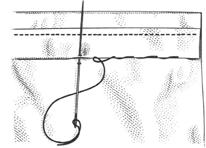
Basic Hand Stitches. Thread your needle and then secure the thread to the fabric so that it does not pull out. The easiest way to secure the thread is to make a tiny knot at its end. A more attractive way is to take two or three tiny stitches at the beginning of your sewing (you will do so again at the end), as experienced sewers do.
For greater strength, double your sewing thread. When you use a double thread, knot the loose ends together or secure both loose ends by taking a couple of inconspicuous stitches. However, for less visible stitching, desirable in hemming, for example, sew with a single strand of thread. To do this, you knot or secure only one of the loose ends of thread, and leave the other hanging 2 or 3 inches down from the eye of the needle. When you are sewing with a single thread, watch out that you do not accidentally catch the loose end in your stitching and begin sewing with a double thread. Do not use a longer thread than you need—the length of your arm extended is the maximum you can comfortably sew with; you sew faster with a shorter thread, and shorter thread is not so prone to tangle and knot. On the other hand, when you are sewing long seams or a hem with a wide circumference, it is annoying to have to keep rethreading your needle, so most of us choose to use a longer thread. Just before you run out of thread, secure it again with tiny stitches or a tiny knot, then snip the thread. (If you let the thread get too short, you will not have enough left to make a knot or a couple of stitches.)
Needle threader
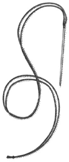
Knotted thread ready for sewing
The most common and useful hand stitches are described below.
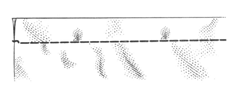
Running Stitch. Used for most basic sewing, mending, seams, and quilting. You use a long, thin needle. Push the needle in and out of one or more layers of cloth every 1/16 to ¼ inch in a straight line, keeping all the stitches even (the same size) and small. The smaller the stitch, the stronger the seam.
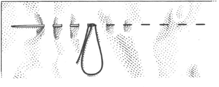
Running stitch
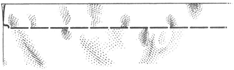
Basting Stitch. This is just a longer running stitch, from ¼ to ½ inch, used to hold things together temporarily until you do a more permanent stitch. Remove basting when the permanent stitches are in.
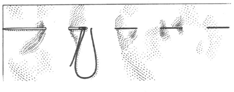
Basting stitch
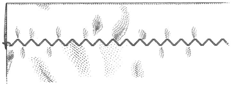
Back Stitch. This is a strong stitch, a variation on the running stitch, used for repairing ripped seams and reinforcing vulnerable ones. It looks like machine stitching on the right side, but you see overlapping on the wrong side. You use a shorter needle than for the running stitch. After securing the thread, take a small (say ⅛ inch) running stitch, pushing the needle from the right side of the cloth through to the underside and then bringing it back up to the right side. Now reinsert your needle in the first hole of this first stitch and take a running stitch twice as long (say ¼ inch) and from now on, all the stitches will be the longer length. (Your needle will emerge ¼ inch ahead of the beginning of the first stitch.) Go back and reinsert the needle at the middle hole—halfway through the second stitch—and take another stitch. Repeat until the seam is completed. Basically, you simply repeatedly reinsert your needle in the hole from which it last emerged.
Back stitch
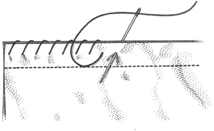
Hem Stitch. This is not a strong stitch, so it is not used where it would be subjected to strain. Begin with your needle coming through the edge of the fold of the hem. (See “Hemming Skirts and Uncuffed Casual Pants,” below.) Pick up one or two threads of the fabric, then one of the fold of the hem, then one of the fabric, and so forth, creating small slanted stitches. (My grandmother would let me take only one thread of the fabric, but I will approve if you take two.) Do not pull too tight or the hem will pucker. If your stitches are too loose or too far apart, the hem will sag or catch on things and pull out.

Hem stitch
Slip Stitch. This invisible stitch, similar to a hem stitch and likewise not strong, is used to secure hems, facings, and so on. Turn back the edge of the hem or fold about ¼ of an inch. Secure the thread. Then proceed by taking a small stitch in the fold, then picking up a thread of the fabric, then taking a small stitch in the fold, then picking up a thread of the fabric, and so forth, until it is all hemmed. For heavy fabrics or skirt hems, stitches should be close together, but in other places you can space them widely—up to ½ inch apart.
Slip stitch
Overhand or Whipping Stitch. These are basically the same stitch, called overhand if it is perpendicular and whipping if it is slanted. It is used for less visible, strong seams. With a whipping stitch, you usually stitch from the right side of the cloth. Hold the folded edges of the seam allowances together. Secure the thread. Then pick up one or two threads from each fold in turn, always beginning with the edge of the cloth in the back and proceeding to the front. Keep the stitches close together.
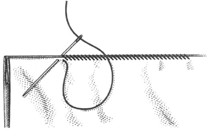
Whipping stitch
Overcast Stitch. Overcast stitching is used to finish the raw edges of hems and seams. It is similar to the whipping stitch, except that it is done on raw edges of cloth and is about ¼ inch deep, so it is more visible. Secure the thread. Holding together the two raw edges of the cloth, take slanting stitches over the two together. Proceed from the back of the cloth to the front.
Overcast stitch
Blanket Stitch. This is another stitch for finishing raw edges. Turn under the edge of whatever you are sewing. Secure the thread on the wrong side and push the needle through to the right side. Working from left to right and facing the right side of the article, insert the needle on the right side—at about ¼ inch from the edge of the fold, at the right of the thread—and ush it through to the wrong side, holding the thread to the needle’s left. You will catch the thread right at the edge of the fold. As you repeat the stitch, a row of stitches forms along the edge of the fold of the cloth.
Blanket stitch
Four Basic Machine Stitches. Follow your machine’s instructions on threading the needle, filling the bobbin, setting the tension, and adjusting the stitch size.
Regular. This is a running stitch. Standard or “regulation” stitching gets 12 stitches per inch. Use 16 per inch on fine and sheer cloth, and 8 to 10 for heavy cloth. Remember to use fine, medium, and heavy-duty needles for cloth of different weights.
Running machine stitch
Basting. This is a long running stitch. Use 6 to 8 stitches per inch.
Basting machine stitch
Backward. This is a running stitch in reverse.
Zigzag. You set the machine to sew in a pattern instead of in a straight line. You can make the stitches narrower or wider, longer or shorter. See your instruction manual for using the zigzag feature on your machine. Zigzag patterns are used for decoration and reinforcing and finishing seams.
Zigzag machine stitch
Basic Sewing Techniques
Hemming Skirts and Uncuffed Casual Pants. Besides looking good and preventing unraveling, hemming gives weight and shape at the bottom of a garment to make it hang properly. To lengthen or shorten a hemmed garment, remove the stitching in its hem, iron out the old hem fold-line, and refold the hem to the desired length. When lengthening, especially when the garment is not new, keep in mind that sometimes the original hem fold-line shows as an unattractive line that laundering and ironing fail to remove.
There is no law stating how wide a hem should be. Generally, dresses hang better with a generous hem, say two inches, and the stitch that almost always looks best on dresses is a hem stitch. But on blouses, the legs of casual pants without cuffs, and some other articles, narrow machine-stitched hems are often preferable. If the hem is to be on a skirt or dress or uncuffed pants, you must try the garment on and measure how much hem should be turned up to create a good length. With some garments, this can lead to intricacies that are beyond the scope of this book. For example, if the finished hem would be too wide, you will have to cut off some cloth; getting the hem to hang an even distance from the ground can present difficulties; garments that widen toward the bottom, like flared skirts and bellbottoms, must be tucked, gathered, or otherwise narrowed when you turn them up. When such difficulties are all settled to your satisfaction, there are several ways to go ahead and put in the hem.
Hem using seam binding
Hem using pinked edge
One standard way of hemming a garment that would be the desired length with, say, a 1½-inch finished hem, is this. (Note that making this 1½-inch finished hem will shorten the garment by ¾ inches.) First, to finish the raw edge of the cloth, turn under to the wrong side ¼ inch of the raw edge and baste it down using either a machine or hand-basting stitch. Then turn the ironed or basted edge under (to the wrong side), making a fold about 1½ inches wide and, to hold the fold in place while you hem-stitch it to the fabric, pin it or baste it near the fold-line so that it stays in place. (You can sometimes avoid basting or pinning these folds and simply iron them in.) Then stitch the hem by hand, using the hem stitch. Some machines will do a hem stitch. Remove the basting stitches. Press or iron.
There are other ways of hemming than simply turning under the raw edge and stitching it down. You might sew seam binding to the raw edge, using a machine (or by hand, if you have no machine). (Seam binding is a narrow, ribbonlike strip of cloth.) Then hem by hand, stitching the outside edge of the seam binding to the cloth, again using the hem stitch. Or you could, for very casual purposes, simply pink the raw edge, assuming that the cloth does not unravel, turn it under, and hem as before. This would be good for a child’s Halloween costume, for example.
Patching. You can patch almost any kind of tear, but patches do not look good on everything. There are many ways of patching. You can put patches on the right or wrong side of the garment, and you can make them of the same fabric as the garment or of a different fabric. If you want to make them of the same fabric as a purchased garment, you have to find a place on the garment where you can snip enough off to make a patch without its being noticeable. Usually this is impossible, but sometimes you can find enough in a hem or facing where the cut-out will be invisible to mend a small tear or hole. (But you may need to know how to repair the place from which you took your patch as well.) Make the patch extend at least an inch beyond the hole or tear in all directions.
First, to make sure that the raw edge of the patch will not unravel, pink it, overcast it, do a running stitch around the border, zigzag it on your machine, or hem it. If you are putting the patch on the wrong side of the garment, you should make sure that the edges of the hole or tear do not fray: turn under the raw edges of the hole or do a zigzag stitch around them with your machine. If you are making a patch of the same fabric, be sure to align it with any pattern, weave, or grain in the fabric. Pin the patch to the garment. If there is to be no strain on the place where the patch is, sew the fabric to the patch with a tiny slip stitch (invisible but weak), with a running stitch (hand or machine), or any other stitch you like. Where strength is not an issue, it is only a question of whether you like the look of the stitch. But if you need a tough patch, as for the knees on children’s pants, you should use a generous-size patch and secure it with an overhand or whipping stitch, a back stitch, or a zigzag machine stitch.
Whipping stitch patch
Zigzag stitch patch
Running stitch patch
There are also iron-on patches, but they often come off and you have few choices of color and fabric when you use these. Follow the instructions for their use on their labels.
Repairing Ripped or Torn Seams; Reinforcing Seams. Garments are most likely to tear at their seams. Shirts and blouses tear at the point where the sleeve is sewn to the body; trousers tear at the seat of the pants or the crotch; skirts split at the side seam; gloves split along the finger seams. You can resew the seam by machine unless the article is too tiny or the tear is in too awkward a spot. Gloves will often have to be sewn by hand; turn them inside out to work.
Seam repair
To repair by hand the portion of a seam that has come undone, use a small running stitch. If the seam must be very strong, use a back stitch. Work on the wrong side of the garment. Begin an inch or so before the rip, stitching right over the old stitches, and continue an inch or so beyond the rip, securing the thread carefully at both ends by making a few tiny stitches. On a machine, you do this with a regular stitch, securing at both ends by stitching backward for a few stitches. Be sure to use the sturdiest thread consistent with the weight of the fabric. Press the seam open after you have finished so that the fabric does not pucker where you have mended.
If you know that you tend to tear your shirts or blouses under the arm or at the shoulder back, or that you often split the seams of your trousers, you can reinforce the seam and prevent the damage from happening. This is a particularly good idea when the garment is made of something sheer that might tear along the seam, or whenever you notice that a garment’s stitching does not appear strong. Simply sew along the vulnerable seam, using a small running stitch (or a back stitch when you need a particularly strong seam) in the same way that you would repair a seam.
Sewing on Buttons. I learned about sewing on buttons in 4-H. We were given small, square, pale blue swatches along with what seemed an infinite variety of buttons and arbitrary rules about fastening them to the little blue swatches. The rules were not so arbitrary in retrospect, but we were not told much about what they were for.
Be sure to use strong thread—heavy-duty if the fabric is not delicate. On very delicate fabrics, it is often necessary to put some kind of fabric reinforcement under the button or else the fabric will tear when the button gets pulled.
If you are missing a button on a shirt or a dress in a place where it shows and cannot find a button that matches, remove one from the bottom edge or tail (or some other place where it doesn’t show) and put it in the place that does show. Then sew an unmatched button of the right size in the less conspicuous place where you removed the button. Try to make the unmatched button as similar to the others as you can manage.
When you notice that a button is coming loose, reinforce its stitching before it actually falls off and you lose a pretty or unusual button or have to pass half your day half-buttoned. Observe new garments carefully. Often even expensive clothes that should have been made with every attention to detail will have buttons secured by only a couple of threads.
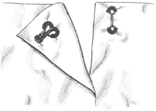
Two—and Four-Hole Buttons. To be sure that you get the button in the right place, close up the garment, buttoning it above and below the missing button so that its buttonhole is at the proper place for buttoning. Mark this place with dressmaker’s chalk. Then secure the thread to the right side of the material at that spot by taking several tiny stitches, until the thread feels tight and does not pull out. Place the button so that it is centered at the spot and so that its holes or pattern are parallel to those of all the other buttons. Now insert the needle into one hole of the button from its wrong side. Then insert the needle into the other (or another) hole on the button’s right side, passing it through to the wrong side of the cloth. To ensure that the button is not sewn so tight that it cannot be buttoned, you can insert a pin or a matchstick under the thread, between the button and the fabric, as you work.
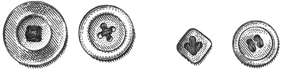
Four-hole buttons

Two-hole button
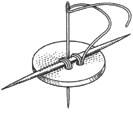
A thread shank

Inserting toothpick
Repeat the in-and-out stitching five or six times, following the same pattern each time. Try to make the stitches very close together so that the stitching looks neat on the right and wrong sides of the cloth. Never sew a stitch over the edge of the button.
When the button has been well secured, remove the pin or matchstick and check to see that the button is just loose enough to button easily. (For a heavy item such as a coat, you would need a longer set of threads connecting the button to the fabric, and a good sewer would make a thread shank of the slack. See “Shank Buttons,” below.) Then draw the needle through to the wrong side of the cloth and again secure the thread with several tiny stitches. Cut the thread.
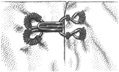
Shank Buttons. A shank button has a shank, or a projection on its back that has a hole in it, through which the attaching threads are drawn. Mark the spot where the shank button is to go in the same way as for two—and four-hole buttons. Secure the thread to the right side of the fabric at that spot by taking several tiny stitches. Then pass the needle and thread five or six times from the wrong side of the cloth through the shank hole and back to the wrong side of the cloth again. Try to make the stitches very close to one another. When the button is firmly sewed on, secure the thread on the wrong side of the cloth with a few tiny stitches.
Sometimes with a stiff or thick shank, or when the button and shank form one piece, the button will not lie easily and attractively in the buttonhole unless you make an additional thread shank. (You will not need to do this for the thin metal or plastic shanks that are so often used.) To do this, insert a matchstick between the button and the cloth as before, if this is feasible; if the shank is not properly shaped to allow this, hold the button taut at a slight distance from the cloth, or put the tip of your finger between the button and the cloth, as you stitch in and out of the shank. Then, after the button is sewn on, do not yet cut the thread. Holding the button away from the cloth so that the slack is pulled taut, wrap the sewing thread around it several times, forming the thread shank. Then secure the thread on the underside, as before, with a few tiny stitches.
Widening and Narrowing Buttonholes. Without learning to make buttonholes or to do the buttonhole stitch, on casual and informal clothes you can often satisfactorily widen a tight buttonhole or tighten one that is so loose that the button keeps slipping out. Those with limited sewing experience should not try this on elegant, formal, or “good” clothes.
To widen a buttonhole, take small, sharp scissors and snip the corner of the buttonhole a tiny bit, no more than 1/16 inch. (If you oversnip, stop; find a sewing friend to help you repair the damage.) Try to fit in the button now. If it is still too tight, take another tiny snip. When the button fits perfectly, choose a thread color that will look satisfactory and close your snipped edge with several overhand stitches perpendicular to the buttonhole to prevent the hole from tearing farther. Secure the thread very firmly before clipping, as buttonholes take a great deal of strain.
To narrow a buttonhole, sew together one corner of it with several overhand stitches perpendicular to the buttonhole. Before clipping your thread, try the button to see if the hole fits with proper snugness. If it is still loose, take a few more stitches. Secure the thread very firmly before clipping.
Snaps. Choose smaller ones for sheer fabrics; larger ones for heavy. The part with the ball goes on the top of the closure, on the hidden side, and the part with the hole goes on the other side of the closure (the one that gets covered), on the right side of the cloth. Mark the places where each should go with dressmaker’s chalk. To sew on the ball portion, secure the thread with a few tiny stitches. Then, using an overhand stitch, go through the cloth and then up to and through first one hole of the snap and then another. The thread will lap over the outer rim. Sew on the hole portion of the snap in the same manner.
Snaps sewn on
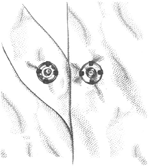
Hooks and Eyes. Hooks and eyes have to be very precisely placed and aligned to work properly. This takes patience, but the actual stitching is simple. Choose smaller ones for sheers and larger ones for heavy fabrics. You use the kind with a straight catch (or eye) when the sides of the opening will overlap when closed. You use the kind with a round eye when the edges meet without overlapping. A hook is often used with just a loop made out of thread.
Hook and eye—closed
With dressmaker’s chalk, mark the positions the hook and eye will take. Say you are putting the hook and eye on a neck closure that will overlap. Put the hook on the side of the closure that will cover the other, on the underside of the garment and with the hook facing down, placed so that the end of the hook is recessed ⅛ inch in from the edge. Put the eye—the straight type—on the right side of the covered closure, set back to the seam, or about ⅜ inch in from the edge. For a closure that will not overlap, place the round eye so that it extends about ⅛ inch past the edge of the cloth. Using the overhand stitch, attach the hook and eye to the spots you have marked.
Hook and eye—closed
If you are making a thread loop, just secure the thread at one end of where the loop should be and then insert the needle at the place where the other end should be, leaving the stitch loose. Bring the needle up through the first end and then again down through the second, again leaving the stitch loose. Secure and cut off the thread. You now have a two-stranded loop. To complete the loop, work the entire edge of the loop with a blanket stitch (described above).
Broken Zippers. It is rarely possible to repair a zipper, and it takes some practice to learn to remove an old zipper and sew in a new one neatly. But with metal zippers you can sometimes make a rough repair that at least lets you continue to use the garment. One common problem on metal zippers is that the metal teeth at the bottom of the zipper become bent or pulled and the lead cannot be pulled past them. You can repair this sometimes by getting a pair of pliers and straightening the teeth. If the zipper is closed at the bottom (that is, if it is not the kind used on a coat with two unattached sides), you can sometimes fix it in a way that involves limiting how far down you can pull the zipper. What you do, when there is a bump or broken tooth past which the zipper lead will not proceed, is cut the zipper there and reinsert the lead just past the cut. Then sew up the cut with a whipping or overhand stitch, intentionally making a thick block past which the zipper will not go. From now on you’ll just zip down to this point. This works on many skirt and trouser zippers, and these often do break at the bottom. You will not, however, be able to use this technique with tight garments, as you probably could not pull them on with the zipper only partially opened.
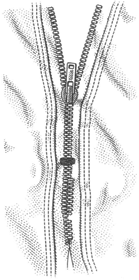
Mended zipper