Designing the User Form
Open up the Excel VBA Editor. From the menus at the top, click on Insert
. From the Insert menu, select User Form
. Locate the properties area on the left, and the Name
property. (If you can't see any Properties, click View
from the menu at the top of the Excel VBA Editor. From the View menu, select Properties Window
. You can also press F4 on your keyboard as a shortcut.) Delete the default of UserForm1
and type PictureViewer
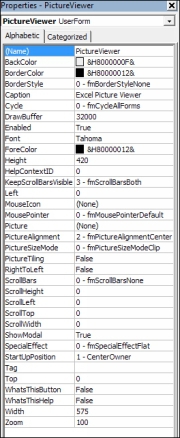
. Change the following properties, as well:
Caption
: Excel Picture Viewer
Height
: 420
Width
: 575
Your properties area should look like this:
The first object we want to add to the form is the MultiPage
control. Make sure your form is selected and examine the toolbox. (If you can't see the toolbox, click View
from the menu at the top of the Excel VBA Editor. From the View menu, select Toolbox
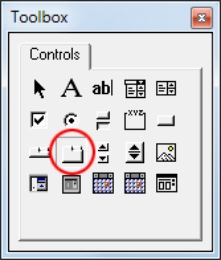
.) Now click on the MultiPage
control, which is circled in red in the image below:
In the properties area for the MultiPage, change the Height
to 378 and the Width
to 558. Set the Top
property to 10 and the Left
property to 6.
By default, the MultiPage control has two pages. This is fine for us. To change the captions on the pages, click on the first one, which has the default name Page1. (Click exactly on the text Page1.) This will open up the properties for that page, rather than the MultiPage control as a whole. Locate the Caption
property of Page1 and change it to View Photos
. Now do the same for page2. Click on the text Page 2 and change the Caption
property to Add New Photo
. The top of your form should now look like this:
We can now add the controls to the MultiPage. The controls we want on the View Photos
page are 7 Labels, 6 Textboxes, 1 ComboBox, 2 option buttons, 3 command buttons, and 1 picture frame. We'll add the labels first.


