The Previous Photo Button
To move back through the images on the spreadsheet, the code is more or less the same. Here it is:
The first line is slightly different, though. It's this:
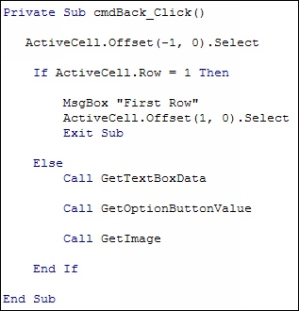
ActiveCell.Offset(-1, 0).Select
The ActiveCell needs to be moved back one, which we do with Offset:
Offset(-1, 0)
A negative number is used for the Row value, and a 0 is used for the Columns. This means move back one row but stay on the same column.
However, we can't keep going back as we have headers in the first row. The If Statement checks for this:
If ActiveCell.Row = 1 Then
The Row
property of ActiveCell
is used to test for a value of 1, meaning the first row on the spreadsheet. If it is the first row, we have this:
MsgBox "First Row"
ActiveCell.Offset(1, 0).Select
Exit Sub
On the first line of the code for the button, we moved the ActiveCell back one. If we've moved to the first row then we need to use Offset to move it back to where it was:
ActiveCell.Offset(1, 0).Select
This means move down one row from where the ActiveCell currently is.
The Else part again calls the Subs that do the works of filling out the form with the data from the spreadsheet.
And that's it for the View Photos
tab. Run your form and test it out. You should now be able to cycle back and forward through all your photos.