The Add New Photo tab
What we'll do for the Add New Picture
button is to display an Open File dialogue box so that you can select a new image. The new image will then be loaded into the Image Box control on the form. We'll also put the image name into the tbImageName
text box.
To make a start, select your Add New Photo
tab at the top of your form. Now double click your cmdAddNew
button to open up a code stub.
Before we look at the Open File dialogue box, add a new variable to the General Declarations area. Add the following:
Dim CopyImage As String
Your General Declarations
area should now look like this:
The reason we need this variable here is because we're going to copy the selected image over to the images folder. The image folder, remember, is where we store all the pictures referred to on the spreadsheet. The image you want to add might be in a different location. So copying your chosen image over to the images folder ensures that all your pictures are in one place.
When displaying an Open File dialogue box, you have the option of setting an initial directory. This is the folder you want the dialogue box to be in when appears. What we want is the images folder to display. To make that happen, we can call our NavigateFromWorkBookPath
function again. We can then add the images folder to it:
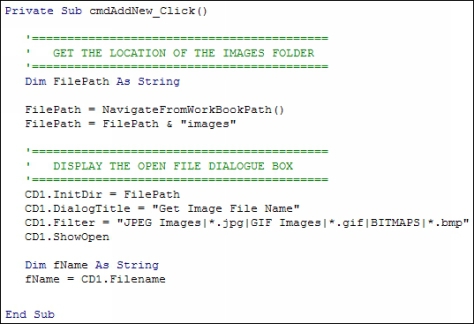
Dim FilePath As String
FilePath = NavigateFromWorkBookPath()
FilePath = FilePath & "images"
Add the three lines of code to your own cmdAddNew
button. The & "images"
is the part that adds the folder called images
to the file path we got from the function.
If you managed to add an Open File Dialogue Box Control earlier then follow along with the steps below. If not, then click here to go to your lesson:
64 BIT TUTORIAL
To display an Open File dialogue box the code is fairly simple. It's just:
CD1.ShowOpen
(The CD1 above is the name of the CommonDialog control you added when you were designing the form.)
There are quite a lot of extra properties you can set, however. The Initial Directory is one of these properties. You use it like this:
CD1.InitDir = FilePath
Before the equal sign, you have the name of your CommonDialog
control followed by a dot. After the dot, you type InitDir
, which is short for Initial Directory. After the equal sign, you can either hard-code a file path surrounded by double quotes, or you can have the name of a variable. We have our FilePath
variable, which contains the path to our images folder.
You can also add a title to the top of the dialogue box. This is done with the DialogTitle
property:
CD1.DialogTitle = "Get Image File Name"
Whatever you want as the title goes between double quotes, after the equal sign.
One thing you will want to set is the type of files that the dialogue box can display. This is done with the Filter property. Examine the following line:
CD1.Filter = "JPEG Images|*.jpg|GIF Images|*.gif|BITMAPS|*.bmp"
Before the equal sign, it's pretty straightforward: just type Filter
after the name of your CommonDialog
control. After the equal sign, we have this:
"JPEG Images|*.jpg|GIF Images|*.gif|BITMAPS|*.bmp"
Here, we want to display three different image types: JPG, GIF, and BMP files. Let's look at how the JPG image type is laid out:
JPEG Images|*.jpg
The part before the pipe character (the | symbol) is what appears in the dropdown list to the right of File name
:
To the right of the pipe character you type an asterisk (*). This means all file names. You then need a dot followed by the type of file you want to display, which is jpg
in this case.
To add more file types to the dropdown list, you repeat the process:
|GIF Images|*.gif
Notice that there is now another pipe character, at the very start. This is used to separate each file type.
If we wanted to specify files of any type and any name, we'd do this:
"JPEG Images|*.jpg|GIF Images|*.gif|BITMAPS|*.bmp|All Files|*.*"
Notice the symbols used for All Files
– two asterisks separated by a dot.
One final point to make is that all of your filters need to go between two sets of double quotes.
The Open File dialogue box, however, doesn't actually open a file: it just gets you a file name. This is done with the Filename property:
fName = CD1.Filename
Because you're trying to read a value, you need the Filename
property to the right of an equal sign. To the left of the equal sign is the name of the variable that's going to store the file name.
With all that in mind, add the following code to your button (CD.Filter should all be on one line)):
CD1.InitDir = FilePath
CD1.DialogTitle = "Get Image File Name"
CD1.Filter = "JPEG Images|*.jpg|GIF Images|*.gif|BITMAPS|*.bmp"
CD1.ShowOpen
Dim fName As String
fName = CD1.Filename
Your coding window should now look like this (we've added some comments):


