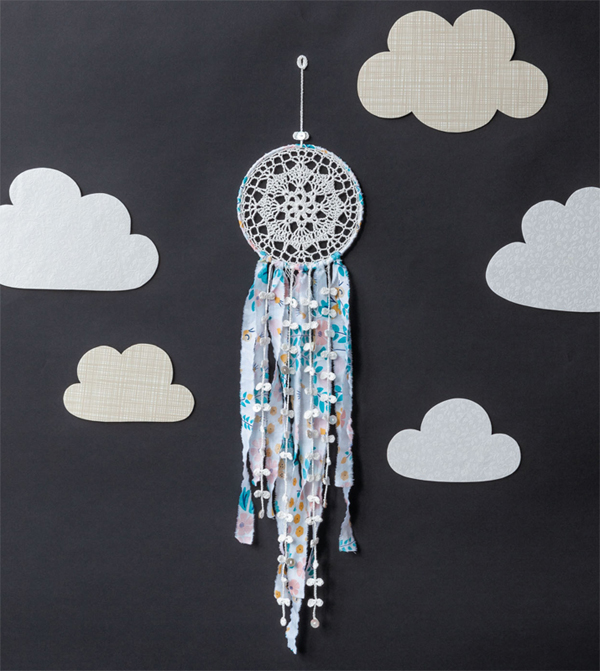
Dreamcatchers originate from the Ojibwe people of North America who believed they would protect sleeping children from bad dreams. Originally they were hung from the hoop of a cradleboard where the bad dreams would become entangled in the delicate web-like net, allowing only good thoughts to pass through to the dreamer. This belief has now been adopted and adapted by many people across the world and I keep one hanging in my studio to remind me not to dwell on negative or uncreative thoughts.


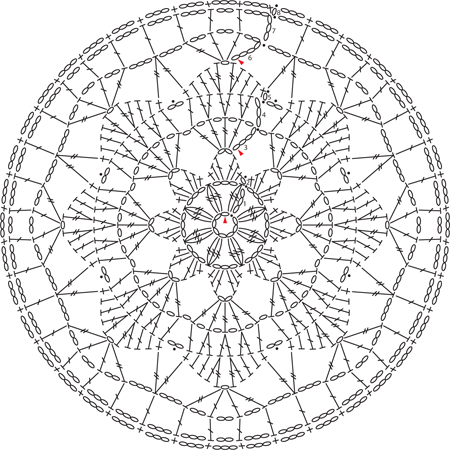
Dreamcatcher web
Any standard 4ply (fingering) weight yarn can easily be substituted for the stated yarn; however, checking your tension carefully beforehand is strongly recommended.
Using 2 strands of yarn held together, 6 rnds in tr sts (12st increase each rnd) = 10cm (4in)
18 x 86cm (7 x 34in)
It is easy to make your own fabric ribbons from a long quarter of standard quilting cotton fabric measuring approx. 25 x 112cm (10 x 44in). Here, I’ve used Meadow Blossoms organic cotton in white from the Lotus Pond collection by Rae Hoekstra. Along the fabric selvedge, mark 2.5cm (1in) intervals with a fabric pen, then take your scissors and cut approx. the same distance into the fabric at these points. Tear the fabric into strips and discard any loose threads. Steam press your fabric ribbons with a hot iron before use.
Foundation ring: using 3mm hook and two strands of yarn held together ch8, ss to form ring
Round 1: ch3, 2dtr-cl (counts as first 3dtr-cl), *ch3, 3dtr-cl* rep from * to * 7 times, ch3, ss into top of first 2dtr-cl
Round 2: ch1, [dc, htr, tr, ch2, tr, htr, dc] into each ch-sp around, ss into first dc, fasten off yarn
Round 3: join yarn in any ch-sp of prev rnd, ch5 (counts as first dtr, ch1), [dtr, ch1] 4 times into same ch-sp, [dtr, ch1] 5 times into each ch-sp around, ss into 4th of starting ch5
Round 4: ch3 (counts as first tr), *†2tr inc into next 3sts, tr into next st, ch2†, tr into next st* rep from * to * 7 times, rep from † to † once more, ss into 3rd of starting ch3
Round 5: ch1, dc into base of ch1, *†htr, tr, [tr, dtr, ch1] into next st, [dtr, tr] into next st, tr, htr, dc, ss into ch-sp†, dc* rep from * to * 7 times, rep from † to † once more, ss into first dc, fasten off
Round 6: join yarn in any ch-sp of prev rnd, ch6 (counts as first dtr, ch2), [(tr, ch2) twice, dtr] into same ch-sp, *†ch3, dtr2tog over next 2 dc sts of prev rnd, ch3†, [dtr, ch2, (tr, ch2) twice, dtr] into next ch-sp* rep from * to * 7 times, rep from † to † once more, ss into 4th of starting ch6
Round 7: ch6 (counts as first tr, ch3), *†[tr, ch2] into next st†, [tr, ch3] into next 4 sts* rep from * to * 7 times, rep from † to † once more, [tr, ch3] into next 3 sts, ss into 3rd of starting ch6
Round 8: ch1, dc into base of ch1, ch3, [dc, ch3] into each tr st of prev rnd, ss into first dc, fasten off and weave in loose ends

Steam block the dreamcatcher web to 16.5cm (61⁄2in) diameter.

Crochet streamers
Make 4 streamers 2 long and 2 short.
Repeats for the streamer buds are shown as: long (short).
First: using 3mm hook and two strands of yarn held together, leave a 20cm (8in) tail of yarn, ch4, 3tr-cl into 4th ch from hook, ch3, ss into base of cl st
Next: *ch12, 3tr-cl into 4th ch from hook, ch3, ss into base of cl st, ss into next ch, ch3, 3tr-cl into base of cl st, ch3, ss into base of cl st, turn work and ss between 2 buds just created* rep from * to * 15 (10) times, ch12, fasten off leaving a 20cm (8in) tail of yarn
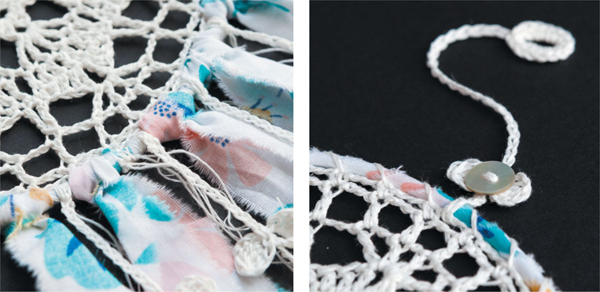
Using a yarn needle and the 20cm (8in) tail of yarn at the beginning of the crochet streamer, sew a button to the first bud of each streamer. Sew another three buttons onto random buds of the long streamers and two onto random buds of the short streamers.
Wrap a 7.5cm (3in) section of the metal ring with double-sided tape. At the halfway point of the taped section, secure one end of a fabric strip at a 45-degree angle and start to wrap it around the metal ring, half overlapping itself with each wrap to cover the ring completely (one fabric strip should be sufficient to do this). When you reach your start point, secure the end of the fabric strip with a small piece of double-sided tape, then bind in place with a length of yarn.
Use the sprung pegs to hold the dreamcatcher web in place inside the metal ring. Using the yarn needle threaded with a 1.5m (60in) length of doubled yarn, thread it through the top of any double crochet stitch of the last round of the dreamcatcher web and tie it securely onto the metal ring. Working whip stitch around the metal ring and through the top of each double crochet stitch, sew the web to the ring, ensuring even stitch spacing all the way around. Fasten off securely.
Take a fabric ribbon and fold it in half so that there is a loop at the centre. Pass the loop around the dreamcatcher ring and through a 3ch crochet space at the bottom edge of the dreamcatcher web (your crochet hook will be useful in tight spaces here). Pass the ends of the fabric ribbon through the loop and pull the loop tightly closed.
Repeat for the remaining four fabric ribbons, adding them to alternate 3ch crochet spaces at the bottom edge of the dreamcatcher web.
Trim the fabric ribbons to varying lengths to create a deep V shape at the bottom.
Using a yarn needle and the 20cm (8in) tail of yarn at the end of the long crochet streamers, securely sew each one either side of the central fabric ribbon. Repeat with the short crochet streamers placing them between the outer fabric ribbons. Fasten off.
First: using 3mm hook and two strands of yarn held together, leave a 30cm (12in) tail of yarn, ch6
Next: pass crochet chain through the top of the dreamcatcher web and around the metal ring, ss into first ch to secure in place
Next: ch6, 3tr-cl into 4th ch from hook, ch3, ss into base of cl st, ss into next ch, ch3, 3tr-cl into base of cl st, ch3, ss into base of cl st, turn work and ss between 2 buds just created
Next: ch30 (or to desired length), ss into 8th ch from hook to form ring
Next: 14dc into ring, ss into first dc, fasten off and weave in loose ends
To finish: using a yarn needle and the 30cm (12in) tail of yarn, sew the last button between the 2 buds at the beginning of the hanging loop
