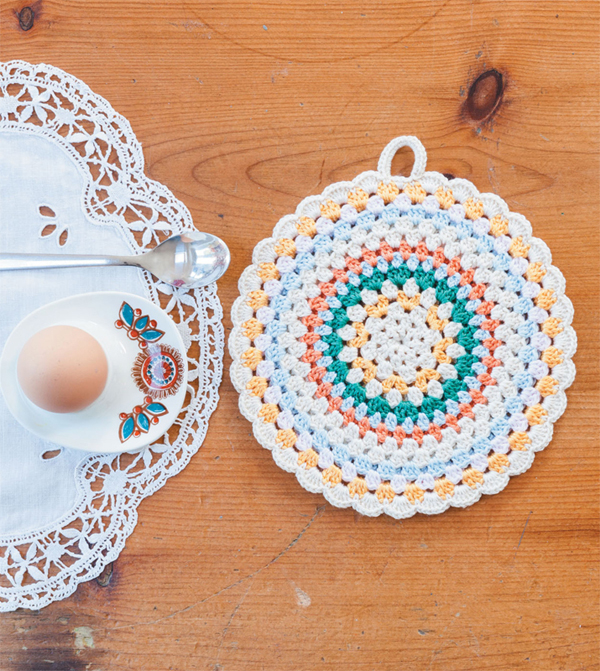
If you have never crocheted a potholder before, this simple granny circle is a great place to start. Just as easy to work as your basic granny square, it can be quickly crocheted in a couple of hours. It is made using a beautifully soft yet sturdy mercerized cotton, which is an ideal fibre for daily use in the kitchen as it can withstand regular washing and is resilient to high temperatures. Practical and pretty! What more do you need from a potholder?
Any standard 4ply (fingering) weight cotton yarn can easily be substituted for the stated yarn; however, checking your tension carefully beforehand is strongly recommended.
7 rnds in tr sts (12st increase each rnd) = 10cm (4in)
18cm (7in) diameter
Front and back panels with edging
The back and front panels of the simple folk circle potholder are worked in the same stitch and colour arrangement but, for the front section, leave a 30cm (12in) tail of yarn before beginning.
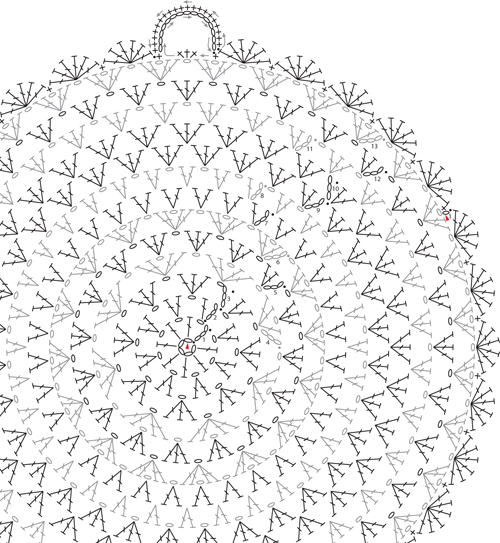
Foundation ring: using yarn A and 3mm hook, ch5, ss to form ring
Round 1: ch4 (counts as first tr, ch1), [tr, ch1] 7 times into ring, ss into 3rd of starting ch4
Round 2: ss into next ch-sp, ch3 (counts as first tr), [tr, ch1] into same sp, [2tr shell, ch1] into each ch-sp around, ss into 3rd of starting ch3
Round 3: ch4 (counts as first tr, ch1), [3tr shell, ch1] into 7 ch-sps, 2tr into last ch-sp, ss into 3rd of starting ch4, fasten off
Round 4: join yarn B in any ch-sp, ch3 (counts as first tr), [tr, ch1, 2tr shell, ch1] into same ch-sp, [2tr shell, ch1] twice into each ch-sp around, ss into 3rd of starting ch3, fasten off
Round 5: join yarn A in any ch-sp, ch3 (counts as first tr), [2tr shell, ch1] into same sp, [3tr shell, ch1] into each ch-sp around, ss into 3rd of starting ch3, fasten off
Round 6: join yarn C in any ch-sp and work as given for rnd 4, fasten off
Round 7: join yarn D in any ch-sp, ch3 (counts as first tr), tr into same sp, 2tr shell into each ch-sp around, ss into 3rd of starting ch3, fasten off
Round 8: join yarn E between any 2tr shells of prev rnd, ch3 (counts as first tr), [tr, ch1] into same sp, [2tr shell, ch1] between 2tr shells around, ss into 3rd of starting ch3, fasten off
Round 9: join yarn A in any ch-sp, ch3 (counts as first tr), 2tr shell into same sp, 3tr shell into each ch-sp around, ss into 3rd of starting ch3
Round 10: ch3 (counts as first tr), 3tr shell into each sp between 3tr shells of prev rnd, 2tr into last sp, ss into 3rd of starting ch3, fasten off
Round 11: join yarn D between any 3tr shells of prev rnd and work as given for rnd 5, fasten off
Round 12: join yarn F in any ch-sp of prev rnd and work as given for rnd 5, fasten off
Round 13: join yarn B in any ch-sp and work as given for rnd 4, fasten off

Weave in loose ends of front and back panels. Lay front and back panels together, with WS facing, and line up the stitch pattern at the centre. Using the yarn needle and 30cm (12in) tail of yarn, sew the two panels together using a whip stitch through the centre hole and tr sts of rnd 1; fasten off yarn between the two panels and weave in the loose end.
All of the edging sts are worked through corresponding ch-sps of both panels together.
First: with front panel facing, line up the stitch pattern at the edge of the panels
Round 1: join yarn A in ch-sp in the centre of any 2tr shell rep of prev rnd, ch1, dc into same sp, *6tr shell into next ch-sp, dc into next ch-sp* rep from * to * 5 times
Hanging loop: 3dc into next ch-sp, dc into next ch-sp, ch15, working backwards ss into the first dc after the prev 6tr shell, ss into the last tr st of prev shell, working forwards 20dc into ch-sp, ss into same space as last dc before 15ch
Continue round 1: rep from * to * 26 times, 6tr into next ch-sp, ss into first dc, fasten off and weave in loose ends
Using a press cloth, steam block on reverse with a hot iron.