This design was originally inspired by my appreciation of vintage quilt designs, particularly postage stamp quilts made from small squares of fabric. I love how even the simplest design can lend itself to a vast array of interpretations and colour arrangements, although I have always been particularly fond of this classic chequerboard pattern.

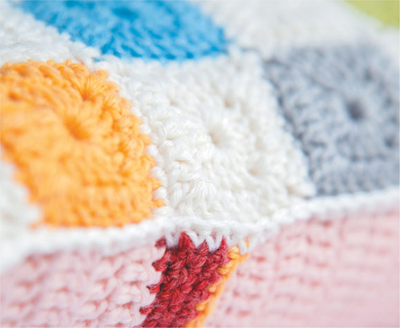
Each tiny square motif should measure approx. 4cm (11⁄2in) across
21sts and 12 rows in rows of tr sts = 10cm (4in)
40 x 30cm (16 x 12in)
A great stash-busting project for those precious leftovers that you can’t bear to part with. Each tiny square motif uses approx. 4m (43⁄8yd) of yarn, and if you can find 40 different colours in your stash, one for each tiny coloured square, you will be able to crochet a truly unique cushion cover.
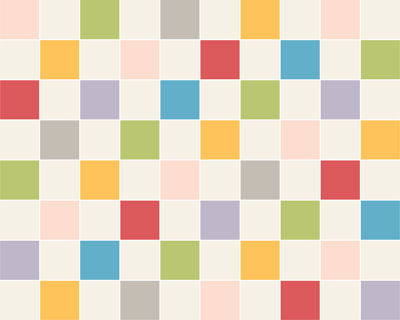
Make 40 in yarn A; 8 in yarn B; 7 each in yarns C and D; 5 each in yarns E and F; 4 each in yarns G and H.
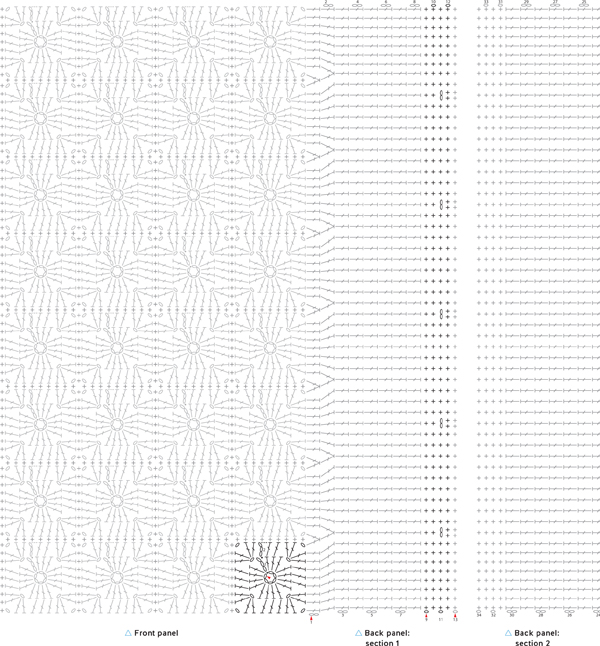
Foundation ring: using yarn and 3.5mm hook, ch6, ss to form ring
Round 1: ch4 (counts as first tr, ch1), [4tr, ch1] 3 times into ring, 3tr into ring, ss to 3rd of starting ch4
Round 2: ch3 (counts as first tr), *†[2tr, ch1, 2tr] into corner ch-sp, miss 1 st of prev rnd†, tr into 3sts* rep from * to * 3 times, rep from † to † once more, tr into 2sts, fasten off invisibly
Arrange the tiny square motifs face up in an 8 x 11 grid, matching the arrangement shown in the colour placement diagram to create a chequerboard design.
Using yarn A, join the motifs from the back, working in rows of dc stitches vertically then horizontally. Crochet 1 dc into each corner ch-sp and 1 dc into the top of each side st. When working the horizontal joining rows, simply crochet over the top of the vertical rows when you come to them.
The back panel is worked in two sections that are crocheted directly onto the front panel along the short ends as follows:
Row 1: along first short end of the front panel, with RS facing, join yarn B in the top rightmost corner ch-sp of first tiny square motif, ch2, tr into same space, *†tr into 7 sts†, tr2tog over next two corner ch-sps (1st + 2nd motifs)* rep from * to * 7 times, rep from † to † once more, tr into last corner ch-sp (65sts), turn
Row 2: ch2, tr into 7sts, *tr2tog, tr into 6sts* rep from * to * 6 times, tr2tog, tr into 8 sts (58sts), turn
Row 3: ch2, tr into 58sts, turn
Rows 4–8: rep row 3
Row 9: with RS facing, join yarn E in rightmost st of prev row, ch1, dc into 58sts, turn
Row 10: ch1, dc into 58sts, turn
Row 11: ch1, dc into 8sts, *ch2, miss 1st of prev row, dc into 9sts* rep from * to * 5 times, turn
Row 12: ch1, *dc into 9sts, 2dc into ch-sp* rep from * to * 5 times, dc into 8sts, fasten off
Row 13: with RS facing join yarn C in rightmost st of prev row, ch1, dc into 63sts, fasten off
Rows 1–3: on the other short end of the front panel work as given for rows 1-3 of section 1
Rows 4–30: rep row 3 of section 1
Row 31: ch1, dc into 58sts, turn
Row 32–34: rep row 31, fasten off


 Snowdrop
 Shell Pink
 Sunshine
 Leaf
Leaf
 Strawberry
 Frosty
 Dawn
Dawn
 Lake
Lake

The front panel is larger than the back panel, so that when the cushion cover is complete the front panel will wrap around the cushion insert more than in a standard cushion design.
Steam block the front panel to 42 x 32cm (161⁄2 x 13in).
Steam block section 1 of the back panel to 28cm (11in) square and section 2 to 10 x 28cm (4 x 11in).
All side seam sts are worked through corresponding sts and ch-sps of both front panel and back panel sections together.
First: fold section 2 of the back panel onto the front panel with WS facing, and pin in place along the sides, lining it up with 8 of the tiny square motifs of the front panel
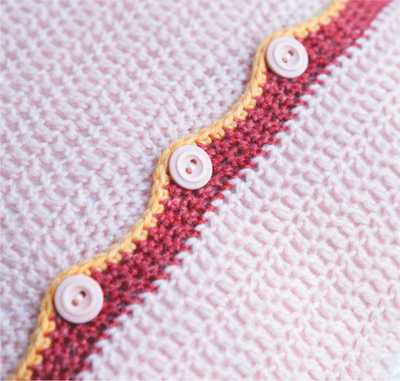
Next: fold section 1 of the back panel and pin in place along the sides, lining it up with the remaining 2 tiny square motifs of the front panel and with the contrasting button band overlapping section 2
Next: with RS of cushion facing, join yarn A in corner ch-sp of top rightmost tiny square motif and ch1
Next: work a row of dc sts along the side of the cushion, working into each ch-sp and 8sts of tiny square motifs, joining them to corresponding tr and dc sts of back panel (note that you will work into each tr st twice, the stem and the top of the st) working through three layers at the button band overlap, fasten off
Next: rep for second side seam, fasten off and weave in loose ends
On row 32 (2nd row of dc sts) of section 2 of the back panel mark 9th, 19th, 29th, 39th and 49th sts with a pin. Sew a button onto each of the marked sts with the sewing needle and thread.
