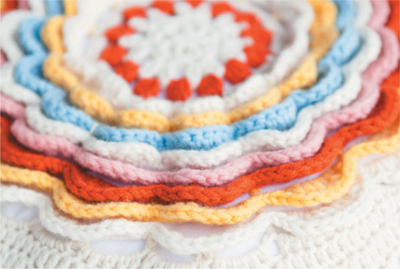
Here is a fabulous oversized flower to get your hook into. This time its layers of pretty petals are crocheted in the softest Italian wool and cashmere blend yarn from Gomitoli’s. This cushion cover will surely be a favourite to cuddle up against in your cosy reading corner or crocheting nook.
Any standard worsted weight yarn can easily be substituted for the stated yarn; however, checking your tension carefully beforehand is strongly recommended.
bp-htr = back post half treble
sdc = spike double crochet
5 rnds of granny square motif worked in tr sts = 10cm (4in)
35cm (14in) square
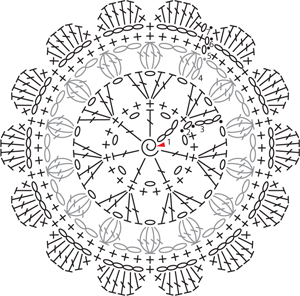
Front panel: centre of rose motif
Foundation ring: using yarn A and 4.5mm hook create an adjustable ring and place starting loop on hook
Round 1: ch4 (counts as first tr, ch1), [tr, ch1] 6 times into ring, close ring, ss into 3rd of starting ch4
Round 2: ch1, dc into base of ch1, *2dc into ch-sp, dc into next st* rep from * to * 6 times, 2dc into ch-sp, ss into first dc
Round 3: ch3 (counts as first tr), [tr, ch1, 2tr, ch1] into base of ch3, *miss 2sts of prev rnd, [2tr, ch1] twice into next st* rep from * to * around (6 times), ss into 3rd of starting ch3, fasten off
Round 4: join yarn C in any ch-sp, ch2, 3tr-cl into same ch-sp (counts as first 4tr-cl), ch2, [4tr-cl, ch2] into each ch-sp around, ss into top of first 3tr-cl, fasten off
Round 5: join yarn A in any 4tr-cl st of prev rnd, ch1, dc into base of ch1, *3dc into ch-sp, dc into next st* rep from * to * 13 times, 3dc into ch-sp, ss into top of first dc
Round 6: ch1, dc into base of ch1, *ch4, miss 3sts of prev rnd, dc into next st* rep from * to * 13 times, ch4, ss into first dc
Round 7: ch1, [dc, htr, 4tr, htr, dc] into each ch-sp around, ss into first dc, fasten off
Round 8: join yarn D between any 2 dc sts (last and first sts of petals) of prev rnd, ch1, *bp-htr onto dc st of rnd 6, ch5* rep from * to * around, ss into first bp-htr
Round 9: ch1, [dc, htr, tr, 3dtr, tr, htr, dc] into each ch-sp around, ss into first dc, fasten off
Round 10: join yarn E between any 2 dc sts of prev rnd, ch1, *bp-htr onto same st of rnd 8, ch6* rep from * to * around, ss into first bp-htr
Round 11: ch1, [dc, htr, tr, 4dtr, tr, htr, dc] into each ch-sp around, ss into first dc, fasten off
Round 12: join yarn A between any 2 dc sts of prev rnd, ch1, *bp-htr onto same st of rnd 10, ch7* rep from * to * around, ss into first bp-htr
Round 13: ch1, [dc, htr, tr, 5dtr, tr, htr, dc] into each ch-sp around, ss into first dc, fasten off
Round 14: join yarn B between any 2 dc sts of prev rnd and work as given for rnd 12 with bp-htr sts worked onto those of rnd 12
Round 15: work as given for rnd 13, fasten off
Round 16: join yarn C between any 2 dc sts of prev rnd, ch1, *bp-htr onto same st of rnd 14, ch8* rep from * to * around, ss into first bp-htr
Round 17: ch1, [dc, htr, tr, 6dtr, tr, htr, dc] into each ch-sp around, ss into first dc, fasten off
Round 18: join yarn D between any 2 dc sts of prev rnd, ch1, *bp-htr onto same st of rnd 16, ch9* rep from * to * around, ss into first bp-htr
Round 19: ch1, [dc, htr, tr, 7dtr, tr, htr, dc] into each ch-sp around, ss into first dc, fasten off
Round 20: join yarn A between any 2 dc sts of prev rnd and work as given for rnd 18 with bp-htr sts worked onto those of rnd 18
Round 21: ch1, [dc, htr, tr, 8dtr, tr, htr, dc] into each ch-sp around, ss into first dc

Front panel: petals of rose motif
Note: Rnds 6 and 7 repeated from previous chart
Round 22: ch1, *bp-htr onto same st of rnd 20, ch5, from behind the work dc between 4th and 5th dtr sts of petal of prev rnd onto foundation ch of rnd 20, ch5* rep from * to * around, ss into first bp-htr
Round 23: ch1, *5dc into next 2 ch-sps, 5htr into next ch-sp, [4tr, dtr] into next ch-sp, dtr into next st, [dtr, 4tr] into next ch-sp, 5htr into next ch-sp, 5dc into next ch-sp* rep from * to * 4 times, ss into first dc
Round 24: ch2, htr into base of ch2, htr into 7sts, *†tr into 9sts, dtr into 3sts, [2dtr, ch2, 2dtr] into next st, dtr into 3sts, tr into 9sts†, htr into 11sts* rep from * to * 3 times, rep from † to † once more, htr into 3sts, ss into first htr
Round 25: s-tr, tr into 21sts, *†[2dtr, ch2, 2dtr] into corner ch-sp, miss 1st of prev rnd†, tr into 38 sts* rep from * to * around, rep from † to † once more, tr into 16 sts, ss into top of s-tr
Round 26: s-tr, 2tr into base of s-tr, [miss 2sts of prev rnd, 3tr shell into next st] 7 times, *†[3tr, ch1, 3tr] into corner ch-sp, miss 3sts of prev rnd, 3tr shell into next st†, [miss 2sts of prev rnd, 3tr shell into next st] 12 times* - rep from * to * 3 times, rep from † to † once more, [miss 2sts of prev rnd, 3tr shell into next st] 4 times, ss into top of s-tr
Round 27–29: rnd 26 sets the pattern for a traditional granny square, continue in this way for rnds 27 to 29, fasten off
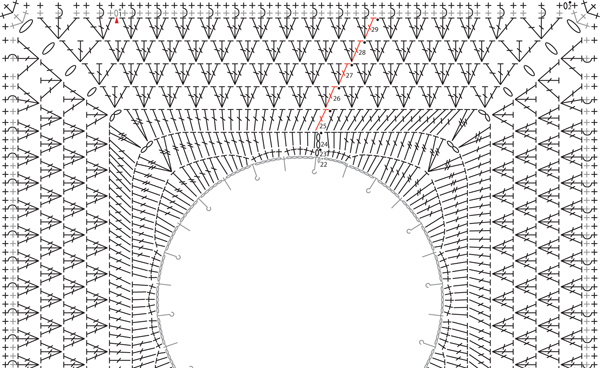
Front panel: background and edging
Note: Rnd 22 repeated from previous chart
Along one side of the front panel, with RS facing, join yarn A in back loop only of 7th st from right-hand corner.
Row 1: ch2, tr into base of ch2, tr into back loop of 41 sts, turn
Row 2: ch2, tr into 42sts, turn
Row 3: rep row 2, fasten off
The back panel of this cushion is a one colour, basic granny square crocheted as follows:
Foundation ring: using yarn B and 4.5mm hook, ch6, ss to form ring
Round 1: s-tr, [2tr, ch1] into ring, [3tr, ch1] 3 times into ring, ss into top of s-tr
Round 2: s-tr, [3tr, ch1, 3tr] into next 3 ch-sps, [3tr, ch1, 2tr] into last ch-sp, ss into top of s-tr
Round 3: ss into side sp (between s-tr and first tr of prev rnd), s-tr, 2tr into same sp, *†[3tr, ch1, 3tr] into corner ch-sp†, 3tr shell into side sp* rep from * to * 3 times, rep from † to † once more, ss into top of s-tr
Round 4: s-tr, 3tr shell into next side sp, *†[3tr, ch1, 3tr] into corner ch-sp†, 3tr shell into 2 side sps* rep from * to * 3 times, rep from † to † once more, 2tr into last side sp, ss into top of s-tr
Round 5: ss into side sp, s-tr, 2tr into same sp, 3tr shell into next side sp, *†[3tr, ch1, 3tr] into corner ch-sp†, 3tr shell into 3 side sps* rep from * to * 3 times, rep from † to † once more, 3tr shell into side sp, ss into top of s-tr
Rounds 6–18: rnds 1–5 set the pattern for the basic granny square motif, continue in this way for rnds 6–18, fasten off
Steam block the back and front panels to 34cm (131⁄2in) square.
All edging sts are worked through corresponding sts and ch-sp of both front and back panels together. Lay panels, with WS facing, lining up the edges and work as follows:
Round 1: with front panel facing, join yarn D in top of first st (of both front and back panels) after button flap, ch1, dc into base of ch1, dc into 5sts, *†3dc into corner ch-sp†, dc into 54sts* rep from * to * 3 times, rep from † to † once more, dc into 6sts, dc into front loop of 42sts in front of button flap, ss into first dc
Next: pull working loop through same sp just worked ss to back of work, turn work and dc into 42sts of back panel, ss into first edging st after button flap, fasten off
Round 2: with front panel facing join yarn A in first st after 3sts of any corner, ch1, dc into base of ch1, *†[sdc into next st, dc into 2sts] 18 times, 3dc into next st†, dc into 2 sts* rep from * to * 3 times (working along the RS of the button flap only), rep from † to † once more, dc into next st, ss into first dc. Fasten off and weave in loose ends
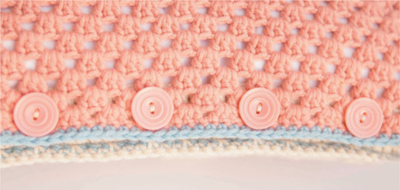
On row 2 of the button flap mark 8th, 17th, 26th and 35th sts with a pin, then with the sewing needle and thread, sew a button onto each of the marked sts.