
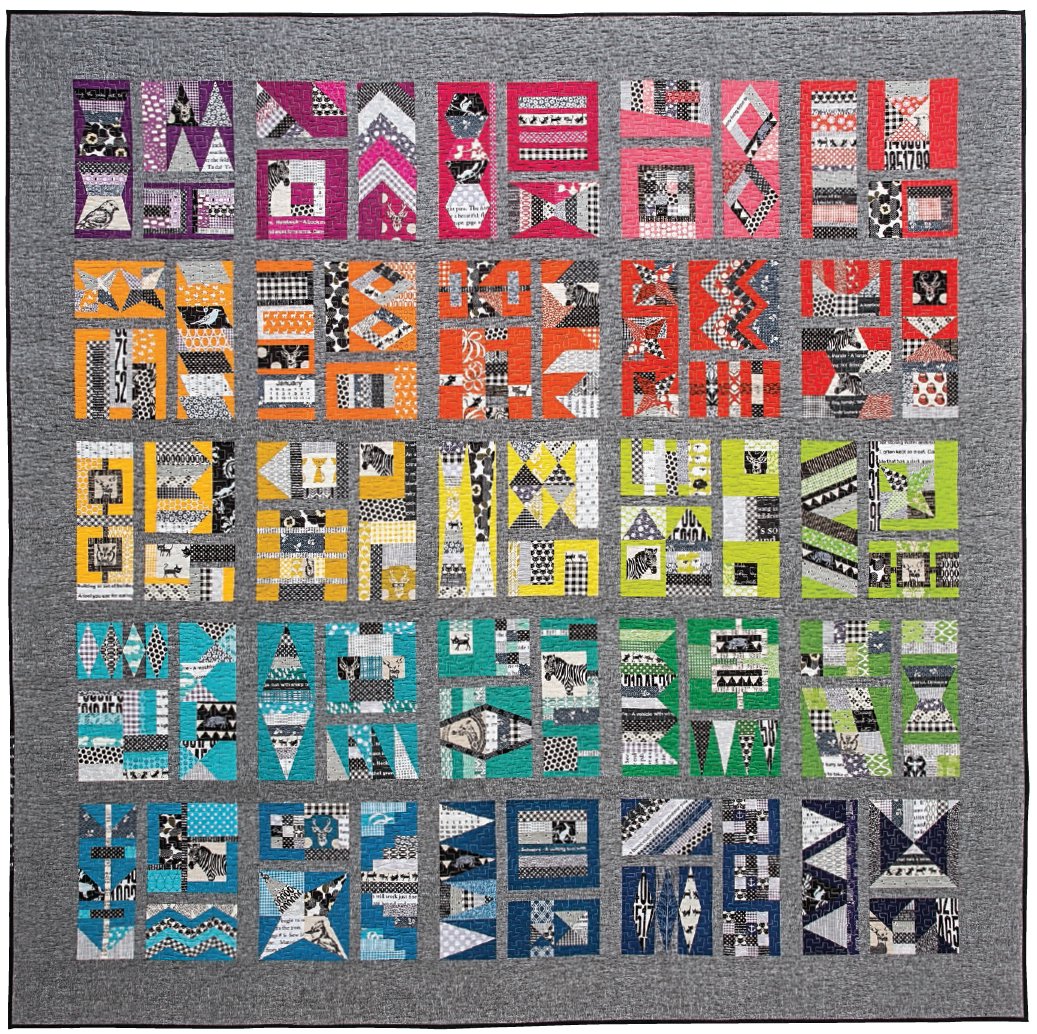
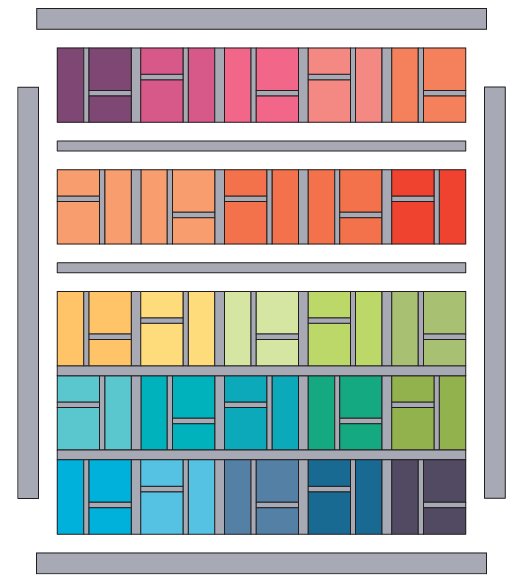
This quilt uses all 75 blocks—25 each of 5˝ × 8˝, 8˝ × 8˝, and 5˝ × 14˝.
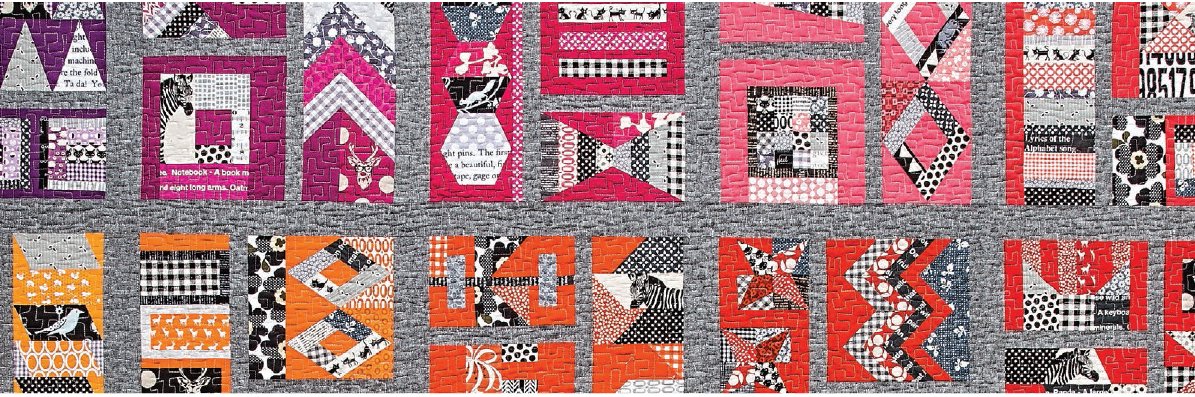
If you’re a quilter with a large fabric stash, making a color wheel quilt can be a fun way to compile scraps from past projects. For Metro Area, I started by selecting 25 different Kona Cotton solids. From there, I pulled coordinating monochromatic print fabric scraps that I contrasted with black, white, and gray prints.
Fabric Requirements
Yardages are based on fabric at least 42˝ wide.
■4 yards neutral solid for sashing
■8¼ yards for backing
■¾ yard for binding
■98˝ × 98˝ of batting
Cutting
NEUTRAL SOLID
■Cut 1 piece 90½˝ × width of fabric. Subcut:
2 border strips 6½˝ × 90½˝ each
2 border strips 6½˝ × 78½˝ each
4 sashing strips 2½˝ × 78½˝ each
■Cut 3 strips 14½˝ × width of fabric. Subcut:
20 sashing strips 2½˝ × 14½˝ each
25 sashing strips 1½˝ × 14½˝ each
■Cut 1 strip 8½˝ × width of fabric. Subcut:
25 sashing strips 1½˝ × 8½˝ each
BACKING FABRIC
■Cut 3 pieces 98˝ × width of fabric each.
BINDING FABRIC
■Cut 10 strips 2½˝ × width of fabric each.
Make the Block Units
All seams are sewn with a ¼˝ seam allowance and pressed open.
1. Sort the 75 blocks into 25 sets, with each set including a 5˝ × 8˝ block, an 8˝ × 8˝ block, and a 5˝ × 14˝ block.
2. Divide the sorted blocks into 2 groups: a group of 13 sets to make 13 of block unit A, and a group of 12 sets to make 12 of block unit B.
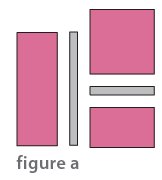
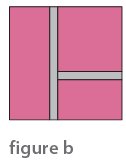
Block Unit A
1. Beginning with a set of 3 blocks from the block unit A group, sew a 1½˝ × 8½˝ sashing strip to the top of the 5˝ × 8˝ block.
2. Sew the 8˝ × 8˝ block to the top of the block unit.
3. Sew a 1½˝ × 14½˝ sashing strip to the left side of the block unit.
4. Sew the 5˝ × 14˝ block to the left side of the block unit.
5. Repeat Steps 1–4 to create a total of 13 block units A. figures a & b
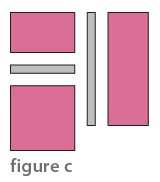
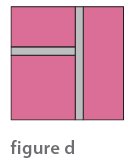
Block Unit B
1. Beginning with a set of 3 blocks from the block unit B group, sew a 1½˝ × 8½˝ sashing strip to the bottom of the 5˝ × 8˝ block.
2. Sew the 8˝ × 8˝ block to the bottom of the block unit.
3. Sew a 1½˝ × 14½˝ sashing strip to the right side of the block unit.
4. Sew the 5˝ × 14˝ block to the right side of the block unit.
5. Repeat Steps 1–4 to create a total of 12 block units B. figures c & d
Make the Quilt Top
1. Arrange the block units in 5 rows of 5 units each, alternating the block units A and B in a checkerboard pattern. Block unit A should be in each of the 4 corners.
2. Sew together the 5 block units in each row, sewing 2½˝ × 14½˝ sashing strips between the block units.
3. Sew together the 5 rows, sewing 2½˝ × 78½˝ sashing strips between the rows.
4. Sew a 6½˝ × 78½˝ border strip to each side of the quilt top.
5. Sew the 6½˝ × 90½˝ border strips to the top and bottom of the quilt top.
Make the Quilt Back
1. Trim away selvages. Sew together the 3 pieces along the 98˝ sides.
2. Trim the finished quilt back to 98˝ × 98˝.
NOTE
You can add interest to your quilt back by inserting a 16˝ × 98˝ strip between 2 backing pieces. The added strip can be pieced from scraps and/or extra blocks. If you do that, you’ll need only 5½ yards of fabric for the rest of the quilt back.
Finish the Quilt
Quilt as desired. Use the 2½˝ binding strips to make and sew the binding.
I finished this quilt by free-motion quilting a continuous-line design of meandering boxes using my home machine.