Chapter 3
Fine-Tuning QuickBooks
IN THIS CHAPTER
 Setting preferences for various options, reminders, and settings
Changing the accounting, checking, and finance charge rules
Controlling jobs and estimates, as well as time tracking
Accounting for multiple currencies, sales, customers, and sales tax
Setting up payroll and employees
Setting purchases and vendors’ preferences along with 1099 reporting rules
You can fine-tune how QuickBooks works for you by setting preferences. In fact, just so you know, much of what you do when you run QuickBooks Setup via the Detailed Start route (also known as the QuickBooks EasyStep Interview) is provide information that QuickBooks uses to fine-tune. If you indicate that you charge customers sales tax, for example, the EasyStep Interview describes how sales tax should work for your business by using the sales tax preferences.
Because these preferences have so much effect on how QuickBooks works and on how a particular user works with QuickBooks, I devote this chapter to describing how you change the preferences. None of this material is particularly complicated, but because QuickBooks provides you a rich set of preferences options, I cover quite a bit of material. Don’t worry: You don’t have to read this chapter from beginning to end. Simply use it as a reference when you have a question about how to change the way QuickBooks works in a particular area.
Accessing the Preferences Settings
You can set preferences within QuickBooks in two ways:
- During the Detailed Start/EasyStep Interview: You actually set all the preferences, or at least all the starting preferences for QuickBooks, when you run the EasyStep Interview. Most of the time, the preferences that the Detailed Start/EasyStep Interview sets are correct. QuickBooks is very smart about the way it asks questions and translates your answers into preferences settings. But if your business changes, if you make a mistake during the setup interview, or if someone in your office ran the Detailed Start/EasyStep Interview for you, you may still need to check and fiddle-faddle with these preferences.
- By manually changing the preferences: You can manually change the preferences by choosing the Edit ⇒ Preferences command. QuickBooks displays the Preferences dialog box, as shown in Figure 3-1. QuickBooks groups categories of preferences. All the accounting preferences, for example, are grouped into an accounting preference set, and all the checking account preferences are grouped into a checking preference set. If you look closely at Figure 3-1, you see that along the left edge of the Preferences dialog box, QuickBooks displays a list of icons. The first icon is Accounting. The second icon is Bills. To see the preferences within one of these groups, you click that preference’s icon.
One other item to note about the Preferences dialog box is that it supplies, in general, two tabs of preferences for each preference set. Preferences that are specific to an individual user appear on the My Preferences tab, shown in Figure 3-1. Preferences that are tied to the company data file appear on the Company Preferences tab, shown in Figure 3-2.
Not every My Preferences tab gives you options for changing the way that QuickBooks works. Sometimes a particular set of preferences gives personal options; sometimes it doesn’t.
The My Preferences tab of the Bills set of preferences, for example, provides no personalized options. In other words, you can’t tell QuickBooks that in your firm, billing works differently for different users. This makes sense, right? Billing needs to work the same way for every user within a firm. With other preferences settings, QuickBooks may allow different options for different users. You see this as I discuss the various sets of preferences in the remainder of this chapter.
Now I’m going to walk you through a discussion of each of these preferences sets. I talk both about the My Preferences option (if available) and the Company Preferences option.
Setting the Accounting Preferences
The My Preferences tab of the Accounting Preferences dialog box (refer to Figure 3-1) provides a single option: You can tell QuickBooks you want it to autofill information when recording a general journal entry.
Don’t get irritated with the lack of personalization, however. This almost total lack of individually personalized preferences makes sense, if you think about it. Accounting for a business needs to work the same way for Jane as it does for Joe and for Susan.
You do have the option to set several company preferences for accounting, however. Again, this makes sense if you think about it. Different companies run their accounting systems in different ways.
Figure 3-3 shows the Company Preferences tab of the Accounting Preferences dialog box.
Using account numbers
By default, QuickBooks lets you use names to identify accounts in the Chart of Accounts list or in the accounts list. The account that you use to track wages expense may be known as “wages,” for example, but you can select the Use Account Numbers check box to tell QuickBooks that you want to use account numbers rather than account names for identifying accounts. Larger businesses and businesses with very lengthy lists of accounts often use account numbers. When you use numbers, you can more easily control both the ordering of accounts on a financial statement and the insertion of new accounts into the Chart of Accounts list.
The Show Lowest Subaccount Only check box lets you tell QuickBooks that it should display the lowest subaccount rather than the higher parent account in financial statements. QuickBooks allows you to create subaccounts, which are accounts within accounts (discussed further in Book 2, Chapter 2). You can also create sub-subaccounts, which are accounts within subaccounts. You use subaccounts to more finely track assets, liabilities, equity amounts, revenue, and expenses.
Setting general accounting options
The Company Preferences tab (not shown) provides the following five general accounting check boxes, as well as date warnings and closing date settings. (The check boxes are probably self-explanatory to anybody who has done a bit of accounting with QuickBooks, but for new QuickBooks users, I provide a brief description of what each one does.)
- Use Account Numbers: The Use Account Numbers check box, if selected, enables you to enter an account number for a transaction. The associated check box, Show Lowest Subaccount Only, tells QuickBooks to display only the name and account number of a subaccount (if you’re using one) instead of the full heritage of the account. If you use a lot of levels of subaccounts, this option can really clean up views, making it easier to tell what account you’re looking at.
- Require Accounts: The Require Accounts check box, if selected, tells QuickBooks that you must specify an account for a transaction. This makes sense. If you aren’t using accounts to track the amounts that flow into and out of the business, you aren’t really doing accounting. It would never make sense, in my humble opinion, to deselect the Require Accounts check box.
- Use Class Tracking for Transactions: The Use Class Tracking for Transactions check box lets you tell QuickBooks that you want to use not only accounts to track your financial information, but also classes. Classes let you split account level information in another way. This sounds complicated, but it’s really quite simple. The account list, for example, lets you track revenue and expenses by categories of revenue and expense. You may track expenses by using categories such as wages, rent, and supplies. Classes, therefore, provide you a way to track this information in another dimension. You can split wages expense into those wages spent for two different locations of your business, for example. A restaurateur with two restaurants may want to do this. Note that QuickBooks also provides boxes you can check to indicate that QuickBooks should prompt you to assign classes and to assign classes to accounts, items, or names.
- Automatically Assign General Journal Entry Number: This check box tells QuickBooks to assign numbers to the general journal entries that you enter by using the Make General Journal Entries command. You want to leave this check box selected. General journal entries, by the way, are typically entered by your CPA or your professional on-staff accountant.
- Warn When Posting a Transaction to Retained Earnings: This check box tells QuickBooks to display a warning message whenever you attempt (or someone else attempts) to directly debit or credit its retained earnings account. (Normally, you don’t want to directly debit or credit the retained earnings account, and only skilled accountants would enter transactions directly into retained earnings in any case.)
- Hide Opening Balance Fields in Names and Items: Check this box to tell QuickBooks to hide opening balance information for customers, vendors, other names, and for items.
- Date Warnings: The Date Warnings boxes tell QuickBooks to warn you when you enter (or someone else enters) a transaction with a date too far in the past or too far into the future. If you check either of the Date Warnings boxes, you also want to specify how many days are too far into the past or too far into the future.
- Closing Date setting: The Closing Date box lets you identify a date before which your QuickBooks data file can’t be changed. In other words, if you set the closing date to December 31, 2017, you’re telling QuickBooks that you don’t want any changes made to the QuickBooks data file before this date. This means that someone can’t modify a transaction that’s dated before your closing date without getting a scary warning message. It also means that someone can’t enter a transaction by using a date before this closing date. You can click the Set Date/Password button to display a dialog box that lets you specify a closing date and create the password required when someone wants to add an old transaction or modify an old transaction.
 Long ago, past versions of QuickBooks also let you turn an audit trail feature on and off by using the Company Preferences tab of the Accounting Preferences dialog box. All recent versions of QuickBooks provide an always-on audit trail, however, so you don’t see an Audit Trail check box accounting preference any more. An audit trail, by the way, simply keeps a list of who makes which changes to transactions. Accountants, predictably, love audit trails. Audit trails enable someone, such as your CPA or an Internal Revenue Service auditor, to come in after the fact and figure out why an account balance is what it is.
Setting the Bills Preferences
If you display the Preferences dialog box and click the Bills icon, you can set company-level preferences for handling vendor bills. You can, for example, specify that bills are considered to be due a certain number of days after their receipt by entering a value in the appropriate text box. You can also use these company-level preferences to specify that early-payment discounts should be used and to choose an account for recording the value of these discounts. (I don’t show you a figure of the Company Preferences tab of the Bills Preferences dialog box. It’s really not worth your time.)
Setting the Calendar Preferences
If you display the Preferences dialog box and click the Calendar icon, you can set your personal preferences for showing calendar information within QuickBooks, including a preference to remember previous calendar settings, the view used to show weeks, which transactions you want to appear on the calendar, and how you want calendar reminders to show. (As with the Bills Preferences, I don’t show you a figure of the My Preferences tab of the Calendar Preferences dialog box because the boxes are straightforward.)
Setting the Checking Preferences
If you display the Preferences dialog box and click the Checking icon, QuickBooks displays either the My Preferences tab, shown in Figure 3-4, or the Company Preferences tab, shown in Figure 3-5.
The My Preferences tab of the Checking Preferences dialog box lets you tell QuickBooks which account it should suggest as a default account when you open particular types of windows within QuickBooks. If you look closely at Figure 3-4, you see the Open the Write Checks box, which is the first check box on the tab. To the right of the Open the Write Checks box, you see the Form with X Account drop-down list. If you select the Open the Write Checks check box, you can select an account from the Form with X Account drop-down list. This setting tells QuickBooks to use or suggest the specified account every time you open the Write Checks window.
The My Preferences tab also includes check boxes that you can use to specify the default account for the Pay Bills window, the Pay Sales Tax window, and the Make Deposits window. If you have multiple checking accounts set up, setting the default accounts by using the My Preferences tab is a good idea. Setting these preferences makes it less likely that you’ll erroneously write checks on or pay bills from the wrong account.
The Company Preferences tab, shown in Figure 3-5, provides check boxes that you can use to describe how checks work within QuickBooks:
- Print Account Names on Voucher: This check box lets you indicate to QuickBooks that it should print account names on the voucher portion of the check.
- Change Check Date When Non-Cleared Check Is Printed: Select this check box to tell QuickBooks to use the current system date as the printed check date.
- Start with Payee Field on Check: Select this check box to tell QuickBooks to place the insertion point, or text cursor, in the Payee field when you open the Write Checks window.
- Warn about Duplicate Check Numbers: Selecting this check box tells QuickBooks to alert you to duplicate check numbers. (You want to leave this check box selected, obviously, so that you don’t use duplicate or erroneous check numbers.)
- Autofill Payee Account Number in Check Memo: Select this check box to tell QuickBooks to automatically fill in the payee account number when you write a check. QuickBooks retrieves the account number for a payee from the Vendor list or from the Other Names list.
- Select Default Accounts to Use: These check boxes let you specify which account QuickBooks suggests when you open the Create Paychecks window or open the Pay Payroll Liabilities window. Essentially, then, these boxes let you tell QuickBooks which checking account you use to write payroll checks and to pay payroll liabilities, such as federal income tax withholding amounts.
- Bank Feeds: If you’ve turned on online banking for QuickBooks, QuickBooks provides option buttons you can use to change the way that online transaction information appears in the online banking window. Book 3, Chapter 4 discusses the QuickBooks online banking tool set.
Changing the Desktop View
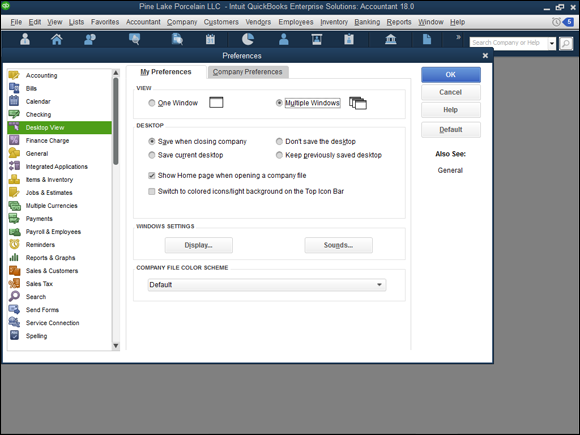
Figure 3-6 shows the My Preferences tab of the Desktop View Preferences dialog box. The My Preferences tab provides View radio buttons — One Window and Multiple Windows — that let you indicate whether QuickBooks should use one window or multiple windows for displaying all its information. The Multiple Windows option looks like older versions of Microsoft Windows. With multiple windows, an application such as QuickBooks displays multiple floating document windows within the application program window. If you have a question about how this works, your best bet is to simply try both view settings.
The Desktop radio buttons (see Figure 3-6) let you specify whether and when QuickBooks should save the current appearance, or view, of the desktop. You can select the Save When Closing Company radio button to tell QuickBooks that it should save the view of the desktop when you close a company. When you reopen a company, QuickBooks reuses this desktop view. You can also select the Save Current Desktop radio button to tell QuickBooks to save the current view and then reuse this view when QuickBooks later opens. If you don’t want to make changes to the default desktop view, select the Don’t Save the Desktop radio button.
The Desktop check boxes let you specify whether QuickBooks should display the QuickBooks home page and use colored icons and a light background for the top icon bar. If you select a check box, QuickBooks adds the home page or tweaks the icon bar coloring.
The Windows Settings buttons let you access the Windows Display Properties and Windows Sounds Properties settings. Typically, you would make changes to Windows Display Properties and Windows Sounds Properties by using the Control Panel tools, but you can make changes from within QuickBooks by clicking these two buttons. (In actuality, when you click these buttons, QuickBooks starts the Control Panel tools.)
If you have questions about how the Windows Display Properties or Sounds Properties work, refer to the Windows Help file or to a good book, such as Windows 10 For Dummies, by Andy Rathbone (John Wiley & Sons, Inc.).
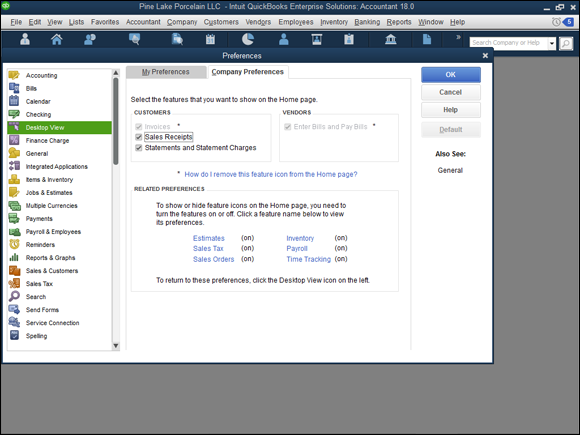
The Company Preferences available for the Desktop View Preferences let you specify what icons appear on the QuickBooks home page, as shown in Figure 3-7. The Customers set of check boxes, for example, lets you specify which customer-related accounting tasks are available via icons on the home page. The Vendors check box lets you specify whether you want to enter and pay bills using the Enter Bills and Pay Bills command. Near the bottom of the Company Preferences tab of the Desktop View Preferences dialog box, QuickBooks supplies hyperlinks you can click to turn on and off the display of other accounting task icons.
Setting Finance Charge Calculation Rules
The Finance Charge Preferences settings let you specify how QuickBooks should calculate finance charges on overdue invoices to customers. None of the My Preferences options is available for finance charges — only Company Preferences options. Because I describe how the Company Preferences tab of the Finance Charge Preferences dialog box works in Book 3, Chapter 1, I won’t repeat that information here.
Setting General Preferences
Figure 3-8 shows the My Preferences tab of the General Preferences dialog box. This tab provides check boxes that you can select to tell QuickBooks to do the following:
- To move the selection cursor from one field on the window to the next field when you press Enter
- To automatically open drop-down lists when typing
- To beep when you record a transaction
- To automatically place a decimal point two digits from the right end of the number
- To warn you when you’re editing an existing transaction
- To bring back all the one-time Help messages that you may have suppressed
- To turn off pop-up messages for products and services
- To show ToolTips for clipped text
- To warn you when you’re deleting an existing transaction or some unused items on a list
- To run QuickBooks in the background even when you’re not using QuickBooks (to make QuickBooks start faster)
- To automatically recall account or transaction information — telling QuickBooks, for example, to automatically recall the last transaction for a particular customer, vendor, or employee
- To use either today’s date or the last entered date as the default date
- To keep custom item information changed as part of entering a transaction
If you have specific questions about the My Preferences check boxes that are available for the General Preferences options, click the Help button that appears along the right edge of the Preferences dialog box. QuickBooks provides brief but useful descriptions of how the Preferences options work and what they do.
Figure 3-9 shows the Company Preferences tab of the General Preferences dialog box. The Time Format radio buttons let you specify whether QuickBooks should show the minutes in an hour as a decimal value or as minutes. The Time Format radio button descriptions include examples of how these two approaches vary, so look closely at the dialog box if you have questions. The Company Preferences tab includes a check box that lets you specify that QuickBooks should always show years using four digits. And the Company Preferences tab includes a check box that you can select to tell QuickBooks that it shouldn’t update the name information for a particular customer, vendor, employee, or other name when you’re saving a new transaction for that customer, vendor, employee, or other name.
Controlling Integrated Applications
The Integrated Applications Preferences aren’t personal, so no options are available on the My Preferences tab. The Company Preferences tab of the Integrated Applications Preferences dialog box, however, does control and track other applications or computer programs that open the QuickBooks company data files. Figure 3-10 shows the Company Preferences tab of the Integrated Applications Preferences dialog box.
The Don’t Allow Any Applications to Access This Company File check box, if selected, tells QuickBooks that it shouldn’t allow other applications to access this company data file. The check box titled Notify the User Before Running Any Application Whose Certificate Has Expired, if selected, tells QuickBooks that it shouldn’t allow any program whose security certificate is out of date to open the QuickBooks company data file without first notifying the user (that’s you).
The list box shows the names of the applications that previously requested access to the QuickBooks company data file. You can remove an application from this list by selecting the application and then clicking the Remove button. You can change the rules or properties that the QuickBooks program applies to access this other application by selecting the application and then clicking the Properties button.
Controlling Inventory
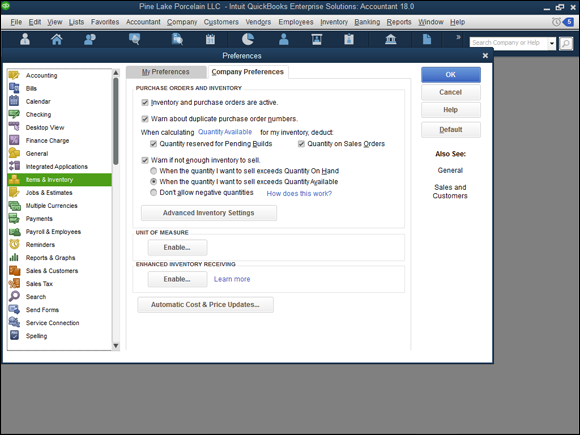
No personal preferences are available for inventory tracking and control, but QuickBooks provides several Company Preferences features regarding inventory and items, as shown in Figure 3-11. You can turn the QuickBooks inventory and purchase order features on and off. You can specify you want to be warned if you enter a purchase order number you’ve previously used. And you can specify how QuickBooks determines whether you have or don’t have enough inventory to sell. (In the Enterprise Solutions version of QuickBooks, you can also indicate whether negative inventory balances are allowed.)
If you buy or sell an item using more than one unit of measure — say, you sell fabric both by the yard and by the bolt (the rolled-up fabric) — QuickBooks lets you quantify your inventory items by using more than a single unit of measure. If you’re interested in doing this, click the Enable button in the Unit of Measure section.
If your business operation processes multiple inventory receipts for a single vendor bill, multiple vendor bills for a single item receipt, or prepayments for inventory, you may want to consider enabling QuickBooks’s Enhanced Inventory Receiving (EIR) feature if you’re using QuickBooks Enterprise Solutions. By turning on this feature, you probably can improve your inventory item counts and avoid the sorts of item count and QuickBooks errors that often occur in these more complicated inventory situations. You can’t turn off enhanced inventory receiving after you turn it on, however. Accordingly, research the details of the QuickBooks EIR feature (by clicking the Learn More hyperlink) or consult your accountant before you click the Enable button in the Enhanced Inventory Receiving section.
To have QuickBooks automatically update the item list’s purchase cost, sales price, and markup percentages, select the appropriate action by using the Automatic Cost and Price Updates button. (Note: This button appears in Figure 3-11 because I’m using the Enterprise Solutions version of QuickBooks. Other flavors of QuickBooks don’t include this option.)
Controlling How Jobs and Estimates Work
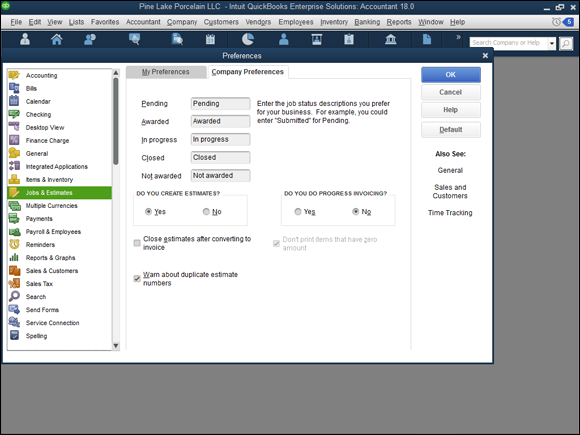
Because no personal preferences are available for Jobs & Estimates preferences, the My Preferences tab of this Preferences dialog box shows no options. You have several company preferences available regarding jobs and estimates, however, as shown in Figure 3-12. The Pending text box lets you describe what term or word should be used for jobs that have been submitted but haven’t been accepted or rejected. The Awarded text box lets you provide a term or description that you want to use within QuickBooks to identify those jobs that customers or clients have accepted. The default description of an awarded job is, cleverly, Awarded. The In Progress, Closed, and Not Awarded text boxes similarly let you describe what term you want to use for jobs that fit into these categories.
The Do You Create Estimates? radio buttons let you indicate to QuickBooks whether you want to create job estimates for customers. You select the radio button — Yes or No — that answers the question. The Do You Do Progress Invoicing? radio buttons let you indicate whether you do progress billing for jobs. The Warn about Duplicate Estimate Numbers check box, if selected, tells QuickBooks to warn you about using duplicate estimate numbers. The Don’t Print Items That Have Zero Amount check box, if selected, tells QuickBooks not to print estimates that have zero balances.
Book 4, Chapter 5 talks more about setting up jobs and estimates. You may want to refer to it if you have questions about how project costing and job costing work within QuickBooks.
Dealing with Multiple Currencies
QuickBooks supports multiple currencies. To turn on QuickBooks’s multiple-currencies feature, choose the Edit ⇒ Preferences command, select the Multiple Currencies option in the list box, and click the Company Preferences tab. Then select the Yes I Use More Than One Currency button, and choose your home currency from the drop-down list.
After you tell QuickBooks that you’ll be working with multiple currencies, you need to set up a bank account for each extra currency in which you want to work (currencies in addition to your home currency). After that, you can indicate which currency a vendor or customer uses when you set up a new vendor or customer. You can also select a transaction currency for vendors or customers with which you haven’t yet transacted any business. You can’t change the currency for a vendor or customer with which you’ve already transacted business in your home currency, however.
After you’ve performed this setup work, you can work with foreign-currency units (euros rather than dollars, or vice versa) as you pay the foreign currency to vendors, collect the foreign currency from customers, and move money in and out of your foreign-currency bank account.
Furthermore, using the currency exchange information available in the Currency list (available when you choose Lists ⇒ Currency List), QuickBooks converts foreign-currency amounts to home-currency amounts so you can prepare reports that use your home currency. QuickBooks, of course, updates its records concerning foreign exchange rates if you display the Currency List window, click the Activities button, and choose Download Latest Exchange Rates.
One final multiple-currency factoid: If you turn on the Multiple Currency feature within QuickBooks, QuickBooks sprinkles little currency reminders throughout its windows and dialog boxes. Amount boxes, for example, show a little abbreviation for the currency that goes into a particular box, thereby reminding you that in this particular text box, you’re supposed to enter, for example, British pounds.
Starting Integrated Payment Processing
The Payments preferences provide several check boxes and links you can use to control the way QuickBooks handles payments.
The Receive Payments check boxes, for example, let you indicate that you want to automatically apply and automatically calculate payments, as well as use the Undeposited Funds account as a temporary holding account for customer payments. (For more information about the Undeposited Funds account and customer payments, see Book 3, Chapter 1.)
The Payments preferences also let you indicate that you’ll allow customers to pay you using credit cards and bank transfers via the ACH (automated clearinghouse) system. If you indicate this, QuickBooks adds a link on invoices that customers can use to make credit card payments or bank transfers.
Not surprisingly, Intuit charges a modest fee for this service, so if you’re interested, pay close attention to current pricing — information that’s available when you check the boxes that turn on this feature. (At the time I’m writing this chapter, the fee runs 2 to 3 percent for credit card payments and 50 cents for an ACH payment, and may require a modest monthly fee.)
Controlling How Payroll Works
The Payroll & Employees Preferences set includes only the Company Preferences tab, shown in Figure 3-13. The QuickBooks Payroll Features radio buttons let you tell QuickBooks how you want to handle payroll: using an outside payroll service such as Intuit Complete Payroll (select Complete Payroll Customers in this case), using QuickBooks payroll features (select the Full Payroll radio button), not using payroll at all (select the No Payroll radio button), or using the self-descriptive option, Online Payroll. Note that QuickBooks displays only radio buttons that make sense given the version of QuickBooks you’ve selected.
The Pay Stub & Voucher Printing button lets you tell QuickBooks what employee information to print on the payroll check: employee address, company address, sick-pay information, vacation-pay information, and pay period information. You can figure out how this works by clicking the button and looking at the dialog box that QuickBooks displays.
The Workers Compensation button lets you fiddle with the way that QuickBooks tracks information related to your workers’ compensation tax. The Sick and Vacation button lets you fine-tune how QuickBooks monitors employee sick- and vacation-pay accrual and use. Again, click either of these buttons to see a screen that provides more information about how the button works.
In roughly the middle of the Company Preferences tab of the Payroll & Employees Preferences dialog box, QuickBooks supplies several other check boxes and radio buttons:
- Copy Earnings Details from Previous Paycheck: Another duh.
- Recall Quantity Field on Paychecks: QuickBooks recalls or reuses paycheck quantity information from the last pay period’s paychecks. (The QuickBooks Help file suggests that you use this option when you have a “fixed quantity that occurs from paycheck to paycheck.” The Help file uses the example of tiered sales commissions where the commission amount is set for each tier.)
- Recall Hour Field on Paychecks: QuickBooks recalls or reuses hours-worked information from the last pay period’s paychecks. You use this option when you have a fixed number of hours that occurs from paycheck to paycheck.
- Job Costing, Class, and Item Tracking for Paycheck Expenses: QuickBooks lets you track payroll expenses not just by account, but also by job, class, or item.
- Assign One Class Per: The Entire Paycheck and Earnings Item options enable you to break wage expenses into classes more finely. You can indicate, for example, that you want to use a different class for each item that appears on an employee’s paycheck. (Note: These options appear only if classes are enabled.)
The Display Employee List By radio buttons let you choose how employee lists are sorted on reports: by first name or by last name.
If you click the Employee Defaults button, QuickBooks displays a dialog box that you can use to set employee payroll default information, such as deductions for taxes or health insurance.
Finally, at the bottom of the dialog box, QuickBooks provides two other options for handling payroll. The Mark New Employees As Sales Reps check box, if selected, does what you’d expect: It marks new employees that you add to the Employee list as sales reps. And the check box titled Display Employee Social Security Numbers in Headers on Reports, if selected, also does what you’d expect: It adds employee Social Security numbers to reports.
Telling QuickBooks How Reminders Should Work
The My Preferences tab of the Reminders Preferences dialog box consists of just one check box, which you can use to tell QuickBooks that you want to see the Reminders list when you open a company file. Because the My Preferences tab includes only a single check box, I don’t show it here as a figure.
The Company Preferences tab, shown in Figure 3-14, provides a bunch of radio buttons that you can use to specify how QuickBooks should remind you of accounting and bookkeeping tasks that you need to complete: Checks to Print, Paychecks to Print, Invoices/Credit Memos to Print, Overdue Invoices, Almost Due Invoices, Sales Receipts to Print, Sales Orders to Print, Inventory to Reorder, Assembly Items to Build, Bills to Pay, Memorized Transactions Due, Money to Deposit, Purchase Orders to Print, To Do Notes, and Open Authorizations to Capture.
For each of these accounting or bookkeeping tasks, you indicate whether you want to see a reminder for the item in the Summary list that appears in the QuickBooks Company Preferences Reminders list. You can also choose to actually see the list of tasks — such as the list of checks to print — or you can indicate that you don’t want to be reminded of some particular category of accounting or bookkeeping. For some of the reminder notes, you indicate how many workdays in advance you want to be reminded. If you indicate that you want to be reminded to print checks, for example, you must indicate how many days before the check date that you want the reminder to appear. You do this by entering a numeral in one of the Remind Me text boxes.
Specifying Reports & Graphs Preferences
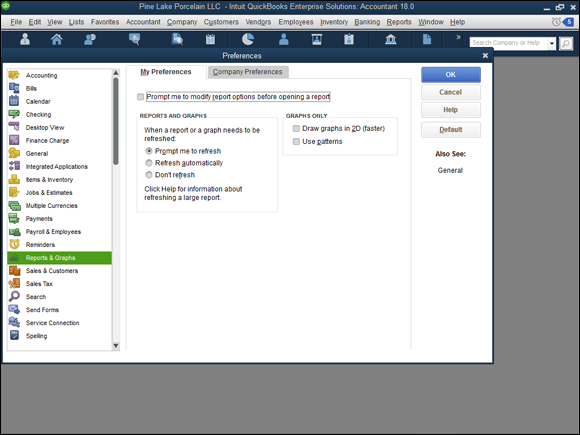
The My Preferences tab of the Reports & Graphs Preferences dialog box is shown in Figure 3-15. This tab provides radio buttons that you can use to indicate how QuickBooks should refresh reports when the information upon which the report is based changes. The default refresh option is Refresh Automatically. You can also select the Prompt Me to Refresh radio button to have QuickBooks (politely) suggest that you refresh a report only whenever the data changes. (You may not want to refresh automatically if you have a large data set and many reports. Refreshing a report can be rather time-consuming.) You can also select the Don’t Refresh radio button if you don’t want or don’t need to be reminded about refreshing a report.
The check box titled Prompt Me to Modify Report Options before Opening a Report, if selected, tells QuickBooks to open the Modify Report window whenever you create a report. You can use the Modify Report window to control what information is included in a report (such as what date range the report is based on) and other reporting options as well. If this check box isn’t selected, QuickBooks creates a report by using the default reporting options.
The Graphs Only check boxes let you control the way QuickBooks graphs report information. You can select the Draw Graphs in 2D check box to tell QuickBooks to draw two-dimensional rather than three-dimensional graphs. (QuickBooks draws two-dimensional graphs much more quickly, so you may want to use two-dimensional graphs.) Note that two-dimensional graphs are visually more precise than three-dimensional graphs. You can also select the Use Patterns check box to tell QuickBooks to draw a graph that uses crosshatching patterns rather than colors for the different pieces of a chart.
For a complete discussion of the Modify Reports window, take a look at the discussion in Book 4, Chapter 2.
Figure 3-16 shows the Company Preferences tab of the Reports & Graphs Preferences dialog box. This tab provides several useful options for default report generation rules. The Summary Reports Basis radio buttons, for example, let you indicate whether the default accounting method used to create a report should be accrual-basis accounting or cash-basis accounting. The Aging Reports radio buttons let you specify how the age of an invoice or bill should be calculated: from the due date or from the transaction date. The Reports - Show Accounts By radio buttons let you specify how account information appears in reports: account name only, description only, or both name and description.
Two other options are especially noteworthy. The Classify Cash button displays a dialog box that lets you indicate whether changes in a particular account balance should appear in the operating, investing, or financing portion of the statement of cash flows.
 If you’re not a professional accountant, you want to get your CPA’s help in making changes to this area of QuickBooks. The rules for presenting a statement of cash flows are quite involved.
If you clear the Default Formatting for Reports check box and click the Format button, QuickBooks displays the Report Format Preferences dialog box, which lets you customize the report header and footer information. Figure 3-17 shows the Header/Footer tab of the Report Format Preferences dialog box. The Show Header Information check boxes let you specify what information should appear in the report header area. The Show Footer Information check boxes let you make the same specifications for the report footer. The Alignment drop-down list in the Page Layout section lets you specify how information should be aligned on the report page.
Figure 3-18 shows the Fonts & Numbers tab of the Report Format Preferences dialog box. From this tab, you specify what font and formatting you want to use for bits of report information. If you want to change the font for the report’s column labels, for example, click the Column Labels entry in the Change Font For list box; then click the Change Font button. QuickBooks displays a Font Formatting dialog box (not shown) that lets you specify the font, font style, point size, and other special effects.
If you’re confused about changing report formatting, check out Book 4, Chapter 2. It talks about all this stuff.
Setting Sales & Customers Preferences
I won’t show you the My Preferences tab. The personalized preferences for dealing with sales and customers are pretty basic. The tab lets you specify whether QuickBooks should prompt you to invoice a customer for time or costs you’ve previously said are billable to that customer.
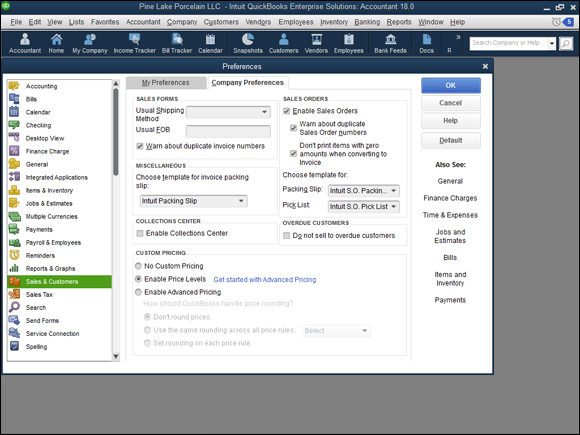
The company preferences deserve more explanation. Figure 3-19 shows the Company Preferences tab of the Sales & Customers Preferences dialog box. The Sales Forms options relate to the invoice information you supply to customers. The Usual Shipping Method drop-down list lets you specify the default shipping method. The Usual FOB text box lets you set the default free on board (FOB) point. You can select a check box to tell QuickBooks whether it should warn you when you use duplicate invoice numbers.
The Choose Template for Invoice Packing Slip drop-down list in the Miscellaneous section lets you specify how packing slips should look.
The Enable Price Levels radio buttons — No Custom Pricing, Enable Price Levels, or Enable Advanced Pricing — let you turn on QuickBooks price levels features. I won’t say more about this here. Price levels are discussed in more detail in Book 3, Chapter 3.
The Sales Orders check boxes let you control how the QuickBooks sales orders work, including whether you even want to use sales orders, how numbering should work, and how they should look when they print. The Sales Orders options also include drop-down list boxes you can use to specify how sales orders should look and a check box you can select to tell QuickBooks not to sell more stuff to customers with overdue balances.
Specifying How Sales Are Taxed
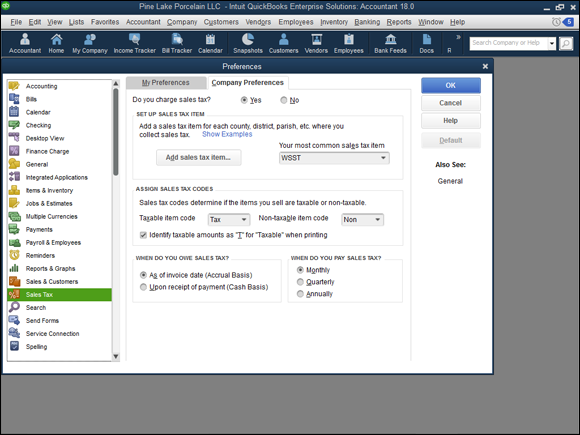
Although no personal preferences are available for sales tax, company preferences do exist. Figure 3-20 shows the Company Preferences tab of the Sales Tax Preferences dialog box. The Do You Charge Sales Tax? radio buttons, which appear at the top of the tab, control whether you can charge sales tax within QuickBooks. You select the radio button — Yes or No — that answers the question.
The Taxable Item Code and Non-Taxable Item Code drop-down lists let you define what code QuickBooks should use to identify taxable and nontaxable sales. By default, QuickBooks uses the clever “tax” code for taxable sales and the equally clever “non” code for nontaxable sales. You can select the Add New entry from either drop-down list, however, and use the dialog box that QuickBooks displays to create your own taxable and nontaxable codes.
The Set Up Sales Tax Item and Assign Sales Tax Codes sections let you set up an item for the sales tax that you charge on invoices. You can indicate the default (or most common) sales tax item that you want to include by entering this sales tax item name in the Your Most Common Sales Tax Item combo box. To add the sales tax item, choose Add New from this drop-down list and complete the dialog box that QuickBooks displays. The New Item dialog box lets you name the sales tax item and identify the sales tax rate.
You can also add a new sales tax item by clicking the Add Sales Tax Item button.
The Taxable Item Code and Non-Taxable Item Code drop-down lists let you select the code words to designate invoice items as subject to sales tax. The check box titled Identify Taxable Amounts as “T” for “Taxable” When Printing, if selected, tells QuickBooks to flag taxable amounts on an invoice with the code T.
The When Do You Owe Sales Tax? radio buttons let you indicate when the taxing authority says you owe sales tax: as of the invoice date (which means that the taxing authority requires accrual-basis accounting) or upon receipt of payment (which means that the taxing authority allows cash-basis accounting).
The When Do You Pay Sales Tax? radio buttons (Monthly, Quarterly, and Annually) let you tell QuickBooks how frequently you must remit sales tax amounts. You select the radio button that corresponds to your sales tax payment frequency.
Book 2, Chapter 2 describes how to set up sales tax items.
Setting the Search Preferences
The My Preferences tab of the Search Preferences dialog box provides a check box you can use to indicate that you want the Search box to appear on the QuickBooks icon toolbar. (This seems pretty self-explanatory, but if you’re confused, check the box, click OK, and then look at the way that QuickBooks has modified your icon toolbar.)
The Company Preferences tab of the Search Preferences dialog box (not shown) lets you specify how frequently QuickBooks updates the index of company data file and menu items that are used when you search for data within the QuickBooks program. By default, QuickBooks does its update every hour, but you can request more frequent or less frequent updates. An update of the index takes a few minutes, and during the update, QuickBooks runs more slowly. The Search Company Preferences tab also includes a button you can click to demand an immediate update of the index.
Setting the Send Forms Preferences
The My Preferences tab of the Send Forms Preferences dialog box lets you check a box to specify whether the To Be E-Mailed check box is selected for customer invoices; click an option button to specify when emailed forms should be processed with web mail (such as Gmail or QuickBooks email); and provides buttons you can click to build a list of email accounts you want to use for web mail.
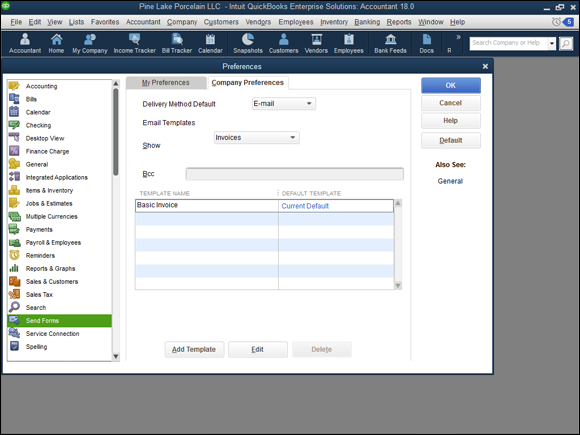
The Company Preferences tab of the Send Forms Preferences dialog box is shown in Figure 3-21. The Company Preferences tab lets you specify the default message text, message subject, and salutation for emailed invoices, estimates, and statements. To use the Company Preferences tab, you use the Show drop-down list to specify which type of message text you want to change. Next, click the message you want to change; then click the Edit button. When QuickBooks displays the Edit Email Template dialog box (not shown), you change the default message however you want.
Book 3, Chapter 1 talks about invoicing customers and emailing customer invoices.
Fine-Tuning the Service Connection
The My Preferences tab of the Service Connection Preferences dialog box provides two check boxes you can select to control how QuickBooks works when you’re making web connections, as shown in Figure 3-22. One check box gives you the option of saving downloaded files. The other tells QuickBooks not to close your web browser when it finishes using the web.
For the Service Connection Preferences dialog box, two Company Preferences options are available. You can, for example, indicate whether QuickBooks should automatically connect to QuickBooks Services without asking for a password or whether it should always ask for a password. To make this decision, you simply select the appropriate radio button. You can also select the Allow Background Downloading of Service Messages check box to tell QuickBooks that background collection of messages is okay. (If you select this check box, QuickBooks downloads new messages during idle times so that it doesn’t slow your other Internet activities.)
Controlling Spell Checking
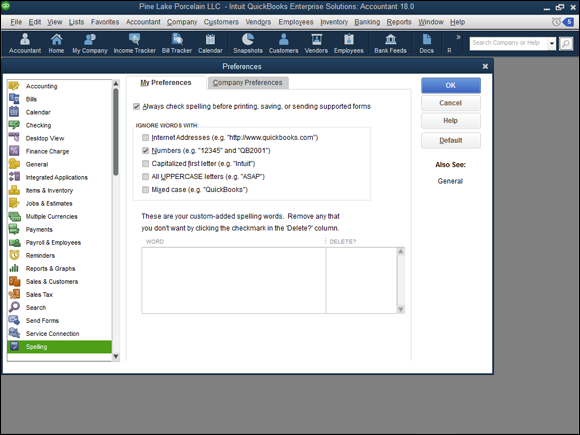
No company preferences exist for the Spelling Preferences dialog box, but the My Preferences tab (shown in Figure 3-23) provides several options for controlling how spell checking works for you within QuickBooks. Select the check box titled Always Check Spelling Before Printing, Saving, or Sending Supported Forms if you want to have automatic spell checking performed before you actually distribute a document to an outside party, such as a customer or vendor.
You can use the Ignore Words With check boxes to tell QuickBooks not to spell-check words or phrases that aren’t going to appear correctly spelled because they aren’t real words. Select the Internet Addresses check box, for example, to tell QuickBooks that it shouldn’t check Internet URL addresses. And select the All UPPERCASE Letters check box to tell QuickBooks that it shouldn’t attempt to spell-check words that are acronyms and abbreviations, such as OK and ASAP.
QuickBooks also lets you remove custom-spelled words from your spell-checking dictionary. (You add custom-spelled words during spell checking by telling QuickBooks that a word flagged as possibly misspelled is, in fact, spelled correctly. To do this, click the Add button when the Check Spelling dialog box appears.)
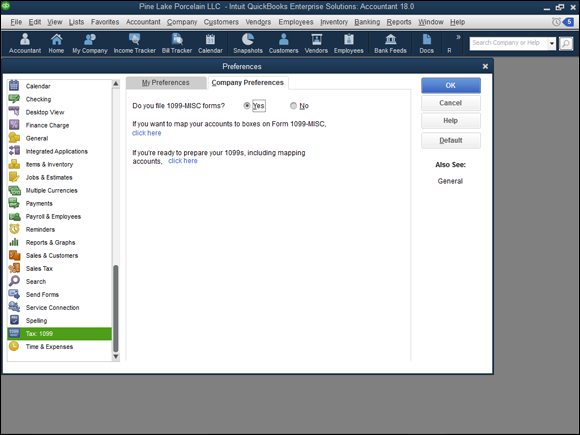
Controlling How 1099 Tax Reporting Works
No personal preferences exist for 1099 tax reporting. Company preferences exist, however, as indicated by the Company Preferences tab, shown in Figure 3-24. This tab lets you tell QuickBooks when you’re required to file 1099-MISC forms (answer the Do You File 1099-MISC Forms? question by selecting the Yes radio button). The tab also lets you map QuickBooks accounts to the different boxes on the 1099 form you use to report payments to independent contractors. (To do this, click the Click Here hyperlink.) Confer with your tax adviser if you have questions about these boxes or the 1099 reporting threshold amounts, or visit the IRS website at www.irs.gov.
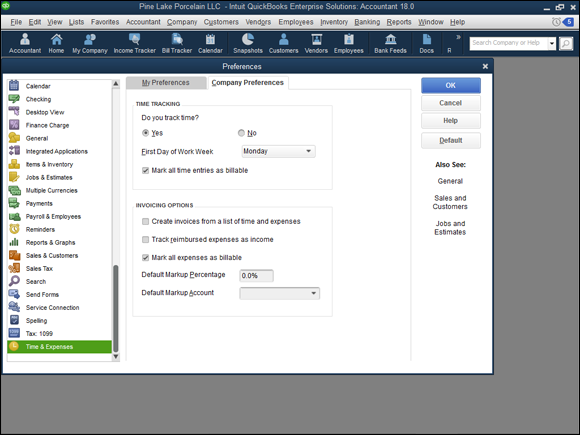
Setting Time & Expenses Preferences
Figure 3-25 shows the Company Preferences tab of the Time & Expenses Preferences dialog box. To turn on time tracking within QuickBooks, enable Do You Track Time? by selecting the Yes radio button. You can also use the First Day of Work Week drop-down list to indicate which day should appear first on the Weekly Time Sheet window. (This setting is what you use to describe billable time for the week.) Book 3, Chapter 1 talks about billing for time in more detail. You may want to look there if you have questions about tracking time and billing for that time.
You may need to scroll down the list of Preferences to see the Time & Expenses preference settings.
Use the Invoicing Options check boxes to indicate how you want to track reimbursed expenses. To indicate that you sometimes want to base invoices on accumulated time and expenses, select the Create Invoices from a List of Time and Expenses check box. Furthermore, to indicate that you want to track reimbursed expenses that you bill and then later collect from customers or clients as income, select the Track Reimbursed Expenses As Income check box. The Default Markup Percentage text box lets you specify a default retail markup percentage to use in your pricing (although you should double-check that it’s showing up properly in estimates before you count on it). The Default Markup Account drop-down list lets you specify which account QuickBooks should use for tracking your markups.