Chapter 1
For Accountants Only
IN THIS CHAPTER
 Managing QuickBooks journal entries
Keeping company information up to date
Handling memorized transactions
Working with Accountant & Taxes reports
Making an Accountant’s Copy of the QuickBooks data file
Issuing client data review commands
In this short chapter, I want to quickly go over stuff that accountants need or want to know. Because I assume that you’re an accountant, I go a little faster here than I do in other chapters of this book. Also, I don’t provide blow-by-blow instructions for working with the windows and dialog boxes that this chapter discusses.
If you find yourself just a wee bit frustrated with me at this point, go ahead and peruse the paragraphs of this chapter — keeping in mind that what I discuss in this chapter is pretty advanced accounting stuff. You don’t want to do the things that this chapter talks about unless you really know your debits and credits. And if you do know your debits and credits, you should find the information I provide here to be all that you need.
Working with QuickBooks Journal Entries
QuickBooks makes it easy for you — an accountant — to record journal entries. If you’ve spent any time working with QuickBooks, you may know that most of the journal entries that get recorded in the QuickBooks data file are recorded automatically. If somebody writes a check, for example, QuickBooks records the journal entry for that. When somebody creates an invoice, again, QuickBooks records the journal entry for that.
In some cases, however, somebody — probably you — needs to record a journal entry to get some transaction into the QuickBooks data file. You use journal entries to record depreciation, to accrue liabilities, and to record the disposal of assets, for example.
Recording a journal entry
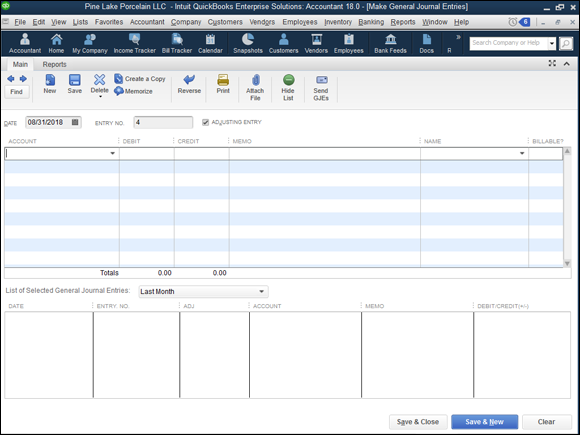
To record a journal entry, choose Company ⇒ Make General Journal Entries. QuickBooks displays the Make General Journal Entries window, as shown in Figure 1-1.
You can probably figure out how to use the Make General Journal Entries window yourself. You enter the general journal entry date in the Date box. You use the Entry No. box to number journal entries or to assign them some meaningful code. After you provide this basic information, you use the columns of the Make General Journal Entries window to record the journal entry. You don’t need me to tell you that the general ledger account number or name goes in the Account column, the debit amount in the Debit column, and the credit amount in the Credit column. You may find it useful, though, to be reminded that you can use the Memo column to enter some description of the debit or credit; you can use the Name column to identify the customer, vendor, employee, or other name associated with the credit or debit; you can use the Billable column to indicate that the debit or credit should be listed as an amount to be billed to the named customer; and you can use the Class column (if you’ve turned on class tracking) to classify the debit or credit.
 My technical editor, who’s also a CPA, reminds me that you should never put a name in the first row of the journal entry. If you do, that name will be associated with every line of that journal entry when you view reports in QuickBooks, even if the name relates only to the first line.
 If you do want to associate names with lines of a journal entry, one way to do this cleanly is to leave the first line of the journal entry blank so that no stray entries become inadvertently associated with reports.
Reversing a journal entry
To reverse a journal entry, first display the Make General Journal Entries window by choosing the Company ⇒ Make General Journal Entries command. QuickBooks displays the Make General Journal Entries window (refer to Figure 1-1). Use the Previous and Next buttons to page through general journal entries that you’ve already entered. Found the entry? Good.
An update to this year’s version now means all general journal entries can be reversed the same way: When you find the journal entry that you want to reverse, click the Reverse button. (The Reverse button appears along the top edge of the Main tab of the Make General Journal Entries window.) QuickBooks reverses the general journal entry by entering a transaction in the next accounting month with the debits and credits flip-flopped.
The Adjusting Entry check box, available in the Make General Journal Entries window in some versions of QuickBooks, indicates that the journal entry is a special entry made after the fact by the accountant. You can print a report of just those special “adjusting entries.”
Book 1, Chapter 1 discusses the basics of accounting. Book 1, Chapter 2 describes basic bookkeeping, including how debits and credits work. Book 1, Chapter 3 describes how to do special accounting magic tricks, including how and why to enter reversing journal entries. If you find yourself in this chapter even though you’re not a degreed accountant, you may want to peruse the information in those chapters to understand what journal entries are and why in the world one would want to reverse one.
Editing journal entries
Typically, you won’t want to fool around and later change the journal entries. If you do feel the need to make changes, however, QuickBooks provides an Edit menu with commands that you can use for just this purpose. For one, QuickBooks supplies a Delete General Journal command that you can use to delete the journal entry shown in the Make General Journal Entries window. QuickBooks also supplies a Void General Journal command that you can use to void the general journal entry shown in the window. Typically — and again, you already know this — you don’t want to delete general journal entries. Instead, you want to void them. Enough said.
Updating Company Information
The Company menu supplies a bunch of commands in addition to the Make General Journal Entries command. Accountants may have occasion to use the Company Information command, for example. This command enables you to update company name and address information, fiscal and tax year settings, the tax form used to report profits, and taxpayer identification numbers.
Working with Memorized Transactions
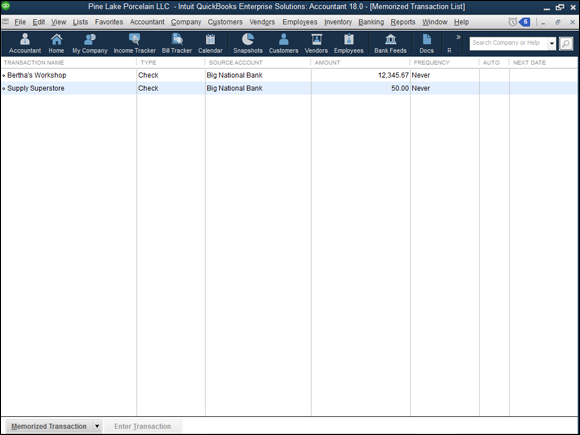
A quick tip: Most of the transactions that people enter in QuickBooks can be memorized by choosing the Edit ⇒ Memorize command when the transaction appears in the open window. You (or someone else) can later reuse a memorized transaction. You choose the Lists ⇒ Memorized Transaction List command, and then, when QuickBooks displays the list of memorized transactions (shown in Figure 1-2), you double-click the transaction that you want to enter again.
Reviewing the Accountant & Taxes Reports
The Accountant & Taxes menu appears when you choose the Reports ⇒ Accountant & Taxes command. Although I don’t show pictures of each report that gets displayed when you choose a command from the Accountant & Taxes menu (I do show the Trial Balance report in this section), I want to point out that hidden on this submenu are nearly 20 commands and reports that are particularly interesting and useful to accountants. The following list identifies these reports:
- Adjusted Trial Balance: The Adjusted Trial Balance menu command produces, of course, a Trial Balance report as of a particular date. What’s unique about this version of the Trial Balance report (compared with the one described next) is that adjusting journal entries are clearly highlighted. (Adjusting journal entries are those that were marked as such when made by your accountant.) As noted earlier in the chapter, although Figure 1-1 doesn’t show it, some versions of QuickBooks (like the version your accountant probably uses) provide an Adjusting Journal Entry check box. You can check that box to indicate an adjusting journal entry.
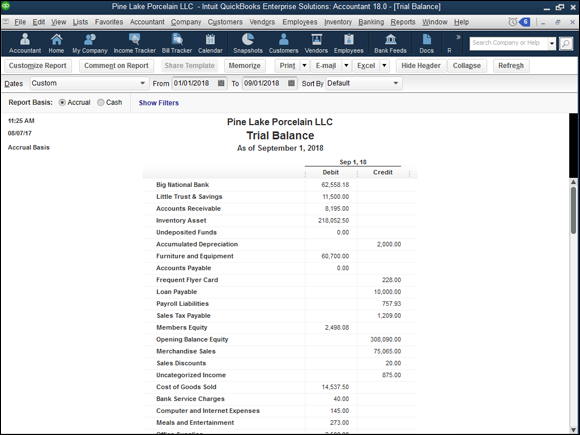
- Trial Balance: The Trial Balance menu command produces, of course, a Trial Balance report as of a particular date (see Figure 1-3).
- General Ledger: The General Ledger menu command produces a report that simply lists the accounts in your Chart of Accounts list and then changes the account for the month, year, or whatever accounting period you specify.
- Transaction Detail by Account: This menu command produces the report that you’d expect: a list of the transactions that affect a particular account.
- Adjusting Journal Entries: The Adjusting Journal Entries command produces a list of the journal entries that you or someone else marked as being adjusting journal entries.
- Journal: The Journal menu command produces a report that lists transactions by transaction type and number.
- Audit Trail: The Audit Trail report is pretty important for accountants — particularly for accountants who are concerned or worried that transactions have changed when they shouldn’t have changed. The Audit Trail report lists transactions by the person entering the transactions. The Audit Trail report also lists changes to transactions and identifies who made the changes.
- Closing Date Exception Report: If you finalize the accounting data for the year (referred to as closing the books) — and you should — the Closing Date Exception Report command identifies changes to closed transactions. (Closing the QuickBooks data file is described in Book 7, Chapter 2.)
- Customer Credit Card Audit Trail: A Customer Credit Card Audit Trail report lists only credit card transactions — perfect for people with heavy credit card transaction volumes that they can’t make heads or tails of.
- Voided/Deleted Transactions Summary: The Voided/Deleted Transactions Summary command produces a summary report of voided transactions and deleted transactions.
- Voided/Deleted Transactions Detail: The Voided/Deleted Transactions Detail command produces a detailed listing of all voided transactions and all deleted transactions.
- Transaction List by Date: The Transaction List by Date report lists transactions in order of date of entry.
- Account Listing: The Account Listing report lists all the accounts in your Chart of Accounts list. The report also gives the account balance and indicates the line on the tax return where the account is reported.
- Fixed Asset Listing: The Fixed Asset Listing report lists all the fixed assets in your Fixed Assets list.
- Income Tax Preparation: The Income Tax Preparation report shows on which lines of which tax forms account balances are reported.
- Income Tax Summary: The Income Tax Summary report uses your income tax preparation data to show what amounts should be reported on what lines of your tax forms. If you’re a sole proprietor filing a Schedule C tax form, for example, QuickBooks looks at all the accounts that you use to track gross receipts or sales. Then it totals the balances in those accounts and shows the actual value that should be reported on the gross receipts or sales line of your Schedule C tax form.
- Income Tax Detail: The Income Tax Detail report gives the same information as the Income Tax Summary report, except that this report shows the individual accounts that get bunched together to produce the tax line total.
Creating an Accountant’s Copy of the QuickBooks Data File
QuickBooks makes it easier for accountants to work with client data files. Consider this scenario: You have a client who needs help finishing the year’s accounting period. You have two choices. First, you can drive over to his shop, probably getting stuck in traffic along the way, and find yourself wondering whether you can bill the client $150 for your travel time. Second, you can have the client use the Accountant’s Copy feature of QuickBooks to send you a copy of the QuickBooks data file. You can review this accountant’s copy of the data file, make whatever fixes or changes are appropriate, and then send the changes to be made back to the client. The client can easily import these changes into his existing QuickBooks file and go off on his merry way. Pretty neat, right?
Creating an accountant’s copy
Your client creates the accountant’s copy of the QuickBooks data file by using his version of QuickBooks and the real data file. Then your client creates and sends you a file (through postal mail, email, or some other secure electronic format), or Intuit, the maker of QuickBooks, sends the file to you. Fortunately, the process is very straightforward either way.
Manually handling the accountant’s copy
Here’s what your client needs to do if the client will take care of sending the file to you:
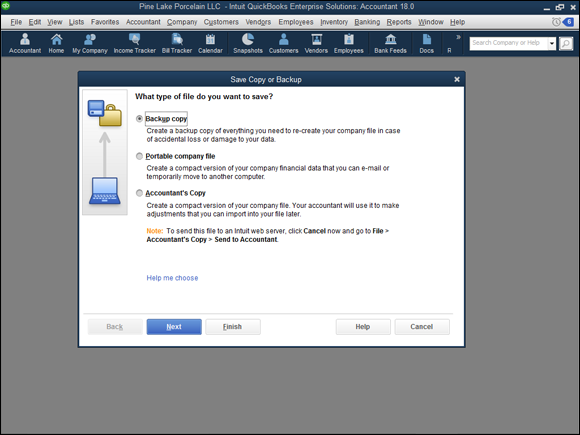
Choose the File ⇒ Create Copy command.
QuickBooks displays the Save Copy or Backup dialog box (see Figure 1-4), asking the client whether he wants one of the following:
- A backup copy of the file, which is a second copy of the QuickBooks file you create (usually) so that you’ll have a copy of the file in case something bad happens to the original QuickBooks data file.
- A portable copy of the file, which is a real live copy of the QuickBooks data file that’s been slightly scrunched in size so that it’s easier to move around (such as by emailing the file as an attachment).
- An accountant’s copy of the file, which is what I talk about in the opening paragraph of this discussion about the accountant’s copy, so I won’t repeat myself here.
- Select Accountant’s Copy and then click Next to continue.
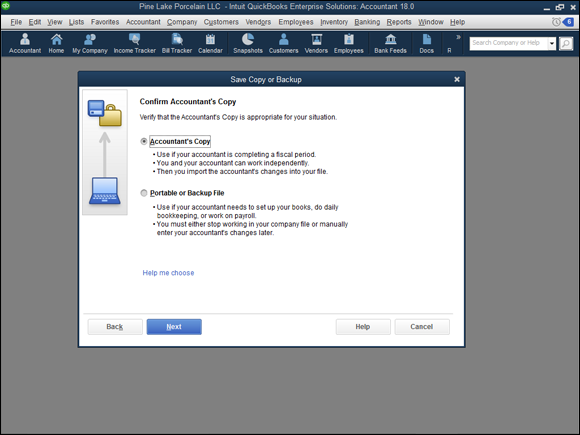
Confirm that you really want an Accountant’s Copy, and click Next.
QuickBooks next displays another dialog box to insist that your poor stressed-out client confirm that he really wants an accountant’s copy (see Figure 1-5) rather than simply a portable copy of the file.
Specify a dividing date.
When a client clicks the Next button to continue with the creation of an accountant’s copy, QuickBooks asks him for the dividing date. Transactions falling before this date can be edited only inside the accountant’s copy. Transactions falling after this date can be edited inside both the accountant’s copy and the client’s copy.
Click Next to continue.
Another message appears, telling the client that QuickBooks must close all the windows to create an accountant’s copy.
Click OK.
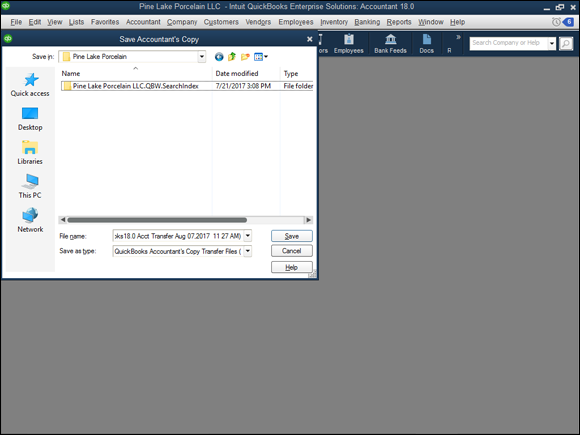
QuickBooks displays an updated Save Accountant’s Copy dialog box, shown in Figure 1-6.
Name the accountant’s copy.
Use the File Name box of the Save Accountant’s Copy dialog box to name the accountant’s copy of the QuickBooks data file. If necessary, the client can also use the Save In drop-down list to specify where the accountant’s copy of the QuickBooks data file should be saved.
The client needs to remember where the accountant’s copy of the file gets saved. This file is given to the accountant — via email or snail mail, or on a disc — so that he can use it.
Create the file.
After the client names the accountant’s copy of the data file and indicates, if necessary, where the accountant’s copy should be saved, the client clicks Save. QuickBooks saves an accountant’s copy of the QuickBooks data file.
Then this data file is transmitted to the accountant by the client. In other words, the client needs to snail-mail or email the file.
Your email provider may limit the size of attachments (including QuickBooks files) that you can send via email. If the size thing fouls you up, you can upload the QuickBooks file to the Intuit website by choosing File ⇒ Send Company File ⇒ Accountant’s Copy ⇒ Client Activities ⇒ Send to Accountant. Intuit sends the accountant a message with a clickable link that she can use to grab the file.
 Accountant copies use three file types. The Accountant Transfer File (with the
 .qbx file extension) is what a client creates and gives to the accountant. The actual Accountant’s Copy (with the .qba file extension) is what the accountant works with after he or she opens the Accountant Transfer File. Finally, there’s the Accountant Export File (with the .qby file extension), which holds the changes that go back to the client.
Obviously, it may not actually be your client who takes these steps; you may have to do the dirty work. In either case, however, that’s how the process works. Note, however, that the real-time savings for the accountant and the cost savings to the client occur when you can get the client to choose the command and work with the dialog box. Then you can charge billable time for actually working with QuickBooks data rather than for fiddle-faddling with the file.
Electronically sending the accountant’s copy
Your client can also send a copy of the QuickBooks accountant’s copy electronically by using Intuit’s file transfer service. To do this, the client chooses File ⇒ Send Company File ⇒ Accountant’s Copy ⇒ Client Activities ⇒ Send to Accountant. QuickBooks provides onscreen instructions for sending, or uploading, the accountant’s copy to the Intuit server, including the steps for adding a password to secure the uploaded file.
After the accountant’s copy is uploaded, the Intuit server sends the accountant an email message with a link the accountant can use to download the accountant’s copy file. As noted, the client provides a password to restrict access to the downloaded file, so the accountant needs this password from the client before the download. The accountant also needs any QuickBooks password to open the downloaded file.
You want to use the Send Company File command or have your clients use the Send Company File command if you can. The Send Company File command saves you much wailing and gnashing of teeth. It also provides a highly secure way to share accountant’s copies. The only problem that I’ve encountered with the process, in fact, is that the link in the email message you get from Intuit expires after a few days. Accordingly, if your client sends you the file on the first day of your two-week vacation, the link won’t work when you get back to the office. The link will have expired.
Because the links Intuit sends you do expire after a few days, in our CPA office, we actually try to avoid having clients send us their QuickBooks files via the Send Company File command. Instead, we ask clients to upload their QuickBooks files to our www.sharefile.com. Is it, er, unpatriotic if I say you may want to provide the same alternative to your clients?
Using an accountant’s copy
Regardless of whether the client manually transmits an accountant’s copy, emails an accountant’s copy, or sends an accountant’s copy via the Intuit file transfer service, you use the accountant’s copy by choosing the File ⇒ Send Company File ⇒ Accountant’s Copy ⇒ Open & Convert Transfer File command. When you choose this command, QuickBooks displays a series of message boxes explaining how you work with the accountant’s copy. To move back and forth through the message boxes, click Next and Back. After you click Next in the last message box, QuickBooks displays the Open Accountant’s Copy Transfer File dialog box (not shown).
Use the Look In drop-down list to identify the location of the accountant’s copy. If necessary, enter the accountant’s copy filename in the File Name box. When you click Open, QuickBooks prompts you to name the accountant’s copy and then opens the accountant’s copy. Note that you won’t be able to make the same changes to an accountant’s copy that you can make to a regular QuickBooks data file. QuickBooks limits the sort of changes that you can make in an accountant’s copy.
Reusing an accountant’s copy
If you’ve already opened an accountant’s copy file once, you can reuse the accountant’s copy by choosing the File ⇒ Open Previous Company command. When you do this, QuickBooks displays a list of the company files (including accountant’s copy files) that you’ve worked with previously. When you click the accountant’s copy you want to work with, QuickBooks opens the data file so that you can continue performing your magic.
Exporting client changes
After you’ve used an accountant’s copy to correct transactions or to enter new transactions, you export the changes so that they can later be imported into the client’s data file. To do this, choose the File ⇒ Send Company File ⇒ Accountant’s Copy ⇒ View/Export Changes for Client command. QuickBooks first displays a window that lists the changes you made to the accountant’s copy (not shown). Note that you can print this list or create a .pdf file of it by clicking the Print or Save As PDF button.
If you click the Create Change File for Client button, QuickBooks displays the Save Accountant’s Export to dialog box (not shown). This dialog box works like a standard Windows dialog box for saving a file or document. You use the Save In drop-down list to identify the location of the changes file. Then use the File Name box to give the file a unique name. When you click Save, QuickBooks saves the changes that you’ve made into a file. You later import this file, or have the client import this file, into the QuickBooks data file.
If you click the Send Changes to Client button, QuickBooks displays the Save Accountant’s Changes dialog box (also not shown). This dialog box collects the information necessary to send the client an email with instructions about how to import the accountant changes and a link the client can use to retrieve the actual accountant’s changes. One neat thing about this option is that QuickBooks tells the accountant when the client grabs the changes.
You don’t keep your accountant’s copy of the data file. In other words, the accountant’s copy is just a temporary copy of the data file that you use to identify and create a set of changes necessary to update or correct the client’s records. After you make the changes, you export the changes to a changes file. Then the client imports those changes (as discussed in the next section). If you make changes again sometime in the near future, you have the client create a new — a brand-new — accountant’s copy.
To identify when you’re working with an accountant’s copy, QuickBooks displays the parenthetical phrase (Accountant’s Copy) along the top of the QuickBooks program window. QuickBooks also identifies regular QuickBooks data files for which accountant’s copies have been created by adding the parenthetical phrase (Accountant’s Copy Exists). This phrase appears only on the QuickBooks program window title bar from the point when the client creates the accountant’s copy to the point when the client imports changes from the accountant’s copy.
Importing accountant’s changes
Your client imports the changes that you’ve made in the accountant’s copy of the data file into her working copy of the data file. To do this, the client chooses the File ⇒ Send Company File ⇒ Accountant’s Copy ⇒ Client Activities ⇒ Import Accountant’s Changes command.
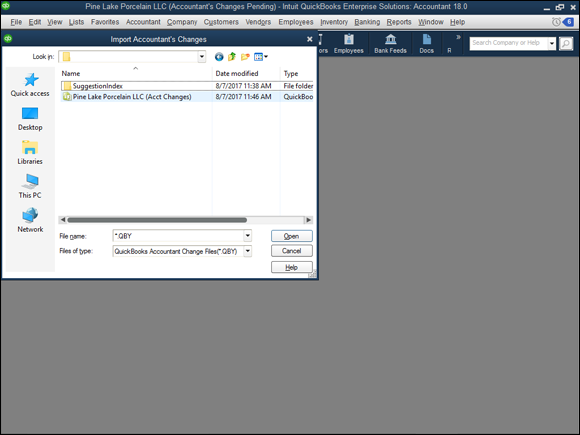
QuickBooks displays the Import Accountant’s Changes dialog box, as shown in Figure 1-7. To use the Import Accountant’s Changes dialog box, the client uses the Look In drop-down list to identify the location of the changes file. After the client identifies the location — this may be a disc with the changes file on it — the client should be able to see the change file in the middle of the Import Accountant’s Changes dialog box. The client can double-click the change file to import the changes into his or her QuickBooks data file. QuickBooks, by the way, displays a window that highlights the accountant’s changes to the file for the client.
QuickBooks prompts the client to back up the QuickBooks data file. I don’t describe that process here, but I go into a lot of detail about how to back up a data file in Book 7, Chapter 2.
After the client imports the changes, QuickBooks removes the parenthetical phrase (Accountant’s Copy Exists) from the QuickBooks program window title bar.
Canceling accountant’s changes
Here’s a little question for you: What happens if the client gives you an accountant’s copy of the QuickBooks data file and then realizes that you won’t be making changes or that he or she doesn’t want to accept the changes? Bummer, right? Well, not really.
When a client creates an accountant’s copy of the QuickBooks data file, QuickBooks marks the client’s data file as one that can be modified through the accountant’s changes. QuickBooks does this to later allow the accountant’s changes. But if those changes won’t be made, the client unmarks the data file as available for changes. To do this, the client chooses the File ⇒ Send Company File ⇒ Accountant’s Copy ⇒ Client Activities ⇒ Remove Restrictions command. When the client chooses this command, QuickBooks displays a message indicating that the client is choosing to cancel out of accountant’s copy mode. After the client chooses this command, the client won’t be able to import any changes created by using the canceled accountant’s copy.
Troubleshooting accountant’s copy transfers
Let me leave you with one last comment concerning accountant’s copies. Quite honestly, we’ve sometimes found the accountant’s copy system a little, er, impractical. Yes, yes, if all goes well, your client gets your journal entries into his or her QuickBooks with just a few clicks. But obtaining and then opening accountant’s transfer files sometimes doesn’t work smoothly. (Usually, the lack of smoothness stems from someone sending us an accountant’s copy created with the version of QuickBooks released while Happy Days was still running in prime time.)
Our work-around? If we can’t easily get an accountant’s copy to work, we ask for a backup copy of the client’s QuickBooks data file. That backup copy is nearly always easy to get open. We then print out the journal entries the clients need to enter on their own into their data file.
Using the Client Data Review Commands
Before this chapter ends, let me mention the Client Data Review command, which is available in the Accountant Edition versions of QuickBooks Premier and QuickBooks Enterprise Solutions.
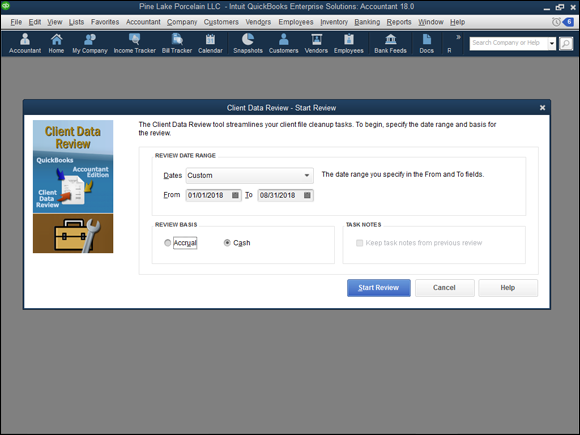
Choose the Accountant ⇒ Client Data Review ⇒ Client Data Review command to display the Client Data Review – Start Review dialog box (see Figure 1-8). It starts you on a multiple-step process that walks you through the cleanup of a client’s QuickBooks data file, including utilities for finding and fixing unapplied customer and vendor payments and credits (a bane of bookkeepers everywhere), for performing wholesale reclassifications of transactions (useful for undoing wholesale errors), for cleaning up undeposited funds accounts and bad payroll liability account balances (common problems), and for writing off uncollectible invoices.
If you’re using an Accountant Edition of QuickBooks and want some tools for quickly cleaning up some poor client’s bookkeeping mess, therefore, check out these self-explanatory tools.
If you’re not using an Accountant Edition of QuickBooks, you may want to consider signing up as a QuickBooks Certified Pro Advisor just to get an Accountants Edition copy of QuickBooks. Note that the QuickBooks Certified ProAdvisor training covers the Client Data Review tools in detail.