
Origami Symbols Key
Trumpet Flower

Designed by many modern folders.

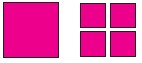
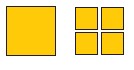
1. Use full size or quarter sized paper. One square makes one flower.

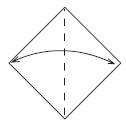
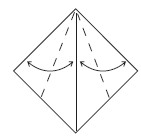
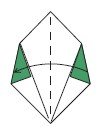
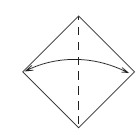
2. Valley-fold in half edge to edge, both ways, on the white side. Valley-fold in half corner to corner, both ways, on the colored side.
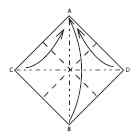
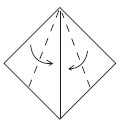
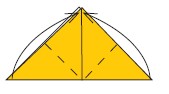
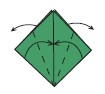
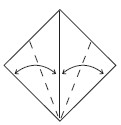
3. Mountain and valley-fold to bring all corners together.

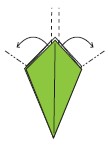
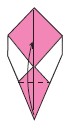
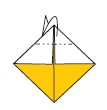
4. Valley-fold the bottom right edge of the first layer to the front. Mountain-fold the bottom left edge of the first layer behind. Repeat behind.

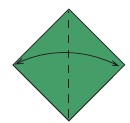
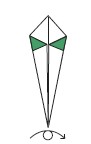
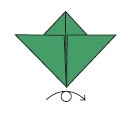
5. Open.

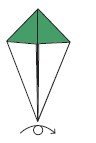
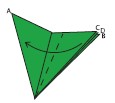
6. The finished Trumpet Flower. Combine with any of the leaf projects.
Blossom

Designed by Michael G. LaFosse
1. Cut paper into quarters, approximately three inches square. You will need six pieces of paper for one flower.

2. Fold in half, corner to corner. Unfold.

3. First, fold in the bottom right edge to the crease. Fold down the top corner, half way to the square corner.

4. Fold in the top left edge to the center crease. Turn the paper over, left to right.

5. Fold up the bottom corner, making sure that the crease hits the corner on the right.

6. The finished petal. You will need six to make one flower.

7. Slip the bottom left corner of one petal unit into the triangle corner of another. Turn over.

8. Mountain-fold the left corner of the top piece behind the right flap of paper of the bottom piece. Mountain-fold the loose corner. Turn over and continue to add more petal units.

9. The finished Blossom.
Star Flower

Designed by Michael G. LaFosse

1. Begin with full size or quarter sized paper. You will need eight pieces for this project.
2. Fold in half, corner to corner. Unfold.
3. Fold in the top left and right edges to the crease.

4. Mountain-fold the bottom left and right edges the center of the back.

5. Fold up the bottom corner.

6. The finished petal. You will need eight for one flower.

7. Slip the bottom left corner of one unit into the triangle pocket of another. Turn over.

8. Tuck the bottom left corner in. Turn over and add another unit. Continue with the remaining units.

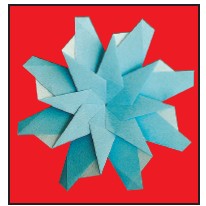
9. The completed Star Flower.
Striped Star Flower

Designed by Michael G. LaFosse

1. Begin with full size or quarter sized paper. You will need eight pieces for this project.

2. Fold in half, corner to corner. Unfold.
3. Fold in the top left and right edges to the crease.

4. Fold corners in to the crease lines.

5. Fold top edges to the crease lines and fold over again.

6. Mountain-fold the bottom left and right edges the center of the back.

7. Fold up the bottom corner.

8. The finished petal. You will need eight for one flower.

9. Slip the bottom left corner of one unit into the triangle pocket of another. Turn over.

10. Tuck the bottom left corner in. Turn over and add another unit. Continue with the remaining units.

11. The completed Striped Star Flower.
Christine’s Morning Glory

Designed by Christine Clement
Use a full size sheet of origami paper, green on one side and white on the other.

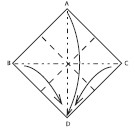
1. Valley-fold in half edge to edge, both ways, on the white side. Valley-fold in half corner to corner, both ways, on the green side.

2. Mountain- and valley-fold to bring all corners together.

3. Lift corner E up and center it. Flatten E down, letting the two layers of paper move to the outside left and right.

4. Repeat with the other three corners.

5. Fold over the right top layer to the left. Repeat on the other side.
6. Fold out the two inside corners, turning them inside-out, from white to green; as far as they will go.

7. Fold down the front layer. Repeat behind.

8. Fold under the four inside corners. Twist the outside corners.

9. The finished Christine’s Morning Glory.
Leaf Two

Created independently by many modern folders.
1. Begin with the colored side up. Fold in half, corner to corner. Unfold.

2. Fold in bottom edges to the center crease.
3. Turn over.

4. Fold in left and right long edges.
5. Turn over.

6. Open out the left and right corners.

7. The finished Leaf Two. Use it to add foliage to any suitable blossom.
Aster
Designed by Michael G. LaFosse

1. Cut paper into quarters, approximately three inches square. You will need eight pieces of paper for one flower.

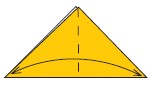
2. Fold in half, corner to corner. Unfold.

3. Fold bottom edges to the crease. Unfold.

4. Fold corners to the nearest crease.

5. Fold in to meet at the center crease.

6. Turn over.

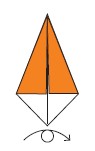
7. Fold bottom corner up, level with the side corners of the kite.

8. You will need eight. Turn over to begin assembly.

9. Tuck in left corner. Turn over.

10. Tuck in left corner. Mountain fold top left layer, follow the line of the triangle point.

11. Eight pieces assembled, back and front views.
Chrysanthemum

Designed by Michael G. LaFosse

1. Cut paper into quarters, approximately three inches square. You will need eight pieces of paper for one flower.

2. Fold in half, corner to corner. Unfold.

3. Fold in the top edges to the center crease.
4. Turn over.

5. Fold in the bottom edges to the center.

6. Fold down the top corner.

7. Fold in half.

8. Pull out the inner corner.

9. You will need eight petal units to make one flower. Apply a small amount of glue inside the top edge and on one side of the outside top edge.

10. Glue all eight together, as shown. Bring the outside edges together with glue.

11. The finished Chrysanthemum.
Blooming Cactus

Designed by Michael G. LaFosse

1. Cut paper into quarters, approximately three inches square. You will need at least six pieces of paper for the cactus plant and three or more pieces for the flowers.
For the Blossom

2. Fold in half, bottom corner to top corner.
3. Fold in half, corner to corner. Unfold.
4. Fold up the left and right corners to the top corner.

5. Turn over, left to right.

6. Fold in the bottom left and right edges, allowing the corners at the back to come out to the front.

7. Turn over.

8. Fold in the left and right edges, covering some of the center shape.

9. The finished Blooming Cactus blossom.
For the Base

10. Begin color side up if using origami paper. Fold in half, bottom edge to top edge.

11. Fold down the right side of the first layer, matching it to the bottom edge.
12. Turn over, top to bottom.

13. Fold up the right edge, matching the top edge. Unfold.

14. Fold up the right side, matching the crease to the top edge.

15. Turn over, top to bottom.
16. Fold up the left corner. Make sure that the crease runs from the square corner of the triangle flap up to the notch on the left.

17. Fold up the bottom corner.

18. The finished Blooming Cactus base. There are two places where you can fit other pieces into the back. Turn over to see the front side.

19. Be creative! Fit together as many segments as you like, adding cactus blossoms at the ends. You may use glue to make your cactus design permanent.
Plant Base Three

Designed by many modern folders.

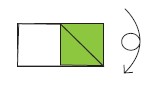
1. Valley-fold in half corner to corner, both ways, on the white side. Valley-fold in half edge to edge, both ways, on the colored side.

2. Mountain- and valley-fold to bring all corners together.

3. Fold the left half over to the right half.
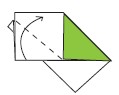
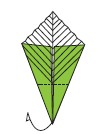
4. Fold corner A to the left.
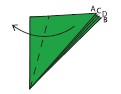
5. Fold corner C to the left, but not as far.

6. Fold corner D to the left, but not as far.

7. The completed plant. Insert the Blooming Cactus flower, the Simple Tulip, or the Lantern Blossom, for a beautiful flowering plant.
Preliminary Rose

Designed by Michael G. LaFosse

1. Valley-fold in half edge to edge, both ways, on the white side. Mountain-fold in half corner to corner, both ways, on the colored side.
2. Mountain- and valley-fold to bring all corners together.

3. Fold the bottom right edges up to the top left edges. Unfold. Repeat behind.

4. Fold the bottom left edges up to the top right edges. Unfold. Repeat behind.

5. Create a twist by folding just the top layer of each lower left edge to the upper right edge, so that corner A meets corner B. Make a vertical crease halfway down the square so the edge lies flat, then unfold. Repeat on the back and then on each of the sides. Form the rose by letting the creases fall back into place.

6. Push in the top of the center point and pinch the sides in, making an X-shaped pocket. Curl downward each of the eight corners to form graceful petals.

7. The finished Preliminary Rose. Combine it with Leaf Three or with the Quickie Rose Leaf.
Quickie Rose

Designed by Gay Merrill Gross

1. Use a piece of square paper colored on both sides. You can place origami paper back to back if you wish. Fold in half, corner to corner, both ways. Unfold.

2. Fold all four corners to the center.

3. Valley-fold in half, edge to edge, both ways. Mountain-fold in half, corner to corner, both ways. Use these creases to form the shape shown in step four. Use the letters, A through F, as a guide.

4. Valley fold corner B to the top. Mountain-fold corner A to the top. Repeat behind with C and D. You will be forming a pinwheel shape, so be sure that each corner is folded in the correct direction. Look ahead at step five for the shape.

5. Gently open out the four corners that you folded in step four until the folds you made form right angles. Pull out the four corners of the original square of paper to meet the sides.

6. Shape the corners evenly and you will have a good beginning form. Push in the top of the center point, making a X-shaped pocket in the center of the blossom.

7. Gracefully curl the petals! Add the Quickie Rose leaf for the final effect.
Quickie Rose Leaf

Designed by Gay Merrill Gross

1. Begin with green origami paper, white side up. Fold in half, corner to corner, and unfold. Fold in bottom edges to the center crease.

2. Fold bottom corner up to the green corners. Unfold.

3. Fold in half.

4. Beginning at the crease mark, mountain and valley fold to make leaf veins. Open paper.
5. Mountain fold bottom corner to the back.

6. Fold in the side and bottom corners to round the shape. Turn over.

7. Pinch the top layer corner in half and bend it down to one side to form a spike.

8. Fold the long edges of spike over to make it thinner. Stand the spike straight up.

9. The finished Quickie Rose Leaf. Place a Quickie Rose, or other blossom, on the spike.
Leaf Three

Created independently by many modern folders.

1. Fold in half, corner to corner. Unfold.

2. Fold bottom edges to the crease. Unfold.
3. Fold corners to the nearest crease.
4. Fold in half, right to left.

5. Fold top layer to the right, at an angle.

6. Turn over.

7. The finished Leaf Three. Use it to add foliage to any suitable blossom.
Two Lip Plant

Designed by Michael G. LaFosse

1. Use green and red papers, back to back. Begin with the red side up. Fold in half, bottom corner to top corner.

2. Fold in half and unfold.

3. Fold up the bottom left and right corners.

4. Turn over.
5. Fold in the bottom edge to the center crease; allow the corners to come from the back to the front.
6. Turn over.

7. Fold down the first layer of the top corner.

8. Mountain-fold the top and bottom red corners behind.

9. Fold the right and left sides in, with some of the paper going behind the center shape. Dent in the top of the upper lip.

10. The completed Two Lip Plant. Insert a written message between the lips!
Poinsettia

Designed by Michael G. LaFosse

1. Use full size or quarter size papers. You will need eight pieces to make one flower.

2. Fold in half, corner to corner. Unfold.

3. Fold in the bottom right edge to the crease. Turn over.

4. Fold in the bottom right edge to the crease.

5. Fold up the bottom corner to match the white square corner.

6. The finished petal. You will need eight for one flower.

7. Slip the bottom left corner of one petal unit into the triangle pocket of another.

8. Mountain-fold corner behind, making the fold run parallel to the center crease of the top unit. Be sure to take the triangular point of the paper behind when performing this step.

9. Two units joined. Glue is not required. Add the remaining units.

10. The completed Poinsettia.
Magnolia Blossom

Created by Michael G. LaFosse

1. Use full size paper or quarter size. You will need five or six pieces of paper for this project.

2. Begin color side up. Fold in half, corner to corner, and unfold.

3. Fold in the left and the right corners to the center.

4. Mountain-fold the left and right bottom edges to the middle of the back.
5. Fold up the bottom corner.

6. The completed petal. Make five or six for one flower.

7. Apply a small amount of glue to the bottom left corner of a petal unit. Slip this corner into the triangle pocket of another unit.

8. Valley-fold to make a hinge. Add additional petal units.

9. The completed Magnolia Blossom.
Plant Base Four

Created by many modern folders.
1. Fold in half, corner to corner. Unfold.
2. Fold bottom edges to the crease. Unfold.

3. Fold corners to the nearest crease.

4. Fold in to meet at the center crease.

5. Mountain-fold top corner behind. Fold up bottom corner to the top edge.

6. The finished Plant Base Four. Insert any flat blossom for a beautiful presentation!
Thistle

Designed by Michael G. LaFosse

1. Cut paper into quarters, approximately three inches square. You will need eight pieces of paper for one flower.

2. Fold in half, corner to corner. Unfold.

3. Fold in the top edges to the center crease.

4. Turn over.

5. Fold in the bottom edges to the center.

6. Fold down the top corner.

7. Fold in half.

8. Pull out the inner corner.

9. You will need eight petals to make one flower. Apply a small amount of glue to one side of the outside top edge.

10. Glue all eight together, as shown. Bring the outside edges together with glue.

11. The finished Thistle.
Snapdragon

Designed by Michael G. LaFosse
1. Begin with quarter sized paper. One square makes one flower. You can group several blossoms into a cluster, to resemble a spike of snapdragons.

2. Begin colored side up. Fold in half, edge to edge. Unfold.

3. Valley-fold the top corners to the center of the front. Mountain-fold the bottom corners to the center of the back.

4. Your paper will look like this.
5. Mountain-fold the top corner to the center of the back.

6. Mountain-fold in half and rotate the bottom corner to the left.

7. Fold up the bottom corner while pulling open the right flap. Repeat behind.

8. The finished Snapdragon.