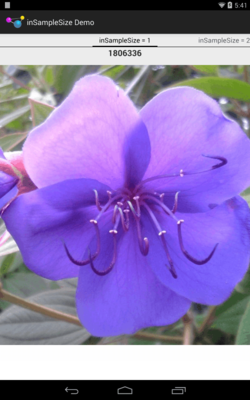
Figure 1002: InSampleSize Demo, on an LG Pad 8.3, inSampleSize = 1, Flower JPEG, Full Size
RAM. Developers nowadays are used to having lots of it, and a virtual machine capable of using as much of it as exists (and more, given swap files and page files).
“Graybeards” — like the author of this book — distinctly remember a time when we had 16KB of RAM and were happy for it. Such graybeards would also appreciate it if you would get off their respective lawns.
Android comes somewhere in the middle. We have orders of magnitude more RAM than, say, the TRS-80 Model III. We do not have as much RAM as does the modern notebook, let alone a Web server. As such, it is easy to run out of RAM if you do not take sufficient care.
There are two facets of memory issues with Android:
This part of the book examines memory-related issues, with this chapter focusing on the application heap. Another chapter will deal with system RAM issues. These are not to be confused with any memory-related issues inherent to graybeards.
Understanding this chapter requires that you have read the core chapters and understand how Android apps are set up and operate, particularly the chapter on Android’s process model.
When we think of “memory” and Java-style programming, the primary
form of memory is the heap. The heap holds all of our Java objects
– from an Activity to a widget to a String.
Traditional Java applications have an initial heap size determined by the virtual machine, possibly configured via command-line options when the program was run. Traditional Java applications can also request additional memory from the OS, up to some maximum, also configurable.
Android applications have the same basic structure, with very limited configurability and much lower maximums than you might expect.
The original Android devices had a heap limit of 16MB. As screens increase in resolution, the heap limit tends to rise, but only to a point. 32MB to 64MB of heap space is fairly typical, but less-expensive devices, such as Android One models, will tend towards the lower end of that range.
This heap limit can be problematic. For example, each widget or
layout manager instance takes around 1KB of heap space. This is why
AdapterView provides the hooks for view recycling — we cannot
have a ListView with literally thousands of row views without
potentially running out of heap.
API Level 11+ supports applications requesting a “large heap”.
This is for applications that specifically need tons of RAM, such as
an image editor to be used on a tablet. This is not for applications
that run out of heap due to leaks or sloppy programming. Bear in mind
that users will feel effects from large-heap applications, in that
their other applications will be kicked out of memory more quickly,
possibly irritating them. Also, garbage collection on large-heap
applications runs more slowly, consuming more CPU time. To enable the
large heap, add android:largeHeap="true" to the <application>
element of your manifest. Finally, bear in mind that your “large heap”
may not be any bigger than your regular heap would have been, as
the “large heap” size is determined by the device manufacturer and
takes into account things like available system RAM.
To get a sense for how much heap you will be able to potentially
grow to, you can call getMemoryClass() on an ActivityManager.
This will return your per-process heap limit in megabytes.
If you requested android:largeHeap="true" in the manifest, use
getLargeMemoryClass() on
ActivityManager to learn how large your “large heap” actually is.
Note that it is entirely possible that the “large heap” is not all
that large, or potentially is no bigger than the standard heap,
depending upon how much RAM is physically present on the device.
The Dalvik garbage collector is a non-compacting implementation, which
makes OutOfMemoryError messages somewhat more likely than you would
find on traditional Java environments.
Here, “non-compacting” means that Dalvik does not try to move objects around in physical memory to “compact” the use of physical memory, leaving a large contiguous block of free physical memory for future allocations.
For example, suppose that we allocate three 1K byte arrays, named A, B, and C. As it turns out, they were allocated using adjacent portions of physical memory, so that the last byte of A immediately precedes the first byte of B, and so on. Hence, we consumed 3K of available heap space to create these three 1K blocks.
If we release all references to A and B, they can be garbage-collected. Dalvik, like Java, will see that A and B are adjacent and will free up their physical memory, such that the memory is available as one contiguous 2K block for future allocations.
If, however, we release all references to A and C instead of A and B, Dalvik would be unable to make their blocks be contiguous, and so our heap would have two free 1K blocks, in addition to whatever other free memory that the heap already had.
Hence, allocating memory not only ties up that memory while it is in use,
but it may fragment the memory even when it is released, such that our formerly
pristine heap is now comprised of lots of little free blocks of space, separated
from other such blocks by in-use objects. When we try to make a large allocation,
such as setting up a byte array for a large image, it may be that while we have
enough total heap available for the request, there is no single block that
would meet our request, and so we get an OutOfMemoryError.
One technique to help address this is to pre-allocate any large buffers that
you know you need, up front when your process starts up, such as via a custom
Application subclass. Then, use an “object pool” approach to obtain, use,
and reuse these pre-allocated buffers, rather than having them be garbage-collected
and have to be re-allocated later.
ART — the runtime engine used on Android 5.0+ — has a compacting garbage collector. However, it only compacts the heap when the app is in the background. So long as your application is in the foreground, ART behaves like Dalvik does, and your heap will continue to fragment.
It would be nice if we knew when a good time would be to cut back on our heap usage. For example, if we are caching a lot of data in our process, to save on future disk I/O, we could free up those caches at some point to help minimize our heap usage.
Fortunately, Android has some hooks for doing just that.
Starting in API Level 14, your activities, services, content providers, and
custom Application classes all offer an onTrimMemory() method that you can
override. This will be called from time to time to let you know about changes
in the state of your app that might indicate it is time to free up some caches
or otherwise cut back on memory consumption.
onTrimMemory() is passed a “level”, indicating how serious the memory crunch
is. At the present time, there are seven such levels, but others may be added
in future versions of Android. However, these levels are in priority order, and
the documentation indicates that Google will ensure that future levels are slotted
into the order as appropriate. Hence, you can watch for levels of a certain
severity or higher and take appropriate action at those points in time.
The seven levels are all defined as constants on the ComponentCallbacks2 interface
that defines onTrimMemory(). Four were defined in API Level 14, while the
remaining three were defined in API Level 16.
They are (in order of increasing severity):
TRIM_MEMORY_RUNNING_MODERATE (added in API Level 16)TRIM_MEMORY_RUNNING_LOW (added in API Level 16)TRIM_MEMORY_RUNNING_CRITICAL (added in API Level 16)TRIM_MEMORY_UI_HIDDEN (added in API Level 14)TRIM_MEMORY_BACKGROUND (added in API Level 14)TRIM_MEMORY_MODERATE (added in API Level 14)TRIM_MEMORY_COMPLETE (added in API Level 14)In particular,
TRIM_MEMORY_BACKGROUND (or higher) indicates that your process is now on
the list of processes to terminate to free up memory, and so the more memory
you can free up, the less likely it is that your process will be terminated.
Also, at TRIM_MEMORY_UI_HIDDEN or higher, your UI is no longer visible to
the user, and so this is a fine time to free up UI-related memory that is
safe to release, such as perhaps widget hierarchies that you would be
rebuilding in onResume() later on anyway.
Note that while the focus tends to be on activities implementing onTrimMemory()
to clean up UI-related resources, you are welcome to implement onTrimMemory()
in services, content providers, and any custom Application subclass, so that
you can free up memory that those may be managing as caches.
In the chapter on system RAM, we will get into why freeing up memory may help keep your process around, as we discuss the relationship between your application heap and available system RAM.
However, the most likely culprit for OutOfMemoryError messages are
bitmaps. Bitmaps take up a remarkable amount of heap space.
Developers often look at the size of a JPEG file and think that “oh,
well, that’s only a handful of KB”, without taking into account:
RGB_565, 3 bytes per pixel for RGB_888)ImageView still
consumes 800x480 worth of pixel dataAndroid can make some optimizations, such as only loading in one copy
of a Drawable resource no matter how many times you render it.
However, in general, each bitmap you load takes a decent sized chunk
of your heap, and too many bitmaps means not enough heap. It is not
unheard of for an application to have more than half of its heap
space tied up in various bitmap images.
Compounding this problem is that bitmap memory, before Android 3.0, was
difficult to measure. In the actual Dalvik heap, a Bitmap would need
~80 bytes or so, regardless of image size. The actual pixel data was
held in “native heap”, the space that a C/C++ program would obtain
via calls to malloc(). While this space was still subtracted from
the available heap space, many diagnostic programs — such as
MAT, to be examined in the next chapter — will not know about
it. Android 3.0 moved the pixel data into
the Dalvik heap, which will improve our ability to find and deal with
memory leaks or overuse of bitmaps.
Many Android libraries, like Picasso, offer bitmap caching. Using an existing caching implementation is a lot easier than is rolling your own.
However:
getMemoryClass() as is noted earlier
in this chapter.onTrimMemory() so that you can flush
that cache when appropriate.Sometimes, you do not need a full-size image. For example, if you are showing
thumbnails of images in a ListView, but only expect to show the full-size image
for a few (e.g., rows that the user clicks upon), it is wasteful to load the full-size
image for everything in the list.
BitmapFactory.Options offers inSampleSize, which tells the framework to sample
the image as it is loaded, to result in a smaller image. inSampleSize of 2 will
result in an image that is half the width and half the height; inSampleSize of 4
will result in an image that is a quarter the width and a quarter the height; etc.
Note that inSampleSize is limited to powers of 2 and will round as needed.
If you know ahead of time the size of the image, you can calculate an appropriate
inSampleSize to use. Otherwise, for local content, you can use BitmapFactory
twice:
BitmapFactory.Options set with inJustDecodeBounds set to true,
which will merely tell you how big the image is via outHeight and outWidth
on the BitmapFactory.Options itselfBitmapFactory.Options set with inSampleSize set to your desired
value and inJustDecodeBounds set to false, to really load the image, but downsampled
to consume less memoryThis approach does not work well for images being downloaded directly from the Internet,
as you do not want to download the image twice, once just to figure out how big it
is. Instead, download the image without using BitmapFactory to a local file, then
use BitmapFactory to load in the image. If you are electing to use a two-level cache
(memory plus disk), you might download the image to the disk cache, for example.
For example, let’s look at the
Bitmaps/InSampleSize
sample project, which demonstrates the memory impact (and visual impact) of loading
bitmaps at varying sample sizes.
In the assets/ directory, we have a ~70KB JPEG file of a flower (courtesy of
the Wikimedia Project)
and a ~50KB PNG of the CommonsWare logo. Both images are 672
pixels square, which makes them relatively large images. These are in assets to
ensure that Android will not attempt any sort of density-based conversion of the
images, if they were to be in a drawable resource directory.
The MainActivity of the project simply loads up a ViewPager and attaches
it to a SampleAdapter:
package com.commonsware.android.bitmap.iss;

import android.app.Activity;
import android.os.Bundle;
import android.support.v4.view.PagerAdapter;
import android.support.v4.view.ViewPager;

public class MainActivity extends Activity {
  @Override
  public void onCreate(Bundle savedInstanceState) {
    super.onCreate(savedInstanceState);
    setContentView(R.layout.main);

    ViewPager pager=(ViewPager)findViewById(R.id.pager);

    pager.setAdapter(buildAdapter());
  }

  private PagerAdapter buildAdapter() {
    return(new SampleAdapter(this, getFragmentManager()));
  }
}
SampleAdapter, in turn, populates the ViewPager with four instances
of a BitmaFragment, where we supply the newInstance() factory method of
BitmapFragment with a value of 1, 2, 4, or 8 (1 << position), indicating
the inSampleSize value we want to use for that fragment instance:
package com.commonsware.android.bitmap.iss;

import android.app.Fragment;
import android.app.FragmentManager;
import android.content.Context;
import android.support.v13.app.FragmentPagerAdapter;

public class SampleAdapter extends FragmentPagerAdapter {
  Context ctxt=null;

  public SampleAdapter(Context ctxt, FragmentManager mgr) {
    super(mgr);
    this.ctxt=ctxt;
  }

  @Override
  public int getCount() {
    return(4);
  }

  @Override
  public Fragment getItem(int position) {
    return(BitmapFragment.newInstance(1 << position));
  }

  @Override
  public String getPageTitle(int position) {
    return(BitmapFragment.getTitle(ctxt, 1 << position));
  }
}
BitmapFragment then:
ImageView widgets, two at 672dp square
for the “natural” size (scaling only for density), and two at 128dp square to
illustrate how the images appear when constrained to a smaller space:
<ScrollView xmlns:android="http://schemas.android.com/apk/res/android"
  android:layout_width="match_parent"
  android:layout_height="match_parent">

  <LinearLayout
    android:layout_width="match_parent"
    android:layout_height="wrap_content"
    android:orientation="vertical">

    <TextView
      android:id="@+id/byte_count"
      android:layout_width="wrap_content"
      android:layout_height="wrap_content"
      android:layout_gravity="center_horizontal"
      android:layout_marginBottom="16dp"
      android:textSize="20sp"
      android:textStyle="bold"/>

    <ImageView
      android:id="@+id/flower_large"
      android:layout_width="672dp"
      android:layout_height="672dp"
      android:layout_gravity="center_horizontal"
      android:layout_marginBottom="16dp"
      android:contentDescription="@string/flower_large"
      android:scaleType="fitCenter"/>

    <ImageView
      android:id="@+id/logo_large"
      android:layout_width="672dp"
      android:layout_height="672dp"
      android:layout_gravity="center_horizontal"
      android:layout_marginBottom="16dp"
      android:contentDescription="@string/logo_large"
      android:scaleType="fitCenter"/>

    <ImageView
      android:id="@+id/flower_small"
      android:layout_width="128dp"
      android:layout_height="128dp"
      android:layout_gravity="center_horizontal"
      android:layout_marginBottom="16dp"
      android:contentDescription="@string/flower_small"
      android:scaleType="fitCenter"/>

    <ImageView
      android:id="@+id/logo_small"
      android:layout_width="128dp"
      android:layout_height="128dp"
      android:layout_gravity="center_horizontal"
      android:contentDescription="@string/logo_small"
      android:scaleType="fitCenter"/>
  </LinearLayout>

</ScrollView>
load() method to load the images at the desired inSampleSize
using a BitmapFactory.Options objectImageView widgets, one large and one smallTextView widgets in the fragment to show how much memory those
images are consuming
package com.commonsware.android.bitmap.iss;

import android.annotation.TargetApi;
import android.app.Fragment;
import android.content.Context;
import android.content.res.AssetManager;
import android.graphics.Bitmap;
import android.graphics.BitmapFactory;
import android.os.Build;
import android.os.Bundle;
import android.util.Log;
import android.view.LayoutInflater;
import android.view.View;
import android.view.ViewGroup;
import android.widget.ImageView;
import android.widget.TextView;
import java.io.IOException;

public class BitmapFragment extends Fragment {
  private static final String KEY_SAMPLE_SIZE="inSampleSize";
  private AssetManager assets=null;

  static BitmapFragment newInstance(int inSampleSize) {
    BitmapFragment frag=new BitmapFragment();
    Bundle args=new Bundle();

    args.putInt(KEY_SAMPLE_SIZE, inSampleSize);
    frag.setArguments(args);

    return(frag);
  }

  static String getTitle(Context ctxt, int inSampleSize) {
    return(String.format(ctxt.getString(R.string.title), inSampleSize));
  }

  @Override
  public View onCreateView(LayoutInflater inflater,
                           ViewGroup container,
                           Bundle savedInstanceState) {
    View result=inflater.inflate(R.layout.sample, container, false);
    int inSampleSize=getArguments().getInt(KEY_SAMPLE_SIZE, 1);

    try {
      Bitmap flower=
          load("Tibouchina_urvilleana_flower_ja.jpg", inSampleSize);
      Bitmap logo=load("square.png", inSampleSize);

      ImageView iv=(ImageView)result.findViewById(R.id.flower_large);

      iv.setImageBitmap(flower);
      iv=(ImageView)result.findViewById(R.id.flower_small);
      iv.setImageBitmap(flower);
      iv=(ImageView)result.findViewById(R.id.logo_large);
      iv.setImageBitmap(logo);
      iv=(ImageView)result.findViewById(R.id.logo_small);
      iv.setImageBitmap(logo);

      TextView tv=(TextView)result.findViewById(R.id.byte_count);

      tv.setText(String.valueOf(byteCount(flower)));
    }
    catch (IOException e) {
      Log.e(getClass().getSimpleName(), "Exception loading bitmap", e);
    }

    return(result);
  }

  private Bitmap load(String path, int inSampleSize) throws IOException {
    BitmapFactory.Options opts=new BitmapFactory.Options();

    opts.inSampleSize=inSampleSize;

    return(BitmapFactory.decodeStream(assets().open(path), null, opts));
  }

  private AssetManager assets() {
    if (assets == null) {
      assets=getActivity().getResources().getAssets();
    }

    return(assets);
  }

  @TargetApi(Build.VERSION_CODES.KITKAT)
  private int byteCount(Bitmap b) {
    if (Build.VERSION.SDK_INT >= Build.VERSION_CODES.KITKAT) {
      return(b.getAllocationByteCount());
    }

    return(b.getByteCount());
  }
}
If you run this on a device, you will see the images at the various sample sizes,
one sample size per page of the ViewPager. While the quality of the loaded images
decreases as inSampleSize increases, the smaller ImageView widgets are still
usable for the flower JPEG, though the line-art PNG suffers.
NOTE: The following screenshots will themselves be modified as part of the publishing process of the book and are here only for illustration purposes. You will want to run the demo and see the results first-hand.
Figure 1002: InSampleSize Demo, on an LG Pad 8.3, inSampleSize = 1, Flower JPEG, Full Size

Figure 1003: InSampleSize Demo, on an LG Pad 8.3, inSampleSize = 1, CW Logo PNG (Full Size) and Smaller Sizes
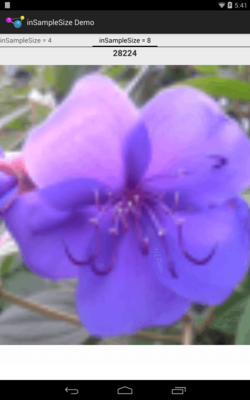
Figure 1004: InSampleSize Demo, on an LG Pad 8.3, inSampleSize = 8, Flower JPEG, Full Size
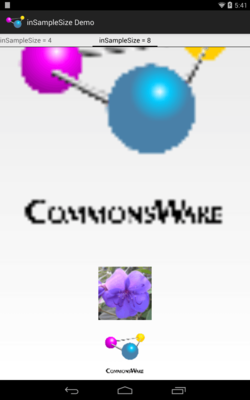
Figure 1005: InSampleSize Demo, on an LG Pad 8.3, inSampleSize = 8, CW Logo PNG (Full Size) and Smaller Sizes
The key, though, is the reduced memory footprint. The images loaded without
sampling (inSampleSize of 1) take up 1,806,336 bytes of heap space
(672 x 672 x 4 bytes per pixel).
The inSampleSize of 8, by contrast, take up 28,244 bytes of heap space,
less than 2% of the original.
You should consider experimenting with inSampleSize and determine an appropriate
sampling level for the types of images you will receive (photos work better than
line art) and the sizes you intend to use them in.
BitmapFactory will load images as ARGB_8888 by default. That means that each
pixel takes up four bytes, one each for the red, green, and blue color channels, plus
a byte for the alpha channel (transparency).
However, particularly for thumbnails of photographs, where transparency probably does not exist and the image is small when viewed by the user, four bytes per pixel may be overkill.
Instead, you can set inPreferredConfig of the BitmapFactory.Options to RGB_565,
which uses only two bytes (five bits for red, six bits for green, five bits for blue,
and no transparency). This will cut your memory consumption for the bitmap in half,
with no loss of resolution (as you get with inSampleSize).
If you will be doing a lot of work with bitmaps, particularly bitmaps of the same
size, an object pool can be of tremendous help to minimize heap fragmentation. You
can reuse the same Bitmap over and over again, by supplying it via inBitmap in
the BitmapFactory.Options object. If the Bitmap is compatible with what you are
looking to decode, it will be reused, rather than have a new Bitmap (backed by a new
hunk of heap space) be created.
Here, “compatible” means:
ARGB_8888 versus RGB_565)inBitmap resolution is the same as or higher than the bitmap to be loadedSQLite maintains a “page cache” of loaded pages from your database files.
Curiously, it does so on a static basis, not on a per-SQLiteDatabase basis. Hence,
even after you have closed your databases, you might still be consuming more memory
than you need to, due to this cache.
From onTrimMemory(), you can call the static releaseMemory() method on
SQLite, to try to free up some of this memory. This should not cause any database
errors, but it may slow down the next few database accesses, as the necessary
pages may no longer be cached and may have to be loaded again from disk.
All your efforts at improving memory management may be merely “rearranging deck chairs on the Titanic”. Certain scenarios simply require a lot of system RAM, such as complex image manipulations.
android:largeHeap="true" is one example of “cheating”: working around
the heap limits. However, as noted above, you may or may not get a
particularly “large” heap, depending upon device capabilities.
The NDK is another option for cheating. The heap limits are for the Dalvik and ART runtime engines. Anything you do in native C/C++ code does not count against that heap limit. Hence, you might consider migrating complex logic into NDK code not only to get a possible boost in execution speed but also to avoid impacting your heap limit.
However, even with the NDK, you may not have enough RAM, because the system may not have enough RAM. Android One and similar low-spec devices might have as little as 512MB for the entire device, and your app would only be able to use a fraction of that, even from native code. Note that Android devices do not use “swap space” or similar memory paging techniques, and so once system RAM is exhausted, the device is likely to crash.
You can use isLowRamDevice() on ActivityManager to determine whether
the device that your app is running on is considered to have low RAM.
Nowadays, that means 512MB or lower of system RAM with a low
screen resolution (e.g., 800x480). Before trying to use the NDK to cheat,
check whether the device is a low-RAM device. If it is, you may need
to disable certain features, rather than potentially crash the system
by consuming all available system RAM.