Figure 53: Barcode Scanner App Screen in Settings, Showing Version 4.2
In the discussion of Android Studio, this book has mentioned something called “Gradle”, without a lot of explanation.
In this chapter, the mysteries of Gradle will be revealed to you.
(well, OK, some of the mysteries…)
We also mentioned in passing in the previous chapter the concept of the “manifest”, as being a special file in our Android projects.
On the one hand, Gradle and the manifest are not strictly related. On the other hand, some (but far from all) of the things that we can set up in the manifest can be overridden in Gradle.
So, in this chapter, we will review both what Gradle is, what the manifest is, what each of their roles are, and the basics of how they tie together.
First, let us “set the stage” by examining what this is all about, through a series of fictionally-asked questions (FAQs).
Gradle is software for building software, otherwise
known as “build automation software” or “build systems”. You may have used
other build systems before in other environments, such as make (C/C++),
rake (Ruby), Ant (Java), Maven (Java), etc.
These tools know — via intrinsic capabilities and rules that you teach them — how to determine what needs to be created (e.g., based on file changes) and how to create them. A build system does not compile, link, package, etc. applications directly, but instead directs separate compilers, linkers, and packagers to do that work.
Gradle uses a domain-specific language (DSL) built on top of Groovy to accomplish these tasks.
There are many programming languages that are designed to run on top of the Java VM. Some of these, like JRuby and Jython, are implementations of other common programming languages (Ruby and Python, respectively). Other languages are unique, and Groovy is one of those.
Groovy scripts look a bit like a mashup of Java and Ruby. As with Java, Groovy supports:
class keywordextends
import
{ and })new operatorAs with Ruby, though:
"Hello, $name" for Groovy instead of "Hello, #{name}" for
Ruby)Groovy is an interpreted language, like Ruby and unlike Java. Groovy scripts
are run by executing a groovy command, passing it the script to run.
The Groovy runtime, though, is a Java JAR and requires a JVM in order to
operate.
One of Groovy’s strengths is in creating a domain-specific language (or DSL). Gradle, for example, is a Groovy DSL for doing software builds. Gradle-specific capabilities appear to be first-class language constructs, generally indistinguishable from capabilities intrinsic to Groovy. Yet, the Groovy DSL is largely declarative, like an XML file.
To some extent, we get the best of both worlds: XML-style definitions (generally with less punctuation), yet with the ability to “reach into Groovy” and do custom scripting as needed.
Google has published the Android Plugin for Gradle, which gives Gradle the ability to build Android projects. Google is also using Gradle and Gradle for Android as the build system behind Android Studio.
Originally, when we would build an app, those builds were done using Eclipse and Ant. Eclipse was the IDE, while Ant was the command-line tool. Eclipse does not use Ant for building Android projects, but rather has its own build system. And we were successfully building a million-plus apps using these tools. Those tools still work today, though Ant support is fading fast.
So, why change?
There were several contributing factors, including:
As noted above, Android Studio uses the new Gradle-based build system as its native approach for building Android projects. While the IntelliJ IDEA IDE that serves as Android Studio’s core also has its own build system (much like Eclipse has one), IDEA is more amenable to replaceable build systems.
Over time, this will allow Google to focus on a single build system (Gradle) for all supported scenarios, rather than having to deal with a collection of independent build systems.
As with any build system, to use it, you need the build system’s engine itself.
If you will only be using Gradle in the context of Android Studio, the IDE will take care of getting Gradle for you. If, however, you are planning on using Gradle outside of Android Studio (e.g., command-line builds), you will want to consider where your Gradle is coming from. This is particularly important for situations where you want to build the app with no IDE in sight, such as using a continuous integration (CI) server, like Jenkins.
What most developers looking to use Gradle outside of Android Studio will wind up doing is installing Gradle directly.
The Gradle download page contains links to ZIP archives for Gradle itself: binaries, source code, or both.
You can unZIP this archive to your desired location on your development machine.
You may be able to obtain Gradle via a package manager on Linux environments. For example, there is an Ubuntu PPA for Gradle.
If you are starting from a project that somebody else has published,
you may find a gradlew and gradlew.bat file in the project
root, along with a gradle/ directory.
This represents the “Gradle Wrapper”.
The Gradle Wrapper consists of three pieces:
gradlew.bat) or shell script (gradlew)gradle/wrapper/ directory)gradle-wrapper.properties file (also in the
gradle/wrapper/ directory)Android Studio uses the gradle-wrapper.properties file to determine
where to download Gradle from, for use in your project, from the
distributionUrl property in that file:
#Wed Apr 10 15:27:10 PDT 2013
distributionBase=GRADLE_USER_HOME
distributionPath=wrapper/dists
zipStoreBase=GRADLE_USER_HOME
zipStorePath=wrapper/dists
distributionUrl=https\://services.gradle.org/distributions/gradle-2.14.1-all.zip
When you create or import a project, or if you change the version of
Gradle referenced in the properties file, Android Studio will download
the Gradle pointed to by the distributionUrl property and install
it to a .gradle/ directory (note the leading .) in your project.
That version of Gradle will be what Android Studio uses.
RULE #1: Only use a distributionUrl that you trust.
If you are importing an Android project from a third party — such as
the samples for this book — and they contain the
gradle/wrapper/gradle-wrapper.properties file, examine it to see
where the distributionUrl is pointing to. If it is loading from
services.gradle.org, or from an internal enterprise server, it is
probably trustworthy. If it is pointing to a URL located somewhere
else, consider whether you really want to use that version of Gradle,
considering that it may have been tampered with.
The batch file, shell script, and JAR file are there to support
command-line builds. If you use gradlew, it will use a local
copy of Gradle installed in .gradle/ in the project. If there is no
such copy of Gradle, gradlew will download Gradle from the
distributionUrl, as does Android Studio. Note that Android Studio
does not use gradlew for this role — that logic is built into
Android Studio itself.
RULE #2: Only use a gradlew that you REALLY trust.
It is relatively easy to examine a .properties file to check a
URL to see if it seems valid. Making sense of a batch file or
shell script can be cumbersome. Decompiling a JAR file and making
sense of it can be rather difficult. Yet, if you use gradlew
that you obtained from somebody, that script and JAR are running
on your development machine, as is the copy of Gradle that they
install. If that code was tampered with, the malware has complete
access to your development machine and anything that it can reach,
such as servers within your organization.
Note that you do not have to use the Gradle Wrapper at all. If
you would rather not worry about it, install a version of Gradle
on your development machine yourself and remove the Gradle Wrapper
files. You can use the gradle command to build your app
(if your Gradle’s bin/ directory is in your PATH), and Android
Studio will use your Gradle installation (if you teach it where
to find it, such as via the GRADLE_HOME environment variable).
The Android Plugin for Gradle that we will use to give Gradle “super Android powers!” is updated periodically. Each update has its corresponding required version of Gradle.
The rules, according to Google, are:
| Android Plugin for Gradle Versions | Supported Gradle Versions |
|---|---|
| 1.0.0 - 1.1.3 | 2.2.1 - 2.3 |
| 1.2.0 - 1.3.1 | 2.2.1 - 2.9 |
| 1.5.x | 2.2.1 or higher |
| 2.x | 2.10 or higher |
If you are using the Gradle Wrapper, you are using an installation
of Gradle that is local to the project. So long as the version of
Gradle in the project matches the version of Gradle for Android requested
in the build.gradle file — as will be covered in the next chapter — you
should be in fine shape.
If you are not using the Gradle Wrapper, you will need to decide
when to take on a new Gradle for Android release and plan to update your
Gradle installation and build.gradle files in tandem at that point.
If you installed Gradle yourself,
you will want to define a GRADLE_HOME environment variable, pointing to
where you installed Gradle, and to add the bin/ directory inside of
Gradle to your PATH environment variable.
You may also consider setting up a GRADLE_USER_HOME environment variable,
pointing to a directory in which Gradle can create a .gradle subdirectory,
for per-user caches and related materials. By default, Gradle will use your
standard home directory.
An Android Studio project usually has two build.gradle files, one at the
project level and one at the “module” level (e.g., in the app/ directory).
The build.gradle file in the project directory controls the Gradle
configuration for all modules in your project. Right now, most likely you
only have one module, and many apps only ever use one module. However,
it is possible for you to add other modules to this project, and we will
explore reasons for doing so later in this book.
Here is a typical top-level build.gradle file:
// Top-level build file where you can add configuration options common to all sub-projects/modules.

buildscript {
    repositories {
        jcenter()
    }
    dependencies {
        classpath 'com.android.tools.build:gradle:2.2.2'

        // NOTE: Do not place your application dependencies here; they belong
        // in the individual module build.gradle files
    }
}

allprojects {
    repositories {
        jcenter()
    }
}
The buildscript closure (i.e., code section wrapped in braces)
in Gradle is where you configure the JARs and such
that Gradle itself will use for interpreting the rest of the file. Hence,
here you are not configuring your project so much as you are configuring
the build itself.
The repositories closure inside the buildscript closure
indicates where dependencies can come from, typically
in the form of Maven-style repositories. Here, jcenter() is a built-in
method that sets up the repository information for Maven Central, a
popular location for obtaining open source dependencies.
The dependencies closure indicates what is required to be able to run the
rest of the build script. classpath 'com.android.tools.build:gradle:2.2.2' is
not especially well-documented by the Gradle team. However the
'com.android.tools.build:gradle:2.2.2' portion means:
com.android.tools.build group of artifacts in a repositorygradle artifact within that group2.2.2 of the artifactThe first time you run your build, with the buildscript closure as shown above,
Gradle will notice that you do not have this dependency. It will then
download that artifact from the jcenter() repository.
Sometimes, the last segment of the version is replaced with a + sign
(e.g., 2.2.+). This tells Gradle to download the latest version, thereby
automatically upgrading you to the latest patch-level (e.g., 2.2.3 at
some point).
The allprojects closure says “apply these settings to all modules
in this project”. Here, we are setting up jcenter() as a repository to
use for finding libraries used in any of the modules in our project.
In your app/ module, you will also find a build.gradle file. This
has settings unique for this module, independent of any other module
that your project may have in the future.
Here is a typical module-level build.gradle file:
apply plugin: 'com.android.application'

dependencies {

}

android {
    compileSdkVersion 19
    buildToolsVersion "21.1.2"
}
This build.gradle file also has a dependencies closure. Whereas
the dependencies closure in the buildscript closure in the top-level
build.gradle file is for libraries used by the build process, the
dependencies closure in the module’s build.gradle file is for
libraries used by your code in that module.
We will get into the concept of these libraries later in the book.
This particular build.gradle file has an empty dependencies closure,
meaning that it does not depend on any libraries. The dependencies
closure is not required in this case — it is here solely for illustration
purposes.
The android closure contains all of the Android-specific configuration
information. This closure is what the Android plugin enables.
But before we get into what is in this closure, we should “switch gears”
and talk about the manifest file, as what goes in the android closure
is related to what goes in the manifest file.
The foundation for any Android application is the manifest file:
AndroidManifest.xml. This will be in
your app module’s src/main/ directory for classic
Android Studio projects.
Here is where you declare what is inside your application — the activities, the services, and so on. You also indicate how these pieces attach themselves to the overall Android system; for example, you indicate which activity (or activities) should appear on the device’s main menu (a.k.a., launcher).
When you create your application, you will get a starter manifest generated for you. For a simple application, offering a single activity and nothing else, the auto-generated manifest will probably work out fine, or perhaps require a few minor modifications. On the other end of the spectrum, the manifest file for the Android API demo suite is over 1,000 lines long. Your production Android applications will probably fall somewhere in the middle.
As mentioned previously, some items can be defined in both the manifest and in a build.gradle
file. The approach of putting that stuff in the manifest
still works. For Android Studio users, you will probably use the Gradle
file and not have those common elements be defined in the manifest.
There are a few key items that can be defined in the manifest and
can be overridden in build.gradle statements. These items are fairly
important to the development and operation of our Android apps as well.
The root of all manifest files is, not surprisingly, a manifest element:
<manifest xmlns:android="http://schemas.android.com/apk/res/android"
  package="com.commonsware.empublite">
Note the android namespace declaration. You will only use the namespace on
many of the attributes, not the elements (e.g., <manifest>, not <android:manifest>).
The biggest piece of information you need to supply on the <manifest> element
is the package attribute.
The package attribute will always need to be in the manifest, even
for Android Studio projects. The package attribute will control where
some source code is generated for us, notably some R and BuildConfig
classes that we will encounter later in the book.
Since the package value is used for Java code generation, it has to be
a valid Java package name. Java convention says that the package name
should be based on a reverse domain name (e.g., com.commonsware.empublite),
where you own the domain in question. That way, it is unlikely that anyone
else will accidentally collide with the same name.
The package also serves as our app’s default “application ID”. This
needs to be a unique identifier, such that:
By default, the application ID is the package value, but Android Studio
users can override it in their Gradle build files. Specifically, inside
of the android closure can be a defaultConfig closure, and inside
of there can be an applicationId statement:
android {
    // other stuff

    defaultConfig {
        applicationId "com.commonsware.empublite"
        // more other stuff
    }
}
Not only can Android Studio users override the application ID in the
defaultConfig closure, but there are ways of having different application
ID values for different scenarios, such as a debug build versus a release build.
We will explore that more later in the book.
Your manifest may also contain a
<uses-sdk> element as a child of the <manifest>
element, to specify what versions of Android you are supporting. It can
contain, among other things, android:minSdkVersion and
android:targetSdkVersion attributes. Legacy Eclipse-style
projects will always have this element. Android Studio projects may not
have this element, because the values are defined as minSdkVersion
and targetSdkVersion properties in the defaultConfig closure, where
applicationId can be defined.
Of the two, the more critical one is minSdkVersion.
This indicates what is the oldest version of Android
you are testing with your application. The value of the attribute is an integer
representing the Android API level. So, if you are only testing
your application on Android 4.1 and newer versions of Android, you would set
your minSdkVersion to be 16.
You can also specify a targetSdkVersion. This
indicates what version of Android you are thinking of as you are writing your
code. If your application is run on a newer version of Android, Android may do
some things to try to improve compatibility of your code with respect to
changes made in the newer Android. Nowadays, most Android developers should
specify a target SDK version of 15 or higher. We will start to explore
more about the targetSdkVersion as we get deeper into the book;
for the moment, whatever your IDE gives you as a default value is probably
a fine starting point.
The XML element looks like:
<uses-sdk android:minSdkVersion="15" android:targetSdkVersion="19" />
The corresponding entries in build.gradle go in the defaultConfig
closure:
android {
    // other stuff

    defaultConfig {
        applicationId "com.commonsware.empublite"
        minSdkVersion 15
        targetSdkVersion 19
        // more other stuff
    }
}
Your manifest can also specify android:versionName and android:versionCode
attributes, up on the root <manifest> element. An Android Studio project,
though, frequently skips those and defines them via versionName and
versionCode properties in the defaultConfig closure.
These two values represent the versions of your application. The
versionName value is what the user will see for a version indicator
in the Applications details screen for your app
in their Settings application:
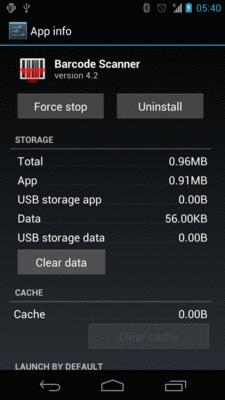
Figure 53: Barcode Scanner App Screen in Settings, Showing Version 4.2
Also, the version name is used by the Play Store listing, if you are distributing your application that way. The version name can be any string value you want.
The versionCode, on the other
hand, must be an integer, and newer versions must have higher version codes
than do older versions. Android and the Play Store will compare the version
code of a new APK to the version code of an installed application to determine
if the new APK is indeed an update. The typical approach is to start the
version code at 1 and increment it with each production release of your
application, though you can choose another convention if you wish. During
development, you can leave these alone, but when you move to production,
these attributes will matter greatly.
You will always have at least two statements directly in the
android closure: compileSdkVersion
and buildToolsVersion.
android {
    compileSdkVersion 19
    buildToolsVersion "21.1.2"
}
compileSdkVersion specifies the API level to be compiled against,
usually as a simple API level integer
(e.g., 19). A legacy Eclipse-style project would pull this out of the
project.properties file in the root of the project directory.
buildToolsVersion indicates the version of the Android SDK build tools
that you wish to use with this project. While downloading the android
plugin from Maven Central gives us parts of what is needed, it is not
complete. The rest comes from the “Android SDK Build-tools” entry in
the SDK Manager:
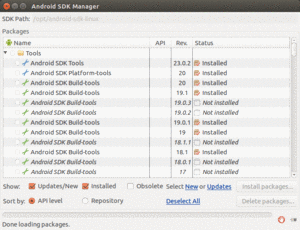
Figure 54: SDK Manager, Showing “Android SDK Build-tools”
Note that the SDK Manager will allow you to download the latest
version of the build tools used by Gradle (appearing as 20 in the above
screenshot) plus prior versions (e.g., 18.0.1 and 17 in the above screenshot).
This corresponds with the buildToolsVersion in your build.gradle file.
So, your android closure could look like:
android {
    compileSdkVersion 19
    buildToolsVersion "20.0.0"

    defaultConfig {
        applicationId "com.commonsware.empublite"
        versionCode 1
        versionName "1.0"
        minSdkVersion 15
        targetSdkVersion 18
    }
}
Eclipse did not really have the notion of a configurable build tools
version, so there is no analogue for buildToolsVersion in a legacy Eclipse-style
project.
You might wonder why we have to slog through all of this Groovy code and wonder if there is some GUI for affecting Gradle settings.
The answer is yes… and no.
There is the project structure dialog, that allows you to maintain some of this stuff. And you are welcome to try it. However, the more complex your build becomes, the more likely it is that the GUI will not suffice, and you will need to work with the Gradle build files more directly. Hence, this book will tend to focus on the build files.
Not everything in the manifest can be overridden in the Gradle build files. Here are a few key items that will always appear in the manifest, regardless of whether this project is to be built by Android Studio or other means.
In your initial project’s manifest, the primary child of the <manifest> element
is an <application> element.
By default, when you create a new Android project, you get a single
<activity> element inside the <application> element:
<?xml version="1.0"?>
<manifest xmlns:android="http://schemas.android.com/apk/res/android"
  package="com.commonsware.android.skeleton"
  android:versionCode="1"
  android:versionName="1.0">

  <application>
    <activity
      android:name="Now"
      android:label="Now">
      <intent-filter>
        <action android:name="android.intent.action.MAIN"/>

        <category android:name="android.intent.category.LAUNCHER"/>
      </intent-filter>
    </activity>
  </application>

</manifest>
This element supplies android:name for the class implementing the activity,
android:label for the display name of the activity, and (sometimes) an
<intent-filter> child element describing under what conditions this activity
will be displayed. The stock <activity> element sets up your activity to
appear in the launcher, so users can choose to run it. As we’ll see later in
this book, you can have several activities in one project, if you so choose.
The android:name attribute, in this case, has a bare Java class name
(Now). Sometimes, you will see android:name with a fully-qualified
class name (e.g., com.commonsware.android.skeleton.Now). Sometimes,
you will see a Java class name with a single dot as a prefix (e.g., .Now).
Both Now and .Now refer to a Java class that will be in your
project’s package — the one you declared in the package attribute
of the <manifest> element.
Android devices come with a wide range of screen sizes, from 2.8” tiny smartphones to 46” TVs. Android divides these into four buckets, based on physical size and the distance at which they are usually viewed:
By default, your application will support small and normal screens. It also will support large and extra-large screens via some automated conversion code built into Android.
To truly support all the screen sizes you want, you should consider adding a
<supports-screens> element to your manifest. This enumerates the screen sizes you have
explicit support for. For example, if you are providing
custom UI support for large or extra-large screens, you will want to have the
<supports-screens> element. So, while the starting manifest file works,
handling multiple screen sizes is something you will want to think about.
You wind up with an element akin to:
<supports-screens
  android:largeScreens="true"
  android:normalScreens="true"
  android:smallScreens="false"
  android:xlargeScreens="true" />
Much more information about providing solid support for all screen sizes,
including samples of the <supports-screens> element, will be found later
in this book as we cover large-screen strategies.
As we proceed through the book, you will find other elements being added to the manifest, such as:
<uses-permission>, to tell the user that you need permission to use
certain device capabilities, such as accessing the Internet<uses-feature>, to tell Android that you need the device to have certain
features (e.g., a camera), and therefore your app should not be installed
on devices lacking such features<meta-data>, for bits of information needed by particular extensions to
Android, such as the Google Play Services library.These and other elements will be introduced elsewhere in the book.
This book will go into more about Gradle, both in the core chapters and in the trails. But, the focus will be on Gradle for Android, and Gradle itself offers a lot more than that. The Gradle Web site hosts documentation, links to Gradle-specific books, and links to other Gradle educational resources.
At present, the Gradle for Android documentation is limited and mostly appears on the Android tools site. Of note is the top-level page about the new build system, and the Gradle plugin user guide, though both may be out of date compared to the actual tools themselves.
There are a few more chapters in this book getting into more details about the use of Gradle and Gradle for Android.
build.gradle filesThere is also the “Advanced Gradle for Android Tips” chapter for other Gradle topics, and the chapter on manifest merging in Gradle.