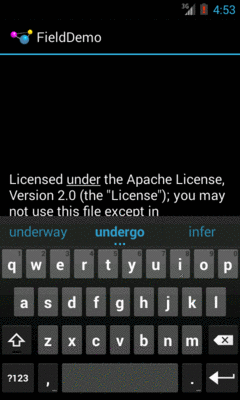
Figure 561: The input method editor, as seen in the FieldDemo sample application
We think of Android devices as having “soft keyboards”. The official term for this is that Android devices offer one or more “input method editors” (or “input methods” for short). These input methods allow for text entry on a touchscreen, avoiding the need for a physical keyboard. Note, though, that “text entry” does not necessarily imply an on-screen keyboard equivalent — for example, the old PalmOS Graffiti text entry system is available as an app on the Play Store.
While it is possible to create custom input method editors — as the authors of Graffiti Pro did — this chapter is focused more on how ordinary app developers are affected by input methods, and how an app can help steer the behavior of the input method to benefit the user.
Understanding this chapter requires that you have read the core chapters,
particularly the section covering the EditText widget.
Some Android devices have a hardware keyboard that is visible some of the time (when it is slid out). A few Android devices have a hardware keyboard that is always visible (so-called “bar” or “slab” phones). Most Android devices, though, have no hardware keyboard at all.
The IMF handles all of these scenarios. In short, if there is no
hardware keyboard, an input method editor (IME) will be available to
the user when they tap on an enabled EditText.
This requires no code changes to your application… if the default functionality of the IME is what you want. Fortunately, Android is fairly smart about guessing what you want, so it may be you can just test with the IME but otherwise make no specific code changes.
Of course, the keyboard may not quite behave how you would like. For
example, in the Basic/Field sample project, the FieldDemo activity
has the IME overlaying the multiple-line EditText:
Figure 561: The input method editor, as seen in the FieldDemo sample application
It would be nice to have more control over how this appears, and for other behavior of the IME. Fortunately, the framework as a whole gives you many options for this, as is described over the bulk of this chapter.
Android 1.1 and earlier offered many attributes on EditText widgets
to control their style of input, such as android:password to indicate
a field should be for password entry (shrouding the password keystrokes
from prying eyes). Starting in Android 1.5, with the IMF, many of these
have been combined into a single android:inputType attribute.
The android:inputType attribute takes a class plus modifiers, in a
pipe-delimited list (where | is the pipe character). The class
generally describes what the user is allowed to input, and this
determines the basic set of keys available on the soft keyboard. The
available classes are:
text (the default)numberphonedatetimedatetimeMany of these classes offer one or more modifiers, to further refine
what the user will be entering. To help explain those, take a look at
the res/layout/main.xml file from the
InputMethod/IMEDemo1
project:
<?xml version="1.0" encoding="utf-8"?>
<TableLayout xmlns:android="http://schemas.android.com/apk/res/android"
  android:layout_width="match_parent"
  android:layout_height="match_parent"
  android:stretchColumns="1"
  >
  <TableRow>
    <TextView
      android:text="No special rules:"
    />
    <EditText
    />
  </TableRow>
  <TableRow>
    <TextView
      android:text="Email address:"
    />
    <EditText
      android:inputType="text|textEmailAddress"
    />
  </TableRow>
  <TableRow>
    <TextView
      android:text="Signed decimal number:"
    />
    <EditText
      android:inputType="number|numberSigned|numberDecimal"
    />
  </TableRow>
  <TableRow>
    <TextView
      android:text="Date:"
    />
    <EditText
      android:inputType="date"
    />
  </TableRow>
  <TableRow>
    <TextView
      android:text="Multi-line text:"
    />
    <EditText
      android:inputType="text|textMultiLine|textAutoCorrect"
      android:minLines="3"
      android:gravity="top"
    />
  </TableRow>
</TableLayout>
Here, you will see a TableLayout containing five rows, each
demonstrating a slightly different flavor of EditText:
EditText, meaning you get a
plain text entry fieldandroid:inputType = "text|textEmailAddress", meaning it is
text entry, but specifically seeks an email addressandroid:inputType = "number|numberSigned|numberDecimal"
android:inputType = "date")android:inputType = "text|textMultiLine|textAutoCorrect")The class and modifiers tailor the keyboard. So, a plain text entry field results in a plain soft keyboard:
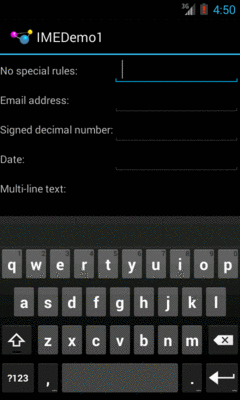
Figure 562: A standard input method editor (a.k.a., soft keyboard)
An email address field might put the @ symbol on the soft keyboard,
perhaps at the cost of a smaller spacebar, depending on the keyboard
implementation:
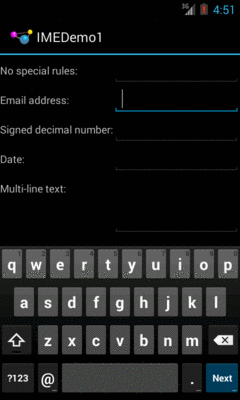
Figure 563: The input method editor for email addresses
Note, though, that this behavior is specific to the input method editor. Some editors might put an @ sign on the primary keyboard for an email field. Some might put a “.com” button on the primary keyboard. Some might not react at all. It is up to the implementation of the input method editor — all you can do is supply the hint.
Numbers and dates restrict the keys to numeric keys, plus a set of symbols that may or may not be valid on a given field:
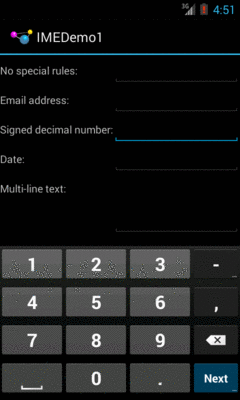
Figure 564: The input method editor for signed decimal numbers
And so on.
By choosing the appropriate android:inputType, you can give the user
a soft keyboard that best suits what it is they should be entering.
You may have noticed a subtle difference between the first and second
input method editors, beyond the addition of the @ key. If you look
in the lower-right corner of the soft keyboard, the second field’s
editor has a “Next” button, while the first field’s editor has a
newline button.
This points out two things:
EditText widgets are multi-line by default if you do not specify
android:inputType
By default, on an EditText where you have specified
android:inputType, the action key will be “Next”, moving you to
the next EditText in sequence, or “Done”, if you are on the last
EditText on the screen. You can manually stipulate what the action key
will be labeled via the android:imeOptions attribute. For
example, in the res/layout/main.xml from the
InputMethod/IMEDemo2
sample project, you
will see an augmented version of the previous example, where two input
fields specify what their action key should look like:
<?xml version="1.0" encoding="utf-8"?>
<ScrollView xmlns:android="http://schemas.android.com/apk/res/android"
  android:layout_width="match_parent"
  android:layout_height="match_parent"
>
  <TableLayout
    android:layout_width="match_parent"
    android:layout_height="match_parent"
    android:stretchColumns="1"
    >
    <TableRow>
      <TextView
        android:text="No special rules:"
      />
      <EditText
      />
    </TableRow>
    <TableRow>
      <TextView
        android:text="Email address:"
      />
      <EditText
        android:inputType="text|textEmailAddress"
        android:imeOptions="actionSend"
      />
    </TableRow>
    <TableRow>
      <TextView
        android:text="Signed decimal number:"
      />
      <EditText
        android:inputType="number|numberSigned|numberDecimal"
        android:imeOptions="actionDone"
      />
    </TableRow>
    <TableRow>
      <TextView
        android:text="Date:"
      />
      <EditText
        android:inputType="date"
      />
    </TableRow>
    <TableRow>
      <TextView
        android:text="Multi-line text:"
      />
      <EditText
        android:inputType="text|textMultiLine|textAutoCorrect"
        android:minLines="3"
        android:gravity="top"
      />
    </TableRow>
  </TableLayout>
</ScrollView>
Here, we attach a “Send” action to the action key for the email
address (android:imeOptions = "actionSend"), and the “Done” action on
the middle field (android:imeOptions = "actionDone").
By default, “Next” will move the focus to the next EditText and
“Done” will close up the input method editor. However, for those, or
for any other ones like “Send”, you can use
setOnEditorActionListener() on EditText (technically, on the
TextView superclass) to get control when the action key is
clicked or the user presses the <Enter> key. You are provided with a
flag indicating the desired action (e.g., IME_ACTION_SEND), and you
can then do something to handle that request (e.g., send an email to
the supplied email address).
If you need more control over the action button, you can set:
android:imeActionId, which provides a custom value for the actionId
that is passed to onEditorAction() of your OnEditorActionListener
android:imeActionLabel, where you provide your own caption for the
button (bearing in mind that your desired caption may or may not fit)You will notice that the IMEDemo2 layout shown above has another
difference from its IMEDemo1 predecessor: the use of a ScrollView
container wrapping the TableLayout. This ties into another level of
control you have over the input method editors: what happens to your
activity’s own layout when the input method editor appears?
There are three possibilities, depending on circumstances:
EditText being edited is at the top
or bottom. This has the effect of hiding some portion of your UI.Android controls the full-screen option purely on its own. And, by
default, Android will choose between pan and resize modes depending on
what your layout looks like. If you want to specifically choose between
pan and resize, you can do so via an android:windowSoftInputMode
attribute on the <activity> element in your AndroidManifest.xml
file. For example, here is the manifest from IMEDemo2:
<?xml version="1.0" encoding="utf-8"?>
<manifest xmlns:android="http://schemas.android.com/apk/res/android"
  package="com.commonsware.android.imf.two"
  android:versionCode="1"
  android:versionName="1.0">

  <supports-screens
    android:anyDensity="true"
    android:largeScreens="true"
    android:normalScreens="true"
    android:smallScreens="true"/>

  <uses-sdk
    android:minSdkVersion="7"
    android:targetSdkVersion="11"/>

  <application
    android:icon="@drawable/ic_launcher"
    android:label="@string/app_name">
    <activity
      android:name=".IMEDemo2"
      android:label="@string/app_name"
      android:windowSoftInputMode="adjustResize">
      <intent-filter>
        <action android:name="android.intent.action.MAIN"/>

        <category android:name="android.intent.category.LAUNCHER"/>
      </intent-filter>
    </activity>
  </application>

</manifest>
Because we specified resize, Android will shrink our layout to
accommodate the input method editor. With the ScrollView in place,
this means the scrollbar will appear as needed when the user is scrolling:
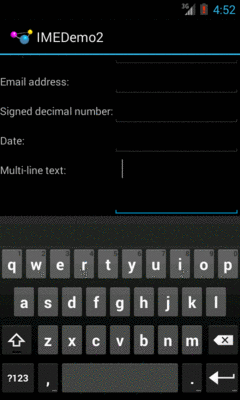
Figure 565: The shrunken, scrollable layout
Sometimes, you need the input method editor to just go away. For example, if you make the action button be “Search”, the user tapping that button will not automatically hide the editor.
To hide the editor, you will need to make a call to the
InputMethodManager, a system service that controls these input method
editors:
InputMethodManager
mgr=(InputMethodManager)getSystemService(INPUT_METHOD_SERVICE);

mgr.hideSoftInputFromWindow(fld.getWindowToken(), 0);
(where fld is the EditText whose input method editor you want to
hide)