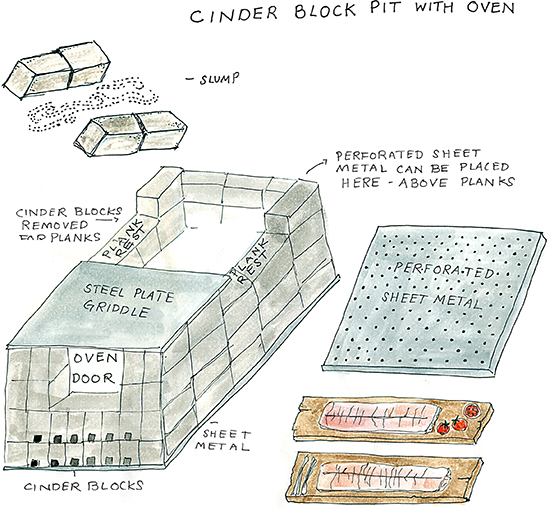
I often build fire pits out of cinder blocks so they are aboveground rather than dug into it. This is convenient because I don’t have to dig up someone’s backyard, and I can dismantle and reassemble the pit in different shapes and sizes depending on my specific needs. For the cedar-planked sturgeon feast, I created a pit that includes a steel plate griddle, an oven, and a makeshift stovetop.
Before you build your pit, look for a flat spot away from any trees, root systems, buildings, or anything else you don’t want to burn down. The ideal land to build a cinder block pit on is covered with dirt or gravel, and it’s dry. A concrete or brick surface will work, but you’ll need to lay a piece of sheet metal to protect it from staining or cracking. Do the same if the ground is wet; otherwise you may have difficulty igniting the fire. Avoid setting up your pit on asphalt, because it will melt, and grass, because the flavor of burned grass isn’t one you want. If grass is your only option, I suggest you dig it up in such a manner that it can be easily replaced later with sod.
Pit Kit
If you need to protect the ground you are building the pit on, add a 48 by 102-inch piece of sheet metal to the list.
68 standard 16-inch cinder blocks
Twenty-four 16-inch cinder blocks with grooved ends
One 4-by-7-foot sheet perforated sheet metal
One 3/8-inch-thick 32-by-48-inch steel plate
2 rainproof tarps
Twine Two 8-inch-long stakes
Measuring tape
1. Measure the space where you are building the pit and mark off a rectangle 48 inches wide by 102 inches long with stakes and twine; if you’re working on a hard surface such as concrete or brick, mark it with chalk.
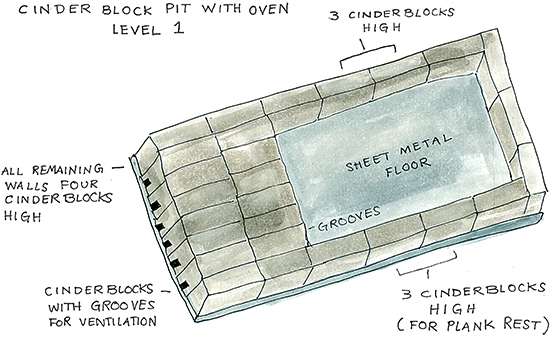
2. If you are using it, lay the larger sheet of metal down on the floor of what is to become your cinder pit.
3. Decide which of the two short sides of the pit you want to leave open, to access as you would an oven.
4. Starting on one long side, lay 6 blocks end to end. On the side you chose for your opening, lay two rows of 6 grooved blocks side by side (so the long sides of the blocks are touching each other) to span the space between the two longer sides. (The second row is inside the pit, creating a two-block-wide, one-block-high wall.)
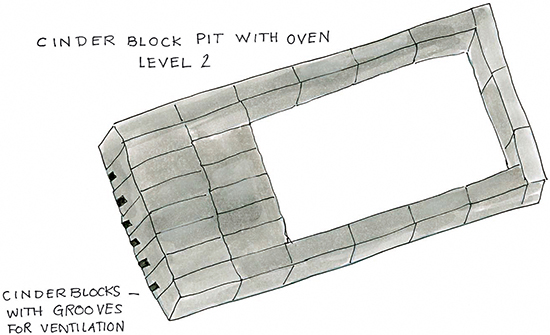
5. Build the second long side in the same way as the first. Lay a line of blocks side by side, 3 blocks high, to close the fourth side. Continue building upward until you have built a pit with three walls three blocks high; the opening wall will be two blocks high.
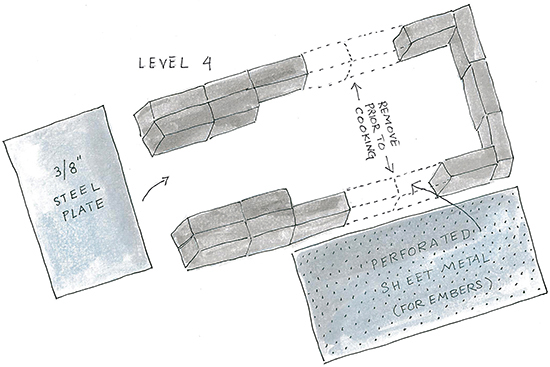
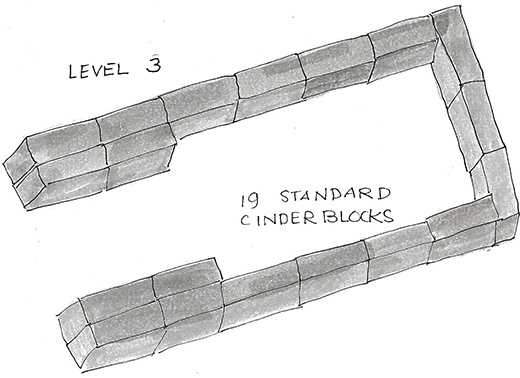
6. For the fourth row, you will leave spaces of two blocks on each side opposite each other, like big grooves on which you will rest the cedar planks (see Level 4 diagram, above).
7. Starting with about half of the wood or charcoal, set up the material for the fire in an elongated teepee-like shape about 6 feet wide by 2 feet long. When you’re stacking the wood or charcoal, allow for some space for air to flow and to tuck small pieces of dry wood and newspaper to act as kindling. Tuck a generous amount of kindling and newspaper into the spaces. Have the rest of the wood or charcoal nearby, as you’ll be throwing it onto the fire as you need it. (I like to stack the wood or bags of charcoal at the closed end of the pit.) Unless you are lighting the fire that day, cover the wood with tarps to protect it from rain and dew.
8. On a flat space near your pit, lay four of the remaining cinder blocks in two rows to make a cooking area for the blackberry slumps. (If you are working on a surface that can be damaged or melt, you’ll want to lay down sheet metal first to protect the surface.) Alternatively, you can make the slumps on the griddle portion of your pit, or inside the house on the stovetop. Space them so the vessels you are cooking the slumps in will rest on top of the blocks over the fire. When you’re ready to cook the slumps, you will shovel a few scoops of embers from the main fire and create a small fire in the center of the “stovetop” you just created.
9. To create a griddle, lay the smaller piece of sheet metal on the cinder blocks, flush with the opening of the pit.
10. Use the remaining two cinder blocks to cover the entrance to the pit. This is your “oven.”