If you’re like Shannon, the kitchen is the heart of your home. It’s also a place for imaginative money-, time-and planet-saving ideas. When shopping, try to choose goods that are recyclable or have the least amount of packaging to save on landfill. We know it’s difficult to avoid packaging altogether so we’ve included other ways to use it throughout your home. Where possible, choose paper and glass over plastics because they’re more hygienic and easier to recycle. Glass is ideal because it can be reused safely over and over again.
SAVE FEATURE: Fruits such as strawberries, blueberries and raspberries are generally packaged in plastic punnets. Rather than tossing the punnet away, wash it and turn it into a string holder. Just thread the string through one of the existing holes and store it somewhere that’s easy to access. Your string stays clean and won’t tangle.
When paper was scarce and costly, Shannon remembers using worn old paper bags or butcher’s paper from the scrap-paper drawer to scribble down shopping lists. Paper packaging has come a long way since then. These days paper products come in all shapes and sizes and can be reinforced with wax or plastic, such as milk cartons. Other items have metal foil bonded to the paper, such as popper drinks, which means the paper is far more durable and reusable.
 Use to store rolled posters, paperwork or artwork.
Use to store pairs of socks, stockings and undies in your drawers. Not only will it make them easy to stack and store, it also makes finding what you need simple because the fabric shows at the end.
Keep your scarves and ties crease-free by wrapping them around the roll.
Take excess rolls to a local school or kindergarten for craft projects.
TIP: Make your own Christmas bon bons. Buy the snaps (the things that make the popping noise when the bon bons are pulled) at a craft store and attach them with a piece of tape or glue to the inside of a thin cardboard roll. Place a paper hat, which you’ve made or recycled from last year, a joke of your own or one downloaded from the internet and a little gift inside. Wrap in colourful crepe paper, pages from a magazine or recycled gift paper, tie off the ends with string or ribbon and you’re ready to pop!
 DID YOU KNOW? There’s a group known as the Cardboard Tube Fighting League that reuses cardboard tubes for mock fighting. They might want your old tubes! Visit www.tubeduel.com.
Old cereal boxes can be converted into document or magazine holders. Cut one corner of the box at a 45-degree angle so it’s big enough for your documents or magazines to fit inside. Decoupage or decorate the box with scrap fabric, leftover wallpaper, recycled gift-wrapping paper or spray paint. Before you decorate, spray the cardboard with a good-quality surface spray to deter bugs that love cardboard, such as cockroaches, beetles and moths.
If your shoes wear out quickly, add another layer of protection by making a shoe liner. Cut the cardboard to the shape of the inner sole and place it inside the shoe, grey side up. The cardboard helps spread the foot pressure and saves wear on the inner lining of your shoes. It also absorbs sweat and is easy to replace. Cardboard shoe liners help prevent the inner sole splitting in children’s school shoes – a source of nasty blisters!
TIP: If you don’t like the cardboard idea, make your shoes last longer by using felt as a shoe liner. Just cut the felt to size and place it inside your shoes.
Line cake tins when baking. It’s already greased and you’ll save on baking paper. Don’t use butter paper made or lined with foil.
Grease cake tins and baking trays by rubbing with butter or margarine paper. Store the paper folded in the freezer ready to use when you need it.
TIP: There’s a concept known as ‘pre-cycling’ where you buy an item only if it can be recycled once you’ve finished using it. For instance, if a packet of biscuits has packaging that can’t be recycled or reused, you make a decision not to buy them. Hopefully the manufacturer is motivated to change the way it packages goods.
Paper bags have many handy uses. They’re a protective covering, reduce exposure to insects and also help items retain moisture (while still allowing air to flow). And they can be reused.
Dry and press flowers (use the search feature of your ebook reader to search for ‘press flowers’).
Dry herbs, vegetables, fruit and rind (use the search feature of your ebook reader to search for ‘dry herb’ or ‘preserve fruits’).
Store mushrooms.
Speed up the ripening process of fruit. Put the fruit in a paper bag with a banana. Bananas give off a chemical called ethylene that boosts the ripening process. You can turn a rock-hard avocado into a ripe one overnight!
Store loose items, such as beads and buttons.
Use for art and craft projects. Make an instant hand-puppet!
TIP: One of the easiest ways to save money is to make your lunch at home and take it to work in a recycled paper bag or lunchbox. The average sandwich costs $7.50 so if you take your lunch each day, that’s a saving of $37.50 a week! A homemade sandwich costs around 80 cents to make.
Even though many people now read newspapers online, you’re still likely to receive a local newspaper. Make use of it! In addition to wrapping up takeaway fish and chips, old newspaper is ideal for lining the tops of cupboards in the kitchen. It collects gunk and saves on cleaning.
Even though we don’t advocate using fireplaces, if you do use one, fire briquettes made from old newspapers are great for starting a fire. Soak the newspaper in water (to remove bleach and toxins – the water is fine for the garden), squeeze out the water, shape the newspaper into balls and allow it to dry. Use only when completely dry.
Make sewing patterns for clothing or other items, such as slipcovers for the couch. You can even take the outline of your children’s feet as a paper pattern and use it when shoe shopping if they’re not with you, as Shannon’s mum does.
Entertain the kids by making papier-mâché. Make sure there’s some plastic covering (such as an old shower curtain) underneath your papier-mâché work area because it can get messy. Rip strips of newspaper 3 centimetres wide, place in a bucket of water and add 2 cups of wallpaper paste. To make the paste, combine 1 part plain flour with 2 parts water in a large saucepan and stir over a gentle heat until the mixture is thick and clear. For each cup of mixture, add 1 tablespoon of salt or 2 drops of oil of cloves to prevent mould. Scrunch the glue and paper together until it’s like putty. To make masks, blow up a balloon and layer the pulp over it, leaving two holes for the eyes, then put aside until it dries. Make a doll’s body, limbs and head and sew them together while wet with a needle and tough thread or string. Make clothes for the dolly with fabric from your rag bag. Create toy furniture that’s light and strong. You can even make your own fabulous Christmas decorations.
Newspaper is a great deodoriser. Shove it in shoes and leave overnight. Place a crumpled sheet of newspaper inside smelly plastic containers to remove nasty odours.
Shred newspapers to use as mulch in the garden. It will cut back on water use and reduce water evaporation.
Create a no-dig garden that’s weed free. Put four layers of newspaper over the designated area and wet each layer with water. Cover the newspaper with a 10-centimetre thick layer of topsoil and fertiliser or potting mixture and mulch. The newspaper kills weeds and the elevated garden bed is easier to access if you have arthritis or difficulties with mobility.
Wrap kitchen scraps in newspaper and put into your bin. It’s better for landfill and is what people used to do before plastic bags came along.
DID YOU KNOW? According to Planet Ark, Australians are the best recyclers of newspapers and magazines in the world. In 2007, we recycled the equivalent of 1 billion newspapers.
Flour bags use double-layered paper which is designed to keep moisture out. Use to line tins when disposing of excess fat.
Shannon’s Great-aunt Leticia used to carry a fold-up metal concertina cup in her handbag to drink cups of tea. These are still available from camping supply stores. Find out if your local café allows you to use your own cup or mug for takeaway rather than using a disposable paper cup.
Wash them clean with water (don’t immerse the cup in water or it will disintegrate). Remove the base and use the container as a funnel.
Protect seedlings by removing the base of the cup and wedging it into the soil around the fledgling plant.
Put in the kids’ busy box.
Waxed or plastic-coated cardboard cartons make great freezer storage containers. Just wash out with a little detergent and water before reuse. Pour soup, casseroles or stews into the cleaned cartons and place in the freezer. If you have a small freezer and can’t rest the milk carton upright, place a plastic bag inside the milk carton, fill it up, tie off the bag tightly and secure the top of the carton with a peg or clip before lying it down. The cartons are easy to stack.
Cut off the top and store excess cooking fat in them. If you leave the fat on the benchtop, make sure it’s covered or nasties will get in. If reusing the fat in cooking, it must be strained to remove any traces of cooked material. To sterilise the fat, cook over a medium-high heat to blue fume stage, which is just before it smokes and gives off a blue haze, and then strain. Never pour fat down the drain because it will clog and is bad for the environment. You can put fat in general household bins or find out if there’s an oil recycler near you. Visit recyclingnearyou.com.au and look under ‘oil-cooking’. The fat could be converted to biofuel.
Use as candle moulds. (For tips on how to make candles, see How to be Comfy and use the search feature of your ebook reader to search for ‘candle’.)
Wash and squash before recycling.
Can you put a pizza box in the paper recycling bin?
You’d think because the carton is made of cardboard it’s fine to put in the recycling bin. But if it’s covered in oil and food, it could contaminate other paper products. Some councils accept pizza boxes and others don’t. It’s best to check with your council (information is often on their website).
Use as a gift box for unusually shaped objects. Clean with a little dishwashing liquid and water but don’t soak them or they’ll disintegrate. Cover in leftover wallpaper, paint or wrapping paper.
Use as seedling pots. Once the seeds have germinated, bury the pot in the ground. The cardboard will disintegrate after about 6 months.
These have many other uses. They make instant paint pots.
Make into toys, such as alligators, monsters and trains.
Use to store delicate Christmas decorations, such as crystal or glass baubles.
Decorate the carton and present handmade chocolates in each casing.
Remove the top and place it in your office drawer as an organiser for clips, drawing pins, staples, paperclips, rubber bands etc.
Use to sort and store jewellery or any other small items.
Send to your local school or kindy.
DID YOU KNOW? Household recyclables are delivered to a Material Recovery Facility where they are sorted and baled into groups: paper, cardboard, plastics, glass, steel and aluminium. They are then sent for remanufacture.
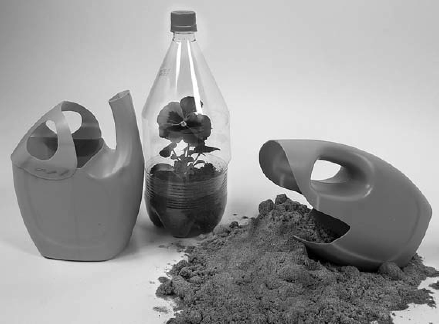
Plastic water bottles have become the environmental equivalent of plastic bags: a new pariah. Some environmental groups are even directing people not to buy bottled water but drink tap water instead. Aside from the petrochemicals and the amount of energy it takes to make and transport bottled water, environmentalists also argue there are more regulations over tap water than bottled water. If it’s taste you’re worried about, a Choice magazine panel found people couldn’t distinguish between two branded bottles of water and Sydney tap water. If your local water supply isn’t to your taste, use a water filter. Another concern with bottled water is Australia doesn’t have great away-from-home recycling facilities: for example, if you drink a bottle of water at the movies and throw the empty bottle in a bin, the plastic isn’t recycled but goes into landfill. There’s also a huge mark-up on the price of bottled water. One survey found bottled water served with meals is 500 times more expensive than tap water and 300 times more damaging to the environment.
The most obvious use for old plastic bottles is to put tap water in them and place them in the fridge so they’re ready when you need them.
Turn them into a terrarium, or mini-greenhouse, for seedlings. Cut the bottle in half, put soil and seeds in the bottom part of the bottle and place the other part of the bottle on top.
Turn them into shakers for children. Add rice, dried pasta or lentils to the bottle and put the lid back on. It makes an instant musical instrument!
DID YOU KNOW? South Australia offers money for recycled bottles and they make up less than 10 percent of the state’s rubbish compared with 13.4 percent nationally.
Delicate fruits, such as mangoes or papayas, often come wrapped in netting. Scrunch up the netting and wipe it over the lint catcher in the dryer to remove lint.
Use for art and craft projects.
Use to provide grip and insulation on water bottles and cans of drink.
TIP: Unfortunately, biscuit wrapping doesn’t recycle well because it’s made of cellulose and plastic. Put it in your household garbage. Reuse the trays to store small items in your sewing kit or workshop. Shannon uses biscuit trays in her sewing box to store bobbins.
The plastic used in milk bottles is easy to cut with scissors. Cut 2-litre bottles in half and use the top part as a funnel.
Using a 4-litre bottle, cut off the top of the lid at an angle to create a watering can. Use the handle as a spout.
Cut diagonally across the body of the bottle, discard the bottom part and you’ve got a scoop. Use in the garden or the kitchen to scoop flour or dried foods, such as beans, rice, nuts.
Cut a hole into the side of a 4-litre milk bottle so it’s big enough for your hand to fit into. Use it to store small items such as paperclips or pins.
Use it to mix pancake batter. Combine 1 cup of plain flour, 1 cup of milk, ¼ teaspoon of salt and 1 egg in the bottle, put on the lid and shake. The batter is ready to pour straight into the pan—and is much cheaper than the commercial ones!
Make a mini-bucket for the kids to use. Cut the spout and handle off, punch a hole in either side of the container and attach string. Use it to catch tadpoles.
TIP: Keep chilled water in the fridge so you don’t waste water waiting for it to cool from the tap.
DID YOU KNOW? Instead of petroleum, researchers in New Zealand are using animal protein waste, such as blood and feathers, to make plastic. It’s fully biodegradable and will be used to make seedling trays and pot plants.
Wipe them out with paper towel and store nuts and bolts in them. The residual oils prevent rust and it’s easy to write what’s inside using a marker pen.
Take on picnics.
Shrink takeaway plastic cutlery. Hold the handle over a stove until it’s soft and touch the soft end to a breadboard so it rolls up and can fit into a lunchbox.
TIP: Make shrinkies from chip packets or other plastic packaging. Set the oven at the lowest temperature, put the chip packet or packaging on baking paper and place inside the oven. Keep an eye on it and remove when it’s the size you want it to be. If you want to be able to hang it, use a hole punch on one corner before putting the packet in the oven. That way, your kids can hang the shrunken items from their school bags! It’s a great way to make toy grocery items for the toy box.
Use old fruit bag netting to store pegs. If you want to hang it from the clothesline, place a wire coathanger on a table, pull the hook sideways 90 degrees and turn the triangle part into a circle. Place the opened end of the fruit bag netting around the circle part of the coathanger and stitch or staple into position. It’s ready to hang from your clothesline. When it rains, water can run through it and your pegs won’t collect mould or debris.
Wash loose vegetables in netting. You can clear the dirt and pick up the vegies in one go.
Secure over a drain hole to stop clogging or to prevent bugs getting into your home. Cut the netting slightly larger than the hole, unscrew the grill across the drain, place the netting over the hole and screw the grill into place. The grill thread will keep the netting in place.
Keep in a sewing box to sort bits, beads and buttons.
Keep in a fishing box to sort sinkers and other gear.
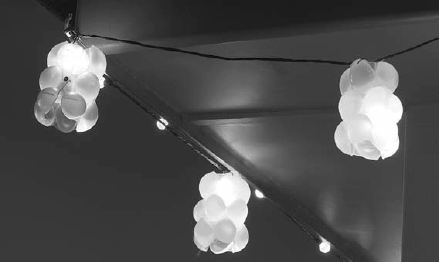
Make ice-cube trays (you can only use the ones that bend) into lanterns. Turn the tray inside out to make a circle and staple the edges together. Only use tealight or votive candles so the tray doesn’t melt. You can also wrap bendy ice-cube trays around fairy lights for a unique light effect.
These are the ultimate storage solution for so many things, especially leftover food. Because plastic absorbs oils and smells, wash containers separately in dishwashing liquid and water.
Use as lunchboxes.
Use to store chopped vegetables in the fridge. Add a little lemon juice to the vegies to prevent browning. Encourage your children to snack on the pre-chopped vegies rather than eating rubbish.
They’re great for mixing and storing lotions and potions.
Store cleaning products in them. Just add a label so you know what’s inside and make sure you keep them out of children’s reach!
Keep tail ends of ribbons and hair clips inside.
Use lids as a divider in a box for your files or recipe cards.
TIP: Don’t use takeaway containers to store food if the plastic surface isn’t slick and smooth because they’re no longer hygienic. Transfer them to the potting shed, garage or laundry.
DID YOU KNOW? When reheating food, some containers are preferable to others. Whenever you heat plastic-based containers in the microwave, you increase the chance of chemicals being released. Only use plastics that have been designed for cooking and opt for heat-resistant glass or ceramics instead. Microwave plastic wraps, baking paper, cooking bags, parchment paper and white microwave-safe paper towels are fine to use.
TIP: Don’t let plastic wrap touch foods during microwaving. Never use thin plastic storage bags, brown paper (unless microwave-safe), plastic grocery bags or newspaper when microwaving. Only use foil if it’s immersed in water and wrapped entirely around something, such as a chicken leg. Otherwise, the foil will arc or short out your microwave.
TIP: Wipe the inside of the microwave after each use with pantyhose ball dipped in white vinegar so food doesn’t harden and become more difficult to remove. You’ll save time!
DID YOU KNOW? 2005 Nobel Peace Prize winner Wangari Maathai argued plastic bags can lead to the spread of malaria. If old bags become filled with rainwater this creates the perfect breeding ground for mosquitoes which carry the disease. As a result, Kenya has banned the production and distribution of light-density bags.
![]() There’s been a lot of discussion about reducing the use of plastic bags. If you don’t use green carry bags at the supermarket, reuse your old plastic ones. Some supermarkets have return bins to recycle them.
There’s been a lot of discussion about reducing the use of plastic bags. If you don’t use green carry bags at the supermarket, reuse your old plastic ones. Some supermarkets have return bins to recycle them.
![]() You’ve probably never thought to wash your plastic bags and hang them on the line to dry to reuse again and again. When Shannon was growing up, plastic bags were rare and were always seen hanging on clotheslines. She always brought bags home from school and reused them.
You’ve probably never thought to wash your plastic bags and hang them on the line to dry to reuse again and again. When Shannon was growing up, plastic bags were rare and were always seen hanging on clotheslines. She always brought bags home from school and reused them.
Use as bin liners for non-recyclable material.
Weave, knit, crochet or plait plastic bags into a range of waterproof items, such as baskets, handbags, mats and coat-hanger covers. Shred different coloured bags into long thin strips and use them to create different patterns. For pattern ideas, visit www.myrecycledbags.com. Shannon has a fishing hat made from used plastic bags.
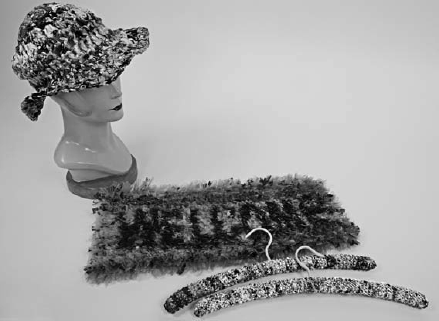
Crocheted hat, knitted coathanger covers and hooked welcome mat all made from plastic bread bags and shopping bags.
Use plastic bags to remove pollen heads from lilies. Place the bag over your hand, remove the pollen and wrap the bag over the top. Place in the bin or use the pollen to make your own yellow dye.
Keep a plastic bag in your handbag. You may need to carry extra items or wrap up something wet.
Use to pick up dog poo.
Use to line school bags to avoid cleaning out squashed banana.
If you carry lots of things, line your handbag with a plastic bag so you avoid staining. This also increases the life of your handbag.
A large plastic bag can double as a poncho when it rains.
If you’re painting and need a break, wrap up the paintbrush in a plastic bag so the paint doesn’t dry out on the brush.
DID YOU KNOW? The Chinese government has banned the production and distribution of the thinnest plastic bags. This is expected to save 37 million barrels of oil. The bags are banned from all forms of public transport and scenic locations because hey get caught in trees and cause what’s known as ‘white pollution’.
CHANGE FOR GOOD: Two British Church of England ministers asked their congregations to reduce their carbon emissions for Lent as part of a ‘Carbon Fast’. Parishioners were asked to avoid using plastic bags, give the dishwasher a day off, insulate the hot-water tank and check the house for draughts. Those taking part were asked to remove one light bulb from a prominent place in their home and live without it for 40 days.
TIP: The easiest way to store plastic bags is in a fabric sausage-shaped bag. Make or buy one. To make one, take a 30 x 30-centimetre square of fabric, fold it in half and sew a seam along one side. Hem either end and thread elastic through each hem. Add a handle or hook so it can be hung. Shove the plastic bags in one end and remove from the other.
DID YOU KNOW? Most people know the damage plastic bags cause to marine life but did you know they were a major factor in severe flooding in Bangladesh because the bags clogged drains? The government imposed bans in 2002.
Use to extend make-up brush handles. Place the straw over the handle.
Rescue objects from a drain by securing the top of the straw over the dropped item and retrieving it.
Put in the kids’ busy box. They’re easy to cut, stick or staple together!
Store nails or screws for the workshop.
Transport food or other items to picnics and parties.
When Shannon was young, she used to keep ribbons and hair bits in old ice-cream containers. On ironing day, she’d get out the container and iron her ribbons for the week.
A lot of fruit and vegetables are packaged on trays. Clean the trays in dishwashing liquid and water and reuse to package gifts. Keep them stacked and ready for use.
Use as a plant saucer or paint palette.
Pierce holes in them and place at the bottom of the crisper drawer in your fridge to allow air to flow around fruit and vegetables.
DID YOU KNOW? Even though some polystyrene has a number 6 stamped on it, most councils don’t accept it in recycling collections. But the EPS industry group coordinates recycling of polystyrene. To find out where the collection facility is in your state, visit www.repsa.org.au.
Use as a holder for oasis sponge when arranging flowers. This stops it from crumbling.
Wrap small items for sending in the post. It’s a great lightweight alternative to bubble wrap.
Turn them into a string holder (use the search feature of your ebook reader to search for ‘string holder’).
DID YOU KNOW? The NSW Food Authority found up to 40 percent of children could be at risk of food poisoning because they had warm lunchboxes. Lunchboxes without icepacks and sandwiches in paper bags were up to 12°C warmer than lunchboxes with frozen drinks or icepacks. There were five times the bacteria after 5 hours. To help keep lunchboxes cool, put ice-cubes in a plastic bag, tightly secure the top and place in the lunchbox.
TIP: Zip-lock bags can be washed and used again. Dry on the clothesline and use until they form holes.
Depending on the size, use as a bucket.
Store toys in them.
Use them to store dry pet food with or without its packaging. Scoop as you need it but keep the lid of the bin secured at other times.
Use as a desk organiser. Place several lids in an office drawer and store items such as paper clips in them.
Use as a pot plant saucer.
DID YOU KNOW? Chopping boards should last a long time. Clean with dishwashing detergent and water but don’t soak wooden ones in water or the timber will dry out and crack. Plastic ones tend to wear more quickly than wooden ones because sharp knives scratch the surface more easily. Once the surface is cut or scratched, get a new chopping board because bacteria thrive in hard-to-clean areas.
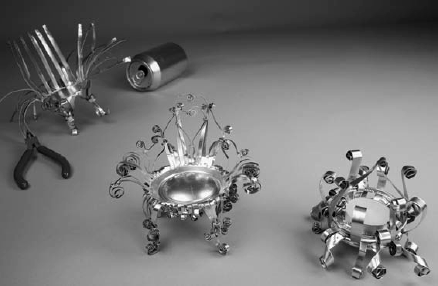
Wander through a shed owned by someone born before the 1960s and you’re bound to see an array of tin cans and glass jars housing nails, screws and other workshop items. Why buy new containers when you can recycle existing containers for free? The metal in tin cans makes a great craft material because it’s malleable and easy to cut. Shannon is amazed that recycling slowed during the hippie era.
These are ideal to store excess fat before disposing in your household garbage.
Wrap a ribbon around a tin and create a vase for informal flower arrangements.
Use tall tin cans to make a base or legs for a shelf in the kitchen to stack spices. Use it as a bookshelf. Decorate the cans with fabric, paint or used gift-wrapping paper. Add extra stability by filling the cans with sand or soil.

Spray paint or cover the cans in decorative paper or fabric from the rag bag and use as pen holders.
Make an old-style tin-can telephone for your kids. Take two tin cans, make a hole in the bottom of each tin and thread some string between the two. When the string is taut, voice vibrations pass along the string. Sadly, no texting is possible!
Label and use tins to hold solvent when cleaning paintbrushes.
Large cans can be turned on their sides to make a wine rack. Attach the cans using a hot glue gun.
Make outdoor candle holders. Punch holes in the side of the tins for the light to get through.
Use to make filigree! Remove the top and rim of a tin can with a can opener and cut fine strips down the side of the can using a pair of tin snips. Twist the strips into curls or whatever shape you want using pliers. You can also use aluminium cans for filigree. Make a tealight candle holder, dolls’ furniture or decorator baskets.
TIP: When you’ve exhausted all the uses for tin cans, apply the ‘wash and squash’ principle. Wash the tin, flatten it and place it in the appropriate recycling bin. It will take up less space.
Use to strain children’s poster paints.
Use when making tinctures.
Add to the children’s tea set and toy box for numerous straining activities.
Use to protect the floor by placing lids under heavy furniture. The lid provides a larger surface area. You could even spray paint them in the same colour as the furniture or cover in the same material as the couch so they blend in.
Use to fill or stuff holes. Steel wool is particularly good at keeping out mice and rats because they can’t eat through it. Birds don’t like it either.
TIP: Keep your steel wool rust free by storing it in the freezer in a zip-lock bag.
Old cutlery is great to use in the garden. Use spoons to create seedling holes. Forks can be used to remove weeds from the lawn.
Use old knives in the shed to spread glue or trim things.
To soften the edge of tin cans or glass, run a serrated knife over the edge like a file.
To make a fine chisel, cut the blade of a knife 2 centimetres from the handle.
Make your own rustic wind chimes: flatten out the cutlery, make a hole in each handle, thread wire through each hole and suspend in the breeze.
Use to make jewellery and belt buckles. Twist fork tines into any design you like and turn into lovely bracelets.
Use knives as weeders in the garden. They will rust (eventually) but are great to cut roots. Trim the roots around a pot when re-potting.
Cut a butter knife across the blade 5 centimetres from the handle and sharpen the leading edge. Use as a scraper for cleaning glass or as a leadlighting tool to cut leads and calmes.
Old knives can be turned into paint scrapers to access fiddly areas.
Use knives in bonsai work.
TIP: If your cutlery has rust marks from being cleaned in the dishwasher, don’t throw it out! Scrub with a paste of bicarb and water.
Slotted spoons are ideal for mixing paint.
Use egg flips to scrape up spills on the floor. They make instant shovels for children in the garden or sandpit.
Egg beaters can help mix paint or fertiliser.
Place stainless steel skewers in tree trunks to hang plants from. They won’t rust or harm the tree.
Mix paint in them.
Mix soil and sand for potting in them.
Use as storage in the garage.
Turn them into toys for the kids’ sandpit.
Take aluminium ones to the recycler and get money for them.
TIP: To clean stainless steel, wipe over with a pair of pantyhose dampened with white vinegar and dry with another pair of clean pantyhose.
Use as a desk organiser or dressing table organiser. Decorate it with paint and one of grandma’s doilies.
Use to soak engine parts in oil in the garage.
Hang on to glass jars because they can be reused in so many different ways. They’re particularly handy for storing items you need to be able to see. And glass is easy to sterilise, so it’s ideal for storing food.
If chipped, smooth the edges around the chip with a sapphire nail file so you don’t cut yourself. Use as a tealight-candle holder. If feeling creative, etch a design into the glass with frosting cream (see How to be Comfy and use the search feature of your ebook reader to search for ‘frosting cream’.)
If big enough, use in the bathroom to hold toothbrushes and toothpaste.
Sterilise by immersing in boiling water for 2 minutes and allow to air-dry or place on a tray in a cold oven and heat to 110°C. When the oven reaches temperature, turn it off and leave until the bottles are cool enough to pick up. Remove the labels as described below. Use to store homemade jams, pickles and preserves. Keep in the pantry for presents.
They make great canisters. To make different sized jars match, decorate the lids in the same colour. Lay fabric over the top, glue on and trim the excess. Use the canisters to store whatever you like. Remember to place a label on the jar or store the label inside the jar.
Use to store pins, buttons, nails or screws.
How to remove a sticky label from a jar
Have you noticed sticky labels are even stickier? There are several ways to remove them depending on what the glue is. For loosely glued ones, fill the glass jar with hot water but don’t get the label wet. Put the lid on and leave for 10 minutes. The label will peel off. If any label remains, put a drop of dishwashing liquid and a little water on some plastic wrap, mix together and place the plastic wrap over the label. Leave for 10 minutes. The label should come off when you remove the plastic wrap. For stickier labels, apply tea tree oil with a cotton ball. Stronger still is eucalyptus oil applied with a cotton ball. If none of these techniques work, it’s time to apply some heat. Aim a hair dryer at the label to melt the glue.
TIP: Transfer cooking oil from plastic bottles to glass ones and store in a cool place away from light. Oil lasts longer in glass and away from light.
DID YOU KNOW? Glass recyclers use optical sorting technology to remove Pyrex dishes, crockery and drinking glasses from glass recycling bins. These melt at a different temperature to other glass and need to be recycled seperately.
These bottles are incredibly strong. Use them to create a garden edge by wedging the top of the bottle into the ground until the base is 5 centimetres above the ground.
Turn into a rolling pin. To increase the weight of your rolling pin, fill with water and cork tightly.
How to cut glass
You’ll need a glass cutter, which can be bought cheaply at the hardware store. Mark your edge by putting sticky tape where you want to cut the glass. Then run the cutting wheel, which will make a screeching noise, next to it. Rotate the cut end of the bottle over a flame and rub with ice until the glass separates and pops off. Carefully smooth the cut edge with a sapphire nail file. You can turn wine bottles into great vases.
The San Pellegrino factor
These lovely bottles are ideal for reuse because they’ve only contained water and are easy to clean. Use them to store your own herb-and spice-infused oils. Place good-quality olive oil in a bottle, add the herbs and allow to infuse for about 3 months. You can flavour vinegar in the same way. Keep or give as presents.
TIP: If you’re feeling creative, decorate old bottles with Cerne Relief paint, which creates a cloisonné effect. The paint is available at craft and paint stores.
Use as a serving platter. It’s perfect for a cheese platter.
Because it’s footed, you can place it on top of bowls in the fridge to create a new shelf.
![]() China and ceramics can last for thousands of years. If you care for yours properly, it could last just as long (even though you won’t be around to enjoy it!).
China and ceramics can last for thousands of years. If you care for yours properly, it could last just as long (even though you won’t be around to enjoy it!).
Once plates become chipped or crazed, it’s best not to use them for food because bacteria can thrive in the cracks. Instead, use the plates as pot plant saucers.
Because paint doesn’t dry out as quickly on porcelain, they make great paint palettes.
For china that’s broken beyond repair, use in mosaics (use the search feature of your ebook reader to search for ‘mosaics’). Keep broken china in a busy box.
To allow drainage in pot plants, place broken bits of china at the bottom of the pot. It’s an ideal alternative to gravel.
Turn a damaged coffee mug into a toothbrush holder in the bathroom.
DID YOU KNOW? When plates start to wear down, they become dangerous if washed in the dishwasher because small bits of ceramic may break off and get caught in the pipes. As soon as china loses shine on any of its surfaces, don’t put it in the dishwasher.
DID YOU KNOW? An average dishwasher uses 40 litres of water; washing dishes in the sink uses 15 litres of water.
Use for a cactus garden.
Use as a storage container for items such as swimming goggles.
Use to transport items, such as vegetables from the vegie patch.
You can remove and replace the plastic shaker on the top of the jar with a knife. Then refill jars with spices or herbs bought at the shops or dried at home. Once refilled, return the plastic shaker to the top of the jar.
After cleaning with dishwashing liquid and water, refill with hundreds and thousands, desiccated coconut or icing sugar. Or use it to dispense glitter! Buy big, inexpensive plastic bags of glitter at the hardware store and transfer it.
Use to store bicarb for cleaning.
Use to store salad dressing when taking salads to work or school. That way the lettuce won’t become soggy.
Sterilise by immersing in boiling water for 2 minutes and allow to air dry or place on a tray in a cold oven and heat to 110°C. When the oven reaches temperature, turn it off and leave until the bottles are cool enough to pick up. Use to store baby food. They’re narrow and tall making them less likely to break and small spoons fit inside them. Label them and keep a stack ready to go.
How to dry herbs
To dry leafy herbs, such as sage, basil and mint, chop the leaves into 3-millimetre thin strips making sure to cut across the leaf, not down it. Cutting across the leaf releases more volatile oils and more flavour. Put the cut herbs in a brown paper bag and store in a cool, dark place. Over the course of a week, shake the bag every morning and evening to loosen the leaves so moisture doesn’t build up. To dry twiggy herbs, such as lavender, rosemary and cinnamon, tie them in a bundle and hang them in a dark corner until dry. Hanging them upside down means all the nutrients go to the head of the herb for greater flavour. The length of time they take to dry depends on the weather.
TIP: Don’t throw out old herbs and spices that are past their use-by date. They can be used in potpourri, added to bicarb to remove odours or heated in the microwave and placed under dinner plates. Add a spicy aroma to a gift by rubbing herbs in some tissue paper and wrapping it around the gift.
How to make your own herbal tincture
Many herbal products are expensive and you can make your own. Just add 1 tablespoon of dried herbs and 2 tablespoons of denatured alcohol (available from the chemist) to a glass jar and cover. Leave the solution in the dark at room temperature for 4 days. Shake the jar every day. Strain the solution through a tea strainer or some muslin cloth into another jar. Label your creation. Use the appropriate tincture in perfumes, lotions, cleaning formulas or pesticides.
Use to wrap parcels and presents.
Tie up plants in the garden or bundle up green waste.
Repair handles on frying pans (see How to be Comfy and use the search feature of your ebook reader to search for ‘frying pans’.)
Use for many kids’ projects, including making mobiles and contraptions.
Use for flower arranging. Winding string along the stems of posies gives them a rustic look.
Create a nautical look by winding string around the outside of a tin can so it’s completely covered. Attach the string to the tin with glue.
DID YOU KNOW? Little boys always used to save pieces of string and keep them in their pockets to use when adventuring.
![]() The advent of screw-top wine bottles means there are fewer corks around but if you get one, don’t throw it away.
The advent of screw-top wine bottles means there are fewer corks around but if you get one, don’t throw it away.
Corks can be cut into discs and placed on the back corners of paintings to protect the wall and allow air to circulate behind your art.
Use a cork as a stopper for a soft drink bottle if a lid goes astray.
Cork is perfect for holding pins and needles. It keeps them dry and rust free.
Use as a doorstop. Cut a cork in half lengthways, secure it between the door and the frame and the door will stay ajar.
Protect skirting boards from door marks by placing some cork where the door hits.
To stop doors from rattling, cut a cork into slithers and place along the doorjamb.
Make a base for soap by cutting champagne corks in half lengthways and placing half on either end of a cake of soap. Use hot water to wet the cork so it sticks to the soap. Your soap won’t become gluggy sitting in water and there’ll be less soap scum to clean up.
Cut cork into discs and fix with PVA glue to the bottom of chair legs. This reduces noise and protects the flooring.
Use cork to make stamps. Cut shapes into the bottom of the cork with a knife or burn patterns by heating a knife and cutting into the cork.
Make your breadboard non-slip by cutting wine corks into 1-centimetre thick discs and gluing them to the underside of the board.
Make a noticeboard. You may have some cardboard or ply timber around the house or you can buy some fairly cheaply. Cut it to size and glue slices of cork over the entire surface with PVA glue. Place two screw-in eye hooks at each top corner, thread fishing wire or string through the hooks and hang the board from a wall.
The fingers tend to disintegrate first but the material in the wrist area can be cut into large rubber bands. Shannon uses them to hold her make-up case together. They’re ideal for securing kids’ lunchboxes or manila folders, diaries and notebooks. Use the rubber bands to sort pens and pencils in children’s pencil cases.
Cut off the fingers and use them over broom handles to make them non-slip, as a finger card for turning pages or to cover one finger when spreading glue.
Use bands cut from fingers over saucepan handles for grip.
Glue strips of rubber under bathmats to make them non-slip.
Use tea towels until they’re completely threadbare! Linen has a strong weave and is great as patching fabric.
DID YOU KNOW? Most modern tea towels are made of cotton because it’s cheaper than linen but linen tea towels are far superior because they don’t leave lint behind. They last for longer and absorb more water.
These can be easily cut with scissors and have a range of other uses. Before reusing them, wash in the washing machine and dry in the sun so you don’t transfer dirt and bacteria. Alternatively, soak a dirty sponge in white vinegar for half an hour, wring it out and leave in the sunshine to dry.
Use old sponges to clean Venetian blinds. Cut a sponge in half and place on the inner edges of a pair of tongs. Secure the sponges with a rubber band (or bands refashioned from rubber gloves). To clean the blinds, pinch and pull the tongs along each slat. To give an extra clean, add some white vinegar to the sponge. If you don’t finish cleaning the blinds, leave a peg on the slat so you know where you’re up to.
Place under the legs and edges of furniture to protect floors. Cut them to size and glue them on with hot glue.
Put them behind paintings and mirrors to allow air-flow and prevent bugs and dust from gathering. Attach with Blu-Tack.
Stop your washing machine walking across the floor and reduce the noise by placing sponges under the feet. This is particularly useful for people who live in apartments.
Soak in children’s paint and place in a takeaway container to use as a stamp pad for potato prints.
How to make your own dishwashing liquid
Get a shaker box (mesh box) and put the tail ends of soap inside. When it’s time to do the washing up, put in the plug and shake the mesh box under hot water to generate frothy soap. Another option is to put shaved soap and water in a container, cover and shake vigorously. You can also do the washing up using just hot water, bicarb and white vinegar.
TIP: After washing up, pour a jug of hot water over the dishes to remove any traces of dishwashing liquid.
These make great storage bins for items such as swimming goggles.
Store pegs for the clothesline.
Turn into hanging pots. Line the basket with newspaper or sphagnum moss. Poke chains or piano wire through the side of the basket and twist. Use a key ring or a curtain ring to hold the chain or piano wire together. Use at least three chains for stability.
If taking a meal to a friend’s house, transport it in a basket that you’re happy to leave behind. They can use it for the same purpose.
Weave into baskets or shopping bags.
If you lock your keys in the car, you can use it to unlock your door.
TIP: Cane and wicker baskets are washable. To clean very dirty ones, combine 1 kilogram of salt with 9 litres of water in a bucket and mix well. For mildly dirty ones, mix 1 cup of salt with 9 litres of water. Wash and leave in the sunshine to dry.
![]() When buying a fridge, look at the energy rating: the more stars the better. Select the most appropriate size for your needs.
When buying a fridge, look at the energy rating: the more stars the better. Select the most appropriate size for your needs.
![]() Place the fridge in a cool spot away from the oven or direct sunlight.
Place the fridge in a cool spot away from the oven or direct sunlight.
![]() A fridge with the freezer compartment at the bottom is more efficient than one with the freezer at the top.
A fridge with the freezer compartment at the bottom is more efficient than one with the freezer at the top.
![]() Set the fridge at the correct temperature of 4°C. A change of 1°C can affect energy consumption by up to 5 percent.
Set the fridge at the correct temperature of 4°C. A change of 1°C can affect energy consumption by up to 5 percent.
![]() Leave a 5-centimetre gap between the back of the fridge and the wall to allow ventilation.
Leave a 5-centimetre gap between the back of the fridge and the wall to allow ventilation.
![]() If unsealed, regularly dust the coils at the back of the fridge.
If unsealed, regularly dust the coils at the back of the fridge.
![]() Check the seals. The seals around the fridge door should be able to hold a piece of paper when closed. If not, replace them.
Check the seals. The seals around the fridge door should be able to hold a piece of paper when closed. If not, replace them.
![]() Place older fridges on a perforated board to allow air to circulate underneath. The legs on older fridges aren’t as high as newer ones.
Place older fridges on a perforated board to allow air to circulate underneath. The legs on older fridges aren’t as high as newer ones.
Turn an old fridge into a tool cupboard. Because they’re sealed, tools won’t get rusty. Make sure it’s got a child-safe latch so kids don’t get locked in. Avoid musty smells by cleaning inside and out, including the seals, with white vinegar.
TIP: Keep the fridge almost full because it creates a thermal mass and will run more efficiently. The fuller the fridge, the better it runs. One idea is to freeze cooler bricks and place them in the fridge to keep the temperature cooler.
What to do with old appliances such as fridges
When people buy a new fridge, they often put the old one in the garage and turn it into a beer fridge (one-third of Australian households have two or more fridges). But this could spell unhealthy carbon emissions if the seals are loose or it’s very old. It also adds to your energy bill to the tune of around $120 a year. To dispose of an old fridge, contact your council or visit www.recyclingnearyou.com.au. If keeping a second fridge, switch it off when not in use.
![]() Have a range of program settings to enable water saving options, including an economy cycle.
Have a range of program settings to enable water saving options, including an economy cycle.
![]() Have a dual hot and cold water connection. That way you can regulate the temperature and use less power. It’s much cheaper to generate heat from your hot-water system than it is to use the element in your dishwasher.
Have a dual hot and cold water connection. That way you can regulate the temperature and use less power. It’s much cheaper to generate heat from your hot-water system than it is to use the element in your dishwasher.
![]() Use the economy cycle for lightly soiled dishes.
Use the economy cycle for lightly soiled dishes.
![]() Clean the filter regularly.
Clean the filter regularly.
![]() Open the door after the final rinse cycle to air-dry the dishes.
Open the door after the final rinse cycle to air-dry the dishes.
![]() Take advantage of cheaper off-peak water rates by running the dishwasher overnight.
Take advantage of cheaper off-peak water rates by running the dishwasher overnight.
![]() Use environmentally friendly dishwashing detergents or bicarb (for detergent) and white vinegar (as a rinse aid).
Use environmentally friendly dishwashing detergents or bicarb (for detergent) and white vinegar (as a rinse aid).
Shannon hates dishwashers and uses hers to store potatoes and root vegetables.
![]() In Australia, sales of electric ovens outnumber gas ovens ten to one even though gas ovens are cheaper to run.
In Australia, sales of electric ovens outnumber gas ovens ten to one even though gas ovens are cheaper to run.
![]() Whether electric or gas, a fan-forced oven is more energy efficient because heat is circulated more evenly making cooking quicker.
Whether electric or gas, a fan-forced oven is more energy efficient because heat is circulated more evenly making cooking quicker.
![]() When using the oven, cook several things at once and freeze excess food.
When using the oven, cook several things at once and freeze excess food.
![]() To save energy, use residual heat by turning the oven off before you need to. The amount of radiant heat varies from oven to oven. Shannon turns her oven off 10 minutes before the meal is fully cooked.
To save energy, use residual heat by turning the oven off before you need to. The amount of radiant heat varies from oven to oven. Shannon turns her oven off 10 minutes before the meal is fully cooked.
![]() When igniting a gas stovetop, don’t turn it to the maximum level because it wastes the gas in the first puff of flame.
When igniting a gas stovetop, don’t turn it to the maximum level because it wastes the gas in the first puff of flame.
![]() Most people only use the microwave to reheat or defrost food. If this is the case with you, an 800-watt microwave will do the job. Shannon has a 1200-watt microwave because she uses it a lot.
Most people only use the microwave to reheat or defrost food. If this is the case with you, an 800-watt microwave will do the job. Shannon has a 1200-watt microwave because she uses it a lot.
![]() The more functions a microwave has, the more efficient it is because you can be very specific when using it.
The more functions a microwave has, the more efficient it is because you can be very specific when using it.
![]() To save money, partially cook food in the microwave and then brown it in the oven.
To save money, partially cook food in the microwave and then brown it in the oven.
![]() Always cover food when cooking in the microwave because it speeds up cooking time and helps retain vitamins.
Always cover food when cooking in the microwave because it speeds up cooking time and helps retain vitamins.
![]() Turn the microwave off at the power point when you’re not using it. The display clocks use more energy than the microwave itself!
Turn the microwave off at the power point when you’re not using it. The display clocks use more energy than the microwave itself!
TIP: If buying more than one whitegood, ask for a discount for ‘bundling’. Do research online and ask a store to match the lowest price you can find.
CHANGE FOR GOOD: In the 1990s, Australia banned the use of chlorofluorocarbons (CFCs) because they depleted the ozone layer, an important block for the sun’s ultraviolet rays. The thinning ozone layer has led to more Australians being affected by skin cancer, cataracts and damage to the immune system.
TIP: Take old appliance boxes to your local school or kindy. They make great cubbies!