First, we need to create and configure IAM Roles for our EC2 Systems Manager to process and execute commands over our EC2 instances. You can either use the Systems Manager's managed policies or alternatively create your own custom roles with specific permissions. For this part, we will be creating a custom role and policy.
To get started, we first create a custom IAM policy for Systems Manager managed instances:
- Log in to your AWS account and select the IAM option from the main dashboard, or alternatively, open the IAM console at https://console.aws.amazon.com/iam/.
- Next, from the navigation pane, select Policies. This will bring up a list of existing policies currently provided and supported by AWS out of the box.
- Type SSM in the Policy Filter to view the list of policies currently provided for SSM.
- Select the AmazonEC2RoleforSSM policy and copy its contents to form a new policy document. Here is a snippet of the policy document for your reference:
{
    "Version": "2012-10-17",
    "Statement": [
        {
            "Effect": "Allow",
            "Action": [
                "ssm:DescribeAssociation",
                  ..... SSM actions list
            ],
            "Resource": "*"
        },
        {
            "Effect": "Allow",
            "Action": [
                "ec2messages:AcknowledgeMessage",
                "ec2messages:DeleteMessage",
                "ec2messages:FailMessage",
                "ec2messages:GetEndpoint",
                "ec2messages:GetMessages",
                "ec2messages:SendReply"
            ],
            "Resource": "*"
        },
        {
            "Effect": "Allow",
            "Action": [
                "cloudwatch:PutMetricData"
            ],
            "Resource": "*"
        },
        {
            "Effect": "Allow",
            "Action": [
                "ec2:DescribeInstanceStatus"
            ],
            "Resource": "*"
        },
        {
            "Effect": "Allow",
            "Action": [
                "ds:CreateComputer",
                "ds:DescribeDirectories"
            ],
            "Resource": "*"
        },
        {
            "Effect": "Allow",
            "Action": [
                "logs:CreateLogGroup",
                "logs:CreateLogStream",
                ..... CloudWatch Log actions
            ],
            "Resource": "*"
        },
        {
            "Effect": "Allow",
            "Action": [
                "s3:PutObject",
                "s3:GetObject",
                "s3:AbortMultipartUpload",
                "s3:ListMultipartUploadParts",
                "s3:ListBucketMultipartUploads"
            ],
            "Resource": "*"
        },
        {
            "Effect": "Allow",
            "Action": [
                "s3:ListBucket"
            ],
            "Resource": "arn:aws:s3:::amazon-ssm-packages-*"
        }
    ]
}
- Once the policy is copied, go back to the Policies dashboard and click on the Create policy option. In the Create policy wizard, select the Create Your Own Policy option.
- Provide a suitable Policy Name and paste the copied contents of the AmazonEC2RoleforSSM policy into the Policy Document section. You can now tweak the policy as per your requirements, but once completed, remember to select the Validate Policy option to ensure the policy is semantically correct.
- Once completed, select Create Policy to complete the process.
With this step completed, you now have a custom IAM policy for System Manager managed instances.
The next important policy that we need to create is the custom IAM user policy for our Systems Manager. This policy will essentially scope out which particular user can view the System Manager documents as well as perform actions on the selected managed instances using the System Manager's APIs:
- Once again, log in to your AWS IAM dashboard and select the Policies option as performed in the earlier steps.
- Type SSM again in the Policy Filter and select the AmazonSSMFullAccess policy. Copy its contents and create a custom SSM access policy by pasting the following snippet in the new policy's Policy Document section:
{
    "Version": "2012-10-17",
    "Statement": [
        {
            "Effect": "Allow",
            "Action": [
                "cloudwatch:PutMetricData",
                "ds:CreateComputer",
                "ds:DescribeDirectories",
                "ec2:DescribeInstanceStatus",
                "logs:*",
                "ssm:*",
                "ec2messages:*"
            ],
            "Resource": "*"
        }
    ]
}
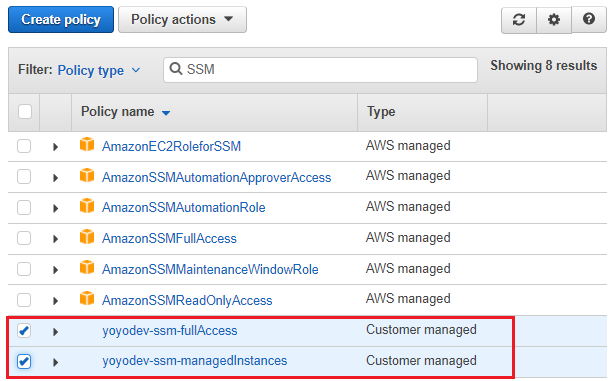
- Remember to validate the policy before completing the creation process. You should now have two custom policies, as shown in the following screenshot:

With the policies created, we now simply create a new instance profile role, attach the full access policy to the new role, and finally verify the trust relationship between Systems Manager and the newly created role:
- To create a new role, from the IAM management dashboard, select the Roles option from the navigation pane.
- In the Create Role wizard, select the EC2 option from the AWS service role type, as shown in the following screenshot. Next, select the EC2 option as the use case for this activity and click on the Next: Permissions button to continue:

- In the Attach permissions policy page, filter and select the ssm-managedInstances policy that we created at the beginning of this exercise. Click on Review once done.
- Finally, provide a suitable Role name in the Review page and click on Create role to complete the procedure!
With the role in place, we now need to verify that the IAM policy for your instance profile role includes ssm.amazonaws.com as a trusted entity:
- To verify this, select the newly created role from the IAM Roles page and click on the Trust relationships tab.
- Here, choose the Edit Trust Relationship option and paste the following snippet in the policy editor, as shown. Remember to add both EC2 and SSM as the trusted services and not just one of them:
{
  "Version": "2012-10-17",
  "Statement": [
    {
      "Sid": "",
      "Effect": "Allow",
      "Principal": {
        "Service": [
          "ec2.amazonaws.com",
          "ssm.amazonaws.com"
        ]
      },
      "Action": "sts:AssumeRole"
    }
  ]
}
- With the new trust policy in place, click on Update Trust Policy to complete the process. Congratulations!
- You are almost done with configuring the Systems Manager! A final step remains, where we need to attach the second policy that we created (SSM full access) to one of our IAM users. In this case, I've attached the policy to one of my existing users in my AWS environment, however, you can always create a completely new user dedicated to the Systems Manager and assign it the SSM access policy as well.
With the policies out of the way, we can now proceed with the installation and configuration of the SSM agent on our simple Dev instance.